To put a patio umbrella in the ground, you need to dig a hole, set an in-ground sleeve or mounting base into it with concrete or compacted gravel, let everything cure, then slide the umbrella pole into the sleeve and lock it in place. The exact hole size depends on your umbrella brand and mount type, but a good general target is 18 to 24 inches deep and wide enough to fit the sleeve with a few inches of clearance around it for concrete or backfill. Done right, the umbrella sits rock-solid, rotates smoothly, and handles wind without rocking.
How to Put a Patio Umbrella in Ground Step by Step

Luca Morrison
14 Jun 2026
First, figure out what type of in-ground mount you have
Not all in-ground umbrella setups work the same way, and mixing up the method leads to a wobbly, frustrating result. Before you dig anything, identify which system you're working with.
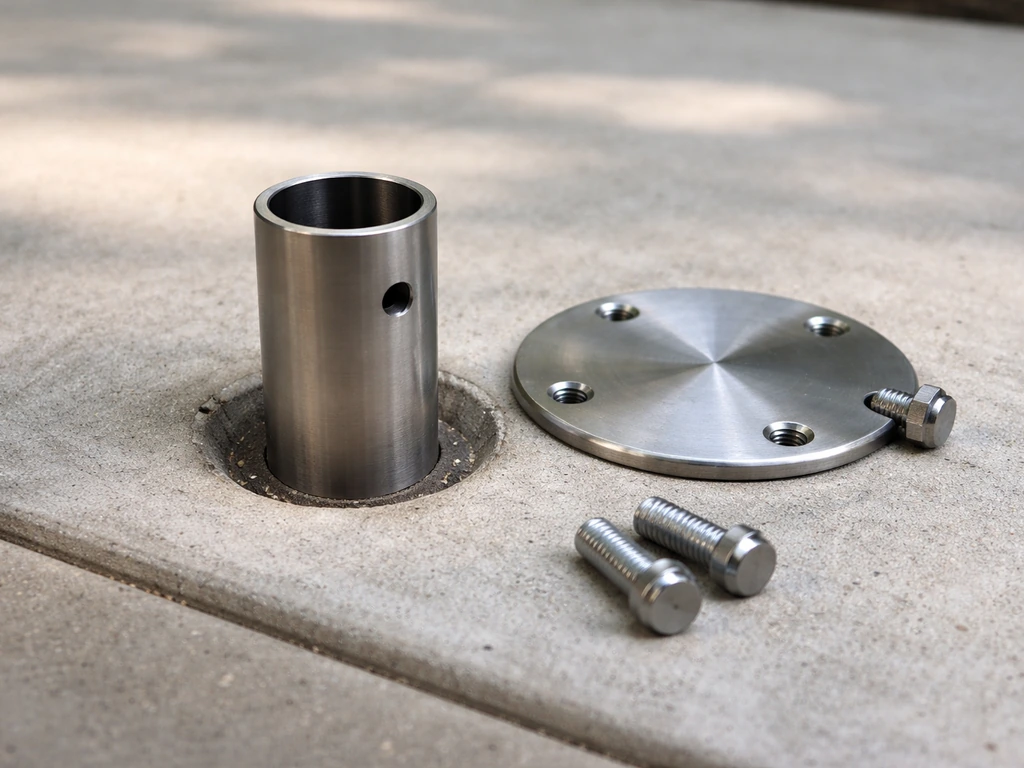
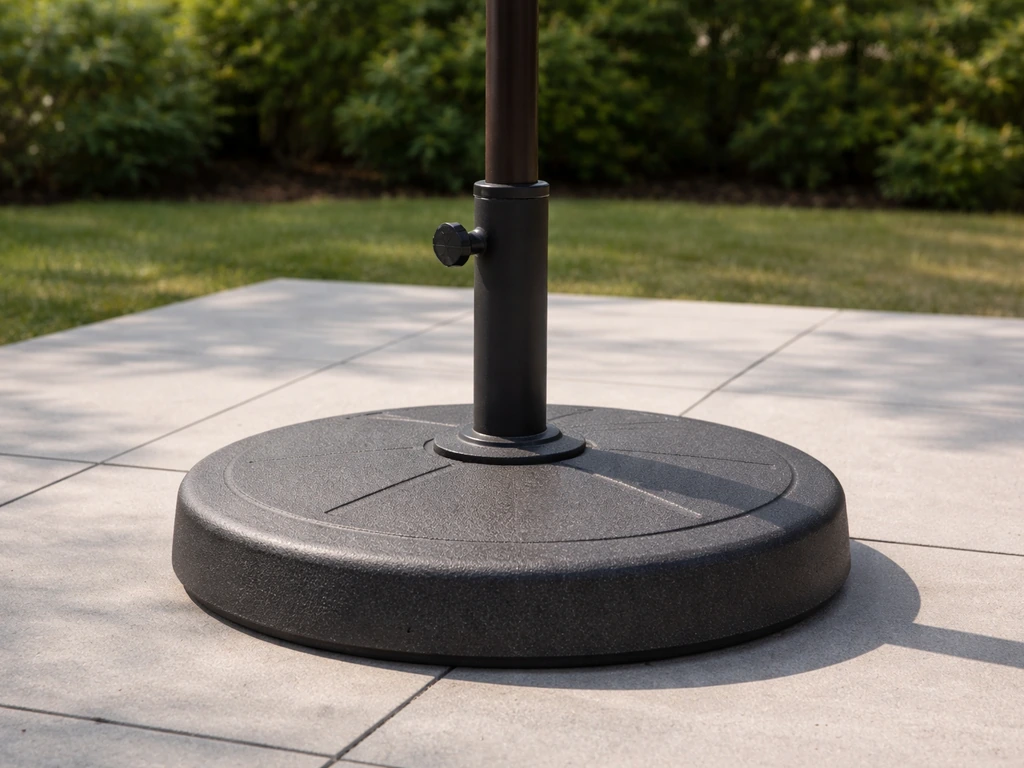
- Sleeve-in-footing (most common): A cylindrical metal or PVC sleeve gets set into a concrete footing underground. Once the concrete cures, you drop the umbrella pole straight into the sleeve. Revolvashade, Horizon Pro 360, and Palapa mounting sleeves all work this way. The sleeve stays in the ground permanently; the umbrella can be removed seasonally.
- Fixed spigot plate mount: A steel base plate with bolt holes gets set into concrete. The umbrella's mast locks onto the plate using bolts or a locking-hole system. CabanaCoast's Axis system uses this approach, where a locking hole lines up with each of the four spigot bolt holes on the plate. Very secure, but less flexible for repositioning.
- Coolaroo in-ground fixed mount: A proprietary mount that slots into a dug hole and gets secured with concrete, sand and gravel, or compacted soil depending on your installation option. Coolaroo specifies their excavation at roughly 200 x 200 mm wide by 420 mm deep (about 8 x 8 inches wide, 16.5 inches deep). The umbrella components then slide directly onto the installed mount.
- Sleeve with gravel drainage (like Palapa's system): Same sleeve-in-footing approach, but once the concrete dries, you add a couple of inches of pea gravel inside the sleeve before inserting the pole. This prevents water from pooling at the bottom and rotting or rusting the pole end.
If your umbrella came with an in-ground mount kit, pull out that manual right now. Brands like Coolaroo, CabanaCoast, and Revolvashade include specific hole dimensions and fastener details you shouldn't ignore. Generic dimensions work when you're buying a universal sleeve, but manufacturer specs always take priority.
What you'll need before you start
Get all of this together before you pick up a shovel. Nothing worse than wet concrete in the hole and realizing you're missing a tool.
- In-ground mount sleeve or base plate (check your kit; if buying separately, match the pole diameter exactly)
- Post hole digger or manual clamshell digger (ideal for the narrow, deep holes most mounts need)
- Measuring tape
- 4-foot level or spirit level
- Fast-setting concrete mix (one or two 50 lb bags is usually enough for a standard sleeve install)
- Bucket and mixing paddle or a drill with a mixing bit
- Pea gravel (a small bag, especially if you want drainage inside the sleeve)
- Landscape marking paint or a stake and string to mark the hole
- Work gloves and safety glasses
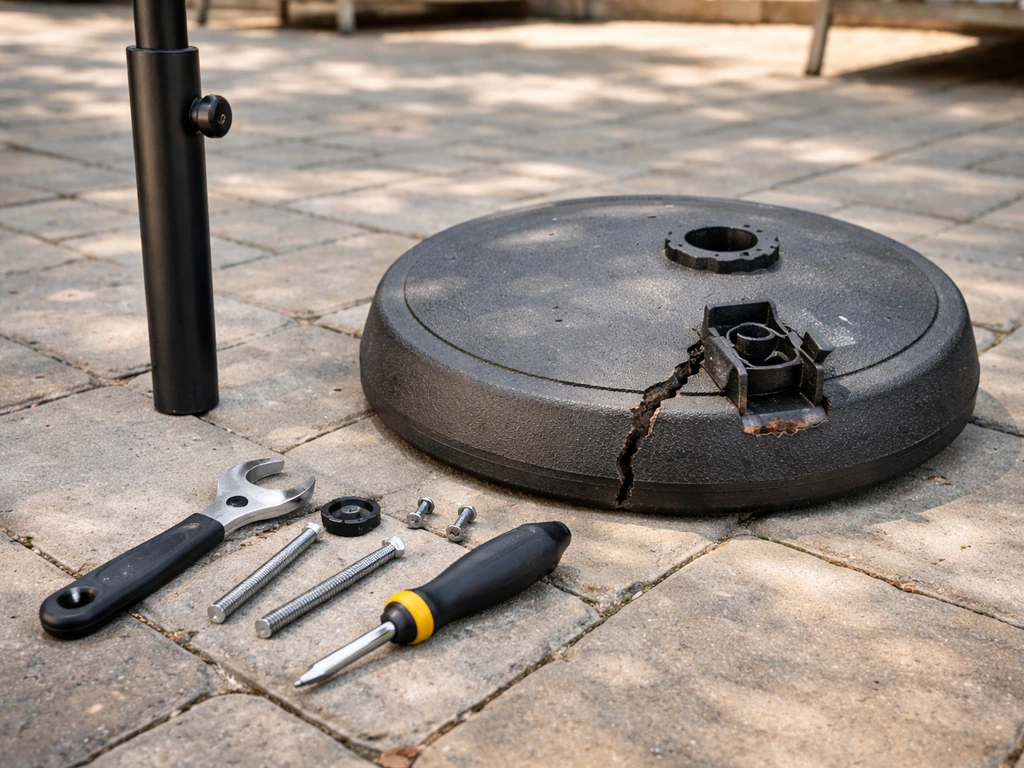
- Allen key or spanner wrench (often included in the mount kit, as with Coolaroo)
- Grease or silicone lubricant (for sleeve-style mounts where the pole rotates)
A quick safety note: call 811 (in the US) or your local utility-locate service before you dig. A patio umbrella hole isn't deep enough to hit most utility lines, but irrigation pipes and low-voltage landscape lighting cables absolutely are at that depth. It takes five minutes and saves a miserable repair job.
Choose the right spot, measure carefully, and mark the hole
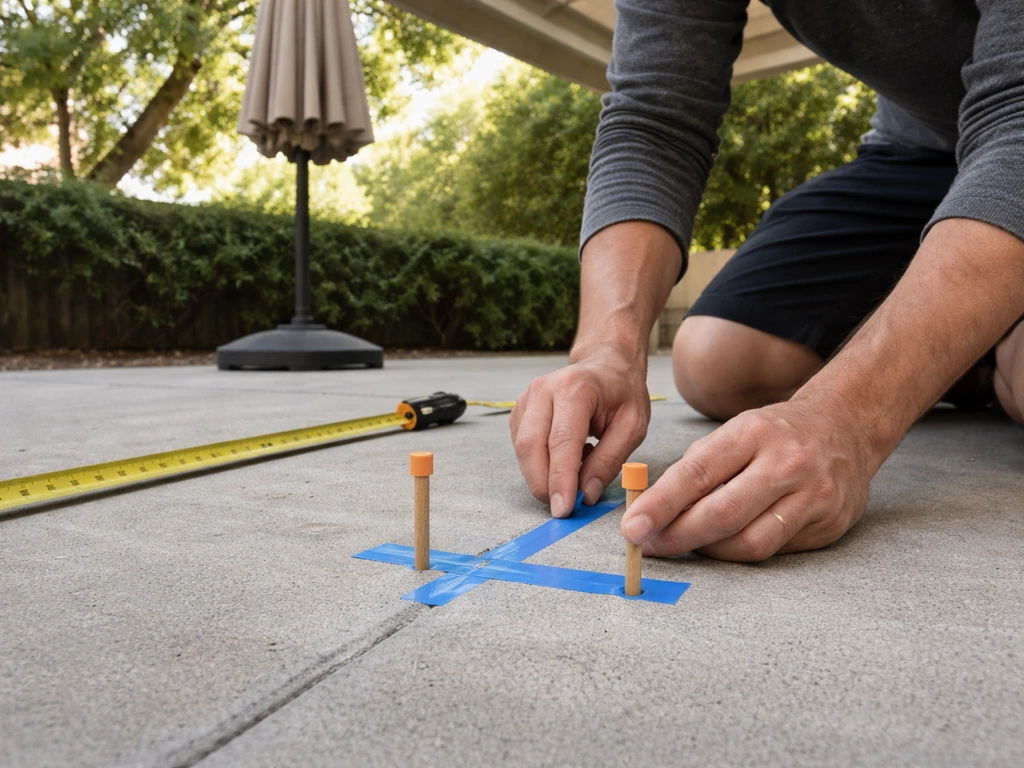
This step matters more than most people think. Once the concrete sets, you're committed, so take ten extra minutes here.
- Stand where you want shade and look up. Check for overhead obstructions: tree branches, roof overhangs, power lines. Your umbrella canopy needs clearance to open fully and, for cantilever models, swing through its full rotation arc.
- For cantilever umbrellas with 360° rotation (like the CabanaCoast Axis), walk the full rotation circle. The canopy needs unobstructed clearance at every position, not just the one you plan to use most. A 10-foot cantilever needs roughly a 10-foot radius of clearance around the mount point.
- Think about wind exposure. An in-ground mount is far more secure than a weighted base, but a location in a consistent wind tunnel (between two buildings or at a corner) puts extra stress on the mount. Position with prevailing wind in mind, or plan to close the umbrella when wind picks up.
- Check drainage. Don't place the mount in a low spot where water pools after rain. Standing water around the concrete footing will degrade it over time and accelerate pole corrosion.
- Mark the center of your hole with a stake or a spray of marking paint. Measure the required hole diameter from your manual. If you're using a universal sleeve with no specific instructions, aim for a hole about 3 inches wider than the sleeve diameter on all sides.
- Double-check the distance from your seating area. Most 9- to 11-foot cantilever umbrella poles mount 4 to 6 feet from the edge of the seating zone so the canopy centers over the table or chairs.
Dig the hole, set the mount level, and secure it
This is the part that makes or breaks the whole installation. If you want to build a dedicated base instead of using a true in-ground mount, see our guide on how to make a base for patio umbrella for an adjacent approach. A crooked, shallow, or poorly drained mount causes every problem people blame on the umbrella itself.
- Dig the hole to your specified dimensions. As a general reference: the Horizon Pro 360 calls for about 15.75 inches in diameter and 20 inches deep; Coolaroo's fixed mount needs roughly 8 x 8 inches wide and 16.5 inches deep; most general sleeve installs work at 18 to 24 inches deep. Go to spec, not close to spec.
- Add 2 to 3 inches of pea gravel to the bottom of the hole before setting the sleeve. This lets water drain away from the bottom of the mount instead of pooling. This is especially important in clay-heavy soil that doesn't drain naturally.
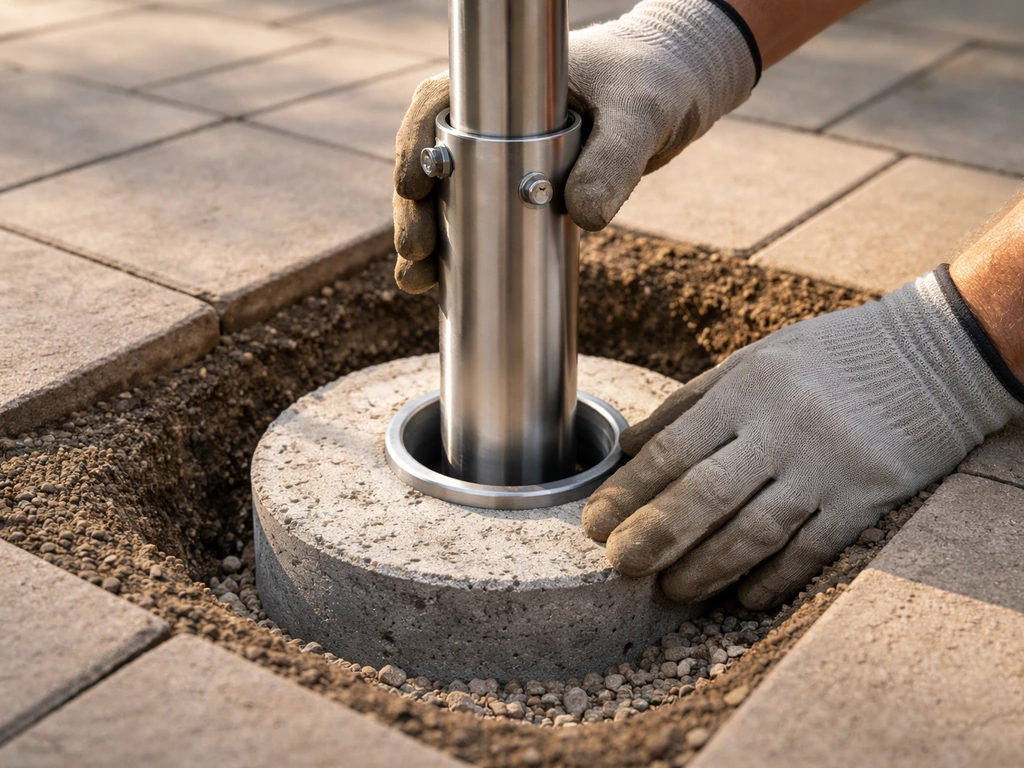
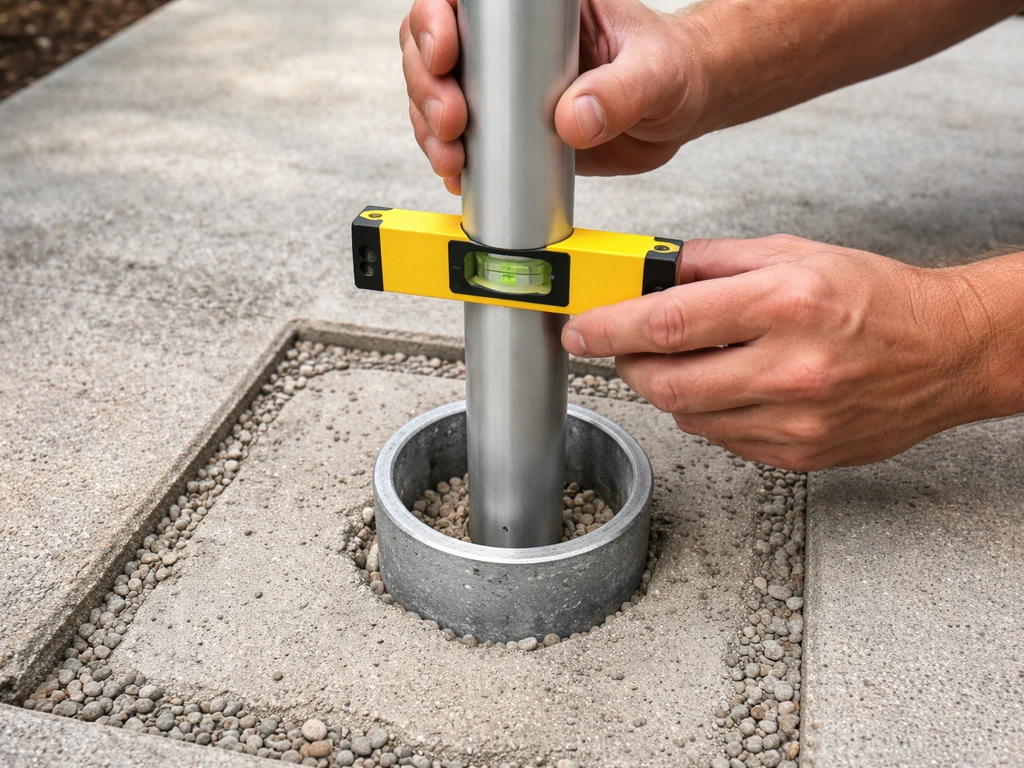
- Lower the sleeve or mount base into the hole. Center it. Place your level on the top edge and check it in two directions (front-to-back and side-to-side). A mount that's even slightly off vertical will cause the pole to lean visibly once the umbrella is in.
- For spigot plate mounts (like the CabanaCoast Axis), make sure the plate is square to your patio or seating layout before the concrete goes in. Misalignment here means the umbrella opens facing the wrong direction and there's no fix short of breaking out the footing.
- Mix your fast-setting concrete according to the bag instructions. Pour it around the sleeve or base, filling to about 2 inches below grade. Work out any air pockets by prodding the wet concrete with a stick.
- Re-check level immediately after pouring. Concrete is still workable for a few minutes. Hold or brace the sleeve in position (a couple of scrap 2x4s propped against it works well) while it sets.
- Allow full cure time. Fast-set concrete typically reaches working strength in 20 to 40 minutes, but 4 hours is better before you load it with an umbrella. Overnight is ideal. Don't rush this.
Insert the umbrella pole, align it, and lock it in
Once the concrete is fully cured, the rest moves quickly. But there's a right order to do it. Coolaroo’s cantilever umbrella installation manual describes locking engagement using the clamp lever (with the clamp lever down) as part of securing the umbrella for operation.
- For sleeve-type mounts: add a couple of inches of pea gravel inside the sleeve now if you haven't already (the Palapa sleeve system specifies this explicitly). It keeps the pole end off standing water.
- Apply grease or silicone lubricant to the pole where it will contact the sleeve interior, and to any rotating ring if your mount has one. Revolvashade specifically calls this out in their installation guide. Skipping lubrication means the pole will bind when you try to rotate or remove it later.
- Slide the umbrella pole straight down into the sleeve. Keep it vertical as it goes in. Once seated, it should feel snug but not forced.
- For fixed spigot plate systems: lower the mast over the spigot, align the bolt holes on the mast plate with the locking holes in the spigot plate, and insert all bolts before tightening any. Hand-tighten first, then snug down with the appropriate wrench or Allen key in a cross pattern to keep even pressure.
- For Coolaroo in-ground mounts: slide the umbrella components onto the finished mount as described in the manual, then lock in place using the clamp lever (push the clamp lever down until it engages). You should feel and hear it seat.
- For Revolvashade systems: insert the winding handle into the lower hex nut on the rear of the frame and rotate clockwise until the umbrella position is firmly locked.
- Give the pole a firm push side-to-side and front-to-back. There should be zero play. If it wobbles at all, the lock bolt or clamp hasn't fully engaged, or the sleeve is slightly oversized for your pole. Address this now, not after a windy afternoon.
Test everything before you call it done
A complete installation check takes about five minutes and catches almost every problem before it becomes a bigger one.
- Open the canopy fully using the crank. It should turn smoothly with no grinding or skipping. If the crank binds, the pole may be slightly off-vertical, putting side pressure on the crank mechanism. Back off, re-check level on the pole.
- Test the tilt function if your umbrella has one. Push-button tilt should click through its positions cleanly. Cord-operated tilt should move without fraying or jamming. Misalignment of the pole in the sleeve can throw the tilt mechanism off.
- For crank-operated cantilever models: GrandinRoad's manual, for example, describes inserting the crank into the Left or Right socket and listening for the rotating lock to engage. If it doesn't click into lock, the canopy can drift closed on its own. Confirm lock engagement before walking away.
- Push laterally on the open canopy with moderate hand pressure. Simulate a wind gust. The mount should absorb it without any movement at the base. If you see any rocking at the sleeve or concrete interface, the footing needs more time to cure or the concrete didn't fully surround the sleeve.
- Check the lock bolt (also called a set screw on some models). Tighten it finger-tight plus a quarter turn with the supplied Allen key. Bolts that are hand-tight only will back out after a few weeks of wind movement and let the pole slip or wobble.
- Close the umbrella and confirm it latches or wraps securely. Always close it before leaving it unattended, especially overnight. This isn't optional: leaving a canopy open in wind puts enormous rotational and lifting force on the footing, even a well-set one.
How different install methods compare
| Method | Best For | Hole Depth Needed | Removal for Winter | Key Gotcha |
|---|---|---|---|---|
| Sleeve in concrete footing | Most cantilever and market umbrellas, universal installs | 18–24 inches typical | Yes, pole lifts out of sleeve | Add gravel drainage at bottom; grease pole before inserting |
| Fixed spigot plate (bolted) | Cantilever systems with dedicated base plates (e.g., CabanaCoast Axis) | Depth per manufacturer spec | Mast unbolts; plate stays in ground | Must be perfectly square before concrete sets; no adjustment after |
| Proprietary fixed mount (e.g., Coolaroo) | Brand-specific cantilever umbrellas with supplied mount kits | ~16.5 inches (Coolaroo spec) | Components slide off; mount stays | Follow brand dimensions exactly; generic hole sizes won't align components |
| Gravel-only backfill (no concrete) | Temporary or soft-soil installs where concrete isn't practical | 24 inches minimum | Yes, full sleeve removal possible | Far less wind resistance; not recommended for cantilever or large-canopy umbrellas |
Keeping it solid long-term
An in-ground mount is a permanent installation, but the umbrella itself needs seasonal attention to stay in good shape.
- At the start of each season, re-check and re-tighten the lock bolt or set screw. Freeze-thaw cycles and regular wind movement back bolts out over time. A loose bolt is the number one cause of pole wobble in an otherwise solid installation.
- Re-grease the sleeve interior and any rotating rings once a year before inserting the pole for the season. Use a silicone-based lubricant or the grease specified in your manual. This prevents corrosion bonding and keeps rotation smooth.
- Inspect the concrete footing at grade level each spring. Cracks, heaving, or gaps between the sleeve and concrete indicate freeze damage. Small cracks can be filled with hydraulic cement; significant heaving means the footing needs to be rebuilt.
- Pull the pole out of the sleeve in late fall if you're in a freeze climate. Water can enter the sleeve, freeze, expand, and crack the footing or deform the sleeve. Store the pole and canopy indoors.
- Always close the canopy when wind exceeds about 20 mph or when you're leaving it unattended for more than a few hours. Wind loading on an open canopy is far greater than most homeowners realize, and even a well-built in-ground footing has limits.
- If the pole develops a slight lean after a season or two, check the lock bolt first. If the bolt is tight but the lean persists, the sleeve may have shifted. You'll need to break out the footing and reset, which is unfortunately the only real fix.
If you're still working out which base system is right for your situation, or if you're dealing with a freestanding weighted base rather than a true in-ground install, the setup process is somewhat different. If you're still working out which base system is right for your situation, or if you're dealing with a freestanding weighted base rather than a true in-ground install, the setup process is somewhat different how to use patio umbrella without base. For a truly secure patio umbrella base, focus on the right mount type, correct hole depth, and proper leveling before you set the concrete how to secure patio umbrella base. If your patio umbrella uses a filled base, you can learn how to fill the base with sand so it stays stable without rocking fill patio umbrella base with sand. And if your existing base is cracked, corroded, or not holding weight properly, it's worth addressing that before committing to a new footing. Getting the base right from the start makes everything else, including wind stability and long-term maintenance, much more manageable. Coolaroo’s FAQ explains that securing a cantilever umbrella to the ground using the right mount and mounting approach is key for stable performance in wind secure a cantilever umbrella to the ground. If you want step-by-step guidance, use this guide on how to set up a patio umbrella base.
FAQ
How do I tell whether my umbrella needs a real in-ground sleeve or a weighted filled base?
Look for an in-ground mounting kit that includes a sleeve or mounting housing meant to be embedded. If your parts only include a stand, filled reservoir, or crank-and-lock pole holder, it’s usually a weighted base setup, not an embedded sleeve. When in doubt, confirm the pole diameter and locking mechanism match the mount hardware before digging.
What should I do if my sleeve or mounting base is slightly too big for the planned hole?
Dry-fit the sleeve first. Aim for a consistent clearance around the sleeve so concrete can flow and the unit sits level. If it is only a little oversized, widen the hole rather than forcing it, because jamming can tilt the sleeve and create a permanent wobble even after cure.
Can I install the in-ground sleeve on a slope or uneven patio area?
Yes, but you must level the sleeve housing before the concrete sets. Use a level on the sleeve itself (not just the surrounding ground) and backfill to maintain that plumb alignment. After curing, the umbrella pole should rotate smoothly without rubbing or binding, which is a good practical check for alignment.
How long should I wait before sliding the umbrella pole into the in-ground sleeve?
At minimum, follow the concrete cure time stated on your product, because partial cure can loosen the sleeve during early use. A practical test is to gently check that the sleeve does not shift or flex and that any grout or concrete around the sleeve is hard and not cool or crumbly.
What’s the best way to prevent water pooling around the sleeve?
Do not create a concrete “cap” that traps water above the sleeve. Keep the surrounding finish sloped away from the sleeve opening and ensure backfill is compacted so water has somewhere to go. After rain, inspect for standing water, which can accelerate corrosion on some pole and mount components.
Do I need to use concrete, or can I use compacted gravel instead?
Both approaches can work, but the stability difference matters. Concrete locks the sleeve in place and reduces movement under gusts. Compacted gravel can be acceptable for some installations, but it relies more on soil conditions and compaction quality, so it can loosen over time in soft or frequently saturated soil.
What if the umbrella is rocking even though the pole seems locked in?
First verify the umbrella pole fully seats and the locking pin or clamp is engaged. If it still rocks, the sleeve may be tilted, the hole may be shallow, or the surrounding concrete may not be supported evenly. The fix is usually re-leveling or redoing the sleeve, not tightening the umbrella hardware.
Will wind cause the sleeve to loosen over time?
A properly embedded sleeve with correct depth and a level, fully cured set resists wind rocking. If your area has frequent high gusts, make sure you have the correct mount type for your model and avoid installing too close to edges where soil can erode. Periodically check for play at the pole-to-sleeve connection each season.
Can I install the sleeve near an existing fence post, patio block, or irrigation line?
You can, but spacing matters for both safety and performance. Call 811 or your local utility-locate service before digging, then measure clearance so the sleeve does not interfere with irrigation piping or low-voltage wiring. Also avoid overcutting near hardscape edges that can undermine soil stability.
What should I cover or protect during cold weather installation?
Cold weather can slow concrete curing and make leveling harder. Protect the concrete until it reaches adequate strength per the concrete label, and avoid installing if freeze-thaw conditions are likely before cure completes. If you must proceed, follow your concrete product’s cold-weather guidance closely.
How do I maintain an in-ground umbrella installation season to season?
Keep the pole clean and remove grit where the pole enters the sleeve, since debris can affect smooth rotation. Check the lock mechanism and any corrosion-prone hardware, especially after winter. If your umbrella has a protective cover, use it when not in use to reduce wear on moving parts.
Next Articles
How to Install a Patio Umbrella in a Base: Step by Step
Step-by-step guide to install a patio umbrella into a base, align the pole, tighten safely, and fix fit and stability is
How to Fix Patio Umbrella Base: Step-by-Step Repairs
Step-by-step guide to fix a wobbly, loose, cracked, or rusted patio umbrella base safely and stop tilt/lock issues.

How to Fix a Patio Umbrella That Won't Open or Close
Step-by-step fixes for patio umbrellas that won’t open or close, with checks for jams, cords, latches, and lubricating t