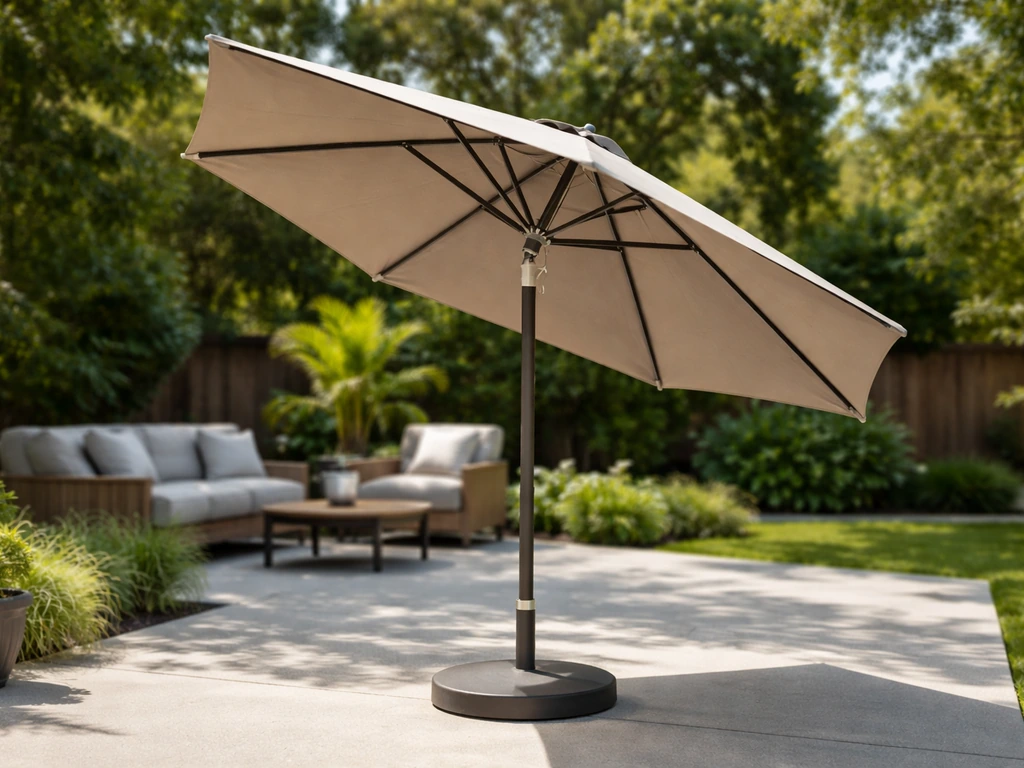
To install a patio umbrella in a base, you slide the pole into the base's center socket, align any locking hardware (set screw, locking pin, bolt, or camlock), tighten it down firmly, and confirm the umbrella opens, tilts, and rotates without catching. The whole process takes under 10 minutes once you know your connection type, and that's the one thing most people skip, which is why umbrellas end up wobbling, not fitting, or falling over. If you are trying to use a patio umbrella without a base, it still needs a stable mounting solution to prevent tipping and wobbling.
How to Install a Patio Umbrella in a Base: Step by Step

Luca Morrison
29 Apr 2026
Step 1: Figure Out Your Pole and Base Connection Type

Before you touch anything, look at the top of your base and the bottom of your umbrella pole. There are four main ways these connect, and mixing them up is the single biggest reason installs fail.
| Connection Type | What It Looks Like | How It Locks |
|---|---|---|
| Insert/socket | Pole slides straight down into a tube or sleeve in the base | Friction fit or separate set screw on the side of the socket |
| Set screw | A small hex-head or flathead screw on the side of the base socket | Tightened with a hex key or screwdriver against the pole |
| Locking pin / spigot | A removable spigot (short pipe stub) attaches to the base, pole drops over it; rotating the pole clicks a pin into place | Rotating the pole until you hear/feel the locking pin snap into position |
| Bolt-through plate | The pole sits on top of a base plate and a bolt threads up through the bottom of the plate into the pole bottom | Tightening the bolt from underneath the base plate |
| Camlock / hex key | A fitting on the base plate accepts the pole's spigot; a hex key rotates the camlock collar to grip | Turning the hex key until the camlock engages and the spigot can't be pulled free |
If your base has a center hole with no obvious hardware, check for a set screw on the side, it's often small and easy to miss. Finbrella’s fixed camlock base kit uses a camlock spigot that is removable with a half-turn, while a fixed camlock plate remains attached to the ground spigot or bolt-plate system. Cantilever (offset) umbrellas almost always use a spigot or bolt-plate system. Standard market umbrellas with a straight center pole most commonly use a socket with a set screw or a locking pin spigot.
What to do if the pole diameter doesn't match
Pole diameters run from about 1.5 inches up to 2.5 inches. If your pole looks like it'll just rattle around inside the socket, you need a reducing sleeve adapter, a short metal or plastic insert that fills the gap. These are cheap (usually $5–$15) and available at most hardware stores or patio retailers. Don't skip the adapter and hope friction holds it; it won't, especially in wind.
Step 2: Get the Base Ready Before the Pole Goes In
A properly prepared base is what keeps the whole setup from tipping over or rocking. If you are building the base from scratch, focus on the right weight, a level mounting surface, and a socket or pole connection that matches your umbrella pole base for patio umbrella. To avoid wobbling and tipping, use the right base setup that matches your patio umbrella pole connection how to set up patio umbrella base. This step is boring but it matters more than anything else in this guide.
Check and add weight
The standard rule of thumb is at least 10 pounds of base weight for every foot of umbrella canopy diameter. So a 9-foot umbrella needs at least 90 pounds of base. For a 10x10 canopy, plan on a minimum of 120 pounds. If your base is fillable, don't rely on sand alone, sand-only filling typically can't hit the 125-pound target. Use a combination of bricks and sand instead: stack the bricks inside first, then pour sand around them to fill the gaps. Water-filled bases work too but create a winterizing headache (more on that at the end).
Level and place the base

Set the base on a flat, hard surface, concrete or pavers, not soft soil or grass. Give it a push from the side; it shouldn't rock at all. If it does, slide a rubber shim under the low side until it sits flat. An unlevel base transfers stress unevenly to the pole connection and loosens hardware faster than anything else.
If you're working with a cantilever umbrella, check the manufacturer's alignment marks now, before the pole goes in. For cantilever models like Frankford’s Eclipse, the manufacturer emphasizes using an appropriate Frankford base or mount system so the base compatibility matches the umbrella Frankford’s Eclipse cantilever umbrella is designed to work with an appropriate Frankford base/mount system.
The Eclipse (Frankford) system, for example, needs the base plate oriented so the umbrella arm faces the shade direction you want before you lock anything in place, getting this wrong means re-doing the whole install.
Remove covers, liners, and plugs
Many fillable bases ship with a rubber plug or plastic liner inside the socket. Pull it out. This sounds obvious, but I've seen people try to force a pole in with the plug still seated, wondering why it won't drop to the right depth. Also remove any shipping-tape covers over the set screw holes.
Quick stability checklist before you proceed
- Base is on a hard, flat surface and doesn't rock
- Weight meets the 10-lbs-per-canopy-foot minimum
- Plug, liner, or shipping cover removed from socket
- Alignment marks checked (cantilever systems)
- Set screw or hardware is accessible and not corroded
Step 3: Install the Umbrella Pole
Now the actual installation. Work through the steps that match your connection type.
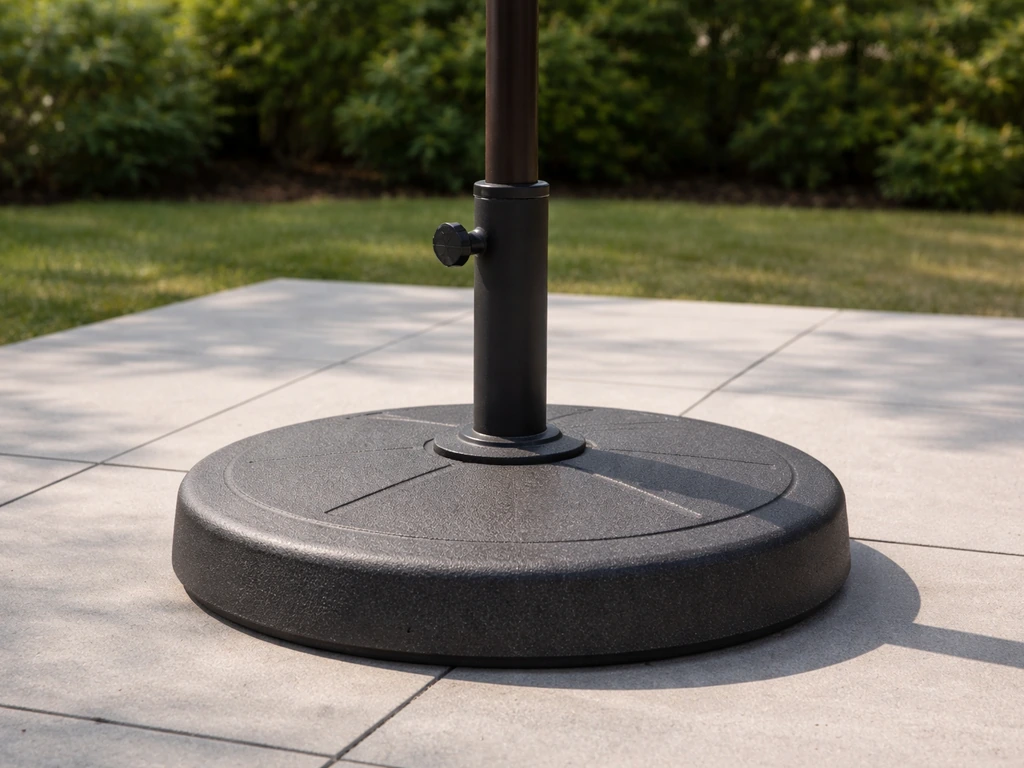
Insert/socket with set screw
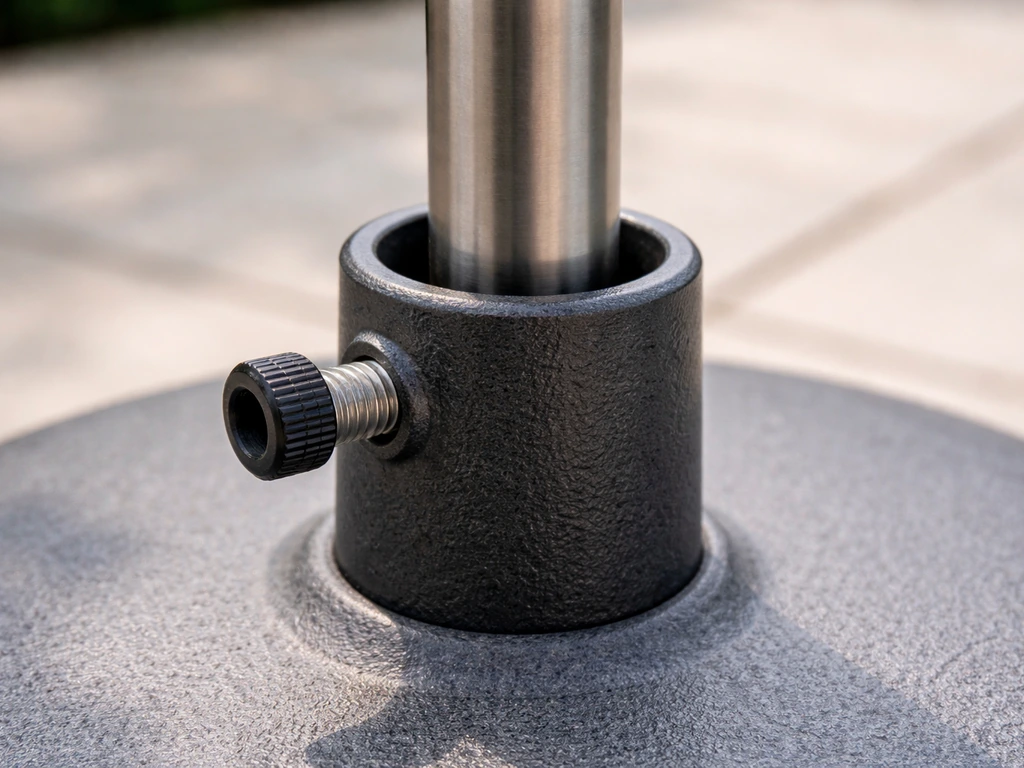
- Back the set screw out two or three full turns so it's clear of the socket interior — don't remove it completely.
- Slide the pole straight down into the socket. It should drop smoothly to its full depth. If it stops short, check for an obstruction inside the socket.
- Hold the pole vertical and tighten the set screw by hand first, then use a hex key or screwdriver for a firm snug. Stop when it's firmly seated — don't crank until you feel resistance and then keep going, or you'll strip the screw head or deform the pole.
- Give the pole a gentle shake side to side. No movement means you're done.
Locking pin / spigot system
- Attach the spigot pipe to the base if it's a removable style — some thread on, others bolt on with an included wrench.
- Lower the umbrella pole (or base socket on the umbrella) down over the spigot.
- Slowly rotate the umbrella clockwise while pressing it lightly downward until you feel and hear the locking pin click into place. Don't force it — if it's not clicking, the pin is misaligned. Lift, rotate a quarter turn, and try again.
- Tug upward gently to confirm the pin is engaged. The umbrella should not lift off the spigot.
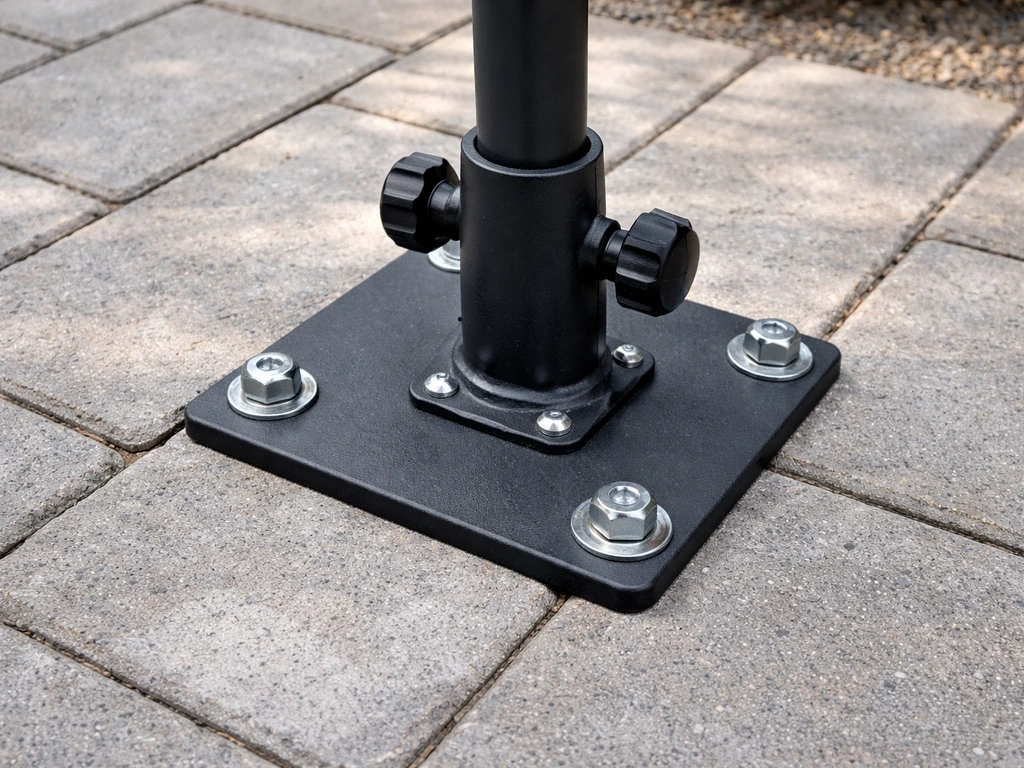
Bolt-through base plate
- Set the pole on the top of the base plate, aligning the bolt hole at the bottom of the pole with the bolt hole in the plate.
- From underneath the base plate, thread the bolt up through the plate and into the pole bottom by hand first to make sure it's threading straight — cross-threading here is easy and ruins the bolt.
- Tighten with the provided wrench until snug. Do not overtighten. Check by trying to rotate the pole; if it stays still, you're good.
Camlock system
- Insert the umbrella spigot into the base plate fitting.
- Insert the hex key into the camlock port (usually marked with an arrow).
- Rotate the hex key until you feel resistance and the spigot can't be pulled free. Most camlocks engage with a quarter to half turn.
Step 4: Test Everything Before You Sit Down
Don't skip this. A two-minute test now saves a face-full of umbrella later.
- Open the umbrella fully using the crank or push-up mechanism. It should open smoothly without catching or grinding.
- If your umbrella has a tilt feature, tilt it to both sides. The hinge should lock at each tilt position and hold without slowly drooping.
- If your umbrella rotates, rotate it 90 degrees in each direction. It should move without the pole pulling up or the base shifting.
- Push horizontally on the open canopy with moderate force. The base should not slide or tip. The pole should not wobble side to side in the socket.
- Close the umbrella fully. The canopy should close all the way and the tie wrap or velcro strap should reach around it.
If the crank feels stiff or the tilt locks aren't holding, the problem is usually with the umbrella mechanism itself, not the base installation. But if the pole wobbles during these checks, go back to Step 3 and re-tighten the hardware.
Step 5: Fix Common Installation Problems
The pole won't fit into the socket
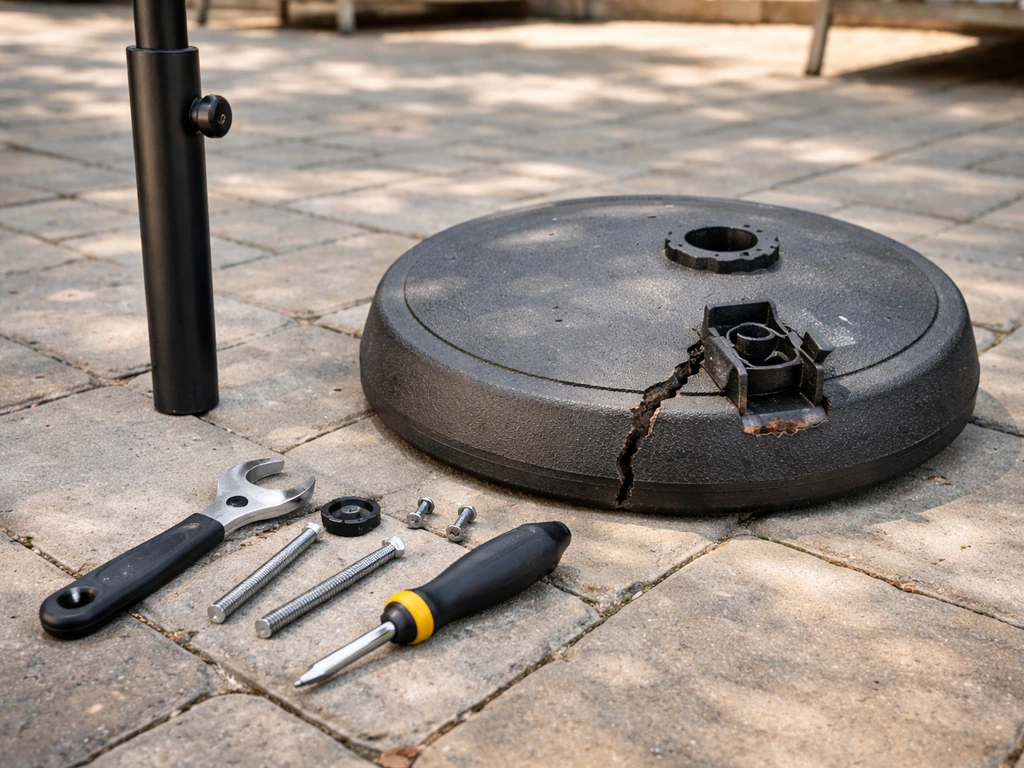
First, confirm you haven't left a plug or liner inside the socket. Second, measure the pole diameter and compare it to the socket opening. If the pole is too small, you need a reducing adapter sleeve. If your patio umbrella base still feels loose after using the right adapter, recheck the socket for wear and confirm the hardware is tightened properly reducing adapter sleeve. If the pole is too large, you either have the wrong base for your umbrella or you need a base with a larger socket, forcing it will crack most plastic bases.
The pole is loose and wobbles after tightening
If the set screw is fully tightened and there's still movement, the socket is worn or the pole diameter is just too small for the socket. A reducing sleeve adapter solves this. If the base is plastic and the socket walls have cracked or deformed, the base needs to be replaced, a cracked socket won't hold weight safely.
The locking pin won't click or engage
This is almost always dirt, debris, or misalignment around the spigot and rotation mechanism. Clean the spigot and the inside of the pole socket with a dry cloth, then inspect for any bent or corroded surfaces. Apply a tiny bit of dry silicone lubricant to the spigot. Try the rotation again slowly. If the pin itself is visibly bent or broken, contact the manufacturer, most sell replacement locking pin assemblies as spare parts.
The set screw threads are stripped
If the screw just spins without tightening, the female threads in the socket body are stripped. Your options from easiest to most involved: try a slightly larger-diameter replacement screw of the same length (it'll self-tap into the slightly damaged threads in many cases), use a thread repair insert (helicoil), or replace the base. Most plastic base sockets aren't worth repairing once the threads are gone.
The bolt won't thread into the pole bottom
Back the bolt all the way out and try threading it by hand from the start. If it won't start cleanly by hand, the threads are either cross-threaded or the bolt is the wrong size. Check the assembly manual for the correct bolt spec (usually M8 or M10 in most patio umbrella bases). A Reddit thread on attaching an offset or hinged umbrella base also emphasizes user advice to assemble carefully and use the right bolt or hardware so the base doesn't wobble or fail check the assembly manual for the correct bolt spec. A wire brush on the pole's threaded insert and a new matching bolt usually solves this.
The umbrella tilts or operates incorrectly after installation
If the canopy droops on one side after opening, the tilt collar isn't locking. Check that the pole is fully seated in the base and not sitting a quarter-inch too high, a partially seated pole can prevent the tilt mechanism from reaching its lock position. If the crank is grinding, something is caught in the rib joints; close the umbrella fully, clear any fabric caught in the ribs, and reopen slowly.
Step 6: Secure It So It Doesn't Tip or Blow Over
Installation isn't done until the base is stable against everyday wind and the occasional gust. This is where a lot of people do the minimum and regret it.
Weight is your first line of defense
If you haven't already confirmed your base hits the 10-lbs-per-canopy-foot target, do it now. An underweight base on a large umbrella isn't just wobbly, it's a safety hazard. A 9-foot umbrella catching a 20 mph gust puts serious torque on that base.
Anti-tip anchoring options
- Bolt the base to a patio surface using lag bolts or concrete anchors through the base plate holes (many bases have these pre-drilled)
- Place the base under a patio table so the table legs act as physical stops against tipping
- Use ratchet straps to connect the base to a fixed structure like a railing or pergola post — this is the fast solution for a rental patio or a quick setup
- Weigh down the base further with sandbags draped over the lower frame if the design allows
Build a tightening schedule
Set a reminder to check all hardware, set screws, locking pins, bolts, every two weeks during the season. Vibration from wind and daily open/close cycles loosens everything gradually. A 30-second check with a hex key is all it takes. Also close and strap the umbrella any time wind is forecast above 20 mph, no matter how well anchored the base is. An open canopy in wind acts like a sail, and no base weight overcomes that.
Step 7: End-of-Season Maintenance So Next Year's Install Goes Smooth
The best time to set yourself up for an easy install next spring is right before you put everything away in fall.
Clean the connection points before storing
Remove the pole from the base and wipe down the spigot, socket interior, set screw, and any metal contact surfaces with a dry cloth. If there's surface rust, hit it lightly with fine steel wool and wipe away the dust. Apply a thin coat of silicone spray or a light machine oil to metal threads and the spigot pipe. Do not use WD-40 as a long-term lubricant, it evaporates and leaves residue that gums up mechanisms over winter.
Deal with the base fill before temperatures drop
If your base is water-filled, drain it completely before the first hard freeze. Water expands when it freezes and will crack a plastic base from the inside. Sand-filled bases can stay filled but check the drain plug seal before winter, a missing or cracked plug lets rainwater in, which then freezes and cracks the same way. Brick-and-sand fills generally don't have this issue.
Store the umbrella indoors if your winters are cold
Cold, wet winters accelerate corrosion on metal pole sections, hinge hardware, and crank mechanisms. If you can bring the umbrella inside a garage or shed, do it. At minimum, use a tight-fitting cover rated for outdoor winter use. Clean the canopy fabric before storing, mold and mildew that sits on the fabric all winter is much harder to deal with in spring than a quick wash-down in fall.
Tag the hardware
Before you put things away, bag up any small hardware (hex keys, extra screws, the locking pin if it's removable) in a small zip bag and tape it to the base. You'll thank yourself in April when you're not searching the garage for a 4mm hex key.
One last thing: if your base itself is cracked, has a deformed socket, or is missing structural pieces, winterizing is the right time to address that rather than discovering it the following spring. Replacing or repairing the base in the off-season means it's ready to go the moment you pull the umbrella back out.
FAQ
How can I tell which connection type my umbrella base uses before I start tightening anything?
If you can’t tell whether your umbrella uses a set screw, locking pin, bolt, or camlock, do a “dry fit” without tightening. The correct hardware should contact the pole only after the pole is fully seated to the same depth on the first try, and you should see a dedicated threaded hole, pin hole, or cam slot. If nothing engages after seating, stop and verify the base model, because forcing usually cracks plastic sockets or bends pins.
What if the pole feels like it’s in, but the tilt or rotation doesn’t lock correctly?
Yes. For some bases, the pole must be inserted until it bottoms out, then tightened. A partially seated pole can still look “mostly in,” but it can block the tilt lock and prevent rotation to the expected range. Mark the pole with a piece of tape at the correct insertion depth the first time, then use that same mark for future installs.
Is it ever safe to skip the reducing sleeve adapter if the pole seems to fit?
Use a reducing sleeve adapter when the pole is smaller than the socket opening. If the pole wobbles even after the hardware is tightened, don’t assume friction will solve it. Conversely, if the pole is larger than the socket and you have to force it, stop, because forcing can permanently deform plastic sockets and reduce strength.
What should I do if the set screw tightens but the umbrella still moves, or if the screw won’t tighten at all?
If the set screw spins without tightening, the most common causes are stripped threads or a cross-threaded screw. Try threading the screw by hand gently from the start (do not power it in), check for debris in the threads, then decide between a thread repair insert and replacing the base. For plastic sockets, stripped threads usually mean replacement is the safest long-term fix.
My umbrella wobbles only when I rotate it, not when it’s stationary, what’s most likely wrong?
Do the “spigot alignment” check before locking: wipe the spigot and inside of the socket, then insert the pole and rotate it slowly by hand. The spigot should slide in smoothly without grinding or catching. If it binds, re-seat the pole and inspect for bent or corroded metal, debris in the socket, or misalignment marks on cantilever systems.
What’s the best way to fill a patio umbrella base for stability, if I don’t want wobble in wind?
For fillable bases, sand alone often underperforms target weight and also tends to compact unevenly over time. If you want maximum stability, use bricks first (to create a solid internal structure), then add sand around them to remove voids. If your base is water-filled, remember you must drain it completely before hard freezes to avoid internal expansion cracking.
Do I really need to close and strap the umbrella in wind, or is base weight enough?
Yes, you should close and strap the umbrella when winds are forecast above 20 mph, even if the base weight is correct. An open canopy acts like a sail, increasing torque dramatically, and it can loosen hardware faster than normal daily use. Strapping and closing reduces leverage on the socket and pin or screw connection.
What’s the correct fix if the base rocks or rocks slightly after I install the umbrella?
If your base rocks, use shims under the low side until the base sits flat on the hard surface, then re-check hardware after a day. If the base still won’t sit flat, the surface may be soft or uneven (grass, compacted dirt, or uneven pavers), in which case leveling or moving to a better location is the right fix rather than tightening harder.
How do I know when to repair versus replace the umbrella base or the locking hardware?
If you stripped the threads or cracked the socket, replacement is often safer than repeated attempts to “make it hold.” In particular, cracked sockets may appear stable when empty but can fail under gust loads. If the bolt or pin components are damaged (bent pin, corroded spigot), get replacement parts so the connection surfaces mate correctly.
Besides every two weeks, when should I inspect or re-tighten the umbrella base hardware?
You should re-check hardware timing and conditions based on use. A common approach is quick checks every two weeks during the season, but also inspect after any major storm, after noticeable wobble, and anytime you notice the crank feels rough. If the mechanism gets harder to operate, don’t keep forcing it, clean and re-check first.
Next Articles
How to Fix Patio Umbrella Base: Step-by-Step Repairs
Step-by-step guide to fix a wobbly, loose, cracked, or rusted patio umbrella base safely and stop tilt/lock issues.

How to Fix a Patio Umbrella That Won't Open or Close
Step-by-step fixes for patio umbrellas that won’t open or close, with checks for jams, cords, latches, and lubricating t
How Does a Patio Umbrella Work? Components, Use, and Fixes
Learn how patio umbrellas work: components, open close tilt, stability, and step by step troubleshooting common mechanic