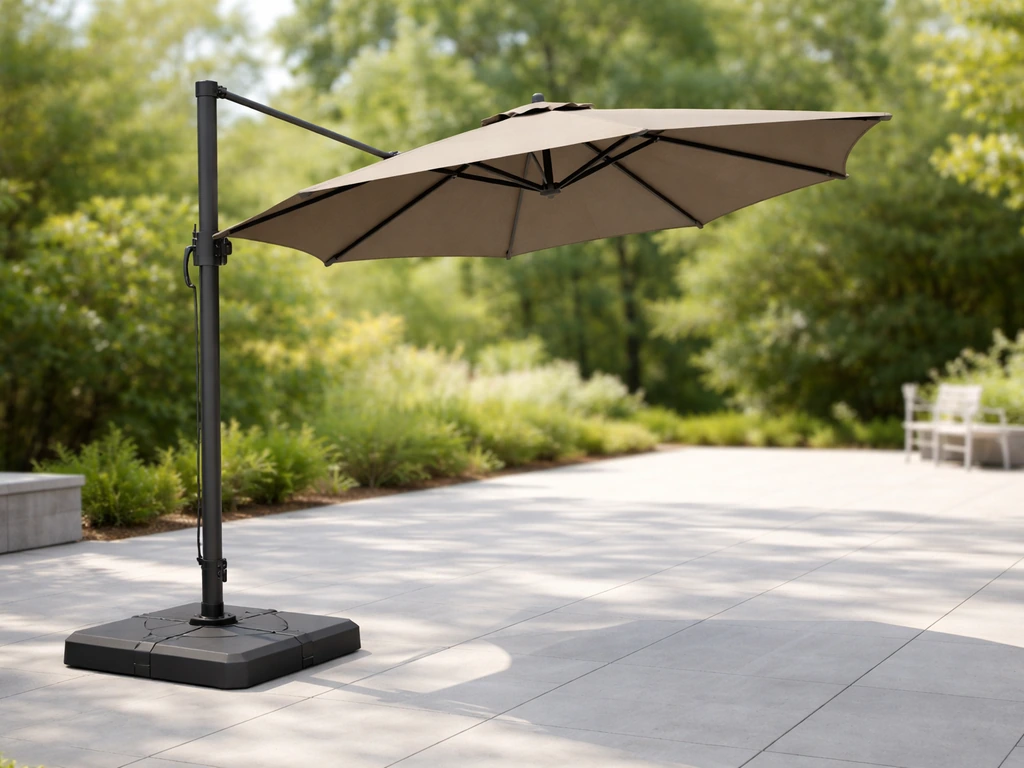
Assembling an offset patio umbrella takes about 30 to 60 minutes if you lay everything out first and follow the right order: base first, then the mast and hinge mechanism, then the canopy and crank hardware, and finally standing it upright and testing the open/close and tilt. Get the order wrong and you'll end up disassembling half of it to fix something you should have done earlier. This guide walks through the whole process, part by part, so you get it right the first time.
How to Assemble an Offset Patio Umbrella Step by Step

Luca Morrison
3 Jun 2026
Identify the parts and hardware before you start
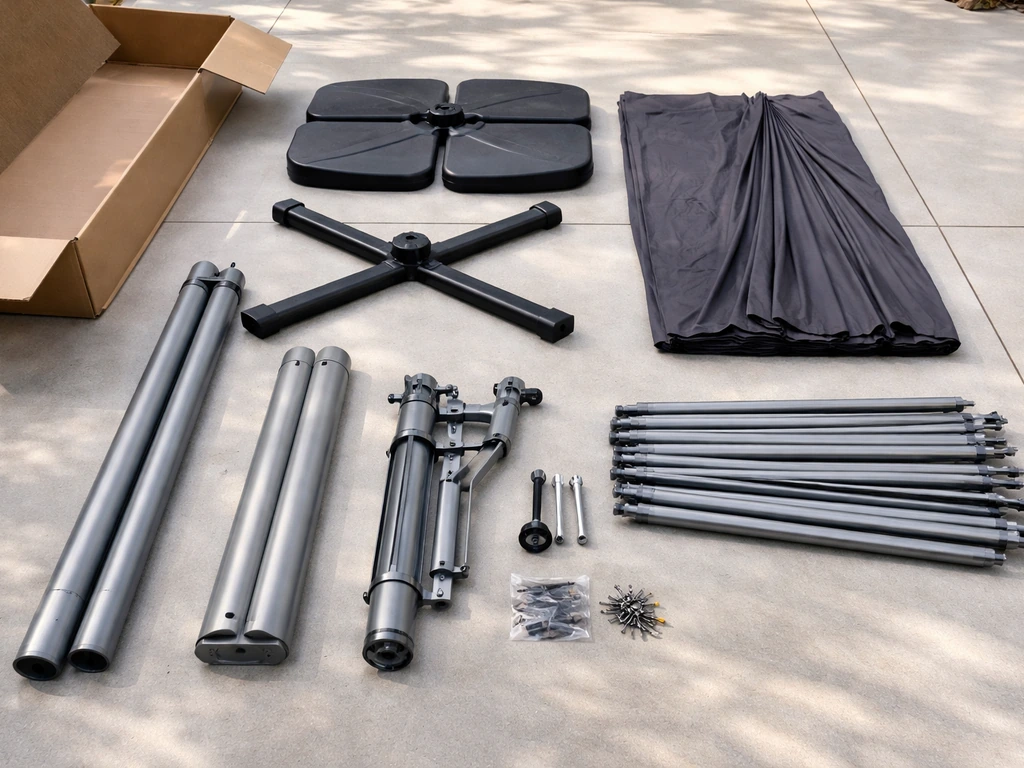
Before you touch a single bolt, dump everything out of the box and match it to your parts list. Offset umbrellas have more components than a center-pole umbrella, and missing one small bracket mid-assembly is genuinely frustrating. Here's what you should have:
- Base: the weighted platform or cross-foot that keeps the whole thing from tipping over
- Base pole socket or collar: the receiver that holds the vertical mast to the base
- Vertical mast (main pole): the upright post that rises from the base, sometimes in two sections
- Horizontal or angled boom arm: the cantilevered arm that extends out over your seating area
- Hinge or pivot joint: connects the boom arm to the mast and allows the canopy to tilt
- Upper hub (top hub): the central ring at the top of the boom where the ribs attach
- Lower hub (runner): slides up and down the boom to push the ribs open and closed
- Ribs: the main structural arms that spread the canopy outward
- Stretchers: the shorter arms that connect mid-rib to the lower hub to hold shape
- Canopy fabric: the shade material with pockets or sleeves that slide over the ribs
- Finial: the decorative cap at the tip of the boom, holds the top of the canopy
- Crank handle or pull cord/pulley: the mechanism you use to open and close the canopy
- Tilt mechanism (if included): a button, collar, or ratchet that lets you angle the canopy
- Hardware bag: bolts, pins, clips, and sometimes a wrench or Allen key
Take five minutes and count every piece against your manual's parts diagram. If anything is missing, call the manufacturer before you start. Trying to assemble around a missing component wastes far more time. Also, keep the hardware bag open on a flat surface rather than digging through it blind while you're mid-assembly.
Assemble the base first
The base is your foundation, and it needs to be fully assembled and in its final position before anything else goes on top of it. Offset umbrellas put enormous leverage on the base because the canopy is way off to one side, so getting this right is not optional.
Cross-foot or weighted slab bases
Most offset umbrellas ship with a cross-foot base (four legs that form an X) or a rolling wheeled base with a pole socket in the center. If yours has multiple base pieces, bolt them together now using the hardware provided. Hand-tighten first, then snug everything down with a wrench. Don't fully torque one bolt before the others or the frame will sit crooked.
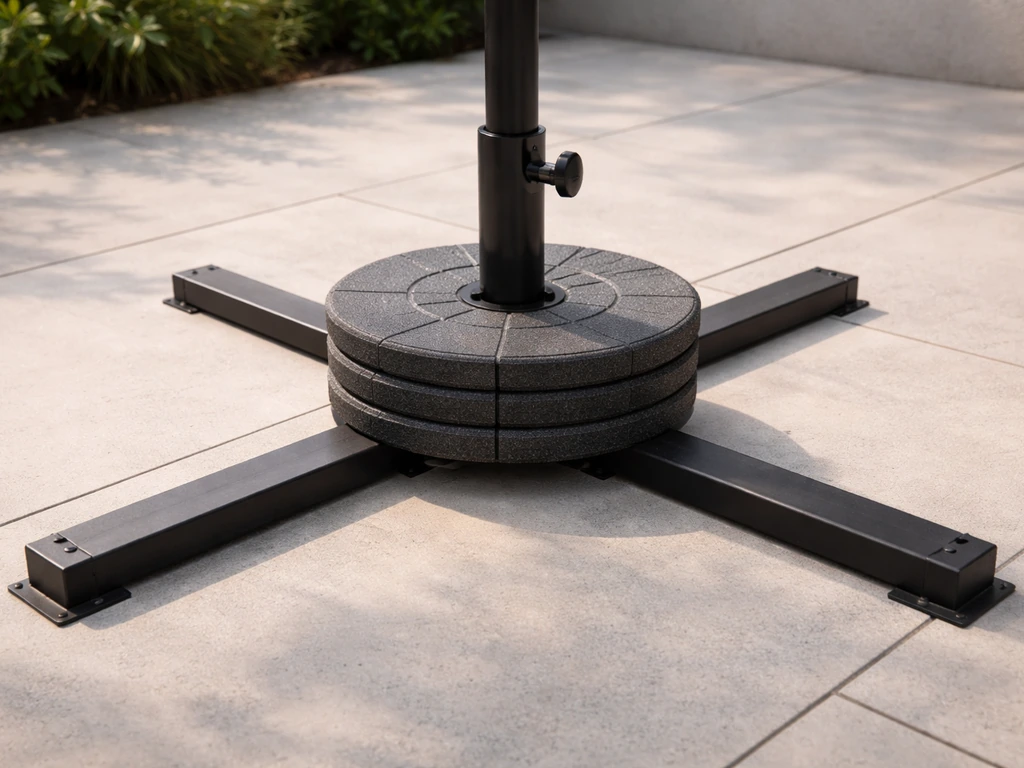
If your base has weight plates, stack them onto the base pole now. Most offset bases need at least 50 to 100 lbs of ballast to handle a full-size canopy (9 to 11 feet). Larger canopies often need more. The plates usually slide over a center post and lock with a pin or a threaded cap. Get all the weight on before you raise the umbrella, not after, because a top-heavy unweighted base can tip during setup.
In-ground anchor bases
Some setups use a ground sleeve or anchor that gets set into concrete or into a paver base. If that's your situation, the sleeve should already be set and cured before assembly day. Slide the base pole into the sleeve and confirm it seats fully and doesn't wobble. If it rocks, check whether the sleeve is level and add shims if needed before proceeding.
Roll or slide the assembled base to its final location on your patio. Offset umbrellas are awkward to move once the mast is up, so position the base now. Make sure the pole socket is oriented so the boom arm will extend over your seating area, not toward a wall or fence.
Assemble and attach the mast, boom arm, and hinge mechanism
This is the most variable part of the assembly, because different brands use different connection systems between the mast and the boom. Read your specific manual here, but the general process follows the same logic.
Set up the vertical mast
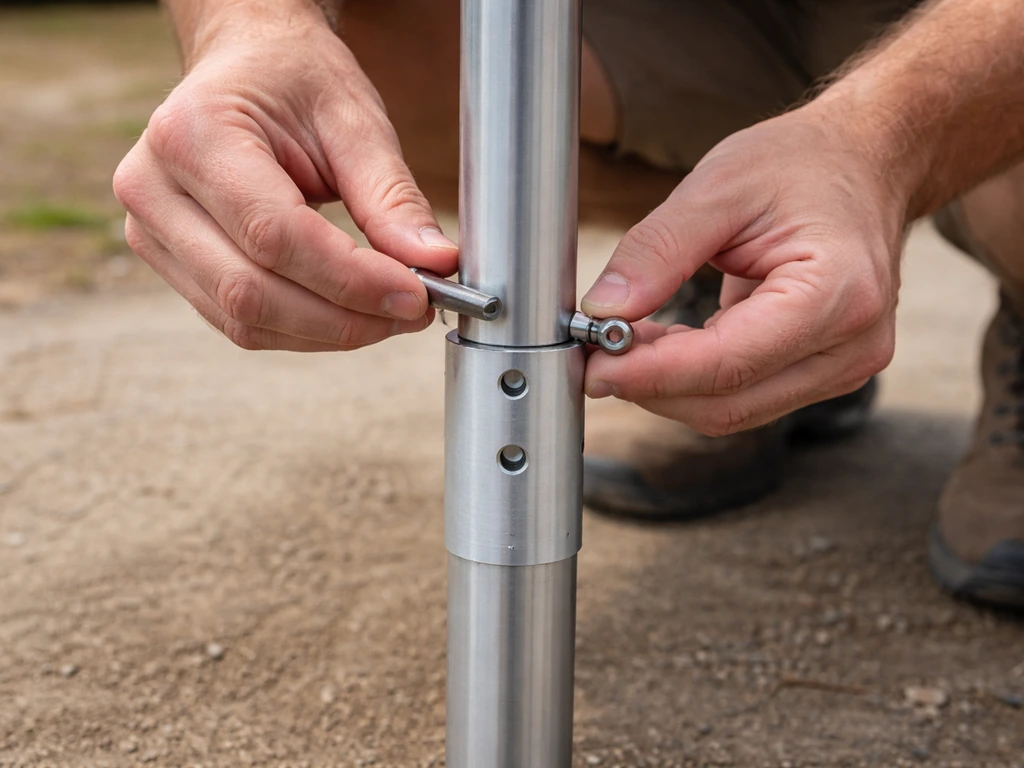
If the mast comes in two sections, slide the upper section into the lower section and align the pin holes. Insert the hitch pin or bolt and secure it. On most designs, there's only one correct orientation, so look for a flat side, a notch, or a labeled arrow. Insert the assembled mast into the base socket and secure it with the locking bolt or pin. Give it a firm shake to confirm it's seated. If it wobbles, the pin isn't fully through or the bolt isn't tight enough.
Attach the boom arm and hinge
The boom arm connects to the top of the mast through a hinge or pivot bracket. This joint is what allows the canopy to tilt sideways or forward. Lay the boom arm on the ground next to the mast and identify the hinge end. Lift the boom up and hook or bolt it into the mast bracket. Most designs use two bolts or a through-pin and locking clip. Insert both before tightening either, then snug them down evenly.
At this point the boom arm will probably hang loosely or sit at a low angle. That's expected. You'll raise and lock it to the correct angle after the canopy is on. If your umbrella has a rotation collar at the base of the mast (letting you spin the whole canopy 360 degrees), make sure it moves freely and the locking knob is loose for now.
Route the cord or cable if your umbrella uses a pulley system
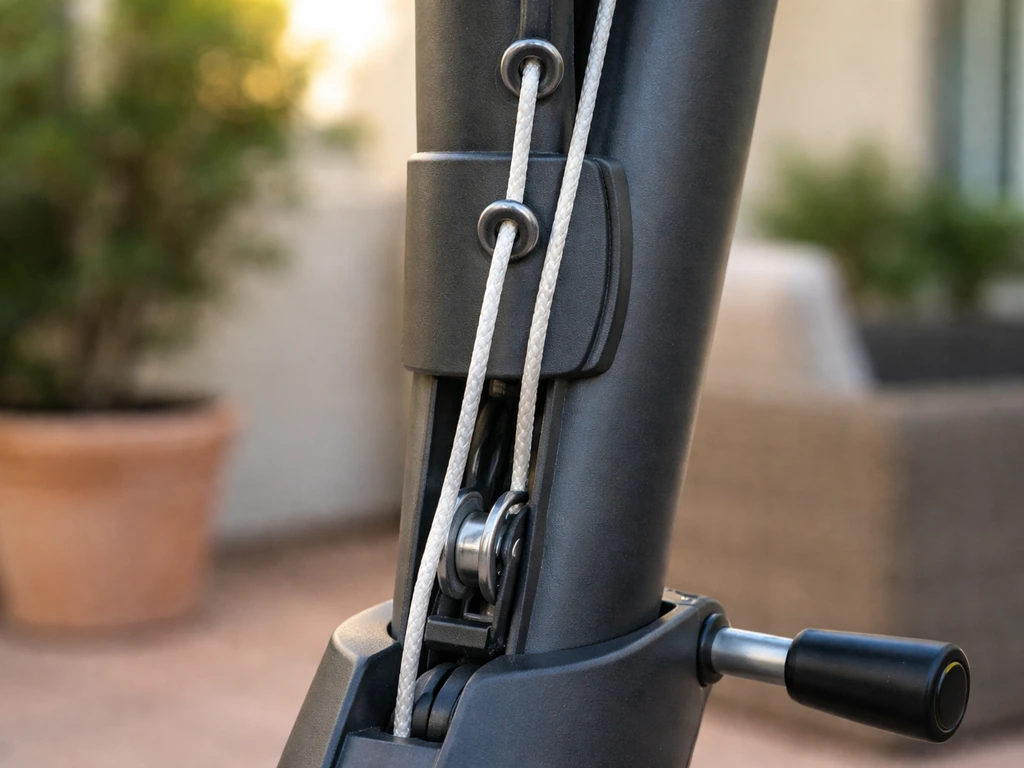
Crank-operated offset umbrellas use a gear and crank at the base of the mast to raise the lower hub and open the canopy. Pulley-based models use a cord routed through guides along the boom. If yours has a cord or cable, route it now before the canopy goes on, following the guide rings or eyelets along the boom. Getting this wrong is the most common assembly mistake on pulley-style umbrellas, and fixing it after the canopy is attached is genuinely painful. If the cord looks tangled or doubled-back on itself, unthread it completely and reroute from scratch.
Attach the canopy and connect the crank or tilt hardware
Slide the canopy onto the ribs
Lay the boom arm as horizontal as possible and attach the ribs to the upper hub if they aren't pre-attached. Most ribs click or bolt into the hub slots. Then slide the canopy fabric over the ribs, working around the canopy evenly rather than doing one full rib at a time. The canopy has sewn pockets or sleeves that fit over each rib tip. Once all the ribs are in their pockets, attach the finial to the tip of the boom to hold the canopy top in place. The finial usually screws on or snaps with a clip.
Connect the lower hub and stretchers
Attach the stretchers between the lower hub and the midpoint of each main rib. These are the shorter arms that brace the canopy open when the hub is raised. They usually click into a socket on each rib. Once all the stretchers are connected, slide the lower hub along the boom and connect it to your lift mechanism, whether that's a crank cable, a pull cord, or a push-lock collar.
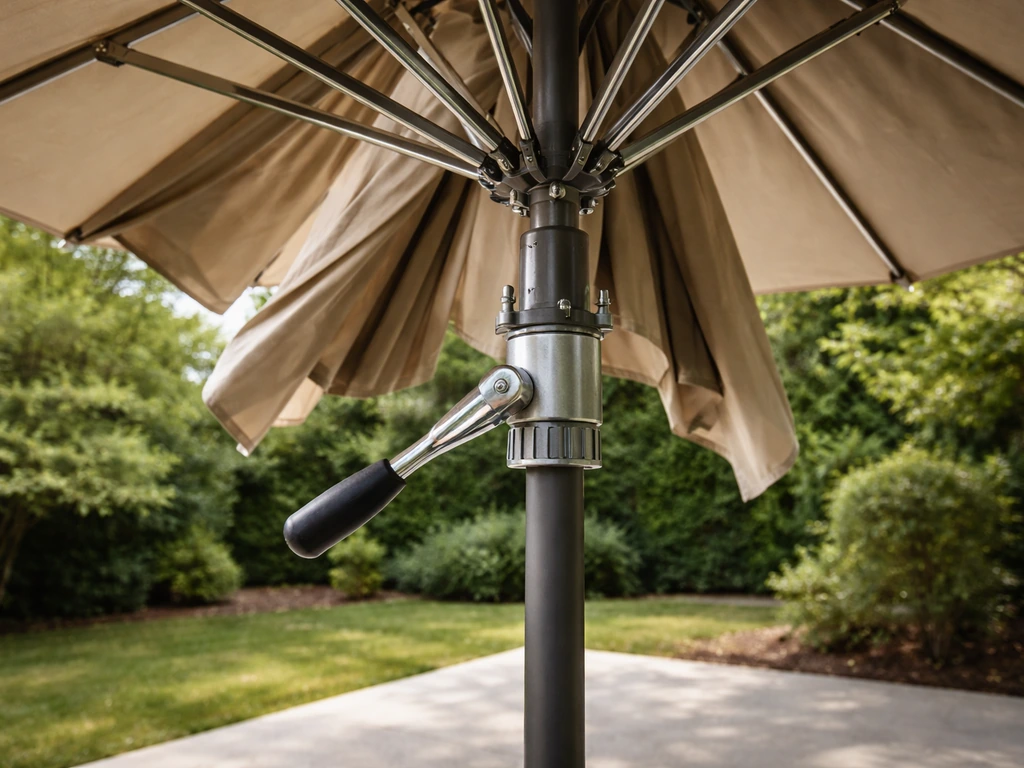
Install the crank handle and check the tilt mechanism
If your umbrella has a crank, slide the handle onto the crank shaft at the base of the mast and secure it with the set screw or retaining clip. Give it a few slow turns to confirm the mechanism engages and moves the lower hub. If it spins without moving anything, check that the cable or gear is connected to the hub. For tilt mechanisms, locate the tilt collar, button, or ratchet on the boom or hinge joint. These let you angle the canopy toward the sun after it's open. A patio umbrella buying guide also describes tilt mechanisms as a key feature for angling the canopy toward the sun after it is open These let you angle the canopy toward the sun after it's open.. Don't force the tilt yet; wait until the canopy is fully open and you're testing operation.
Stand the umbrella up, open the canopy, and test everything
Now it's time to raise the boom arm to its operating angle and open the canopy for the first time. If you want the exact sequence for operating your patio umbrella after assembly, follow the steps in our guide on how to operate patio umbrella open the canopy for the first time. If you want the quick steps for opening the canopy on different crank or pulley models, see the full guide on how to open a patio umbrella open the canopy. This step is easier with two people, especially on umbrellas with longer or heavier boom arms.
- Lift the boom arm to the manufacturer's recommended angle (usually 45 to 60 degrees above horizontal) and lock it using the hinge locking pin, bolt, or collar. Double-check that the pin is fully seated before letting go.
- Stand back and confirm the mast is vertical and the boom is angled correctly over your seating area. Adjust the base rotation collar if you need to swing the canopy left or right.
- Begin opening the canopy slowly using the crank or pull cord. Watch the ribs as they extend and make sure the canopy fabric is spreading evenly. If one rib sticks, stop and check that its stretcher is properly attached.
- Once fully open, lock the lift mechanism in place (crank umbrellas lock automatically when the canopy is fully extended; pull-cord models usually have a cleat or hook to tie off).
- Test the tilt: press the tilt button or turn the tilt collar and angle the canopy toward a simulated sun position. It should move in clicks or notches and hold each position firmly without drifting.
- Close the canopy fully by reversing the crank or releasing the cord, then open it again to confirm smooth operation. Two full open/close cycles is a good check.
Troubleshooting during the test
| Problem | Likely cause | Fix |
|---|---|---|
| Crank turns but canopy doesn't open | Cable disconnected from lower hub or gear stripped | Stop cranking, inspect the cable connection at the hub, reconnect or re-thread |
| One or more ribs won't extend fully | Stretcher not connected or canopy fabric too tight over a rib tip | Close canopy, reattach stretcher or reseat rib tip in fabric pocket, try again |
| Canopy opens unevenly or looks lopsided | Ribs attached out of sequence or cord routed incorrectly | Close canopy, check that all ribs are in their numbered hub slots |
| Tilt doesn't hold position | Tilt collar bolt too loose or tilt ratchet worn | Tighten the collar bolt a quarter turn at a time until tilt holds |
| Boom arm drops when you let go | Hinge locking pin not fully engaged | Lower the boom slightly, confirm pin seats all the way through the bracket, re-raise |
| Crank feels very stiff | Gear needs lubrication or cable is kinked | Apply silicone spray to the gear mechanism; check cable path for kinks |
Final setup: position, align, and adjust for real use
With the canopy open and working, make your final positioning adjustments. Stand under the open canopy and check that it covers the area you want shaded. If you need to rotate the canopy, use the base rotation collar (loosen, rotate, retighten). If you need to change the boom angle, lower the canopy first, adjust the boom hinge, then re-open. Never force the boom angle with the canopy open.
Once the canopy is positioned where you want it, use the tilt to angle the shade toward the afternoon sun if needed. Most offset umbrellas let you tilt in one or two directions. On models with a 360-degree rotation hub, you can usually combine base rotation and tilt to cover almost any sun angle. Once that's dialed in, you're essentially done with assembly. But there's one more important step before you walk away.
Opening and closing the canopy is a slightly different skill from assembling it, and it's worth knowing how to do it smoothly without straining the mechanism. Once it is assembled, you will want to know the correct way to open the cantilever patio umbrella so the mechanism doesn’t bind how to open a cantilever patio umbrella. Once it’s fully open and positioned, closing typically means lowering the canopy partway, disengaging the tilt if needed, then cranking or pushing it closed until it locks closing it properly. The same goes for closing it properly when you're done for the day.
Secure the umbrella for wind and think ahead to storage
Make it wind-safe
An offset umbrella is essentially a big sail on a long lever arm. Even a moderate gust can tip a poorly weighted base or spin the canopy into a table or fence. Here's what actually makes a difference:
- Match the weight to the canopy size: a 9-foot canopy typically needs at least 50 lbs of base weight; a 13-foot canopy may need 150 lbs or more
- Use sandbags or purpose-made weight bags in the base legs if your base supports them
- If your base has a ground anchor option, use it on any hard surface where you can bolt or screw it down
- Tighten all rotation and tilt locking collars fully when the umbrella is in its set position so it can't shift in gusts
- Close the canopy any time winds exceed about 20 to 25 mph, even briefly. No base weight is a substitute for closing it
- Position the base so the weighted side is opposite the direction of prevailing wind if possible
Off-season storage and readiness checklist
When the season ends or you're storing the umbrella for an extended period, a quick checklist makes spring reassembly much easier and prevents damage from sitting in storage.
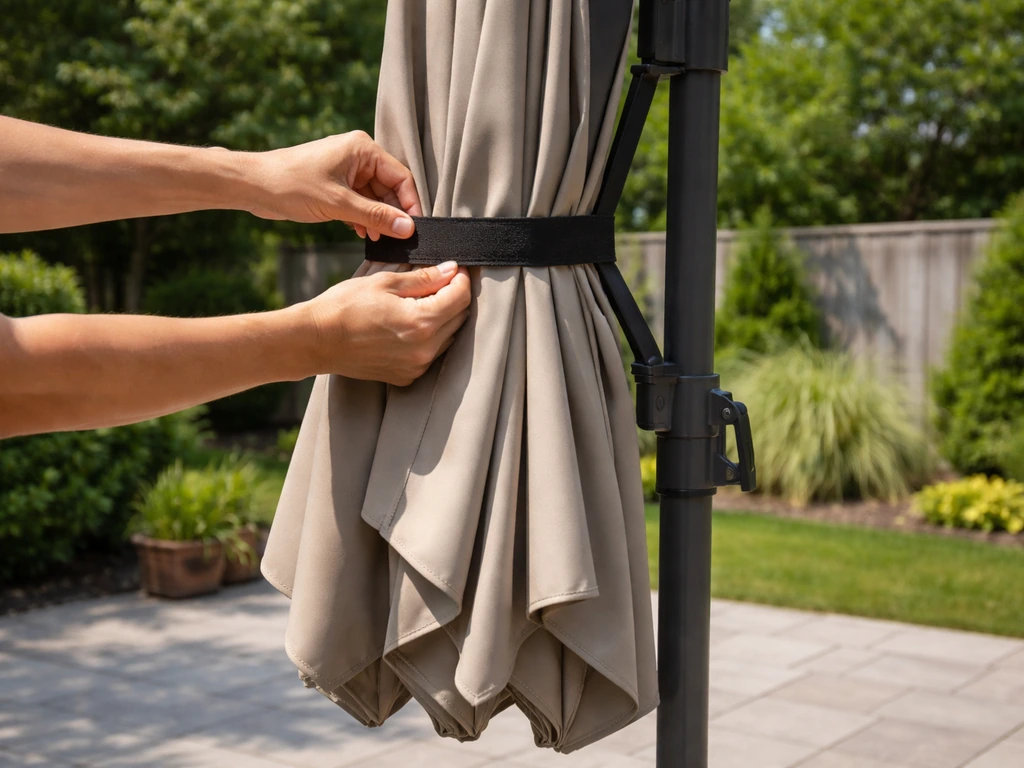
- Close the canopy fully and tie any Velcro straps or drawstring closures so the fabric doesn't flap in the wind
- Lower the boom arm to its lowest hinge position and lock it
- Wipe down all metal joints and the crank mechanism with a dry cloth, then apply a light coat of silicone spray to the crank gear, hinge pivot, and hub slides
- Inspect the canopy fabric for mildew, tears, or fraying rib pockets before storing; spot-clean and let dry completely
- Remove any weight plates and store them flat to prevent cracking
- Store the full umbrella in a protective cover or indoors if possible; UV and moisture will degrade fabric and plastic components faster than anything else
- Put all small hardware (bolts, clips, pins) in a labeled zip-lock bag and store it with the umbrella, not in a random drawer
- Check the crank cable or pulley cord for fraying; replace it now if it looks worn so you're ready for spring
Taking 20 minutes at the end of the season to do this properly means your umbrella will open cleanly next spring without a half-hour troubleshooting session. The joints that seize up, the cranks that jam, and the cords that snap are almost always ones that were stored dirty and dry. Cantilever umbrella repair guidance commonly attributes issues like a stuck crank, tangled or broken cord/pulley system, a rib or hinge catching, or grime and debris locking a joint to specific failure drivers that also show up during assembly and testing joints that seize up, the cranks that jam, and the cords that snap. A little silicone spray and a cover go a long way.
FAQ
Do I need two people to assemble an offset patio umbrella?
It depends on your boom length and canopy weight. A single person can often handle base and rib installation, but the first time you lift the boom to the operating position, two people make it safer and smoother, especially when the canopy is fabric and you are still dialing in hinge angle.
What should I do if the mast or boom wobbles after I insert the pin or bolt?
Recheck that the hitch pin is fully through the mating holes and that the bolt is tightened evenly on both sides of the pivot bracket. Then give the joint a firm shake again, if it still rocks, stop and confirm you did not swap the hinge orientation (many have a flat side or labeled arrow that must face a specific direction).
How can I tell if I routed the crank or pulley cable correctly before attaching the canopy?
Before the canopy goes on, ensure the cable is not doubled back, not twisted, and it runs along the intended guide rings or eyelets on the boom. A quick test is to move the hub through a few slow turns or pulls while watching that the cable tracks cleanly, if it catches or pulls at an angle, reroute it now while access is easy.
What is the safest way to stack weight plates if my base uses ballast?
Stack them onto the base pole before raising anything, confirm each plate locks with its pin or threaded cap, and keep the base in its final patio location. If your umbrella has multiple plate sizes, start with the manufacturer’s required minimum, then only add more if you meet or exceed the recommended canopy size requirements.
Can I assemble the umbrella first and anchor or sleeve it later?
Usually no, not safely. If your setup uses a ground sleeve or concrete anchor, the sleeve should already be set and level and cured. If you mount the base later, you can misalign the pole socket and end up with a seated mast that wobbles, which can stress the hinge and tilt parts.
What should I do if the base rotation collar or tilt mechanism feels stiff during assembly?
Leave the lock knob or collar loosened for now, then confirm the moving parts slide freely when the canopy is still lowered. If it still binds after basic loosening, inspect for debris, check that the collar is installed the correct side up, and do not force it with the canopy open because you can damage the hinge joint.
My canopy ribs do not slide into the pockets or hubs. Is it a mistake I can fix?
Yes, and it is usually a sequencing or alignment issue. Lay the boom arm as level as possible, attach ribs one side at a time while keeping them seated in the hub slots, then slide the fabric pockets over each rib tip evenly. If a rib feels wrong, remove it and re-seat, do not force the pocket because that can create fabric strain.
How do I adjust boom angle without stressing the mechanism?
Lower the canopy first, adjust the boom hinge using the correct procedure for your model, then re-open and re-test. Never attempt to force the boom angle with the canopy fully open, forced adjustments can bind the hinge and make the open/close operation harder later.
What is the best way to do the first open and close test after assembly?
Open slowly, stand clear of pinch points, and verify the hub moves smoothly and the tilt engages only after the canopy is fully open. For closing, lower partway first, disengage tilt if your model requires it, then crank or push until it locks, if anything feels uneven, stop and inspect before fully closing.
How do I prevent the most common damage before storing for the off-season?
Clean and let the joints dry, then apply a light silicone spray where the manual indicates for moving parts, and cover the umbrella. Most long-term problems come from storing with grit or moisture in cranks, hinges, and cord paths, which leads to seizing and snapped cables later.
Next Articles
How to Close a Patio Umbrella Safely Step by Step
Step-by-step guide to safely close patio and cantilever umbrellas, troubleshoot jams, and secure so it stays closed.
How to Open a Patio Umbrella Fast, Even If It Sticks
Step-by-step how to open a patio umbrella fast, including stuck umbrellas, big models, crank or tilt, plus troubleshooti

How to Fix a Patio Umbrella That Won't Open or Close
Step-by-step fixes for patio umbrellas that won’t open or close, with checks for jams, cords, latches, and lubricating t