
To open a cantilever patio umbrella, locate your opening mechanism (crank handle, pull cord, or push-button), make sure the canopy is fully unfolded from its stored position, then turn the crank clockwise, pull the cord hand-over-hand, or press and lift the gas-spring button until the ribs lock into the open position. That covers about 90% of models out there. The rest of this guide walks you through every mechanism type in detail, covers full assembly from the box, explains how to dial in tilt and rotation, and gives you real troubleshooting steps for the most common failures. For step‑by‑step instructions, see our detailed guide on how to assemble an offset patio umbrella.
How to Open Cantilever Patio Umbrella: Step-by-Step Guide

Luca Morrison
26 Jul 2026
What a cantilever umbrella is and who this guide is for
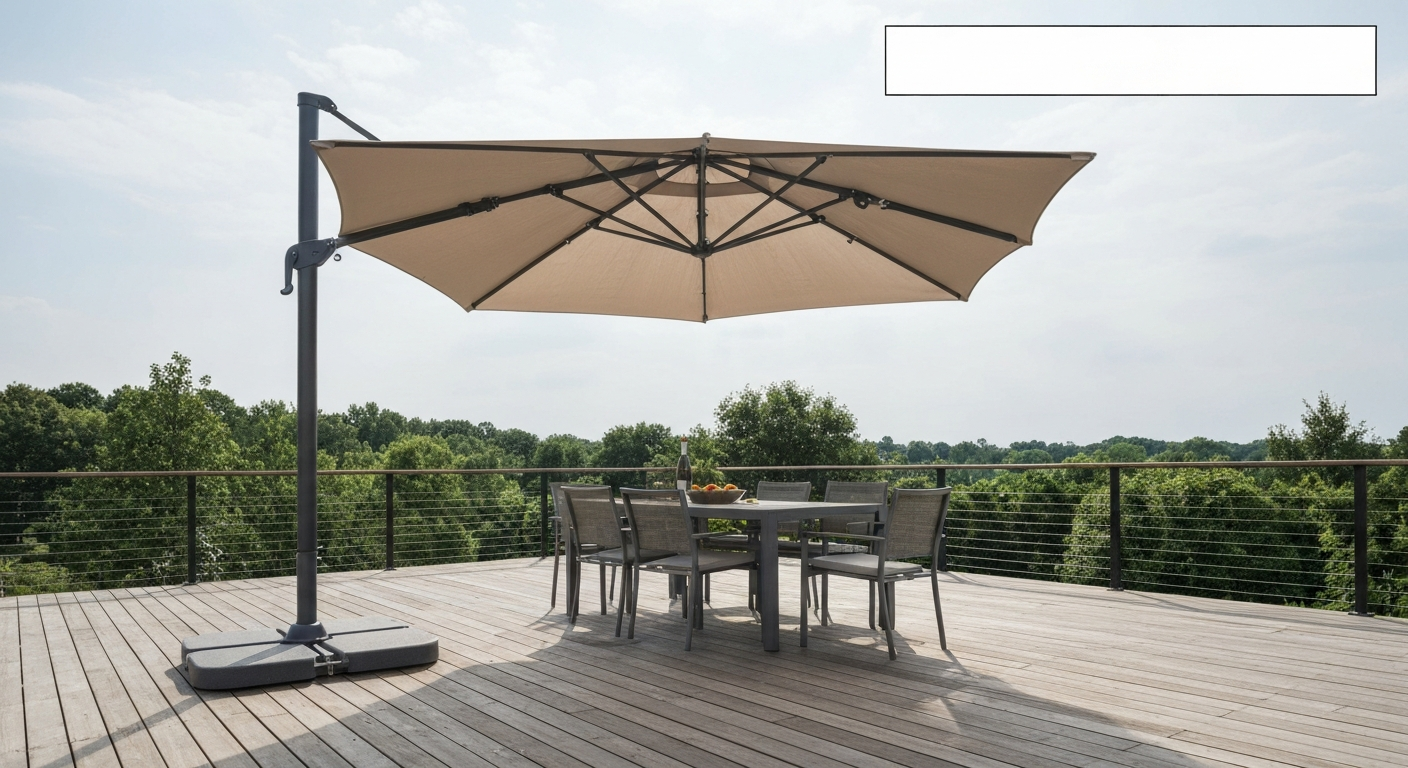
A cantilever umbrella, also called an offset umbrella, has a single pole that stands to the side of the shaded area rather than poking up through the middle of your table. The canopy is supported by an arm that extends out over the seating area, which is what makes the design so useful but also what makes the mechanism a little more involved than a standard center-pole umbrella. The arm creates a lever load on the base, so these umbrellas need heavier bases and more precise assembly than their simpler cousins.
This guide is written for homeowners who have a cantilever umbrella they need to open for the first time, one they just bought and need to assemble, or one that has gotten stiff, stuck, or otherwise difficult to operate. See our how to open offset patio umbrella guide for step-by-step opening and operation instructions. I've worked on Treasure Garden, Tropitone, Galtech, Tuuci, Sunjoy, and several no-name cantilever models over the years, and most of them share the same core mechanisms. Where brands differ in meaningful ways, I'll call that out specifically.
Before you touch anything: a quick safety and inspection checklist
Cantilever umbrellas are large, top-heavy structures. I've seen a poorly weighted base tip over in a gust and put a dent in a deck railing, and the CPSC has documented actual injuries from flying umbrellas. Take five minutes to run through this before you open or assemble anything.
- Check the wind: Close or stow your umbrella any time wind exceeds about 20 mph. If you hear it rattling or see the canopy flexing hard, close it. Cantilever designs catch more wind than center-pole umbrellas because the canopy cannot pivot freely around a central pole.
- Verify the base weight: Most manufacturers specify a minimum base weight. Treasure Garden's AG25T model requires a minimum free-standing base of 200 lb. Tropitone's example installation uses four removable base weights totaling 429 lb. If your base is lighter than the manufacturer's spec, do not open the umbrella until you add weight.
- Inspect the pole and arm: Look for any cracks, sharp bends, or corrosion at the joints. Pay special attention to the knuckle joint where the arm meets the main pole. A cracked casting there can fail suddenly under load.
- Inspect the canopy fabric: Look for tears along the rib pockets, frayed attachment points at the hub, and any rib that has poked through the fabric. Operating with a compromised canopy puts stress on the ribs and hub.
- Check the cord or cable: If your model uses a pulley system, look for fraying anywhere the cord wraps around a pulley. Frayed cord is a failure waiting to happen and is easy to replace before it breaks.
- Confirm the base is on stable, level ground: Cantilever bases on uneven pavers or sloped decking can walk or tip. Use shims or relocate to a flat surface before operating.
- Ladder safety if you're working at height: If you need to reach the top hub or canopy attachment points, use a stable A-frame ladder positioned at a safe angle, maintain three-point contact at all times, and have a second person stabilize the ladder. This is standard OSHA portable ladder guidance and it applies here.
Quick-start: opening and closing by mechanism type
Most cantilever umbrellas use one of three opening systems: a hand crank, a pull cord or pulley, or a gas-spring with a push-button or foot pedal. Here's the fast version for each. Detailed steps and troubleshooting follow in later sections. For step-by-step instructions on how to operate patio umbrella, see our detailed operating guide. For step-by-step closing instructions, see our guide on how to close a patio umbrella.
Crank mechanism
- Locate the crank handle on the main pole or arm, usually about waist height. Insert it into the crank socket if it's removable.
- Make sure the canopy is free from any protective cover or storage tie. Unroll or unfold it from the ribs if it was folded down.
- Turn the crank clockwise slowly. You'll feel resistance increase as the runner rises and the ribs begin to splay outward. Crank gently, especially on cable-driven systems, to avoid jumping a pulley.
- Continue cranking until you feel the ribs reach their fully extended position and the mechanism either clicks into a detent or the crank becomes noticeably stiffer. Do not force it past the stop.
- To close, turn the crank counterclockwise at the same slow, controlled pace until the canopy is fully collapsed against the center hub.
Pulley and cord mechanism
- Find the pull cord, which usually hangs down from the arm or main pole near a cleat or ring.
- Untie or unhook the cord from its stowed position.
- Pull the cord hand-over-hand in a smooth, steady motion. Jerking the cord can fray it at the pulley.
- Once the canopy is fully open, secure the cord to the cleat by wrapping it in a figure-eight pattern.
- To close, uncleave the cord and let it out slowly under tension. Never let the cord free-run; guide it out hand-over-hand so the canopy descends in a controlled way.
Gas-spring and push-button mechanism
- Some models use a foot pedal to release the gas-spring lock; others use a button or lever on the pole or arm.
- With one hand holding the canopy or pole to support the weight, press or step on the release.
- Gently push or lift the canopy upward. The gas spring will assist the motion once the release is engaged.
- Release the button or pedal once the canopy reaches the fully open position and you hear or feel it lock.
- To close, press the release again and lower the canopy by hand, controlling the descent with the gas spring's resistance until it locks in the closed position.
Full assembly and mounting: from the box to a working umbrella
Assembling a cantilever umbrella is a two-person job. I want to be direct about that: this is not me being overly cautious. Every major manufacturer, including Treasure Garden, Tropitone, and Tuuci, specifies two-person assembly in their manuals, and once you're holding an 8-foot arm over your head trying to thread a bolt, you'll understand why. Have a helper before you start.
Tools and hardware you'll need
- Hex wrenches (metric and SAE, sizes 4mm through 8mm cover most models; Treasure Garden AG25T calls out specific hex sizes in their manual)
- An adjustable wrench or open-end wrench set
- A rubber mallet for seating pole sections
- A flat-head screwdriver
- Thread-locking compound (blue Loctite, not red) for bolt-on joints that see vibration
- A helper and a stable A-frame ladder
Step 1: Assemble the base
Assemble the base at the location where the umbrella will live. Cantilever bases are heavy by design and miserable to move once fully loaded. Tropitone's example installation uses a wheeled base with four removable weight sections totaling 429 lb. Some models like certain Galtech designs use an ABS base shell with retractable wheels so you can roll it into position before adding the weight inserts. Follow your specific manual's base assembly sequence, but the general approach is to bolt or pin the base frame sections together first, position it, then add the weight plates or fill with sand or water per the manufacturer's instruction.
Step 2: Install the main pole
With the base in place, slide the main vertical pole into the base receiver. Most poles have a pin or bolt that locks them into the receiver socket. On Treasure Garden models, the lower pole section also carries the rotation hub, which allows you to swing the canopy in an arc around the base. Seat the pole fully, confirm the pin is engaged, and tighten any lock bolts to the torque or snug-plus-quarter-turn spec in your manual.
Step 3: Attach the arm and hub assembly
The horizontal or angled arm that carries the canopy attaches to the main pole at a pivot bracket, usually via two or three hex bolts. This is the most structurally critical joint on the whole umbrella. Torque these bolts fully and check them again after the first week of use since new hardware tends to settle. The hub assembly (sometimes called the rotating hub or canopy hub) goes on the end of the arm. Treasure Garden's AD45SL parts checklist specifically includes the rotating hub as a named component that must be installed and secured before the canopy goes on.
Step 4: Attach the ribs and canopy
Lay the canopy flat on a clean surface and identify the rib pockets. Slide each rib into its pocket, making sure the rib tip seats fully in the pocket seam. Attach the rib base fittings to the hub according to your manual, usually by inserting a pin or snapping a clip. Do not force a rib that doesn't align smoothly; check that you have the right rib in the right pocket. Once all ribs are attached, have your helper hold the arm or canopy while you make the final hub attachment, then slowly raise the arm to the working height.
Step 5: Route the operating cord or connect the crank
If your model uses a crank, insert the crank handle into the crank socket and test it by turning two or three rotations before the canopy is fully deployed. You should feel smooth resistance. If you feel grinding or skipping, stop and check that the cord is properly routed over all pulleys before continuing. If your model uses a pull cord, route it through the guide rings along the arm and down to the cleat location per your manual's routing diagram. Galtech's exploded parts diagrams and parts catalog are particularly useful here since they show the exact pulley routing path for each model variant.
Step 6: First open test
With everything assembled and the base fully weighted, do a slow first open. Watch each rib as it deploys and listen for any clicking, scraping, or uneven resistance. The canopy should open symmetrically. If one side rises faster or a rib hangs up, stop and investigate before cranking further. A rib that is binding at the hub is often just slightly misrouted in its fitting and takes a few seconds to correct by hand.
How crank systems actually work (and how to operate them right)
Inside a crank housing on most cantilever umbrellas there is a worm gear or worm-and-wheel gearset. How to Replace a Patio Umbrella Crank Assembly, EngineerFix documents that crank assemblies sit inside a gear housing driving a cord or lead screw (often a worm gear), and common repairs include opening the housing to restring the cord or replace the crank How to Replace a Patio Umbrella Crank Assembly — EngineerFix. The crank input drives the worm, which turns a wheel that either winds a cord to raise the runner or drives a lead screw that pushes the hub mechanism. Tuuci's Ocean Master line uses what they call a self-lubricating lead screw and gearbox on some models, and their EasyDrive variant changes the gear ratio to reduce the effort needed. The internal arrangement is documented in U.S. patents on umbrella tilt and crank mechanisms, but the practical takeaway is this: the gearset has very little tolerance for shock loading. Turning the crank slowly is the single best thing you can do to extend its life.
Day-to-day crank operation tips
- Always crank at a steady, moderate pace. Fast cranking on cord-driven systems can cause the cord to jump a pulley, which requires re-routing and sometimes a cord replacement.
- If you feel the crank skip or slip backward, stop immediately. That usually means the cord has jumped a pulley or the crank housing is losing its grip on the cord end.
- Keep the crank socket clean and dry. Grit in the socket wears the handle and the housing faster than anything else.
- Never leave the crank handle inserted during a storm. A loose handle can catch wind or get dislodged.
- After operating, set the canopy to the tilt angle you want before locking anything. Adjusting the tilt while the canopy is fully open and under wind load puts stress on the tilt lock mechanism.
How pulley and cord systems work (and how to operate them right)
On a pulley-lift cantilever umbrella, a cord runs from the crank or pull handle, up through guide rings along the arm, around one or more return pulleys at the top hub, and then down to the runner (the sliding collar that pushes the ribs open). When you pull the cord, the runner rises and the ribs splay out. Galtech identifies these as their 'Manual or Pulley Lift Systems' in their product catalog and publishes specific replacement part numbers for the pulleys, hub wires, and crank handles that these systems use. The InstantShade documentation for their Cafe series illustrates the exact routing well: the cord secures at the runner with a knot or crimp stop, which is also a common failure point.
Day-to-day pulley operation tips
- Pull smoothly and steadily. Jerking the cord concentrates stress at the pulley contact points.
- When securing the cord at the cleat, wrap it in a full figure-eight and check that the cleat's horns are seated and not bent outward.
- Inspect the cord at each pulley wheel before the season starts. The cord frays most at the pulley contact points, not in the middle of the run.
- If the cord squeaks when running through a pulley, that pulley wheel is dry and about to seize. A small amount of dry PTFE lubricant on the pulley axle, applied carefully without getting any on the fabric or finish, will fix it. Do not use oil-based lubricants.
- If the cotter pin on the runner fails, the cord will unseat from the runner fitting. That's an easy repair: replace the cotter pin and re-seat the cord per your manual's routing diagram.
How gas-spring and push-button systems work (and how to operate them right)
Gas-spring or auto-lift systems use a sealed nitrogen gas cylinder, very similar to what you'd find on a car's hatch or a sit-stand desk. The spring preloads the arm so the canopy wants to rise on its own; a locking collar or pin holds it in the closed position. When you press the release (push-button, foot pedal, or a lever on the arm depending on the brand), the lock releases and the spring pushes the canopy up. Treasure Garden's AD45SL uses a foot pedal release as part of its design. The practical difference in operation from a crank system is that you are working with the stored energy in the spring rather than against gravity, so the canopy can move faster than you expect.
Day-to-day gas-spring operation tips
- Keep a hand on the canopy or arm when pressing the release. A gas spring that's in good condition will push the canopy up quickly.
- If the spring no longer holds the canopy open, the gas cylinder has lost its charge and needs to be replaced. This is a straightforward swap on most models since the cylinder attaches at two pin fittings.
- Do not lubricate the gas cylinder body. Keep it clean and dry. The seals are self-contained.
- Cold weather reduces gas-spring pressure noticeably. In early spring or late fall, you may need to help the canopy along by hand during opening.
- If the foot pedal feels gritty or stiff, clean around the pivot point with a dry brush and apply a small amount of dry lubricant to the pivot pin only.
Tilt, height, rotation and locking: dialing in your shade angle
Getting the umbrella open is only half the job. Cantilever umbrellas have several adjustment points that let you track the sun throughout the day without moving the base. Here's what each one does and how to use it correctly. For step-by-step instructions on adjusting tilt, height, and rotation, see how to adjust patio umbrella.
Tilt adjustment
Tilt lets you angle the canopy toward the sun rather than having it sit perfectly horizontal. On most cantilever models, tilt is controlled by a locking knob, a hand-tightened bolt, or a detent mechanism at the knuckle joint on the arm, just above where the arm meets the vertical pole. To adjust: loosen the tilt lock (turn counterclockwise by hand or with the appropriate hex wrench), angle the canopy to the desired position, then tighten the lock firmly before releasing the canopy. Never try to tilt the canopy while it's deflecting in wind; close it first, adjust, then reopen. Overtightening the tilt bolt on aluminum knuckle joints is a very common way to crack the casting, so snug-firm is sufficient here.
Height adjustment
Some cantilever models allow you to raise or lower the arm height relative to the main pole. This is usually done by releasing a pin or collar bolt on the main pole and sliding the arm bracket up or down to the desired height hole or channel. If you have a clearance issue (for example, the umbrella edge is too close to a table or chair), raising the arm height a few inches often solves it without repositioning the base. On telescoping-pole cantilever designs, the height adjustment is part of the pole itself: loosen the locking collar, extend or retract to the desired height, and tighten.
Rotation
Most quality cantilever umbrellas allow the canopy to rotate in an arc around the main pole, usually 180 to 360 degrees depending on the model. The rotation hub sits at the base of the arm where it meets the pole. To rotate: press or lift the rotation lock release, swing the arm to the desired position, and release the lock so it engages the next detent. Treasure Garden AG25T's rotating hub installation is specifically detailed in their assembly manual as a distinct step because the hub must be oriented correctly at installation for the detents to align properly. If your rotation feels notchy or rough, a small amount of dry lubricant at the hub detent points usually clears it up.
Locking positions and clearance troubleshooting
If your tilt or rotation lock won't hold position, check the lock bolt or pin first. On knob-type locks, the internal plastic or metal thread insert can strip with repeated use. Replacement lock knobs are a standard stock item at most umbrella parts suppliers, and Galtech's parts catalog lists them by model for their entire cantilever range. If the canopy is hitting a structure or furniture at a particular tilt or rotation angle, do not force it; adjust the base position instead or lower the arm height before selecting that angle.
Common faults, diagnosis, and repairs
Most cantilever umbrella problems fall into a short list of failure categories. Here's how to identify each one and what to do about it, starting with the simplest fix.
| Symptom | Most likely cause | First fix to try | If that fails |
|---|---|---|---|
| Crank turns but canopy doesn't move | Cord jumped a pulley or is disconnected at the runner | Open crank housing, check cord routing over all pulleys | Re-route or replace the cord |
| Crank is stiff or locked up | Grit in the worm gear or a stripped gear tooth | Flush housing with water, re-lubricate with dry PTFE | Replace the crank assembly |
| Cord frayed or broken | Age and abrasion at pulley contact points | Replace with same-diameter polyester braid cord, re-route per your manual's diagram | Use Galtech or brand-specific replacement cord kit |
| Canopy won't fully open (one side lags) | Rib not seated in hub fitting, or a single rib tip loose in the canopy pocket | Close fully, check each rib fitting by hand, reseat loose rib | Replace bent or cracked rib |
| Gas spring no longer holds canopy open | Cylinder has lost nitrogen charge | Replace gas cylinder (two-pin swap) | Source OEM cylinder by model number |
| Rotation hub is stiff or stuck | Debris in detent ring, corrosion at hub | Clean and lubricate detent points with dry lubricant | Disassemble hub, replace detent ring |
| Base tips in wind | Insufficient base weight | Add weight to reach manufacturer's minimum spec (e.g., 200 lb for Treasure Garden AG25T) | Close and store umbrella when wind is above 20 mph |
| Tilt lock won't hold position | Stripped lock knob insert | Replace lock knob with OEM or universal replacement | Repair or replace knuckle joint assembly |
Cord replacement step-by-step
Cord replacement is one of the most common repairs on pull-cord and crank-driven cantilever umbrellas, and it's very doable at home. Treasure Garden publishes specific cord replacement instructions for models like the UM810x and UM812x series that show the exact pulley routing path as a diagram. Umbrella Cord Replacement Instructions (example manual), Manuals.plus shows step‑by‑step cord replacement and pulley routing diagrams for Treasure Garden UM810x/UM812x Umbrella Cord Replacement Instructions (example manual) — Manuals.plus shows step‑by‑step cord replacement and pulley routing diagrams for Treasure Garden UM810x/UM812x.. The general process applies across most brands:
- Photograph the existing cord routing before you remove anything. Your phone camera is your best documentation tool here.
- Open the crank housing by removing the two or three screws on the housing cover. Note how the cord is anchored inside, usually with a knot behind a stopper fitting.
- Cut the old cord free and pull the full length out through the routing path, noting every pulley and guide it passes through.
- Thread the new cord (match the diameter exactly, typically 3mm to 4mm braided polyester) through the same routing path in reverse, starting from the runner end and working toward the crank housing.
- Secure the cord at the runner with a stopper knot or crimp stop as the original used. Pull snug.
- Route through all return pulleys at the top hub, confirm each pulley wheel spins freely.
- Seat the cord into the crank housing anchor point, close the housing, and test by cranking slowly through one full open-close cycle before relying on it.
Required tools and replacement parts to keep on hand
- Hex wrench set (metric 4mm, 5mm, 6mm, 8mm covers most brands)
- Replacement pull cord (3mm and 4mm braided polyester, sold by the foot at most hardware stores and from Galtech's parts catalog by model)
- Replacement crank handle (OEM or universal fit; available from Galtech's replacement parts list by part number)
- Replacement pulley wheels with axle pins (source model-specific numbers from Galtech's 2022 parts catalog or your brand's parts diagram)
- Lock knob replacement set (universal thread sizes fit most brands)
- Dry PTFE lubricant spray (not WD-40, not oil; avoid any lubricant that could migrate onto fabric or coated finishes)
- Cotter pins in assorted sizes (runner pin failures are common and a pack of stainless cotter pins solves them in minutes)
- Replacement gas cylinder if your model uses a gas-spring system (source by model number; Tuuci and Treasure Garden publish model-specific part references in their download centers)
Wind safety and securing your umbrella
The CPSC and ASTM have both put significant attention on umbrella anchoring and wind safety in recent years. ASTM F3681-24, published April 1, 2024, is the current voluntary standard covering consumer umbrella anchoring and anchor device performance. While that standard focuses primarily on beach umbrellas, the physics are the same: an unsecured or under-weighted umbrella base is a projectile in wind. For patio cantilever umbrellas, the practical rules are straightforward.
- Always meet or exceed the manufacturer's specified base weight. This is not a suggestion.
- Close the umbrella when sustained wind reaches 20 mph or gusts exceed that speed. A closed umbrella presents almost no sail area.
- If you're in a region with afternoon thunderstorms or frequent gusty conditions, consider Tuuci's 'high wind stabilizer' accessory or equivalent from your brand, which adds anchoring points from the pole to the base structure.
- Never leave a cantilever umbrella open and unattended overnight.
- On decks where you cannot add significant base weight, consider surface-mount base anchors that bolt to the decking. Verify deck joist location and fastener load ratings before installing.
Seasonal storage and winterizing
Getting the winterizing right saves you a repair job in spring. Treasure Garden's AD45SL manual specifically recommends two-person removal from the base for winter storage, which tells you the process of removing and storing a cantilever umbrella is as involved as installing it.
- Close the canopy fully and tie it closed with the velcro wraps or a canopy strap. A loosely closed canopy can fill with wind and damage the ribs in storage.
- With a helper, detach the canopy and arm assembly from the main pole and lay it on a flat surface.
- Clean the canopy fabric with mild soap and water, rinse thoroughly, and allow it to dry completely before storing. Storing damp fabric causes mildew and degraded UV coating.
- Inspect all hub fittings, rib tips, and cord runs before storage. Repair or replace anything damaged so it's ready to use when you take it back out.
- Lubricate the crank housing, rotation hub detents, and pivot bolts lightly with dry PTFE before storing. This prevents corrosion during the off-season.
- Store the canopy and arm assembly horizontally in a dry, covered space. Leaning a long arm vertically puts a bending load on the arm section over months.
- Store the base weights in place or in a position where they won't trap water that can freeze and crack the housing.
- Cover the main pole stub with a pole cap or bag to keep out insects and moisture.
Brand-specific reference notes
Different brands have different documentation quality and parts availability. Here's a quick reference for the brands I encounter most often.
| Brand | Where to find manuals | Parts availability | Notable model notes |
|---|---|---|---|
| Treasure Garden | Treasure Garden website download center by model number (e.g., AG25T, AD45SL) | Good; OEM parts available through authorized dealers | AG25T requires 200 lb minimum base; rotating hub installation is model-specific. Two-person assembly specified. |
| Tropitone | Tropitone product page and assembly instruction PDFs | Good; hardware list (hex screws, washers, crank handles) in assembly PDF | Base weight example: 429 lb across four removable sections. 'Assemble at place of use' is a hard requirement. |
| Galtech | Galtech 2022 Replacement Parts List PDF and 2025 Weights & Dimensions catalog | Excellent; searchable exploded diagrams with part numbers for pulleys, hub wires, cranks | Publishes explicit part numbers for both pulley-lift and crank variants. Best parts documentation in the category. |
| Tuuci | Tuuci Ocean Master download center (model-specific PDFs: Classic Cantilever, EasyDrive, Auto-Lift Assist) | Good; model-specific manuals and high wind stabilizer accessory documented | EasyDrive uses a different gear ratio than standard crank. High wind stabilizer is an add-on accessory. |
| Sunjoy | Manualzz and Sunjoy distributor sites; search by model number | Variable; base is sold separately, assembly and safety PDFs available | Explicit warnings against use in high wind. Confirm base compatibility before purchase. |
Repair vs. replace: when it's worth fixing and when it isn't
I always lean toward repair over replacement on quality cantilever umbrellas because the base and pole are usually the most expensive parts, and they almost never fail. What fails is the cord, a pulley, a lock knob, or the crank housing. All of those parts cost between $5 and $40 and take under an hour to replace. Where replacement starts to make sense is when the main arm has a structural crack at the knuckle joint casting, when multiple ribs are bent, when the canopy fabric is badly degraded with UV damage or multiple tears, or when the gas-spring cylinder is discontinued and no compatible replacement is available. In those cases, the repair cost approaches the cost of a new canopy and arm, and a new unit with a fresh warranty is the better value.
If you're unsure whether a specific fault is repairable, the fastest diagnostic route is to pull up your brand's exploded parts diagram (Galtech's is the most accessible; Treasure Garden's and Tuuci's are available through their download centers) and identify the failed part by number. If that part is in stock at a reasonable price, fix it. If it's discontinued or costs more than half the price of a comparable new umbrella, replace it.
FAQ
What is the single most important thing to include so the DIY guide is usable for readers with different cantilever umbrella designs?
Model‑specific details and clear mechanism identification. For each umbrella covered, the guide must first identify the lift/operation type (crank/worm gear, pulley/cable, gas‑spring/push‑button, EasyDrive/gearbox), the mounting style (ground inset, deck mount, wall mount, weighted free‑standing), and the orientation (left/right‑handed crank, hub rotation method). This lets readers match instructions, parts and diagnostics to their exact model or family before following steps.
What step‑by‑step opening/closing (quick‑start) instructions should be provided for common mechanisms?
Provide short, tested sequences for each mechanism: - Crank/worm gear: confirm base locked, remove canopy strap, unwind any safety latch, attach crank, turn slowly clockwise to open (count revolutions if helpful), stop if resistance or skipping occurs, secure canopy strap when closed. - Pulley/cable (runner & rope): check rope routing and pulleys, release runner safety catch, pull/operate winch or hand crank slowly until runner locks at top; to close, release runner catch and lower slowly. - Gas‑spring/push‑button: press and hold the push‑button or trigger, slowly raise/lower the canopy until gas spring engages; never force beyond stops. Include recommended handedness, two‑person cautions, and a note to stop immediately on unusual noise or binding.
What full assembly and mounting steps are required for cantilever (offset) umbrellas?
Cover preassembly checks, tools, and a sequenced assembly: 1) Inventory parts against a model parts list (mast sections, arm/boom, hub, ribs, canopy, crank/gearbox, base plate/adapter, fasteners, pulleys). 2) Prepare mounting location—verify concrete pad or deck reinforcement and confirm base weight requirements per model (include examples: Treasure Garden AG25T min. 200 lb; Tropitone examples of heavy removable weights). 3) Assemble canopy to rib hub and runner per manufacturer diagrams, attach ribs and lower hub, install upper hub/finial. 4) Fit boom/arm to mast and install rotation hub/locking pin; install crank/gearbox or pulley winch. 5) Mount umbrella to base plate (secure bolts, torque per manual) or insert into weighted base; use two people to lift into place. 6) Test rotation locks, tilt and crank operation slowly, and apply final torque to hardware. Note use of model exploded diagrams and two‑person safety at all lifting steps.
What adjustment tips should the guide include (tilt, height, rotation)?
Provide practical adjustment steps and cautions: - Tilt: identify tilt mechanism (push‑button, ratchet, hub bracket); always support canopy when releasing tilt; make small incremental adjustments and re‑lock. - Height: for multi‑section masts, loosen clamps/bolts, raise/lower with two people, retighten to specified torque; avoid overextension beyond marked limits. - Rotation: check locking detent/pin engagement before rotating; unlock rotation hub, rotate slowly with two people to avoid shifting base, re‑engage lock. Emphasize avoiding abrupt movements, keeping hands clear of ribs, and re‑checking hardware after adjustments.
What are the common faults and diagnostic steps readers need for cantilever umbrellas?
List faults with clear diagnostics and likely causes: - Stuck crank/gearbox: symptoms—no movement, grinding; diagnostics—remove crank, inspect housing for debris, check for stripped worm teeth; cause—worn gearbox or seized bearings. - Broken/frayed cable or rope: symptoms—slipping, uneven opening; diagnostics—inspect pulleys for chafing, look for frayed sections at guides; cause—wear at pulley edges or UV degradation. - Seized hub or frozen rotation: symptoms—can't rotate or tilt; diagnostics—inspect lock pin, corrosion at bearings, missing lubrication. - Bent ribs or canopy deformation: symptoms—uneven canopy; diagnostics—visual rib bends, cracked rib sockets. - Loose base or tipping: symptoms—instability or wobble; diagnostics—check base weight, bolt tightness, anchor hardware. For each, provide stepwise tests (visual inspection, feel for free play, spin or resistance checks) and severity grading (repairable at home vs. professional).
What DIY repair actions and replacement parts should be described for each common fault?
Map faults to repairs and parts: - Stuck crank: remove housing, clean and lubricate bearings, inspect worm gear; replace crank housing/gearbox assembly if teeth stripped. Parts: crank handle, gearbox, worm wheel. - Broken cable/rope: remove canopy tension, re‑route new cord per pulley diagram, secure with knots or crimp stops, replace worn pulleys. Parts: replacement rope/cord, pulleys, crimps, cotter pins. - Seized hub/rotation: disassemble rotation hub, clean corrosion, apply marine grease to bearing surfaces, replace worn hub bearings or lock pins. Parts: hub bearings, lock pin, retaining clips. - Bent ribs: straighten minor bends with careful heat and backing support or replace rib and end fittings; check rib sockets for cracking. Parts: replacement ribs, rib sockets, end caps. - Loose base/anchor: tighten anchor bolts, replace anchor hardware, add recommended ballast (manufacturer weight spec) or install permanent in‑ground mount. Parts: anchor bolts, base adapter plates, ballast weights. Always show exploded diagrams and model part numbers (use Galtech/Treasure Garden/Tropitone examples) and include torque/tightening specs when available.
Next Articles
How to Open Offset Patio Umbrella: Step-by-Step Guide
How to open offset patio umbrella: step-by-step crank, pulley & tilt, plus assembly, troubleshooting, safety, storage.
How to Operate a Patio Umbrella Step by Step
Step-by-step how to operate a patio umbrella, open close adjust tilt and troubleshoot jams, plus wind safety and mainten
How to Adjust a Patio Umbrella: Height, Tilt, Crank, More
Step-by-step how to adjust patio umbrella height, tilt, rotation, crank and cord, fix locking and wobble, then maintain.