
Most patio umbrella arm and rib failures are fixable at home in under two hours for under $20 in parts. Whether you're dealing with a single drooping rib, a cracked fiberglass arm, or an umbrella that won't open because a hub pin snapped, the repair path almost always follows the same sequence: diagnose the exact failure point, source a matching part or splice material, remove the canopy, and work on the bare frame. This guide walks you through every step, from the first symptom to the finished repair. For a focused, step-by-step walkthrough on how to repair broken patio umbrella ribs, including photos and part lists, consult the dedicated repair broken patio umbrella rib guide.
Fix Patio Umbrella Arm: Step-by-Step Repairs, Parts & Costs

Luca Morrison
24 Jul 2026
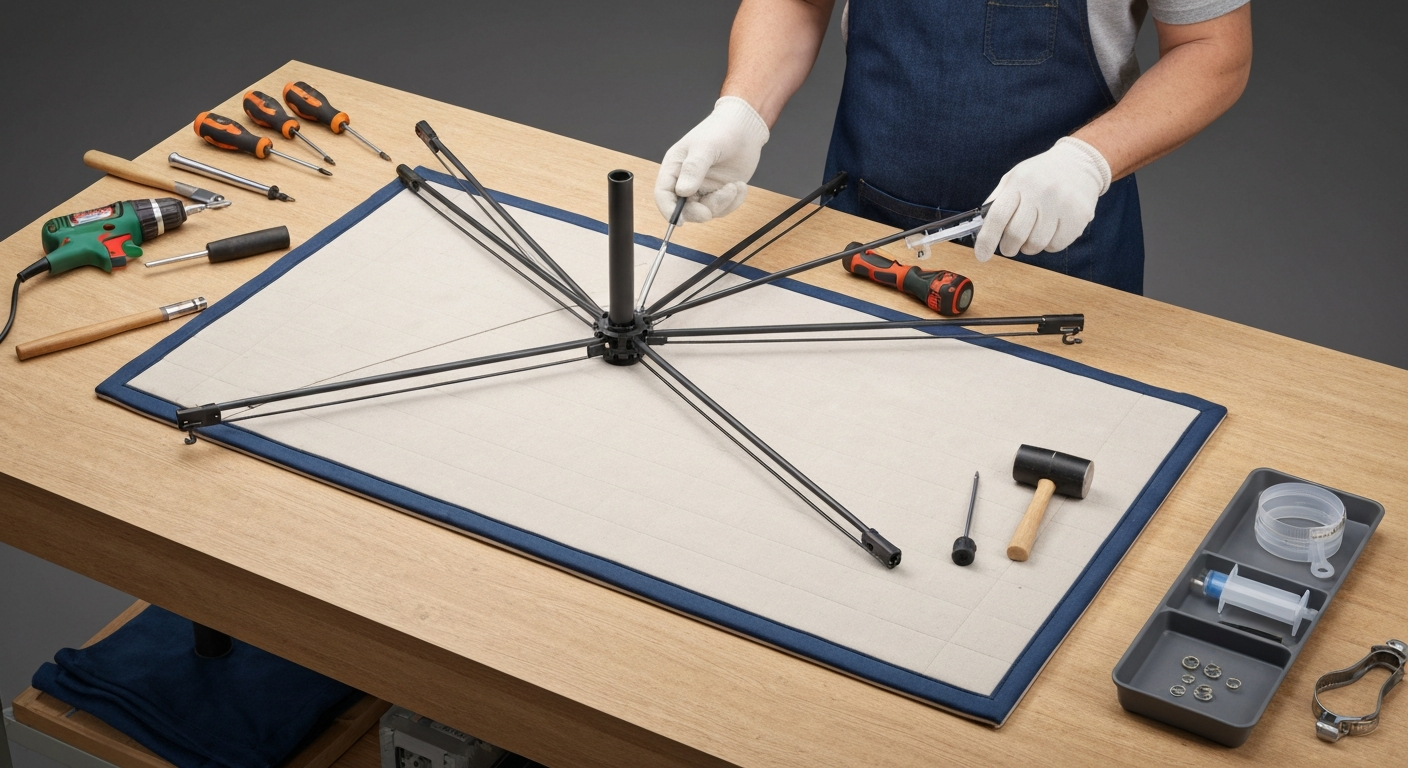
What this guide covers and who it's for
This is a hands-on repair guide for homeowners who want to fix a bent, cracked, broken, or detached patio umbrella arm or rib themselves rather than tossing the whole umbrella. For step-by-step instructions to fix bent patio umbrella parts, refer to the detailed repair procedure in this guide under the rib-straightening and splinting sections. I'll cover diagnosis, tools, step-by-step repair methods, time and cost estimates, and when a repair just isn't worth the effort. If you've found a similar-looking guide on repairing a bent pole or a stuck crank, many of the disassembly steps overlap, so some of what you read here will feel familiar. The techniques here apply to the most common residential umbrella styles: center-pole market umbrellas, offset/cantilever models, and tilting patio styles.
You do not need professional tools or prior repair experience to get through most of these fixes. If you can use a screwdriver, a drill, and a pair of pliers, you can handle the majority of rib and arm repairs covered here. The only jobs I'd call genuinely difficult are welding cracked steel ribs (usually not worth it) and replacing a hub/runner assembly on a cantilever with a proprietary drive mechanism. Everything else is well within DIY range.
Quick troubleshooting checklist
Before you pull out any tools, spend two minutes matching your symptom to the likely cause below. Diagnosis: canopy sag with a single non‑symmetrical droop commonly indicates a bent or detached rib; asymmetric opening or irregular runner travel often points to a broken rib, detached rib pin, or misrouted cable; grinding or clicking while cranking usually signals stripped gear teeth, a broken pawl, or a sheared cable, and visible frayed cable or a free‑spinning crank indicates cable failure needing replacement Diagnosis: canopy sag with single non‑symmetrical sag commonly indicates a bent or detached rib. Getting this right upfront saves you from dismantling the wrong part of the umbrella. Open the umbrella fully and look at it from several angles, then run through the table.
| Symptom | Likely cause | Repair path |
|---|---|---|
| One section of canopy sags asymmetrically | Single bent or partially detached rib | Straighten rib (metal) or splint/replace (fiberglass) |
| Canopy droops on one side and won't open fully | Broken rib, fractured at root or mid-span | Full rib replacement or internal sleeve splice |
| Umbrella opens unevenly; runner travels crooked | Broken rib pin, detached rib arm, or cable misrouting | Reattach/replace rib pin or re-route cable |
| Crank spins freely with no canopy movement | Stripped gear teeth, broken drive cable, or sheared crank pin | Replace crank gearbox or cable (separate crank guide) |
| Grinding or clicking when cranking | Broken pawl, debris in gearbox, or cracked crank housing | Inspect gearbox; clear debris or replace assembly |
| Tilt hub slips or collapses unexpectedly | Broken tilt pin, worn push-button detent, or cracked hub collar | Replace tilt pin/collar; inspect hub for cracks |
| Visible crack or split along a rib | Impact or overload, often wind-related | Epoxy + external splice clamp or full replacement |
| Rib detached from hub; connector hardware missing | Corroded or sheared rivet/pin at hub socket | Replace rivet or pin; reseat rib into hub socket |
If your symptom points to the crank or tilt mechanism rather than a rib itself, the rib-repair steps in this guide still apply for disassembly, but you'll want to consult a dedicated tilt or crank repair guide once you've isolated the hub as the source. Those mechanisms have their own failure families: pulley-and-cable systems fail when the cord frays or snaps, ratchet/winch systems strip their drive teeth or shear their pawl, and push-button tilt collars fail when the spring or detent pin wears out.
Tools, materials, and replacement parts you'll need
The exact shopping list depends on the repair type, so I've broken it into three groups. Pick the column that matches your diagnosis before you head to the hardware store.
| Repair type | Tools required | Materials/parts required |
|---|---|---|
| Straightening a bent metal rib | Padded bench vise or two padded blocks, rubber mallet, heat gun (optional), measuring tape, marker | None beyond the existing rib; possibly thin steel shim stock if rib is kinked |
| Internal sleeve splice (hollow metal rib) | Drill, drill bits sized to rivet diameter, pop-rivet tool, measuring tape, file or deburring tool | Aluminum or steel rod/tube sleeve (matching OD to rib ID), 3/16" or 1/4" aluminum pop rivets, metal-grade epoxy (e.g., J-B Weld) |
| External splice for cracked fiberglass rib | Fine-grit sandpaper (120–220), mixing sticks, disposable gloves, hose-clamp screwdriver or nut driver | Structural epoxy (West System 105+206, 3M DP420, or J-B Weld), fiberglass cloth or thin fiberglass rod sleeve, stainless hose clamps (sized to rib OD) or pipe-repair clamp |
| Full rib replacement | Screwdriver, pliers, pop-rivet tool, wire cutters, thin wire or cord (for rethreading retaining wire) | Replacement rib (matched by diameter, length, material, and tip connector type), retaining wire or cord, pop rivets |
| Hub pin / tilt collar repair | Small punch or pin tool, hammer, needle-nose pliers | Replacement pivot pin (match diameter and length to original), split ring or cotter pin, threadlocker (optional) |
On pop rivets specifically: size matters more than most people think. For a splice connecting an aluminum sleeve inside a rib wall, a 3/16-inch aluminum pop rivet is the standard starting point. If you're joining steel or a heavier tube, move up to a steel rivet at the same diameter. Rivet manufacturer spec charts list minimum shear strengths by diameter and material, so if you're unsure, cross-check the rivet specs against the load you're asking it to carry. POP® RIVETS, rivet size/strength charts (manufacturer reference) lists minimum shear strengths by diameter and material, which is useful for selecting an appropriate rivet size for an internal sleeve splice POP® RIVETS — rivet size/strength charts (manufacturer reference). For most umbrella rib repairs, a 3/16-inch aluminum rivet with a published shear strength in the 220–250 lb range is more than adequate.
Safety precautions and workspace setup
Patio umbrella frames seem harmless until you're working on one. Broken fiberglass ribs splinter like glass, snapped metal ribs have sharp edges, and a partially open umbrella frame can close under spring tension and catch your fingers. Work with these basics in place and you'll avoid the most common injuries.
- Wear cut-resistant gloves when handling broken fiberglass ribs. Fiberglass splinters are nearly invisible and extremely irritating in skin.
- Wear safety glasses any time you are drilling, filing, sanding fiberglass, or driving pop rivets. Small shards travel fast.
- Work on a flat, stable surface. Lay the umbrella flat on a picnic table, workbench, or clean concrete. Do not prop it at an angle and try to work on it.
- Close and secure the canopy before disassembly. An unexpectedly opening frame is dangerous. Fold the canopy fully and tie it loosely with a fabric strip.
- If you use a heat gun to soften a bent metal rib, use the low setting (around 200°F / 93°C) and never hold it on one spot. Keep it away from canopy fabric even if the fabric is removed.
- When working with two-part epoxies, work in a ventilated space. Epoxy fumes, particularly from faster-cure formulations, are irritating to mucous membranes.
- Keep epoxy off skin. Nitrile gloves are sufficient for most consumer-grade products.
- Before starting any repair, remove the umbrella from its base and lay it on your work surface. Never try to repair a rib while the umbrella is standing upright in a base.
Umbrella anatomy: understanding the parts before you start
Spend a minute learning the part names. Manufacturer parts diagrams label these consistently, and knowing the correct terms will save you a lot of confusion when searching for replacement parts online or calling a supplier.
- Finial: the decorative cap at the very top of the umbrella, above the top hub. It usually unscrews or pulls off and must come off first during disassembly.
- Top hub (upper hub or crown): the metal or plastic collar at the top of the pole where all the main ribs (arms) originate. Ribs pivot on pins or bolts at this hub.
- Ribs (arms): the radial spokes that support the canopy. Main ribs run from the top hub to the canopy edge. Stretchers (sometimes called lower ribs or support ribs) connect the runner to the mid-span of each main rib.
- Runner (lower hub or slider): the sliding collar on the pole that moves up and down when you crank or pull the cord. Stretchers attach here. When you open the umbrella, the runner travels up and pushes the stretchers outward, which in turn push the ribs open.
- Tilt mechanism: a collar, pin, or lever somewhere on the pole (usually just above the base collar) that allows the whole canopy to tilt off-vertical.
- Crank housing: the gearbox assembly, typically near the bottom of the pole, that drives a cable or cord upward to raise the runner.
- Pole: the center shaft. May be single-piece or multi-section.
- Base collar / lower collar: the fitting at the bottom of the pole that keeps the pole seated in the base.
If you have an offset or cantilever umbrella, the geometry is different (the pole is side-mounted and the hub is at the end of a cantilevered arm), but the rib terminology is identical. The main ribs still connect to a central hub; stretchers still connect to a runner. The disassembly and repair steps apply the same way.
When you're diagnosing a failure, a manufacturer parts diagram is the most useful reference you can have. Most umbrella brands publish a PDF parts diagram for each model. Look up your model number on the brand website (Galtech, California Umbrella, Treasure Garden, SunGarden, and others all maintain parts pages) and download the diagram. Print it out and use it as a physical reference while you work. Mark the failed part directly on the diagram so you can order by part number.
Preparing the umbrella: removing the canopy and disassembling safely
Every rib and arm repair starts the same way: canopy off, frame laid flat, disassembled only as far as needed. For a step-by-step walkthrough on how to fix patio umbrella arm, consult the detailed repair guide. Follow this sequence every time and you won't accidentally damage a part you didn't need to touch.
- Close the umbrella fully. Crank or push it all the way closed so all ribs are pointing down and the canopy is bunched around the pole.
- Remove the umbrella from its base. Lift or unscrew it and lay it horizontally on your work surface.
- Unscrew or pull off the finial at the very top. On most models this just unscrews counterclockwise. Set it aside safely; it's easy to lose.
- Loosen and remove the canopy attachment. Depending on your design, the canopy attaches via: hook-and-loop straps around each rib, a fabric sleeve that slides along each rib, ties at each rib tip, or a cord threaded through canopy hem grommets. Work your way around all ribs and detach each connection point before trying to lift the canopy off.
- Slide the canopy off the pole. With all attachments released, the canopy should slide down and off the pole. Set it aside on a clean surface.
- Identify the retaining wire or cord (if present). On market-umbrella styles, a thin wire or cord threads through the rib tips (crowns) at the canopy edge. You will need to unthread this wire if you are replacing a rib. Use wire cutters or needle-nose pliers carefully; note how it routes before removing it.
- Lay the bare frame flat. Open it partially (about halfway) so the ribs are accessible. Place it on a padded surface to avoid scratching.
- Access the specific failed rib. For a rib that attaches to the top hub with a pivot pin or rivet, use a small punch and hammer to drive out the pin if you need to fully remove the rib. Many pins are retained by a tiny cotter pin or split ring: remove that first with needle-nose pliers.
A note on the top hub ring: on some umbrellas the top hub is held together by a threaded ring or collar that screws over the hub body and locks all the rib pins in place. Unscrew this ring (usually counterclockwise) to release the ribs. Keep track of the order in which ribs sit in the hub slots, because they may not all be interchangeable if your umbrella has a mix of main ribs and connector tabs.
Reinstalling the canopy reverses this sequence: seat all ribs in the hub, replace the hub ring, rethread the retaining wire through the rib tips, attach the canopy connections starting from the top and working outward on each rib, then fit the finial back on. Before you put the umbrella back in the base, open it once and check that all ribs track evenly and the canopy lies flat without puckering at the repaired rib.
How to straighten a bent metal rib
Metal ribs, whether aluminum or steel, can often be straightened if the bend is less than about 30 degrees and there is no cracking or kinking at the bend point. If the metal is visibly kinked (a sharp-angle collapse rather than a gradual curve), the internal grain structure is already damaged and the rib will re-bend at the same spot under normal load. In that case, move straight to splinting or replacement. For a smooth, gradual curve, here's the straightening process.
- Remove the rib from the umbrella following the disassembly steps above. Do not try to straighten a rib while it is still attached to the hub; you'll introduce stress at the pivot point.
- Mark the bend. Use a marker to draw a line across the rib at the apex of the bend. This is your reference point.
- Set up a padded vise or two padded blocks. Clamp foam or a folded towel over the vise jaws to avoid crushing the rib wall. For aluminum ribs, this matters a lot because the wall is thin.
- Optional: apply gentle heat. For steel ribs, a heat gun on low (around 200–250°F / 95–120°C) applied for 60–90 seconds at the bend point makes the metal slightly more pliable and reduces the chance of cracking. Do not use a torch; excessive heat warps aluminum and removes temper from steel. Aluminum ribs usually do not benefit from heat and can weaken if overheated, so skip this step for aluminum.
- Secure the rib in the vise with the bend point just above the jaws and the bent section pointing up and toward you.
- Apply slow, steady pressure with your hands, bending the rib back toward straight. Go slowly. Check alignment frequently by sighting down the length of the rib.
- Use a rubber mallet for finer corrections once the rib is close to straight. Tap gently on the high side of any remaining curve while the rib rests on a flat surface.
- Check with a straightedge. Lay the rib on a flat surface and roll it slowly. Any remaining bow will be obvious. A rib that is within 2–3 mm of straight over its full length will perform adequately.
- Inspect the straightened area for cracks or surface crazing. Run your finger along the outside of the bend. Any crack, however small, means the rib is compromised and should be splinted or replaced.
- Reinstall the rib and test the umbrella before reattaching the canopy.
One honest gotcha: aluminum ribs that have been bent by wind will often have microscopic fatigue damage even if they look fine after straightening. If the same rib bends again under normal conditions within one season, don't straighten it again. Replace it. Repeated cold bending cycles progressively weaken metal, and a rib that fails mid-season can damage the canopy and surrounding ribs when it goes.
Time estimate for straightening a single rib: 20 to 40 minutes. Cost: zero, assuming you already have a vise or two blocks. If the rib needs replacement instead, typical aluminum replacement ribs for common umbrella sizes (9-foot through 11-foot) run $8 to $25 per rib from parts suppliers, depending on material and tip connector type.
Repairing cracked or split ribs: splinting, epoxy, and fastener techniques
A rib with a visible crack or split needs more than straightening. For a step-by-step walkthrough to fix patio umbrella rib damage, see the detailed guide to fix patio umbrella rib. The goal of a splint repair is to restore the column strength of the rib so it can support the canopy without flexing at the damaged point. You have two main approaches depending on whether the rib is hollow metal or solid/hollow fiberglass.
Internal sleeve splice for hollow metal ribs
This is the most reliable repair for a cracked or partially broken hollow aluminum or steel rib. You insert a metal rod or tube inside the hollow rib, bridging the crack, and lock it in place with epoxy and rivets.
- Measure the inner diameter (ID) of the hollow rib with a caliper or a set of drill bits used as gauges. You need a sleeve that slides inside with minimal play.
- Cut a length of aluminum or steel rod/tube to span at least 3 inches on each side of the crack, so the sleeve bridges the damaged zone by at least 6 inches total.
- Mix a small batch of J-B Weld or equivalent metal-grade epoxy. J-B Weld Original sets in 4 to 6 hours and reaches full cure in 15 to 24 hours at room temperature; its published tensile strength is approximately 5,000 to 6,200 psi, which is more than adequate for this type of repair.
- Coat the outside of the sleeve tube with epoxy and slide it carefully into the rib, positioning it so the splice is centered over the crack.
- Clamp the rib closed around the crack if there is a gap. Use a hose clamp sized to the rib's outer diameter (OD) tightened over the crack while the epoxy cures.
- Once the epoxy has reached its initial set (follow the product's instructions), drill two rivet holes through the rib wall and sleeve on each side of the crack, 4 holes total.
- Drive 3/16-inch aluminum pop rivets through each hole to mechanically lock the sleeve in place. For steel ribs, use steel rivets.
- Allow full cure before reassembling the umbrella and loading the rib. For J-B Weld, that means waiting the full 15 to 24 hours.
External splice for cracked fiberglass ribs
Fiberglass ribs crack and splinter under overload rather than bending permanently, which is actually helpful for repairs because the pieces usually stay aligned. The repair uses an external fiberglass sleeve (or wrapped fiberglass cloth) bonded with structural epoxy and secured with stainless hose clamps.
- Clean the cracked area thoroughly. Remove any loose splinters carefully (wear gloves and glasses). Sand the rib surface for 2 inches on each side of the crack with 120-grit sandpaper until you see a dull, scuffed surface. Epoxy bonds to sanded fiberglass; it will not bond well to a smooth, factory-finish surface.
- Wipe the sanded area with isopropyl alcohol and let it dry completely before applying any adhesive.
- Choose your epoxy. For fiberglass-to-fiberglass or fiberglass-to-composite repairs, West System 105 resin with 206 Slow Hardener is the professional standard. It has a working time of roughly 90 to 110 minutes at 68°F (20°C) and cures to a handleable solid in about 10 to 15 hours. For a quick homeowner repair, J-B Weld or 3M Scotch-Weld DP420 also work well; DP420 offers higher toughness and peel resistance if you can source it.
- Apply a thin coat of mixed epoxy over the sanded area, working it into any cracks.
- If you have a fiberglass cloth strip (available from marine supply stores), wet it out with epoxy and wrap it tightly around the cracked zone, overlapping at least 1.5 inches on each side of the crack. If you are using a fiberglass rod sleeve instead, coat the inside of the sleeve with epoxy and slide it over the rib centered on the crack.
- Before the epoxy gels, position two stainless hose clamps over the repair: one on each side of the crack, centered about 1 inch outboard of the crack edges. Tighten them firmly but not so hard that they cut into the cloth or sleeve.
- Let the repair cure fully per the epoxy manufacturer's instructions. Do not flex or load the rib during this period.
- After cure, inspect the repair. The hose clamps can stay in place permanently; they add a small amount of ongoing compression and act as a visual indicator if the repair begins to separate.
When fasteners help and when they harm
Pop rivets and hose clamps are good at one thing: holding a spliced repair together mechanically so that if the epoxy ever fails, the pieces do not separate catastrophically. They are a backup, not the primary repair. A common mistake is relying on fasteners alone without epoxy, especially on fiberglass. Rivets through a fiberglass rib without adhesive create stress concentrations right at the rivet hole, and the fiberglass will crack from those holes outward under cycling loads. Always use epoxy as the primary bond and fasteners as the secondary mechanical lock.
The other situation where fasteners can harm the repair is when a rib is already heavily cracked and multiple rivets are drilled through the cracked zone. Each hole removes material in a part that already has reduced cross-section. In that case, the only sensible option is full replacement. If a rib is fractured cleanly near the root (within 2 to 3 inches of the hub connection), or is cracked at multiple points along its length, replacement is almost always faster and cheaper than trying to splice it.
Repair cost and time estimates at a glance
| Repair | Estimated time | Estimated materials cost | Difficulty |
|---|---|---|---|
| Straighten a bent metal rib | 20–40 min | $0 (tools only) | Easy |
| Internal sleeve splice (metal rib) | 45–90 min + cure time | $5–$15 (sleeve, epoxy, rivets) | Moderate |
| External fiberglass splice | 45–90 min + cure time | $10–$30 (epoxy, cloth, clamps) | Moderate |
| Full rib replacement (single rib) | 30–60 min | $8–$25 per rib | Easy–Moderate |
| Hub pivot pin replacement | 20–30 min | $2–$8 (pin, cotter pin) | Easy |
| Crank cable/gearbox replacement | 45–90 min | $15–$40 (cable or gearbox) | Moderate–Hard |
Sourcing replacement parts: brands and where to look
The single most common frustration with patio umbrella repair is finding the right replacement rib. Umbrellas are not standardized across brands; rib lengths, diameters, tip connector styles, and hub socket profiles all vary. Here's how to narrow it down efficiently.
- Find the model number. It is usually printed on a label on the pole (sometimes inside the lower collar) or in the assembly manual. Without the model number, you are guessing.
- Go directly to the brand's parts page. Galtech, California Umbrella, Treasure Garden, Frankford Umbrellas, SunGarden, and Abba Patio all sell replacement ribs by model number. Search '[brand name] replacement parts' and look for a dedicated parts section, not just a general contact page.
- Measure before ordering. Measure the rib's total length from hub-pin center to tip, its outer diameter, and the style of the tip (flat tab, round eyelet, or slotted plate). These three numbers will match or eliminate most available options.
- Use part-number cross-reference. If your brand is obscure or out of business, search for the rib by diameter and length on generic umbrella parts suppliers like Patio Parts Plus or Cabana Coast. Fiberglass rib diameters commonly used in residential umbrellas run from approximately 2.8 mm to 5.0 mm, with 3.2 mm and 4.0 mm being the most common sizes in 9-foot and 11-foot umbrellas.
- For steel or aluminum ribs, check if the rib is a standard extruded profile. Many aluminum umbrella ribs are made from standard aluminum extrusion profiles that can be sourced from metal suppliers and cut to length if the brand no longer stocks parts.
- For market-style umbrellas with a retaining wire, buy a length of replacement wire or cord at the same time as the rib. The original wire often needs replacing after disassembly.
What causes arm and rib failures (and how to prevent them)
Understanding why ribs fail is the most effective preventive maintenance tool you have. The majority of rib failures I see fall into three categories: wind damage, corrosion-accelerated fatigue, and misuse during opening and closing.
Wind damage is by far the most common cause. An open umbrella in sustained wind above about 25 mph is under significant aerodynamic load, and a gust at 35–40 mph can snap a fiberglass rib outright or permanently deform an aluminum one. The fix is behavioral: close and secure the umbrella whenever wind picks up. If you leave your umbrella open regularly in breezy conditions, invest in a weighted base that meets or exceeds the manufacturer's recommended weight (most 9-foot umbrellas need at least 50 lbs of base weight, and 75–100 lbs is better for windy sites). You can also find guides on securing umbrellas against wind if this is an ongoing problem at your location.
Corrosion is a slower killer. Steel ribs, even galvanized ones, eventually rust at the hub socket and pivot pin connections. Rust converts steel to oxide, which is brittle. A rib that looks structurally sound from the outside can have a badly corroded pivot pin that snaps without warning when the umbrella opens. At the start of each season, remove the canopy, inspect all pivot pins and hub sockets for rust, and treat any rust with a penetrating oil or rust converter. Replace corroded pivot pins before they fail.
Misuse during operation is the third cause. Forcing a crank on an umbrella that is jammed, cranking past the full-open stop, or trying to tilt an umbrella that is fully open puts extreme stress on the hub assembly and on the rib roots. If your crank feels stiff, stop and diagnose the resistance before forcing it. A related issue: never leave an umbrella in a partially open position under load. The ribs are designed to carry load in the fully open position; partially opened, the geometry is wrong and rib stress increases.
Temporary fixes when you need the umbrella working today
Sometimes you need the umbrella functional for a weekend gathering and you don't have time for a proper repair. These temporary approaches will get you through, but plan to do the real repair before the next wind event. If you need more detailed, model-specific instructions or parts tips for a broken patio umbrella, consult a dedicated repair resource covering those topics.
- Hose clamp wrap on a cracked rib: fit a stainless hose clamp over the cracked zone and tighten firmly. This won't restore full strength but will hold a crack together well enough for light use in calm conditions. Cost: under $3.
- Zip-tie bundle on a bent rib: if a rib has a gentle bend, running three or four heavy-duty zip ties tightly along the underside of the rib acts as a rough external brace. This is genuinely temporary and will fail in wind; use it only in still conditions.
- Tape the rib out of service: fold the failed rib up against the pole and tape it there with heavy-duty outdoor tape. Open the umbrella with one fewer rib. The canopy will sag in that section but the umbrella will otherwise function. This is a useful stopgap if a rib has snapped and you're waiting on a replacement part.
- For a detached rib that has popped out of its hub socket: reseat it and wrap the hub junction with self-amalgamating (self-fusing) silicone tape until you can replace the pivot pin. Self-amalgamating tape bonds to itself and will hold the rib in place under moderate load.
When to replace rather than repair
DIY repair makes sense when the damage is isolated to one or two ribs and the rest of the frame is sound. It stops making sense in a few specific situations. If more than three ribs are damaged, the frame has likely been overloaded beyond what makes repair cost-effective. If the pole itself is bent or the hub is cracked or fractured (not just a loose pin), no amount of rib repair will produce a safe, functional umbrella. If the umbrella is more than 8 to 10 years old and shows widespread corrosion at multiple joints, replacement parts alone won't address the systemic weakening of the entire frame.
A useful cost rule: if the parts and your labor time (valued honestly) add up to more than 50 to 60 percent of a comparable new umbrella's price, replacement is the better financial decision. At that point you're investing significant resources in an old frame with other aging components that will continue to fail. A new umbrella with a warranty is often the smarter long-term choice.
After the repair: seasonal storage and long-term care
The best way to avoid doing this repair again next summer is to store and maintain the umbrella properly. At the end of the season, close the umbrella, remove it from the base, and store it horizontally in a dry, covered space. If you store it vertically outdoors, moisture collects in the hub sockets and accelerates corrosion at the pivot points. At the start of each season, lubricate all pivot pins and the crank mechanism with a light silicone spray or marine-grade grease, and inspect every rib from hub to tip for cracks, corrosion, and deformation. Catching a bent rib early, before it becomes a broken rib, is always the easiest and cheapest repair of all.
FAQ
How do I quickly diagnose whether the problem is a bent rib, broken rib, detached arm, or a hub/tilt/crank failure?
Start with a visual and functional check: (1) Remove the canopy finial and look down the ribs—a visible kink, permanent bend or misaligned rib indicates a bent rib; a clean break, splintering (fiberglass) or missing section indicates a broken rib. (2) If the canopy sags only at one side or the runner binds asymmetrically, suspect a detached rib root, shear pin failure, or broken stretcher. (3) If the umbrella won’t stay open, cranks freely, or grinds when cranking, inspect the crank gearbox/cable for stripped teeth, frayed or broken cable, or a sheared pawl. (4) Check tilt/push-pin areas for broken pins or cracked collars if the canopy tilts unexpectedly. Use the symptom mapping: single-side sag → rib/attachment; asymmetric runner travel → rib/cable routing; free-spinning crank/grinding → gearbox/cable.
What tools and materials should I have on hand before attempting DIY rib/arm repairs?
Basic tool list: adjustable wrench, small socket set, flat/Phillips screwdrivers, long‑nose pliers, needle files, hacksaw or tubing cutter (for metal sleeves), metal drill and pop‑rivet gun, hose clamps (stainless), stainless machine screws/bolts and nylon lock nuts, hex rods (steel/aluminum) for internal sleeves, pop rivets, sandpaper and solvent (isopropyl) for prep. Adhesives: structural epoxy (3M DP420 or J‑B Weld) and, for FRP, a marine epoxy system (West System) plus fiberglass cloth if laminating. Safety: eye protection, gloves, and a clean work surface. Have replacement ribs or matching diameter tubing available if full replacement is needed.
Step-by-step: how do I straighten a bent metal rib safely and reliably?
1) Remove the canopy (see canopy removal FAQ) and lay umbrella flat on a padded surface. 2) Expose the damaged rib and check for cracks—do not straighten if metal is cracked. 3) For a small bend, gently bend back using a padded vise or two‑piece clamshell and heat (for aluminum) cautiously with a heat gun to reduce springback—avoid open flames and overheating the canopy. 4) Work in small increments, checking alignment frequently against the opposite rib. 5) If the rib is hollow and weakened, insert an internal sleeve (steel or aluminum rod sized to fit inside) and secure with epoxy and one or two small stainless self‑tapping screws or pop rivets through pre‑drilled holes. 6) Reinstall canopy and test under light load. If repeated bends or fatigue cracks appear, replace the rib.
How do I repair a cracked or broken fiberglass rib?
For hairline cracks: sand and clean, then bond with a marine-grade epoxy and reinforce with thin fiberglass cloth on the tensile side. For a broken or splintered rib: (a) align and dry‑fit, (b) prepare overlapping splice by bedding a sleeve—either an internal dowel for hollow ribs or an external fiberglass clamshell splice formed with cloth and epoxy, (c) clamp until cured per epoxy TDS, (d) wrap exterior with epoxy-soaked fiberglass cloth and allow full cure, (e) sand and finish. If fracture is at the root or the rib is badly splintered, replace the rib entirely. Use West System or equivalent for structural FRP work and follow specified cure times.
How do I replace a rib or arm (full replacement) — what’s the safe sequence?
1) Remove canopy: take off finial, loosen canopy attachments, and slide canopy off per manufacturer sequence. 2) Lay umbrella flat. 3) Unscrew or remove the top hub ring and free the rib root retainers (preserve washers/pins). 4) Unthread retaining wire or remove tensioning parts as required. 5) Remove the damaged rib from its socket and lift out. 6) Fit the replacement rib (check diameter and length), reinsert retaining pin/wire, and re‑tension per diagram. 7) Reinstall hub ring and reattach canopy in reverse order. Follow the parts diagram for your model to keep correct order and hardware orientation.
What temporary fixes can keep an umbrella usable until a permanent repair or replacement is done?
Temporary options: hose‑clamp or stainless two‑piece pipe clamp over a cracked rib joint; wrap with self‑fusing silicone tape or heavy duct tape plus a hose clamp for compression; insert a temporary hardwood dowel or threaded rod inside a hollow rib and clamp; for a broken tilt pin, secure the hub with a bolt and nut sized through the collar as a temporary pin. These fixes reduce movement but are not as fatigue‑resistant as permanent mechanical splices and should be used only short‑term and inspected regularly.
Next Articles
Fix Bent Patio Umbrella: DIY Repairs, Parts & Replace Guide
Fix bent patio umbrella: step-by-step repairs for ribs, arms, and pole with tools, costs, and safety tips.
Repair Broken Patio Umbrella Rib: Step-by-Step Fix Guide
Step-by-step guide to repair a broken patio umbrella rib, inspect damage, replace parts, reassemble, test alignment, pre
How to Fix a Patio Umbrella Arm: Repair or Replace
Step-by-step guide to fix a patio umbrella arm, pole, or spoke with diagnosis, repair, or how to replace parts.