Setting up a patio umbrella correctly takes about 20 to 30 minutes if you have everything ready, and the process is the same whether you bought a classic center-pole market umbrella or a cantilever offset model: assemble the base, secure the pole with a locking pin, extend the canopy using the crank or cord, adjust height and tilt for your space, then make sure the whole thing is weighted and anchored well enough to survive a gust. Where people run into trouble is usually one of three spots: the pole isn't locked into the base properly, the crank is turned the wrong direction, or the base is too light for the umbrella size. This guide walks you through every step in order, plus what to do when something doesn't cooperate.
Patio Umbrella Setup: Step-by-Step Assembly and Secure

Luca Morrison
11 May 2026
Unpack, Inspect the Parts, and Figure Out What Type You Have
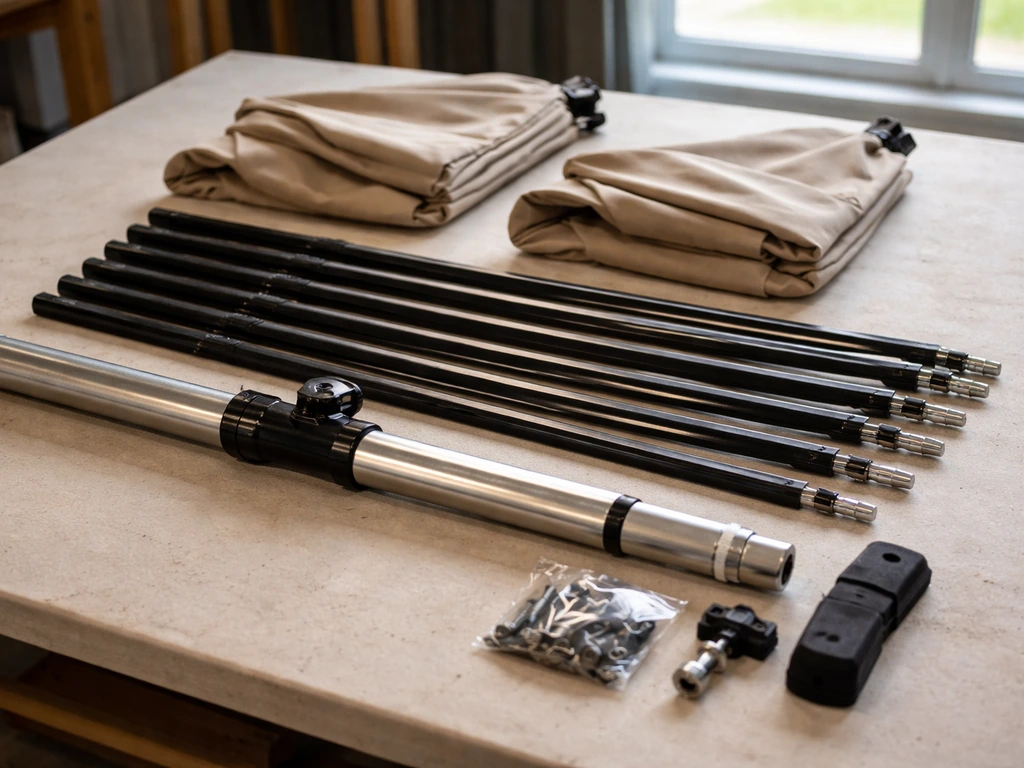
Before you touch anything, lay every piece out on a flat surface and count them against the parts list in your manual. Most center-pole umbrellas ship with a top section, a lower pole section, a finial (the decorative cap at the top), a hub with ribs already attached or needing to be pinned on, and a locking pin or bolt. Cantilever umbrellas add a rotation arm, a pin-and-chain assembly for locking rotation positions, and sometimes a separate base frame that needs to be bolted together first.
Check every rib for bends and every connection point for cracks before assembly. If a rib is bent in the box, that's a warranty claim before you even start. Also confirm that your umbrella base is compatible with your pole diameter. Many manufacturers sell the base separately, and the pole may need a reducer adapter (sometimes called a pole sleeve) if the hole in the base is wider than your pole. Proshade, for example, includes adapters specifically for this reason. Getting the fit wrong at this stage is the most common cause of a wobbly or unstable setup later.
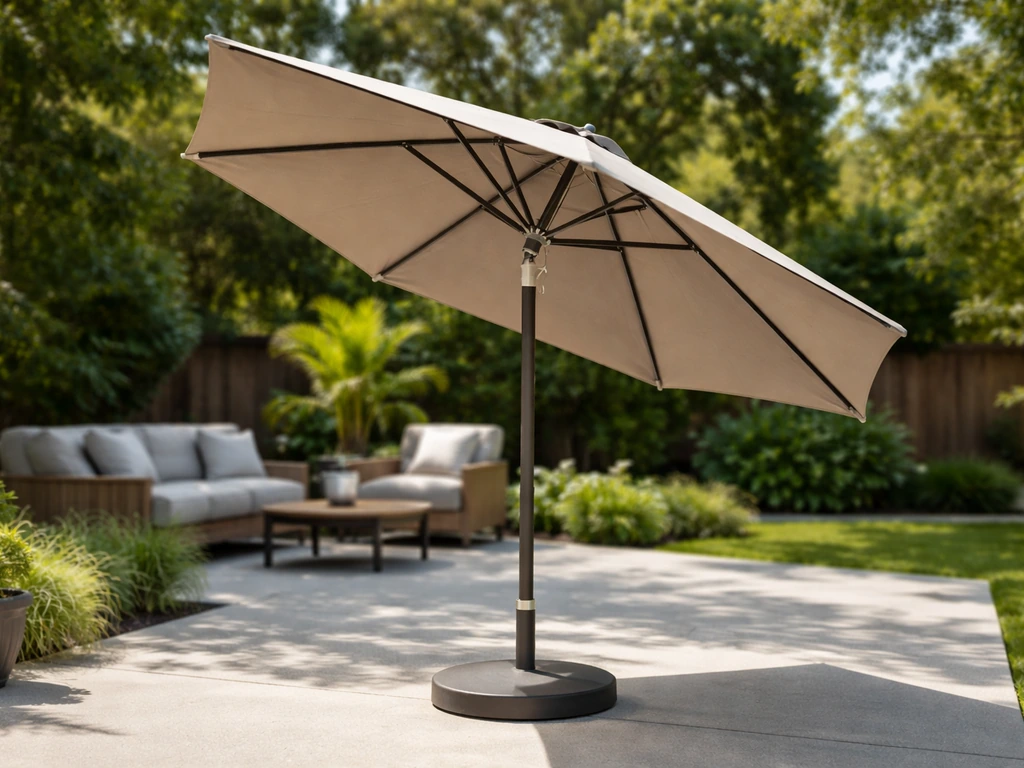
The two main types you'll encounter are center-pole market umbrellas and cantilever (offset) umbrellas. Center-pole models insert directly into a hole in a patio table or into a freestanding base. Cantilever models have the pole offset to the side, with a rotating arm that extends the canopy over a seating area. The assembly steps are different enough that you should identify which one you have before reading further. If you're working with a beach umbrella you're trying to adapt for patio use, that's a separate process worth looking into before you start. If you’re learning how to use beach umbrella on patio, focus on the stand fit, height, and safe anchoring so it stays stable in wind.
Assemble the Base, Pole, and Canopy in the Right Order
For most center-pole setups, the sequence goes: build the base first, then insert the pole, then lock it in place. If your base uses weight plates (the kind with a center bolt through stacked plates), thread the plates onto the center rod and tighten the top nut until everything feels solid. Don't over-torque plastic components. For hollow bases you fill with sand or water, do that after the pole is in and stable, not before, because a filled base is nearly impossible to reposition.
- If your base has a bolt-together frame, assemble it using the provided bolts and hand-tighten, then snug with a wrench. Don't skip this step even if it feels stable without tightening.
- Insert the lower pole section into the base opening. If there's a reducer sleeve, seat it in the base first, then slide the pole through it.
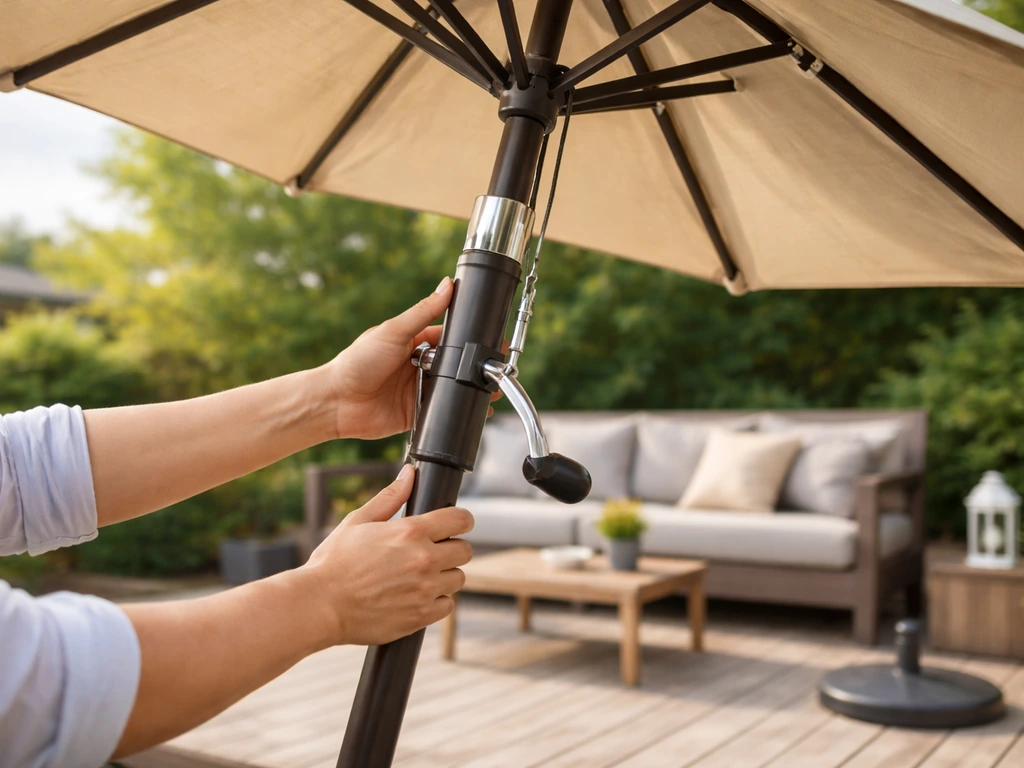
- Connect the lower and upper pole sections (most snap or slide together with a collar); if your model has two-piece poles, make sure the connection is fully seated.
- Attach the finial to the top of the pole by turning it clockwise until it stops. On Pottery Barn-style umbrellas, this also anchors the top of the canopy fabric.
- Insert the locking pin through the hole in the pole (at the base collar or base stand) and secure it. On Casablanca and Abba Patio models, the pin threads through the pole and locks into the base collar. On Awnet-style bases, a bolt and nut replace the pin, but the function is identical: it stops the pole from lifting out.
- For cantilever models: locate the pin-and-chain assembly at the lower arm and insert the pin through the rotation holes in the base stand to lock the canopy into your chosen orientation.
On TUUCI and some higher-end market umbrellas, the ribs connect to the hub via cotter pins. If your umbrella ships with the ribs unattached, connect each rib strut to the hub now using the cotter pins provided before you try to open the canopy. Skipping this leaves loose ribs that jam or snap when you crank it open.
Open the Canopy and Dial In Height, Tilt, and Rotation
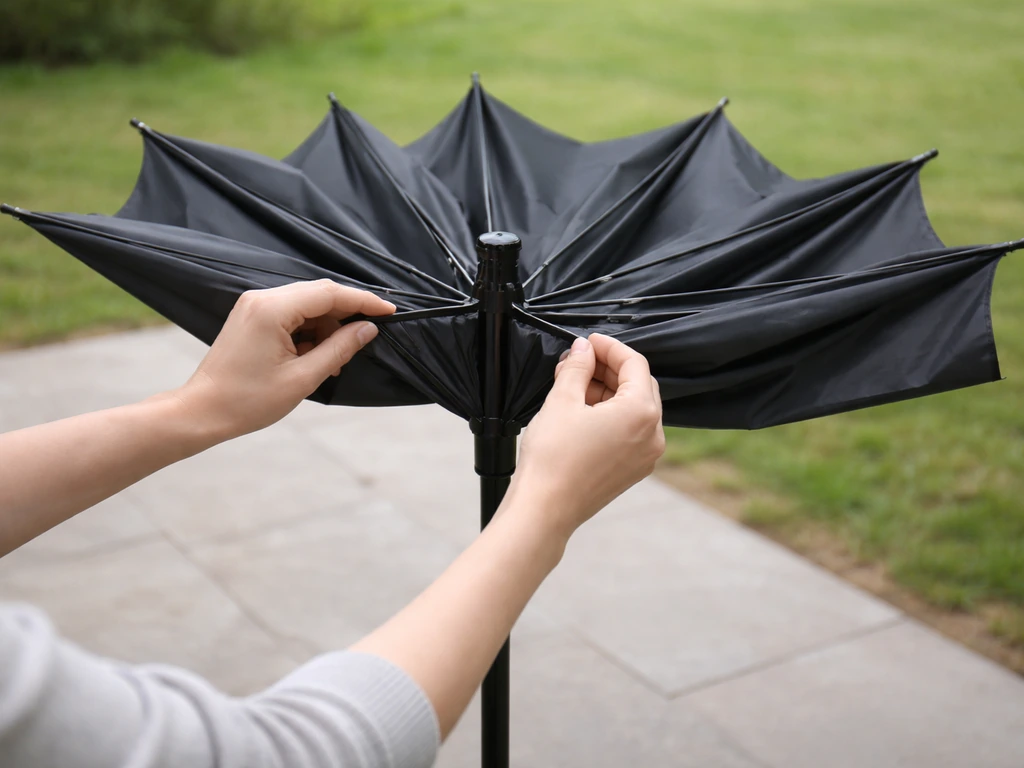
Before you crank or pull anything, do what professionals call 'fluffing the ribs': hold the pole upright and gently fan each rib out so it sits roughly 90 degrees from the pole while the canopy is still closed. This prevents ribs from catching on each other or on the fabric when the hub starts to rise. TUUCI's instructions specifically say to separate each rib about 10 inches from the center post before raising the hub, and that advice applies to most multi-rib umbrellas. On an 8-rib canopy, work around the hub in a circle, not randomly.
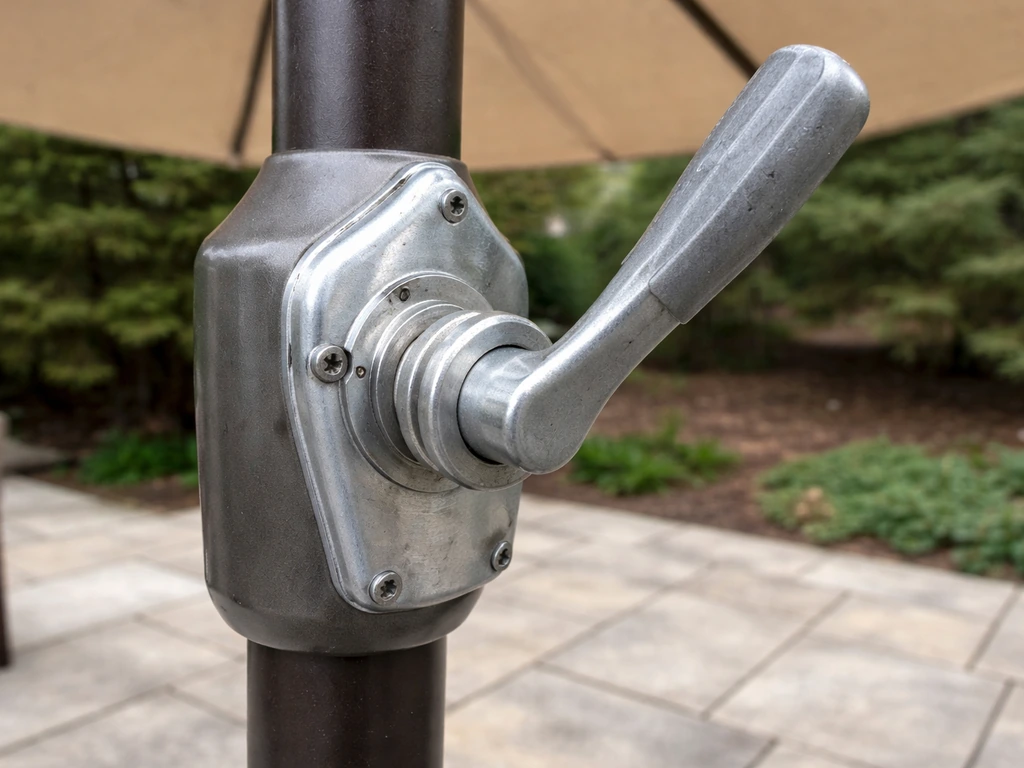
Now operate the opening mechanism. For crank umbrellas, turn the handle clockwise to open. This is the direction that lifts the canopy on virtually every brand. Counter-clockwise closes it. Turn smoothly without forcing it. If you feel resistance, stop and investigate rather than cranking harder. For cord-and-pulley models, pull the cord hand over hand in a steady motion until the ribs lock into the open position, then secure the cord on the cleat. Don't yank the cord in short bursts.
Height adjustment depends on your model. Some poles have multiple pin holes so you can set the pole height before locking the pin. Others have a sliding collar with a button-release. Set the height so the canopy edge clears seated guests' heads by at least 12 inches, which usually means the canopy bottom is around 7 to 7.5 feet above the ground. Too low and it blocks sightlines; too high and you lose shade coverage.
Tilt adjustment is a separate operation from opening and closing on most umbrella models. Many crank-lift umbrellas include a tilt function built into the crank collar: push the collar in, rotate the crank to tilt, then release. Others use a separate button or lever on the pole. Tilt the canopy toward the sun to maximize shade rather than pointing it straight up. For positioning questions beyond the tilt mechanism, like where to actually place the umbrella for best coverage and airflow around your patio layout, that's a topic worth exploring on its own. If you're wondering how to position patio umbrella for the sun, also dial in the tilt and rotation so coverage stays even as the light shifts.
Securing It So It Doesn't Tip Over or Blow Away
Base weight is the most under-sized part of almost every patio umbrella setup. As a general rule, a 7.5-foot umbrella needs a base of at least 50 pounds; a 9-foot umbrella needs 75 pounds or more; anything 11 feet and above needs 100 pounds minimum. Manufacturers often sell the smallest (cheapest) base that technically works in calm conditions, but 'technically works' and 'safe in a 20 mph gust' are two different things. If your umbrella came with a base under 30 pounds, consider upgrading before the first storm.
If your umbrella goes through a patio table hole, the table itself adds meaningful stability, but only if the umbrella pole fits the hole snugly with the right adapter ring. Once the umbrella is fitted correctly in the patio table, you can pair it with simple styling tips for the tabletop and surrounding decor, such as how to decorate patio table with umbrella setups.
If you are trying to put your umbrella in a patio table, make sure the pole diameter matches the table hole and use the right adapter ring so it stays snug. A wobbly fit in the table hole transmits every gust directly into side-load stress on the rib joints. Use a foam or rubber umbrella hole ring to eliminate that play.
For freestanding setups on a deck or patio, consider anchoring the base to the surface with deck anchor brackets if you're in a windy area. These bolt through the base feet into the decking and eliminate tipping risk almost entirely. Short of that, position the umbrella so it's not directly in a wind tunnel between structures.
The simplest and most important wind safety rule: close the umbrella when you're not sitting under it and whenever wind picks up. TUUCI notes that while its shade equipment is tested for higher wind resistance, it does not recommend or warranty deployment in wind conditions exceeding 25 mph blank" rel="noopener noreferrer">wind picks up. TUUCI's operating instructions explicitly state that you should close the canopy during consistent wind conditions blank" rel="noopener noreferrer">exceeding 25 mph. Most residential umbrellas aren't engineered for sustained wind loads above that level, and the damage that happens, bent ribs, snapped cords, stripped crank gears, is almost always avoidable by just closing it. If you leave your patio and it looks breezy, close it.
Troubleshoot Common Setup Failures
Crank Spins But Nothing Happens
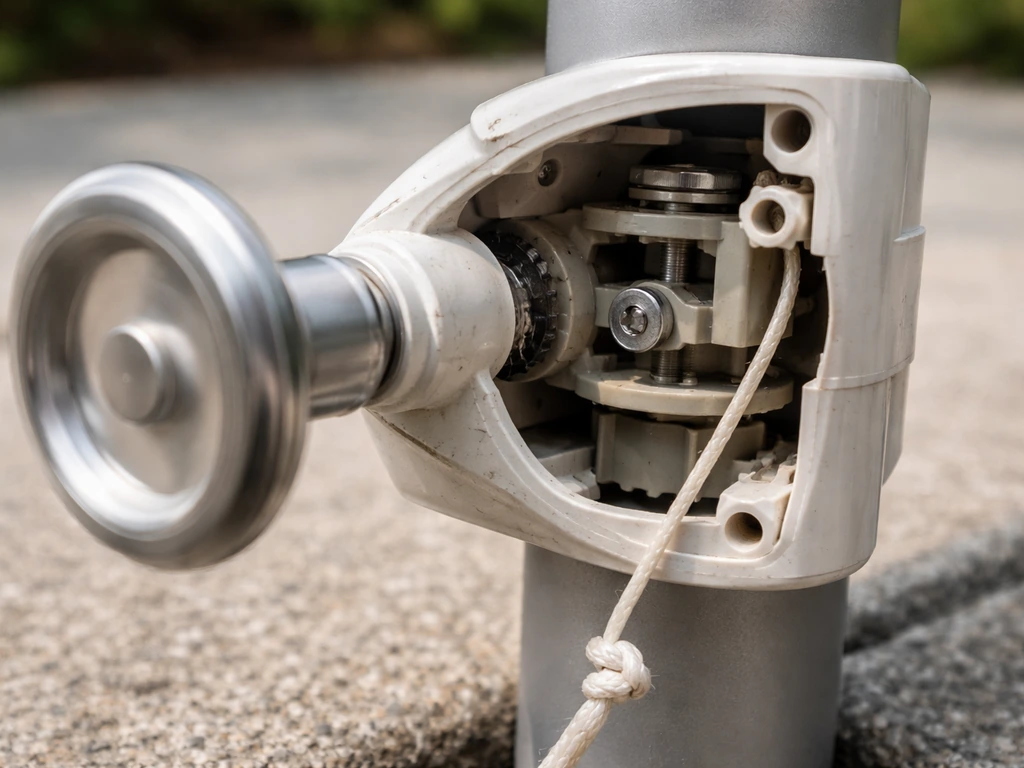
This is the most common crank failure and it means the internal string or gear has disconnected from the lifting mechanism. The crank handle turns freely because there's nothing for it to grab. First, confirm you're turning clockwise to open. If the direction is right and the canopy still doesn't move, the cord has either snapped or slipped off its pulley. Open the crank housing (usually two screws on the collar) and look for a broken or tangled string. Replacement crank cord kits are available for most brands. If the gear itself is stripped, you need a replacement crank assembly, which is worth buying for a quality umbrella but may not be for a budget model.
Umbrella Won't Open Smoothly or Gets Stuck Halfway
Check for debris in the crank housing first, dirt and dried leaves are surprisingly common culprits. A can of compressed air and a wipe-down will clear it in two minutes. If that's clean, look for a bent rib that's catching on the canopy fabric or on an adjacent rib. Gently straighten minor bends with gloved hands; significant bends mean a replacement rib. Also check that all rib-to-hub connections (including cotter pins on TUUCI-style models) are fully seated. A half-seated pin lets the rib flop and catch. Finally, make sure you 'fluffed' the ribs before cranking, because trying to open a compressed canopy against its own fabric is exactly what tears seams.
Tilt Won't Move or Won't Stay in Position
On crank-tilt models, the tilt collar needs to be pressed/engaged before you turn the crank for tilt. If you're cranking without engaging the collar, you're just opening and closing, not tilting. Read your manual's tilt section specifically, because the activation method varies by brand. If the tilt works but the canopy drifts back to vertical under light wind, the tilt collar's tension spring is worn. You can often tighten it with a small adjustment screw inside the collar, but if the spring is broken, a replacement collar is the fix.
Pole Wobbles in the Base

Nine times out of ten, this means the locking pin isn't fully seated, or you're missing the reducer adapter. Pull the pole, confirm the pin hole on the pole lines up exactly with the pin hole on the base collar, and re-insert. For a base that's wider than the pole, use the correct reducer size. Wrapping the pole end in foam tape is a temporary workaround but not a reliable fix for serious size mismatches.
Cord-Lift Umbrella Cord Is Frayed or Broken
Thread replacement cord through the pulley system in the exact path the original cord took. Take a photo of the routing before you remove the old cord. Use braided polyester cord rated for outdoor use (3mm to 4mm diameter for most residential umbrellas). A knot that slips through the cleat is usually a cord diameter problem, the cord is too thin for the cleat channel.
Quick Troubleshooting Reference
| Problem | Most Likely Cause | First Fix to Try |
|---|---|---|
| Crank spins freely, canopy doesn't move | Broken or disconnected internal cord | Open crank housing, inspect and replace cord |
| Canopy gets stuck halfway open | Bent rib or debris in crank mechanism | Check ribs, clear debris, re-fluff ribs before opening |
| Tilt won't engage | Collar not pressed before cranking | Consult manual for tilt activation method on your model |
| Pole wobbles in base | Missing locking pin or wrong adapter size | Re-seat pin, or add reducer sleeve to base |
| Cord frays or snaps | UV/age degradation or overloading | Replace with 3–4mm braided outdoor cord, re-route via pulley path |
| Ribs won't stay open | Cotter pin loose or missing at hub | Inspect hub connections, replace missing cotter pins |
Seasonal Care: Closing, Cleaning, Storing, and Winterizing
What you do at the end of the season directly determines whether your umbrella works correctly the following spring. The two main killers of stored umbrellas are mold in the folded fabric and corrosion in the metal crank and rib joints from moisture trapped during storage. Both are 100 percent preventable.
End-of-Season Cleaning
For Sunbrella and most solution-dyed acrylic fabrics, hose the canopy down about once a month during use and do a full cleaning before storage. Mix a quarter-cup of mild dish soap in a gallon of water, scrub with a soft brush, rinse thoroughly, and let it air dry completely while fully open. 'Completely dry' means at least several hours in good sun, not just surface-dry. Folding damp fabric is the direct cause of the mold spots people find every spring. If you see mildew already, a diluted bleach solution (one cup bleach per gallon of water) works on most non-colored fabrics; test an inconspicuous spot first.
Inspecting Hardware Before Storage
While the canopy dries, inspect every metal part. Look for rust starting at rib joints, the crank collar, and any steel bolts on the base. Sand light rust spots with fine-grit sandpaper and hit them with a rust-inhibiting spray paint before storage. Spray a light coat of silicone lubricant into the crank housing and onto the tilt collar pivot points. This is also the best time to replace any bent ribs, worn cords, or cracked connectors, because those parts are easy to source in fall and a pain to find right when you want to open the umbrella in spring.
Storage and Winterizing
Store the umbrella in a breathable storage bag, not a sealed plastic tarp that traps humidity. A bag with ventilation panels is ideal. Stand the umbrella upright in a dry area like a garage corner or shed if you can; horizontal storage in a bag on a damp floor is a mildew setup. Remove the base from outdoor exposure or drain it if it's water-filled, because water left in a base through a freeze cycle will crack the housing.
For areas with hard winters, bring the entire setup indoors or into an unheated but dry shed. If the umbrella must stay outside, an umbrella cover that ties at the bottom (not just drapes over) is the minimum protection level worth using.
A quick seasonal checklist to run through every spring when you bring the umbrella back out: confirm the locking pin is present and not bent, test the crank a few full rotations before loading the canopy, check that all rib cotter pins are seated, and inspect the cord for fraying before the first opening. Five minutes of inspection in April saves a broken rib in July.
FAQ
How do I decide when to close my patio umbrella during windy weather?
Most brands specify a max wind threshold in the manual, but as a practical rule, if you see steady gusts moving the fabric or the frame starts to sway, close it immediately and avoid trying to “ride out” the gust. Also, keep the umbrella closed when driving guests in and out of the area, since foot traffic and sudden knocks can add side load even when wind is light.
My patio umbrella feels wobbly even though the pin is in, what should I check first?
After opening, give the pole a gentle push by hand at the top, then try again near the canopy edge. Any wobble that changes with your hand placement often indicates a poor base fit or an unseated locking pin, not a rib issue. If it wobbles only when you push sideways, check that the pole hole adapter ring (for table or base) is the correct size and that there is no play between the pole and the adapter.
Where exactly can I apply lubricant, and what should I avoid?
Don’t use lubricant on the fabric. Use silicone spray only on metal pivot points inside the crank housing and at tilt collar pivots, then wipe any overspray off nearby surfaces. If you accidentally get silicone on the canopy or ribs, let it cure and gently remove residue with a damp cloth before storing, because oily buildup can attract dirt and make opening stiffer later.
Can I leave my patio umbrella closed outside during light wind?
Yes, but do it carefully. If your umbrella is closed but still under wind exposure, don’t leave the ribs compressed under tension for long periods. Close the canopy fully, then secure the closure mechanism (cord or latch) if your model has one, so the fabric and ribs relax rather than partially tensioning.
What should I try if my crank handle turns but the canopy still won’t lift?
If your crank handle turns but the canopy won’t open, check that the canopy is not obstructed by a rib that didn’t fluff correctly, and confirm the cord or string is seated on the pulley path. Also look for any debris in the crank housing and confirm the tilt collar is not engaged in a way that conflicts with normal opening on crank-tilt models.
What’s the safest way to dry and store the umbrella if it gets soaked?
Rinse and dry fully, then store. If your umbrella fabric gets wet during a storm, open it when it is safe to do so and allow it to air dry completely in the sun, instead of folding it damp. For stubborn mildew already present, test bleach on an inconspicuous area first, and avoid soaking the finial or hub area so you don’t drive moisture into the crank and rib joints.
Are cantilever patio umbrella setup checks different from center-pole models?
For cantilever models, alignment matters more than most people expect. Place the base so the rotation arm can swing freely without hitting nearby furniture, and ensure the rotation lock pin or pin-and-chain positions are fully engaged before opening the canopy. If the canopy drifts, check chain tension or the locking mechanism engagement, then re-test after opening fully.
When should I stop using a temporary fit fix and buy the correct adapter?
A reducer adapter is the permanent fix for a diameter mismatch, foam tape is only a temporary stopgap and it can loosen with heat. If the pole slides too easily or you can feel gaps, stop and use the correct adapter ring or pole sleeve sized for your pole and base collar. For table installs, a snug fit is what prevents side-load stress during gusts.
How do I reassemble ribs if I dismounted the canopy for storage?
If you need to remove the canopy for winter or replacement, mark how the ribs connect to the hub (a quick photo works). When reassembling, confirm cotter pins or locking clips are fully seated, then fluff the ribs before opening. Don’t force an opening if ribs aren’t separated, forcing the canopy can tear seams or bend rib struts.
What should I look for in an umbrella cover for winter or rainy storage?
Use a breathable cover that is tied down at the bottom, not a loose drape. Make sure the cover does not trap standing water, and keep the storage area dry and ventilated. If you store on a stand, avoid letting the cover contact wet ground, because water can wick under the fabric and keep humidity around the ribs and crank joints.
Next Articles

How to Fix a Patio Umbrella That Won't Open or Close
Step-by-step fixes for patio umbrellas that won’t open or close, with checks for jams, cords, latches, and lubricating t
How Does a Patio Umbrella Work? Components, Use, and Fixes
Learn how patio umbrellas work: components, open close tilt, stability, and step by step troubleshooting common mechanic
Patio Umbrella Crank Not Working: DIY Fix Guide
Fix a patio umbrella crank that won’t work with safe step-by-step jam, gear, and base troubleshooting and repair tips.