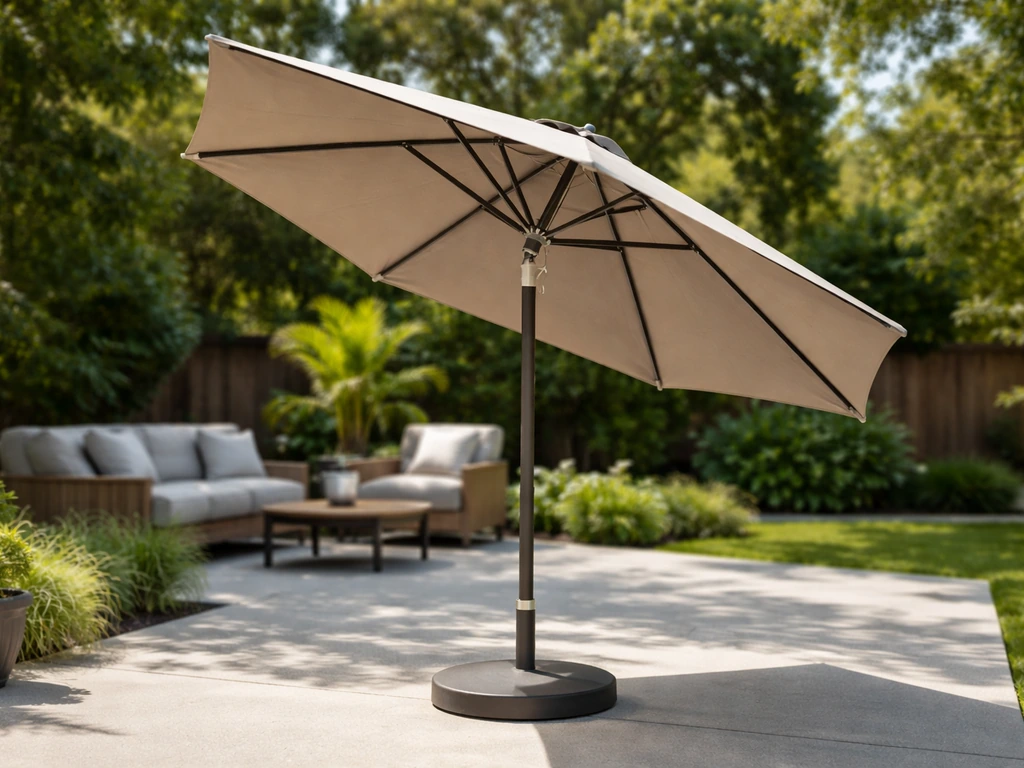
A patio umbrella works by using a pole-mounted crank or pulley system to push a runner sleeve up the center pole, which in turn pushes a set of stretcher arms outward and lifts the canopy ribs into an open, taut position. Turn the crank clockwise to open, counterclockwise to close. A separate tilt collar or button near the top of the pole lets you angle the canopy toward the sun. The whole thing sits in a weighted base that keeps it stable. Once you understand those three systems, the opening mechanism, the tilt, and the base, you can operate any umbrella confidently and diagnose almost any problem that comes up. If your patio umbrella won't open, start by checking the lift cord and crank or pulley mechanism for binding or damage umbrella confidently and diagnose almost any problem.
How Does a Patio Umbrella Work? Components, Use, and Fixes

Core parts of a patio umbrella
Before anything else, it helps to know the names of the parts you're actually dealing with. Most homeowners just call everything 'the umbrella,' but once you can name the piece that's failing, fixing it gets a lot easier.
| Part | What It Does |
|---|---|
| Pole (center shaft) | The main vertical tube everything else attaches to. Usually aluminum or wood, in one or two sections. |
| Hub (top hub / cap) | The fitting at the top of the pole where all the main ribs connect and pivot. |
| Main ribs | The arms that extend outward from the hub and support the canopy fabric. |
| Stretcher arms (lower ribs) | Shorter arms connecting the runner to the main ribs — these are what push the ribs up when you open the umbrella. |
| Runner (slider) | A sleeve that rides up and down the pole. When it moves up, it drives the stretcher arms outward and lifts the canopy. |
| Canopy | The fabric shade. Attached to the tips of the main ribs and sometimes to the hub cap. |
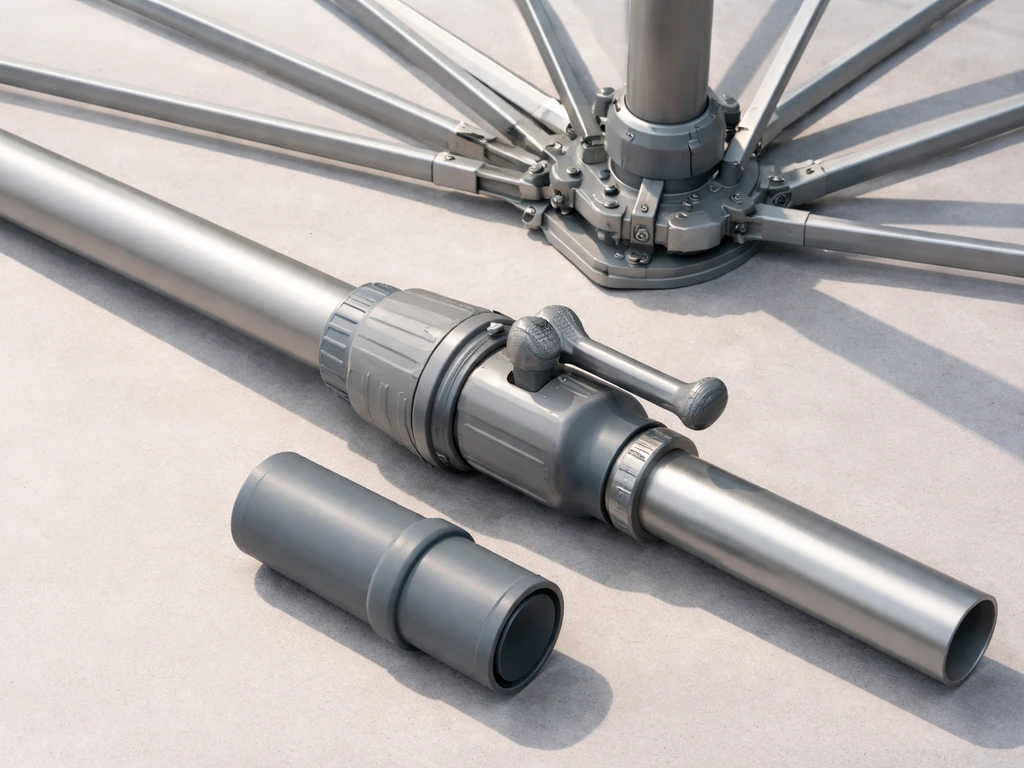
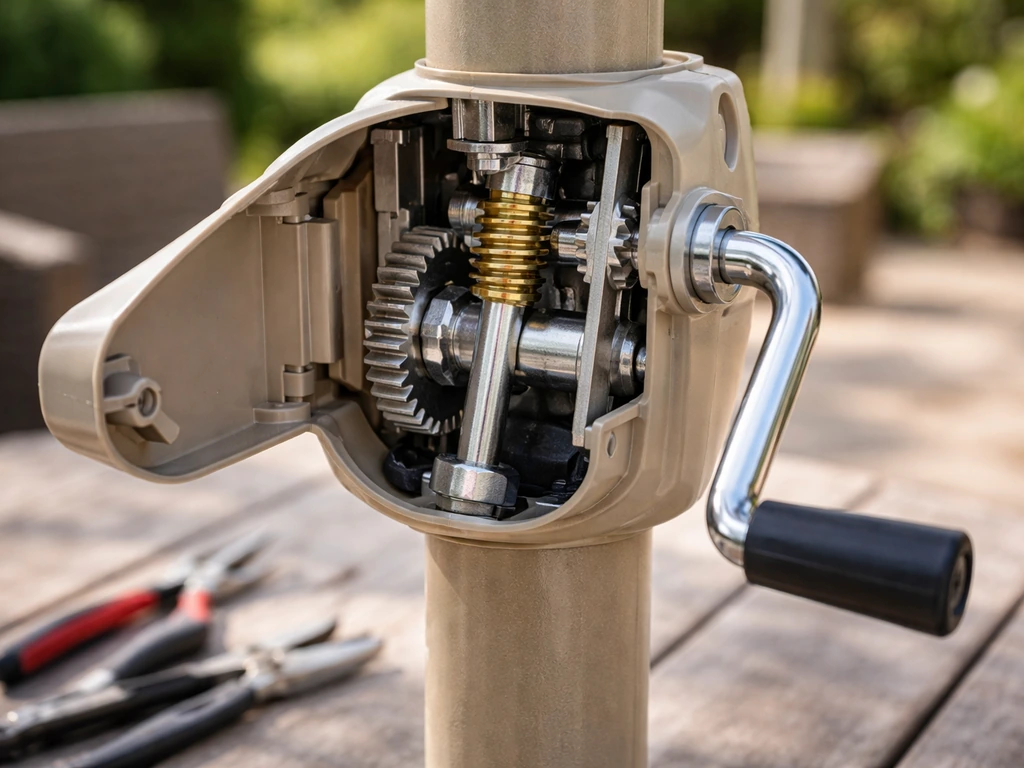
| Crank mechanism | A worm gear assembly mounted on the pole that winds a cord or strap to move the runner. |
| Lift cord / strap | The cord or flat strap connected to the runner — the crank winds this to open the umbrella. |
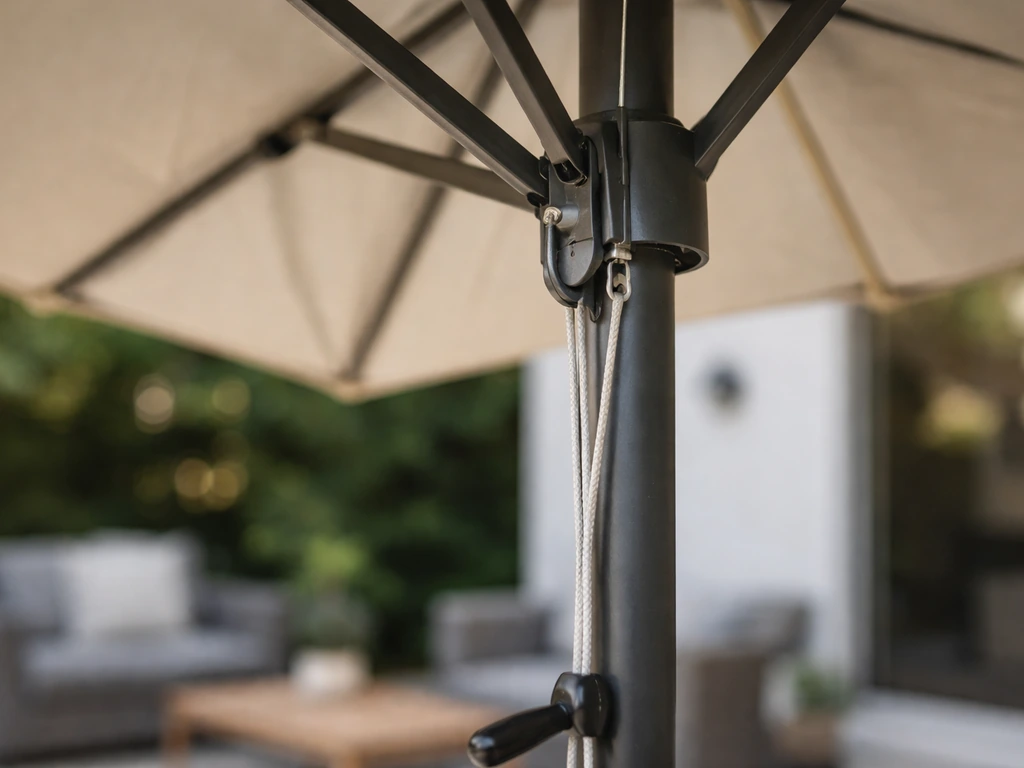
| Pulley | On cord-pull or pulley-style umbrellas, a small wheel at the top hub redirects the lift cord so pulling down raises the canopy. |
| Tilt collar or button | A fitting on the pole just below the hub that lets you angle the top section of the pole (and canopy) left or right or forward. |
| Base and pole sleeve | The weighted stand with a tube that accepts the pole. Keeps everything upright. |
How the opening and closing mechanism works
The core mechanics are simpler than they look. When you turn the crank handle clockwise, a small worm gear inside the crank housing winds up the lift cord or strap. A patio umbrella crank works by converting the crank's turning motion into lift cord movement that raises the runner and opens the canopy crank handle clockwise. That cord runs down the inside of the pole, loops around a pulley at the top, and connects to the runner sleeve on the outside of the pole. As the cord shortens, the runner is pulled upward along the pole. The runner is linked to all the stretcher arms, and when those arms are pushed outward, they lever the main ribs upward and outward, just like an umbrella you hold in your hand. The canopy fabric, already attached to the rib tips, goes taut as the ribs spread out. To close, you turn the crank counterclockwise, the cord unwinds, the runner drops, the stretcher arms fold in, and the ribs collapse downward.
On a push-button or pin-lock style umbrella (common on cheaper or older models), instead of a crank there's a spring-loaded button on the pole. If you need a version that opens without a crank, look for a push-button or cord-pull umbrella design how to open patio umbrella without crank. You slide the runner up by hand until the button clicks into a hole on the pole and holds the runner in place. To close, you press the button and slide the runner back down. On a cord-pull (pulley) umbrella, there's no crank at all, you pull a hanging cord downward, which runs over a pulley at the hub, and that tension lifts the runner directly. Each system achieves the same result; only the input method changes.
Crank, pulley, and tilt mechanics explained
How the crank works
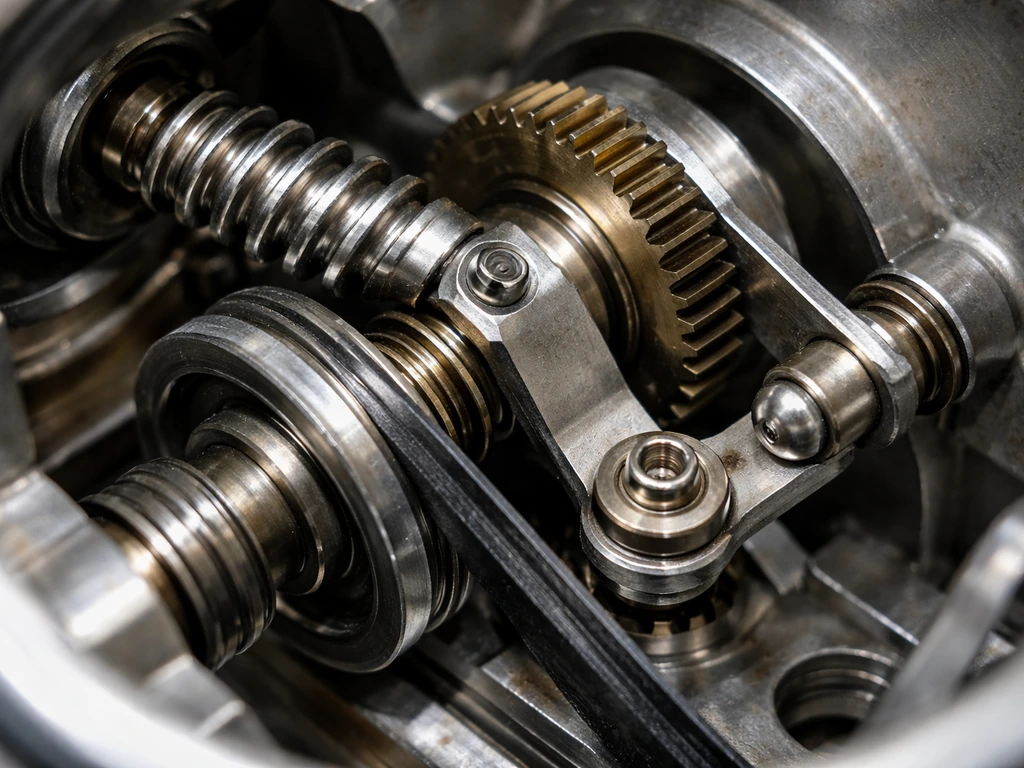
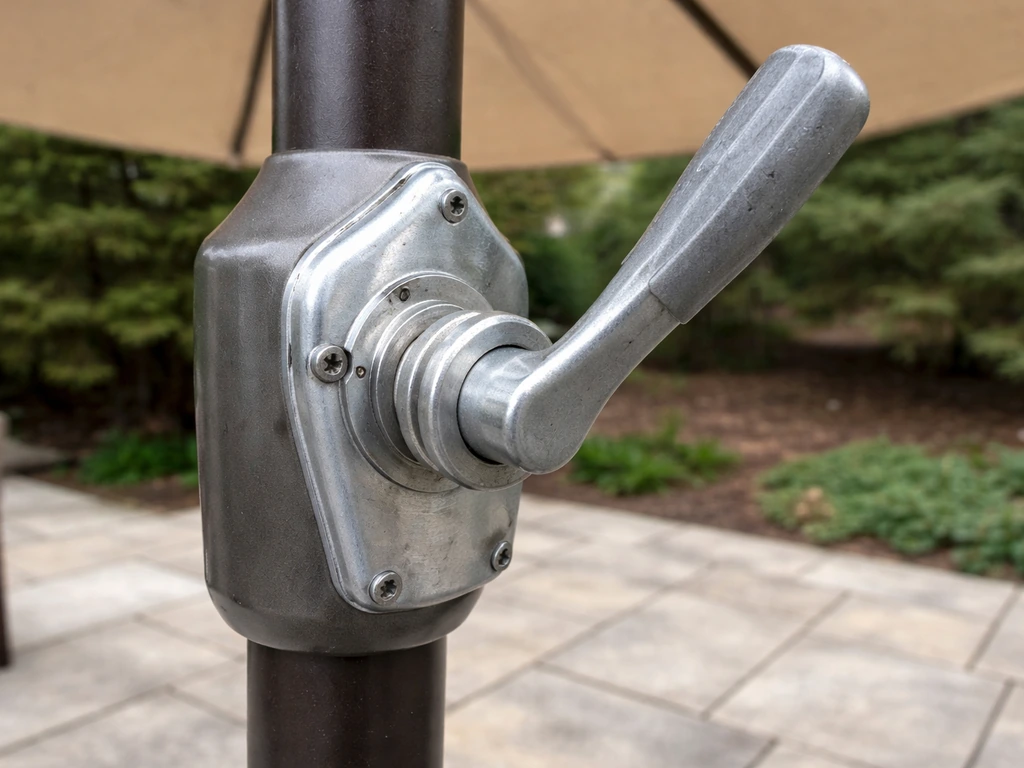
The crank is a worm gear mechanism, a type of gear where a spiral-threaded shaft (the worm) meshes with a toothed wheel (the gear). When you rotate the handle, the worm shaft turns and advances the gear, which winds the cord around a spool. Worm gears are self-locking, meaning the cord won't unwind on its own when you stop cranking, that's why the canopy holds its position without a latch. If you've ever felt resistance before the umbrella is fully open, that's the cord reaching its wound limit or the mechanism binding. The crank housing is usually a plastic or die-cast assembly clamped around the pole with two screws. It's replaceable on most umbrellas, which is good news when it strips or cracks.
How the pulley system works
On pulley-style umbrellas, a small sheave (wheel with a groove) is mounted inside or at the top of the hub. The lift cord passes over this pulley and redirects the force, pulling the cord down on one side of the pulley raises the runner on the other side. It's basic mechanical advantage. The cord itself runs through the hollow pole on most modern designs, which protects it from UV and abrasion. On older or simpler designs, the cord runs along the outside of the pole. Pulley systems are very reliable but the cord does wear and fray over time, especially at the point where it bends over the pulley wheel. If your pulley wheel is damaged or your lift cord is fraying, follow a dedicated troubleshooting guide for how to fix patio umbrella pulley system to get the correct replacement and alignment.
How tilt mechanisms work
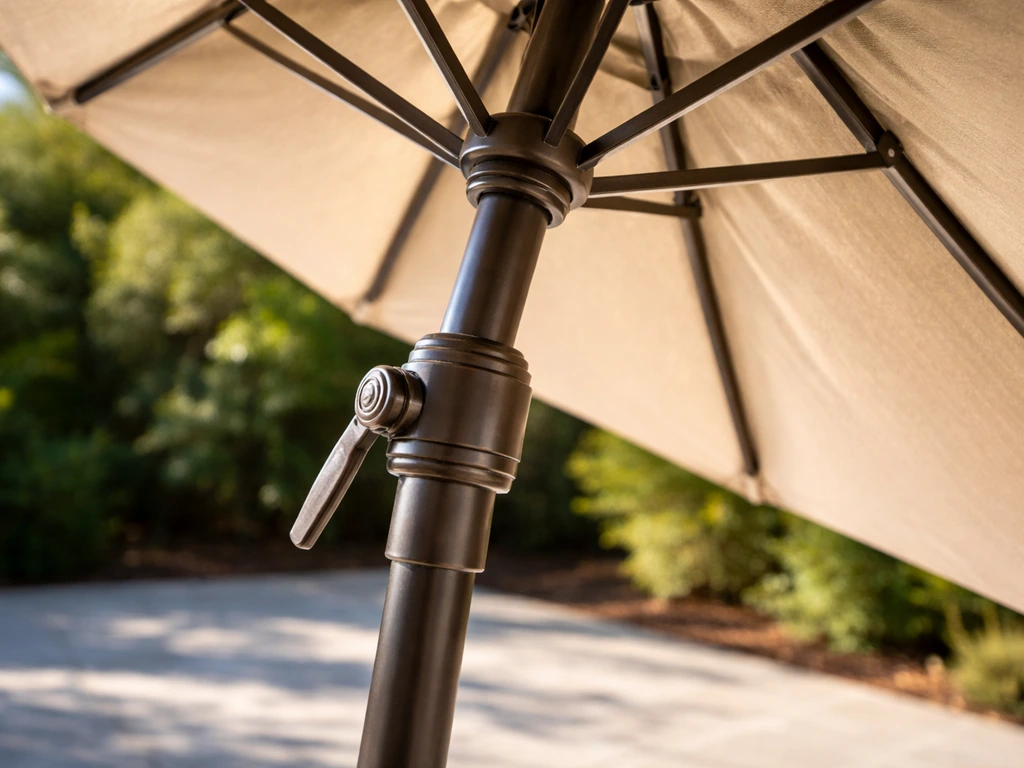
Most patio umbrellas offer tilt so you can angle the canopy toward the afternoon sun without moving the whole base. There are three common tilt designs. The collar tilt (or 'crank tilt') is the most popular: a collar fitting sits on the pole just below the hub, and you twist it to one side, typically clockwise, to lock the top section of the pole at an angle, usually around 30 to 45 degrees. On some models the tilt is integrated into the crank so you tilt first and then crank. The push-button tilt uses a spring-loaded pin at the upper pole section; press the button, angle the canopy, and the pin locks into the next available hole. The auto-tilt, found on higher-end umbrellas, uses the crank itself, crank to open fully, then keep cranking past the 'fully open' point and the canopy begins to tilt. All three methods are just pivoting the upper pole section inside the tilt fitting.
How the base, pole, and stability system work
The stability system is the part most people underestimate until their umbrella ends up in the neighbor's yard. The base works purely through weight, cast iron, concrete, or resin filled with sand or water creates enough mass to resist the torque (twisting/tipping force) created by wind loading on the canopy. Most manufacturers recommend a base weight between 50 and 100 pounds for a standard 9-foot umbrella. For an 11-foot umbrella, you want at least 100 pounds, and in any area that gets gusts over 20 mph, go heavier or anchor to a table.
The pole fits into a sleeve (tube) inside the base. Diameter matters, typical poles are 1.5 inches or 1.875 inches in diameter, and the sleeve should match closely so the pole doesn't wobble. Most bases include a tension bolt or thumb screw on the sleeve collar that you tighten to grip the pole. Some patio tables have a center hole designed to accept the umbrella pole, and the table itself adds mass to the stability system. When using a table mount, always make sure the pole is seated fully in the base sleeve below the table, not just resting in the table hole, the base does the work, the table hole just guides the pole.
The pole itself is typically a straight or two-section tube. Two-section poles join in the middle with an internal ferrule (a short inner sleeve) and are secured with a bolt through both sections or simply press-fit. When moving the umbrella, lift it from the lower frame of the base, not by grabbing the canopy or the crank housing, to avoid stressing the mechanism or the pole joint.
Common failure points and quick troubleshooting
The vast majority of umbrella problems fall into four categories: the crank won't turn or strips out, the lift cord breaks or goes slack, the tilt mechanism won't engage or hold, and the umbrella leans or tips. If the crank won’t turn or feels like it’s stripping, you can fix the crank mechanism by checking the lift cord, crank housing, and worm gear for binding or wear. If your patio umbrella crank won't turn or starts stripping, the fastest way to fix it is to identify whether the worm gear, cord, or crank housing is binding or broken. Here's how to work through each one.
Crank is hard to turn or won't turn at all

- First, check whether the umbrella is overpacked from being stored closed tightly. Sometimes fabric bunches around the runner and binds it. Open the canopy tie wrap and shake the fabric loose, then try the crank again.
- Check the crank housing screws. If the housing has shifted on the pole, the gear alignment is off and you'll feel grinding or seizing. Loosen the screws, reposition the housing so it sits flat and centered, and retighten.
- If the handle turns but nothing happens (spins freely), the worm gear or spool teeth have stripped. This usually means the cord spool inside the crank housing has cracked or the gear has worn smooth. Remove the crank housing (usually two screws) and inspect the gear. Replacement crank assemblies are available for $10 to $30 at most hardware stores and match by pole diameter.
- If the handle is hard to turn and you can hear grinding, the cord may be frayed and jammed in the spool. Remove the crank housing, pull out the old cord, and replace it with a matching diameter cord (usually 3/16 inch braided polyester).
Lift cord is broken or slack
- If the canopy drops or won't lift even when you crank, the lift cord has likely snapped or slipped off the pulley. Fully close the umbrella first to release tension.
- Thread a new cord through the pole (use a wire fish tape or a weighted string to pull it through), over the pulley at the hub, and connect it to the runner using the original knot or attachment point.
- The pulley wheel itself can seize up with grime — clean it with a dry cloth and apply a drop of silicone lubricant (not WD-40, which attracts dirt).
- Make sure the cord is long enough. Too short and it won't reach the runner; too long and it bunches in the pole and jams.
Tilt won't engage or won't hold angle
- On a collar tilt: make sure the umbrella is fully open before trying to tilt. Most collar tilts only work once the ribs are fully deployed — trying to tilt a half-open umbrella strips the collar.
- If the collar turns but the canopy doesn't tilt, the locking pin inside the collar fitting has worn down or the spring has failed. Inspect the collar by removing it from the pole (usually one set screw) and check that the pin engages the notch in the upper pole section.
- On a push-button tilt: clean the button hole with a toothpick or thin wire — grit and debris are the most common reason the pin won't extend fully.
- If the canopy tilts but won't hold its angle and keeps falling back, the friction collar is worn or the set screw is stripped. Replace the collar fitting — these are sold as universal tilt replacement parts.
Umbrella leans, wobbles, or tips
- Check the base weight first. An undersized base is the most common cause of tipping. A 9-foot canopy needs 50 to 75 pounds minimum; an 11-foot canopy needs 100 pounds or more.
- Tighten the pole sleeve collar bolt on the base. If it's hand-tight but the pole still wobbles, wrap the pole just above the sleeve with two or three layers of electrical tape to take up the gap.
- If the two-section pole is loose at the join point, check the through-bolt at the joint. Tighten or replace it — this bolt is usually a standard M6 or 1/4-inch bolt.
- Never use a tilted umbrella in wind. Even a small tilt dramatically increases wind load on one side of the canopy and makes tipping far more likely.
How to operate your umbrella correctly (and safely)
Setup is straightforward once you know the order of operations. Start by inserting the pole fully into the base sleeve and tightening the collar bolt. If you have a two-section pole, connect both sections and secure the joint bolt before inserting it into the base. Position the base where you want the umbrella, then open the canopy by turning the crank clockwise until the ribs are fully extended and you feel the mechanism reach its stop, don't force it past that point. Once fully open, engage the tilt if needed by twisting the tilt collar clockwise (or pressing the tilt button) and angling the canopy to the desired position.
To close, reverse the tilt first (return the canopy to vertical), then turn the crank counterclockwise until the canopy is fully collapsed. Tie or wrap the canopy tie strap loosely around the closed fabric, don't cinch it so tight that it permanently creases the canopy or binds the mechanism next time you open it.
Wind safety, this part really matters
A fully open patio umbrella is essentially a sail. Even a moderate gust of 20 to 25 mph can turn a 9-foot umbrella into a projectile if the base is undersized or the canopy is tilted. The single best habit you can build is closing the umbrella any time you're not sitting under it, especially if you're going inside. Beyond that, here are the non-negotiable rules.
- Close the umbrella whenever wind picks up noticeably — if you can feel a sustained breeze on your face, that's your signal.
- Never leave a tilted umbrella unattended outdoors. Tilt exponentially increases the catch area on the windward side.
- Don't place the umbrella where it's exposed to channeled wind — corridor areas between buildings or fences act as wind tunnels.
- If your base is on a hard surface (concrete, deck), consider adding sandbag weight or cross-bracing to the base legs.
- In storms or sustained winds above 20 mph, bring the umbrella indoors or at minimum collapse it fully and lay it horizontally.
Seasonal storage and winterizing basics
The mechanisms that fail first, crank gears, lift cords, pulley wheels, tilt collar pins, almost always fail because of moisture and UV exposure during off-season storage. A little prep before you put the umbrella away in the fall means you're not troubleshooting a broken crank the first warm weekend of spring. If your patio umbrella crank is not working, start by checking whether the lift cord is binding or the worm gear is stripped, then test the closing action to confirm the problem area patio umbrella crank not working.
- Clean the canopy before storing. Brush off debris, wipe down with mild soap and water, rinse, and let it dry completely in the open position before closing. Storing damp fabric causes mildew that weakens the material and can seize the runner with mold.
- Wipe down all metal parts — hub, ribs, crank housing, runner — with a dry cloth. Apply a thin coat of silicone spray or light machine oil to the crank gear access point, the runner sleeve, and the pulley wheel.
- Inspect the lift cord for fraying before you store it. If it looks worn at the pulley contact point, replace it now. Cord costs about $3 to $5 and it's far easier to do with the umbrella on a table than trying to thread it first thing in spring.
- Collapse the umbrella fully, tie the canopy loosely, and store it in a protective cover bag (most umbrellas ship with one — if yours is gone, a basic fabric umbrella cover costs under $20). The cover protects the canopy material and the crank housing from UV degradation during storage.
- Store the umbrella horizontally if possible, either on a rack or laid flat. Storing it vertically without support for the full length can bow aluminum poles over a winter.
- Remove the base from the pole and drain any water-filled base before freezing temperatures hit. Trapped water expands when it freezes and cracks the base casing.
- Bring the assembly inside a garage or shed if you can. If outdoor storage is your only option, a full cover plus the collapsed canopy strap will do, but the crank and tilt mechanisms will have a shorter service life.
One more thing worth knowing: the opening and closing mechanisms on patio umbrellas are genuinely repairable. A crank that won't turn, a cord that's snapped, or a tilt collar that won't lock are all fixable with basic tools and inexpensive parts. Before you consider replacing the whole umbrella, it's worth diagnosing which specific component failed, in most cases you're looking at a $10 to $30 part and 20 minutes of work, not a $200 replacement.
FAQ
How do I tell if my umbrella is crank-driven vs push-button or cord-pull?
Check what you use to start opening. If you turn a handle, it is worm-gear crank style. If you press a button on the pole and hear a click into a hole while you lift the runner by hand, it is pin-lock/push-button. If there is a hanging cord at the hub that you pull downward to raise the canopy, it is cord-pull pulley style.
My umbrella resists before it fully opens, should I keep cranking?
No. Stop when you feel a clear stop or strong resistance because you may be hitting the cord’s wound limit or a binding point in the cord path. Forcing can strip the worm gear or overload the pulley redirect. Try again after confirming the runner moves freely up the pole (no wobble or debris).
Why does the umbrella feel like it opens, then slips back down?
Most commonly the lift cord is slack, frayed, or not properly seated on the pulley or spool. Less often, the crank mechanism or worm gear is worn enough that it cannot hold tension. If the umbrella drops quickly, do not attempt repeated openings, inspect the cord routing inside the pole first.
What’s the safest way to test the tilt mechanism if it won’t hold?
Open the umbrella fully to its stop, then engage tilt slowly while supporting the top pole with your other hand. If the tilt collar or pin does not lock, check for misaligned holes or a bent pin and confirm the pole is seated at the correct depth in the base sleeve. Tilting without the pole seated fully can prevent proper alignment.
Can I replace just the crank housing without replacing the whole umbrella?
Often yes. The crank housing assembly is typically clamped around the pole with screws and can be swapped without replacing the stretcher arms or canopy ribs. The key is getting the correct housing for your model’s crank type and verifying the cord attachment point is routed correctly after install.
How do I fix a lift cord that went slack but did not fully break?
In many cases the cord is simply not tensioned or is off track on the pulley at the hub. Close the umbrella fully, inspect where the cord runs over the pulley and where it attaches to the runner sleeve, then rethread and retension so the cord shortens evenly as you crank. If you see fraying at the bend point, plan to replace the cord rather than keep testing.
Why does my pulley-style umbrella make noise when opening or closing?
Noise usually comes from the pulley wheel groove being dirty or damaged, or the cord rubbing the inside of the hub/pole. Inspect the pulley surface and remove debris. If the cord is visibly worn at the bend point, replacing the cord and checking pulley alignment is usually the reliable fix.
What’s the correct way to store a patio umbrella to prevent mechanism issues?
Keep it dry and reduce UV exposure. Before storage, fully cycle open and closed once, then tie the canopy loosely and check that the cord is not under tension. Store covered or indoors when possible, especially if your umbrella uses cord, worm gears, or push-button pins that can seize after moisture sits through the season.
How heavy should my base be for my umbrella size?
Use a weight baseline of about 50 to 100 pounds for a standard 9-foot umbrella, and at least 100 pounds for an 11-foot umbrella. If your area gets gusts above roughly 20 mph, go heavier or anchor the umbrella. Also consider wind direction, because a tilted canopy increases tipping torque.
Can I use a table mount instead of a freestanding base?
Yes, but only if the pole is fully seated into the base sleeve below the table. A table hole alone should not be supporting the umbrella, the sleeve connection does. Before operating, check that the tension bolt or thumb screw grips the pole without wobble.
What should I do if the umbrella leans or won’t stay centered when opened?
First confirm the pole diameter matches the base sleeve and that the tension bolt is tightened evenly. Then check the base connection, including any two-piece pole joint alignment. If the pole sleeve is undersized or the pole is not inserted fully, the umbrella can cant even when the mechanisms are functioning.
How can I avoid damaging the crank or cord when moving the umbrella?
Lift the umbrella by the lower frame or base, not by the canopy, ribs, or crank housing. Moving by the crank housing can stress the housing clamps and cord path, which may lead to early stripping or slack cord issues.
How do I choose between fixing vs replacing a patio umbrella?
Diagnose the failed component before replacing. Many common failures are limited to the crank housing, worm gear assembly, lift cord, pulley wheel, or tilt pins, and these are frequently inexpensive parts. If the ribs are bent, the stretcher arms are deformed, or the pole joint is cracked, replacement is often more cost-effective.
Fix a patio umbrella crank that won’t work with safe step-by-step jam, gear, and base troubleshooting and repair tips.
Step-by-step guide to fix a patio umbrella pulley system, rethread/replace lift rope, clear jams, and test smooth operat
Fix a patio umbrella crank with step-by-step diagnosis, handle repair, mechanism checks, tools, reassembly, and testing.