If your patio umbrella crank turns but nothing moves, or the canopy stops halfway and won't budge, the lift rope has almost certainly come off a pulley, broken, or jammed inside the pole. The STAF umbrella manual also provides operational guidance for “pulling the pulley” and removing the pulley rope from a hook, which helps explain how the rope and hook connection should be handled during repairs blank" rel="noopener noreferrer">lift rope has almost certainly come off a pulley. That's the most common cause by a wide margin. The fix is usually re-threading the cord through the correct pulley path, or swapping in a new weather-resistant rope and routing it the same way the old one ran. This guide walks you through diagnosing exactly what failed, doing the repair step by step, and making sure it doesn't happen again.
How to Fix a Patio Umbrella Pulley System Step by Step

Quick diagnosis: figuring out what actually broke
Before you touch a screwdriver, spend two minutes narrowing down which part of the system failed. The pulley system on a crank-lift umbrella has three main components: the lift rope or cable running inside the pole, one or more pulley wheels (usually at the top hub and sometimes at a lower hub), and the crank gearbox that drives the whole thing. Each one fails in a distinct way.
| Symptom | Most likely cause | Where to look first |
|---|---|---|
| Crank turns freely but canopy doesn't move at all | Rope broken, or crank gear not engaging rope | Inside the pole near the crank; check rope tension by pulling it gently |
| Crank feels stiff or grinds, canopy barely moves | Rope jumped off pulley wheel, creating a bind | Top hub pulley; also check bottom hub if your model has one |
| Canopy rises unevenly (one side higher) | Rope routed incorrectly or anchored off-center | Check rope path through all guides and confirm both sides of the rib assembly pull at the same point |
| Canopy stops partway and won't go further | Rope tangled inside pole, or lock pin not engaging | Feed the rope by hand to feel where it catches; check the lock/cleat at the handle area |
| Rope frayed, cracked, or visibly damaged | UV and weather degradation | Full rope length; replace it entirely, don't splice |
A quick field test: remove the crank handle and try pulling the rope directly by hand (on rope-pull models) or look into the pole top with a flashlight (on crank models). If the rope moves freely when pulled but the crank doesn't engage it, the gearbox or the rope's anchor point to the drive mechanism has failed. If the rope barely moves or feels jammed, it's off a pulley. If the rope goes slack immediately and falls, it's broken or detached from its anchor. Note which problem you have before moving on.
Tools, safety checks, and parts you'll need
Tools
- Phillips and flathead screwdrivers (most hub caps and gear covers use both)
- Needle-nose pliers (for grabbing rope ends inside the pole)
- Flashlight or phone torch (the inside of the pole is dark)
- A thin stiff wire or coat hanger bent straight (for feeding replacement rope through the pole)
- Scissors or a utility knife
- Lighter (for heat-sealing the cut ends of nylon or polyester rope to prevent fraying)
- Silicone spray lubricant or light machine oil
- Tape measure
- Masking tape and a marker (for labeling parts during disassembly)
Replacement parts to have ready
For the rope, you want a weather-resistant nylon or polyester cord that matches the original diameter, typically 3mm to 5mm for most residential umbrellas. Measure your original rope's thickness before buying. Using a rope that's too thick will jam in the pulley groove; too thin and it'll slip. Cut the replacement to at least 10% more than the full length of your umbrella pole, measured twice. If a pulley wheel is cracked, chipped, or has a worn groove, replace it at the same time, since a bad pulley will eat through a new rope fast. Most replacement pulley wheels and rope kits are available at hardware stores or from umbrella parts suppliers for under $15 combined.
Safety checks before you disassemble anything
- Close or partially close the canopy before doing any work so the ribs aren't under load. A fully open canopy with a compromised rope can snap shut unexpectedly.
- Move the umbrella out of any wind. Even light wind creates tension on the mechanism while you're working.
- If your umbrella is freestanding in a base, tilt or lay it horizontally on a flat surface. Working at ground level is safer and gives you better access to the pole internals.
- If there's a tie strap or travel tie holding the canopy, leave it loosely fastened while you work so the canopy can't fly open accidentally.
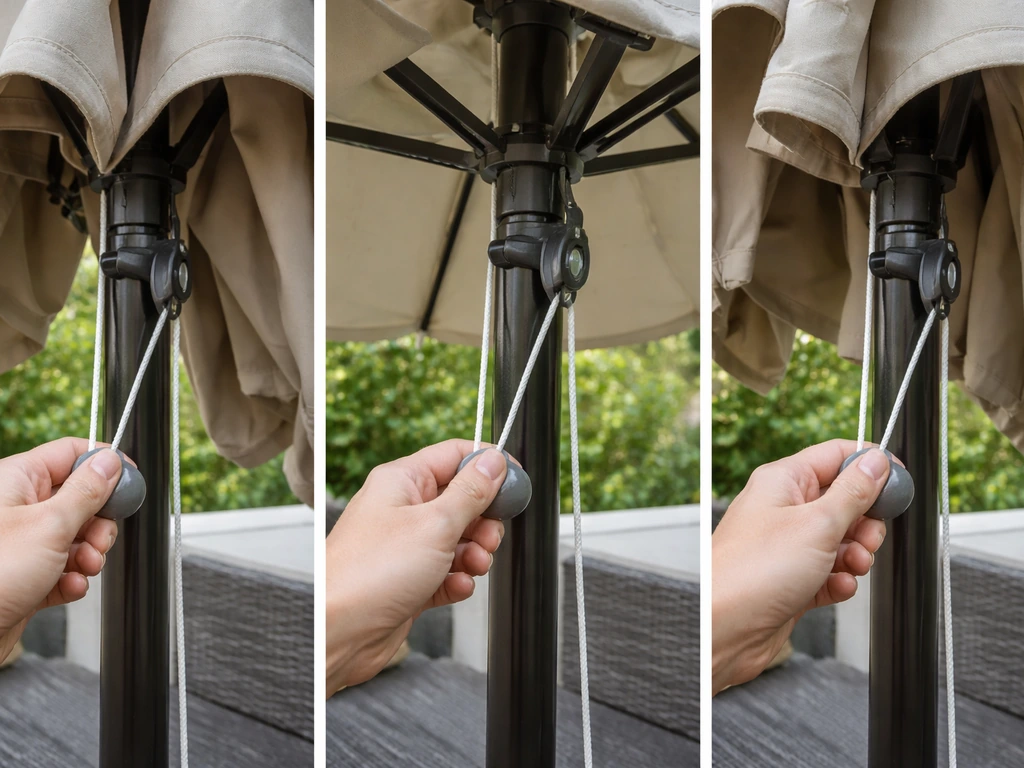
- Before removing the rope from any hook or cleat, note exactly how it's attached. Take a photo on your phone. The lock engagement point is easy to re-route incorrectly.
Step-by-step: re-threading or replacing the lift rope
This is the core repair for the majority of pulley system failures. The process is the same whether you're re-routing a rope that jumped off the pulley or installing a brand-new one. The guide explains the crank-cord repair steps by feeding a replacement cord through the pole from the hub at the top and routing it into the crank housing via the pulley system, and it notes symptoms such as cranks that spin freely when internal cord or drive connections are detached or gears are worn blank" rel="noopener noreferrer">the repair step by step.
- Remove the canopy fabric by unzipping or unsnapping it from the ribs and folding it aside. You don't need to fully remove it in all cases, but having it out of the way gives you access to the top hub.
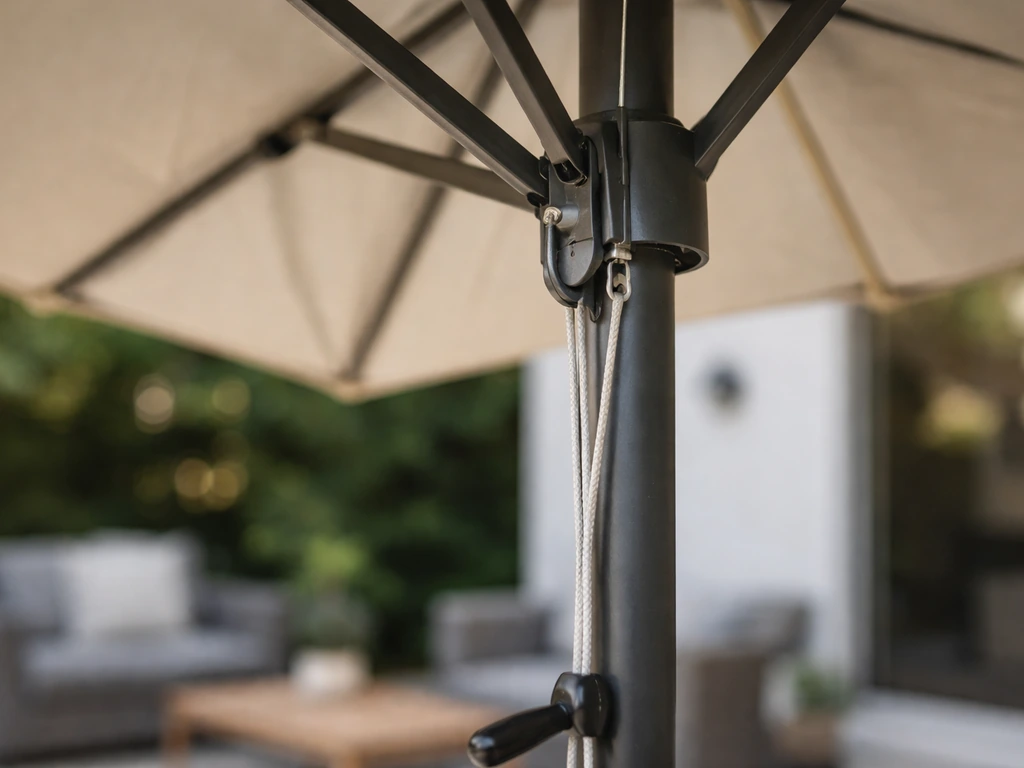
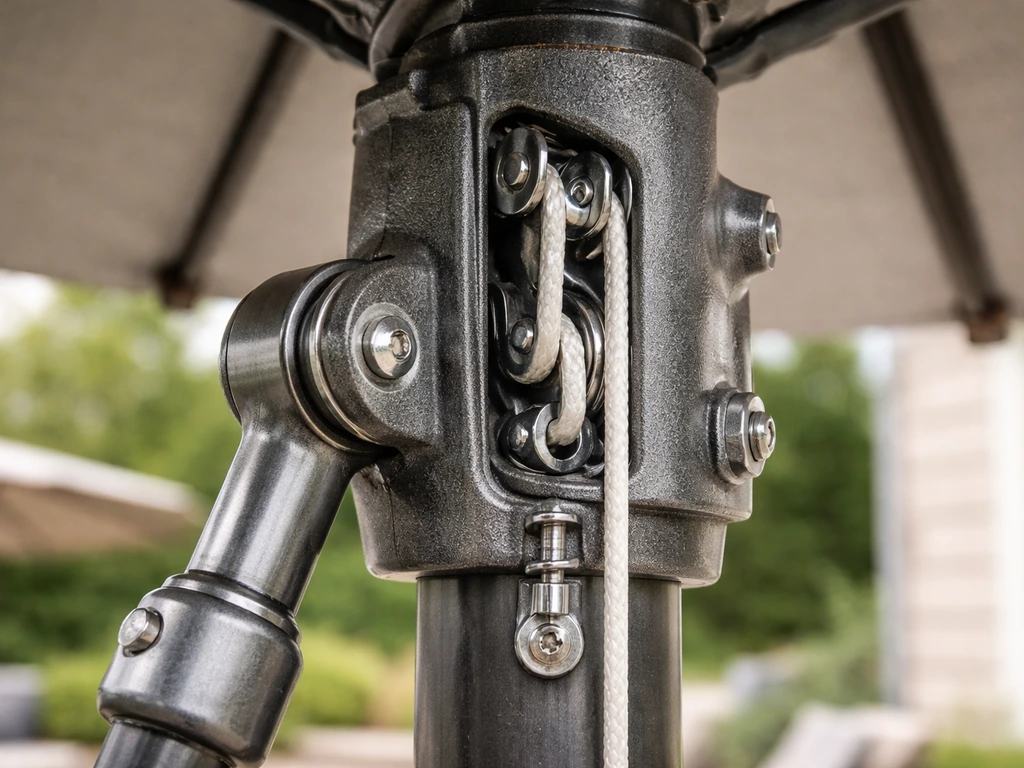
- Locate and remove the top hub cap. This is usually a plastic or aluminum cap at the very top of the pole that snaps or screws off. Under it you'll find the top pulley wheel and where the rope loops or anchors at the crown.
- If your model has a bottom hub (a second pulley point lower on the pole), locate that too. On many center-post umbrellas, the rope runs down from the top pulley, inside the pole, exits at a lower hub or the base of the crank assembly, and ties off there.
- Take a photo of the existing rope path before removing anything. This is the most important step. Incorrect routing after the fact is the number one reason a re-threaded umbrella still won't lift correctly.
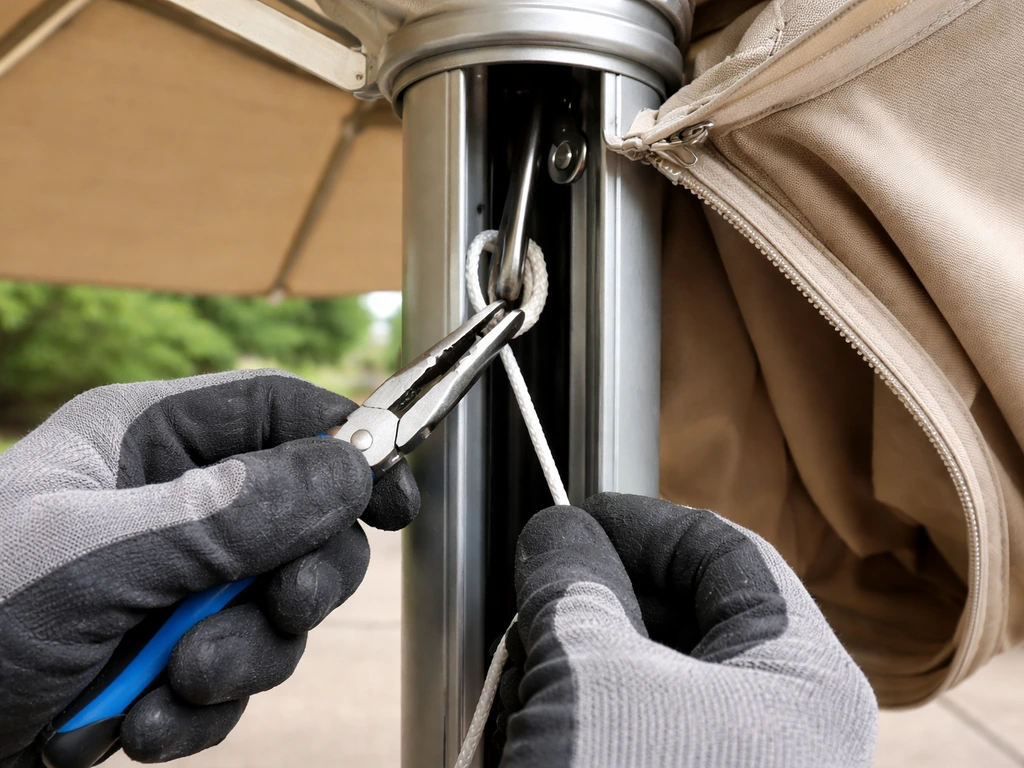
- Remove the old rope. If it's still intact, feed it out slowly and notice every guide hole, pulley groove, and anchor point it passes through. If it's broken, fish both pieces out with needle-nose pliers or the wire hook.
- Inspect all pulley wheels for cracks, worn grooves, or debris stuck in the wheel. Spin each one with your finger. It should spin freely with no grinding. Replace any that don't.
- Attach the new rope to the stiff wire guide and feed it into the pole from the top, following the exact path the old rope took through each pulley wheel and guide hole. Go slowly. If it catches, back it out slightly and reangle rather than forcing it.
- At the bottom anchor point, tie a secure overhand or figure-eight knot so the rope can't pull back through. Seal the cut end of the rope with a lighter flame (touch it briefly until the fibers fuse, then press flat with a damp finger).
- Loop the rope over the top pulley wheel, making sure it sits centered in the groove, not riding up on the rim.
- Replace the top hub cap and any lower hub covers you removed. Snug them down firmly but don't overtighten plastic caps.
- Re-hook or re-cleat the rope at the handle or crank mechanism per your model's original attachment. Refer to the photo you took in step 4.
On models like the AKZ series and several Blissun variants, the rope specifically attaches inside the grip handle housing, not just at the pole base. If you have one of those and the canopy still won't open after re-threading, open the handle housing (two or three screws on the side) and confirm the rope end is seated and knotted in its internal slot before assuming something else is wrong.
Fixing common pulley mechanism failures
Jammed pulley
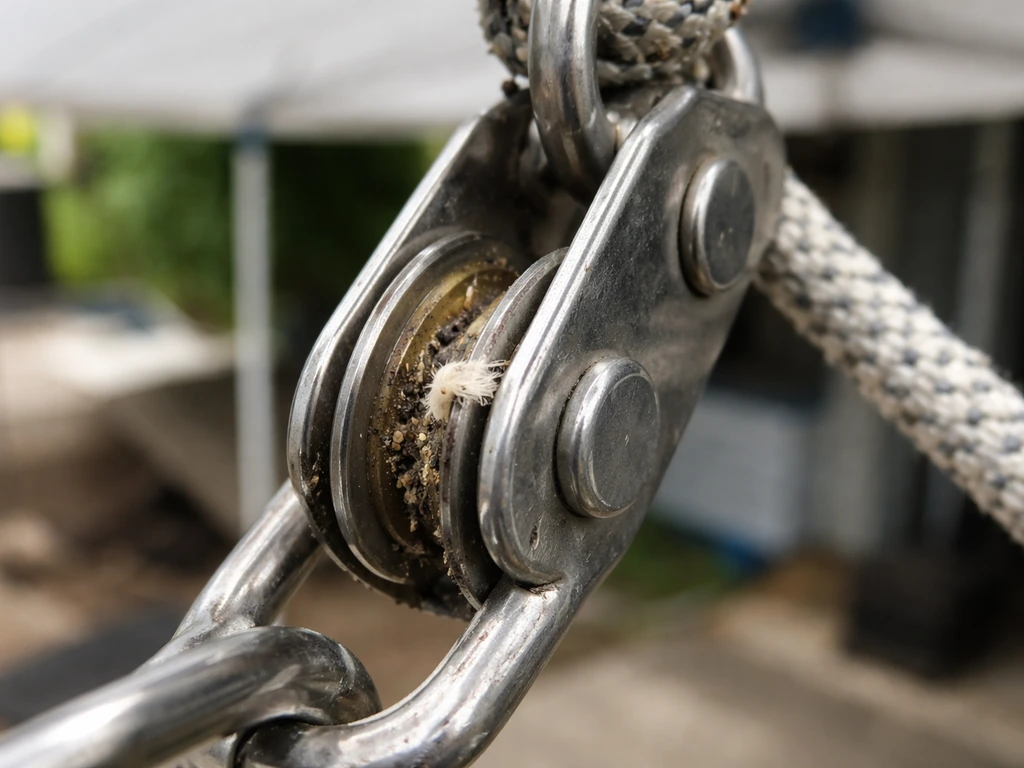
A jammed pulley is almost always caused by debris (grit, a piece of frayed cord, or a small foreign object) lodged in the pulley wheel groove, or by a rope that has wrapped itself around the axle of the wheel instead of sitting in the groove. Remove the hub cap and look directly at the wheel. Clean out any debris with a toothbrush or compressed air. If the rope has wrapped the axle, unwind it carefully with needle-nose pliers. Once clear, apply a small amount of silicone spray to the pulley axle (not the groove, which the rope needs to grip) and spin the wheel to distribute it. Do not use WD-40 as a lubricant here; it attracts dust and will make jamming worse over time.
Slipping rope
If the rope slips through the system without lifting the canopy, either the rope diameter is too small for the pulley groove, the knot at the anchor point has come undone, or the rope has stretched significantly and lost tension. Check the anchor knot first since it's a 30-second fix. If the rope has visibly stretched or feels rubbery and loose compared to a new cord, replace it. A stretched rope won't hold tension properly even if re-knotted.
Uneven lift
Uneven lifting, where one side of the canopy rises higher than the other, almost always points to a routing error. The rope is passing through one guide hole or pulley on the wrong side of the center point, so the tension isn't distributed evenly across both halves of the rib assembly. Remove the hub cap again and trace the rope carefully. On most models, the rope should run straight up through the center of the pole and over a single centered pulley at the top. If yours has two attachment points at the top (a V-shaped anchor), both sides of the rope need to be equal in length from the pulley to their respective anchor points. Adjust and re-knot until both sides match.
Canopy stops midway and locks up
This usually means the locking pin or cleat that holds the canopy at the open position is engaging prematurely, or a tangle inside the pole is catching. Try cranking or pulling the rope slightly past the catch point to see if it releases. If the lock pin is bent or misaligned, you can often straighten it with pliers. If the issue is an internal tangle, you'll need to re-thread the rope as described above, since there's no way to clear a deep tangle without removing the rope entirely. If the canopy lock or a deep internal tangle keeps it from opening fully, also review the steps in how to fix a patio umbrella that won t open for a full troubleshooting order.
Repairing or replacing the crank and gear components
If you've confirmed the rope is correctly routed and intact but the crank still turns without lifting the canopy, the problem has moved upstream to the crank gearbox or the drive connection between the gearbox and the rope. If you suspect the crank gearbox or drive connection is failing, you can troubleshoot it next by inspecting the gearbox components and alignment. If your patio umbrella crank not working issue turns out to be internal, the gearbox and drive connection checks in the crank section are the next related step. If your patio umbrella crank turns but the canopy will not lift, focus first on the rope and pulley routing before you move on to the gearbox. If your crank turns but the canopy will not lift, see the related troubleshooting section on crank-lift gearbox and rope connection checks. This is less common than a rope issue but it does happen, especially on umbrellas that have seen several seasons of heavy use.
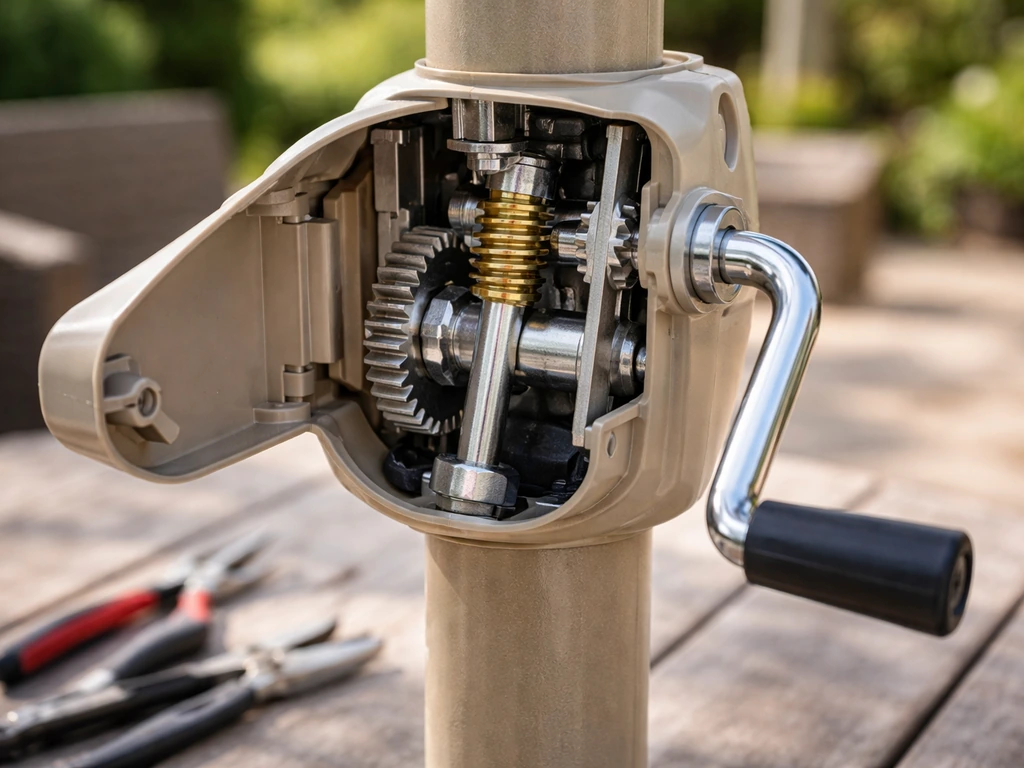
Diagnosing the gearbox
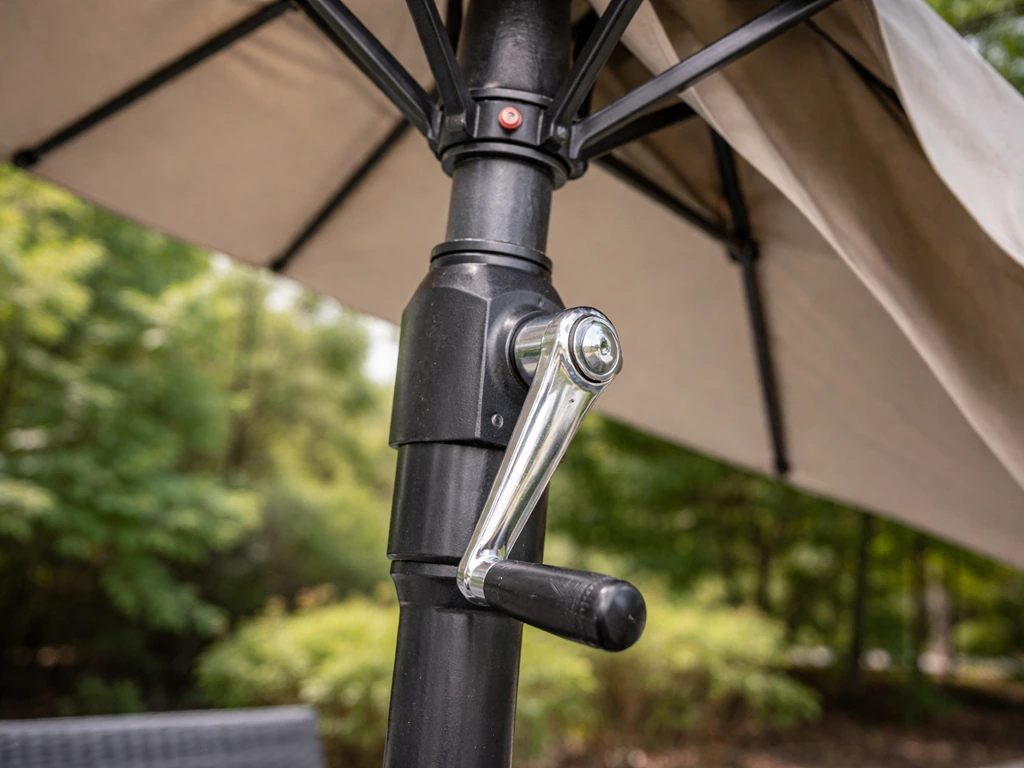
Remove the crank handle by pulling the retaining pin or clip at the base of the handle shaft. Then unscrew or unsnap the gearbox housing cover on the side of the pole. Inside you'll see a small plastic or metal gear assembly. Look for: cracked or chipped gear teeth, a gear that has slipped off its shaft, or a drive pin or clip that has broken and allows the gears to spin without connecting to the rope spool. Understanding how the patio umbrella crank works helps you pinpoint whether the gearbox is driving the lift rope correctly how does a patio umbrella crank work. Any of these will produce the symptom of a crank that turns freely with no load.
Fixing a loose or damaged gear
If a gear has slipped off its shaft, push it back into position and check whether the retaining clip is still intact. If the clip is broken, a small replacement e-clip or c-clip from a hardware store (matched to the shaft diameter) will do the job. If the gear teeth are chipped, replacement gearbox assemblies are available from umbrella parts suppliers, often listed by pole diameter and brand. The crank handle assembly for most residential umbrellas costs $8 to $25 as a complete unit, and swapping the whole thing rather than trying to source individual gears is usually the faster and cheaper path.
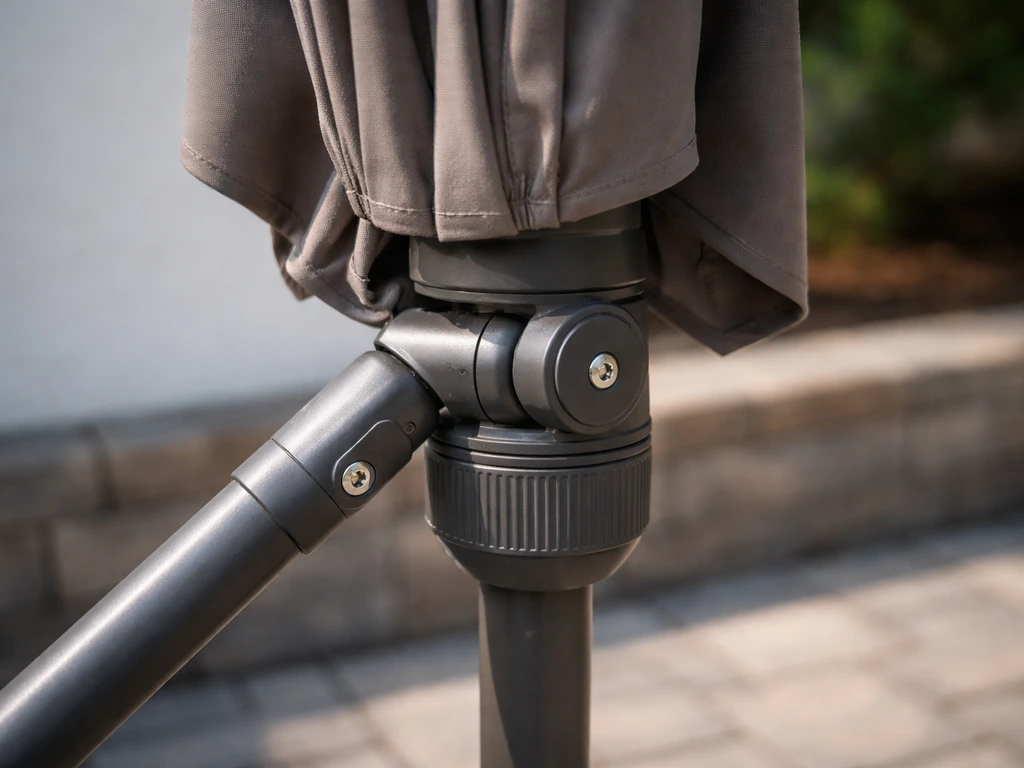
Bent or loose crank tube
Sometimes the crank handle itself is bent, causing the shaft to wobble inside the gearbox and skip instead of driving cleanly. Check by removing the handle and spinning the bare shaft. If it wobbles noticeably, replace the handle. Also check that the set screw or roll pin that fixes the handle to the shaft is tight. A loose connection there mimics a broken gear but is a 30-second fix with a screwdriver or small hex key.
If your crank issues feel more persistent or you're dealing with a push-button tilt that also stopped working alongside the lift, the crank and tilt mechanisms are closely linked. Troubleshooting both together is worth doing since they share the same central pole assembly.
Testing, calibration, and smooth operation checklist
Once you've completed the repair, don't just crank it open once and call it done. Run through this checklist to confirm everything is working correctly before you put the canopy back on and move the umbrella back to its spot.
- With the canopy off or loosely draped, crank or pull the rope slowly through the full opening cycle from fully closed to fully open. Feel for any catches, grinding, or sudden resistance.
- At the fully open position, confirm the rope seats securely in its cleat or hook. The canopy should hold open without any rope feeding back. If it creeps back closed, the lock engagement is off and needs adjustment.
- Crank or pull back through the full closing cycle. The motion should be smooth and consistent throughout. Jerky movement at the same point every cycle means something is catching, possibly a guide hole edge that needs light sanding or the rope running at a slight angle.
- Do three complete open-and-close cycles. Problems that show up only on the second or third cycle are usually a rope tension issue where the rope is slightly too long and starts to pile up inside the pole.
- Reattach the canopy fabric and repeat the open-close test with the fabric on. The added weight of the fabric changes the load slightly, and a borderline rope tension issue will show itself now if it wasn't obvious before.
- Check the rope at both the top pulley and any lower pulley for correct seating in the groove. The rope should sit flat in the center of the groove, not riding on one side.
- Verify the crank handle tightness. It should feel positive and direct, not loose or wobbly, when driving the opening and closing cycles.
If something still feels off after these checks, the most likely culprits are rope length (trim slightly if it's piling up), an incorrectly seated pulley (remove the hub cap and reseat the rope in the groove), or a lock cleat that needs a small bend adjustment to engage earlier or later in the travel. These are all minor tweaks, not full re-dos.
Preventive maintenance so this doesn't happen again
Most rope and pulley failures are slow-motion events. The rope degrades gradually, the pulley wheel collects grit, and eventually something gives. A 10-minute maintenance check every few months will catch problems before they become repairs.
- Lubricate the pulley axles and the crank gearbox with silicone spray or a drop of light machine oil every three to four months. Apply it directly to the axle, not the rope or pulley groove. Wipe off any excess so it doesn't attract dirt.
- Inspect the rope along its full visible length at the start and end of each season. Look for fraying, kinking, stiffening, or discoloration. Replace it at the first sign of wear, before it breaks mid-season.
- Clean debris from the hub caps and pulley areas at the same time. A quick blast of compressed air removes grit that would otherwise embed in the pulley groove and score the rope over hundreds of cycles.
- Close the umbrella when winds pick up above 20 to 25 mph. Wind loading on an open canopy creates sharp, repeated tension spikes on the rope and pulleys that add up to premature wear faster than anything else.
- Store the umbrella with the canopy fully closed and tie-strapped during the off-season. A closed canopy means the rope is at its shortest, lowest-tension state and is far less likely to stretch, settle out of position, or accumulate moisture inside the pole.
- When opening and closing, use steady, moderate force on the crank or rope. Jerky, fast cranking is hard on gear teeth and rope fibers. Slow and consistent extends the life of both.
One honest note on replacement versus repair: if your rope has broken twice in two seasons or the gearbox housing is cracked, it's worth asking whether the umbrella as a whole is worth more repairs. A new rope and pulley kit for a mid-grade umbrella costs under $20 and takes an hour. A new crank assembly adds another $15 to $25. If you're looking at those costs on an umbrella that originally cost $60 to $80, the math starts to favor replacement. But on a quality umbrella that retails for $200 or more, the repair is almost always worth it.
FAQ
Can I use any replacement rope size, or does diameter really matter for fixing the pulley system?
Yes. If you still have the old rope, measure its diameter and compare it to the replacement kit spec, then do a quick dry test by threading the rope through the pulley groove (no canopy installed) and pulling it by hand. If it does not sit fully in the groove or it feels like it binds on every pass, the rope size is wrong and will likely jam again.
What should I check if the rope keeps jumping off the pulley after I re-thread it?
It can. If the rope climbs out of the groove during cranking, it may be routed one pulley off-center, or the pulley wheel groove may be worn. After cleaning and re-threading, look at the rope track from the top with a flashlight while someone slowly cranks, the rope should travel straight without riding up the sides of the wheel.
Is WD-40 ever okay to use on the pulley system, or should I use silicone instead?
Before you add lubricant, confirm the wheel is actually free of debris and rope fibers. Then use silicone spray sparingly on the axle only, run the wheel a few rotations, and wipe any excess. Over-lubing the groove can reduce rope grip and lead to slipping instead of lifting.
Do I need to remove the whole rope from the umbrella pole to fix a pulley issue?
Yes, but only if the rope can move smoothly. The safest approach is to pull the rope out of the pole as much as needed to re-route it, then cut replacement length with a small allowance, and trim only after you confirm equal tension on both sides (for dual anchors) and that the canopy reaches the full open position without slack.
My umbrella stops halfway open, how can I tell whether it is a rope jam or a lock/cleat problem?
If the canopy stops halfway, it often means the rope is binding in the pulley path or the lift lock engages early. Try opening and closing slowly while watching the pulley and rope. If the rope motion feels smooth but the lock catches, adjust the lock pin or cleat timing rather than re-threading again.
How do I identify the correct replacement rope size for my specific umbrella model?
For most crank-lift umbrellas, a general range like a 3 mm to 5 mm rope is common, but the exact value varies by brand and pole diameter. The best match is the original diameter you measured, or a kit labeled for your umbrella brand and pole size, since pulley grooves can differ slightly.
What causes uneven lifting on one side, and how do I fix it correctly?
If your canopy lifting feels uneven, do not just adjust one side. Re-check that each rope run from the top pulley or V-anchors to its matching lower anchor has equal length, then re-knot and verify with a slow open. Unequal lengths usually come from one side slipping out during threading or a knot seating unevenly.
Why does the rope feel taut in the pole but still jams or binds when I crank?
A common mistake is using a rope that is too thick for the pulley groove, or leaving the rope with slack inside the pole. After routing, pull the rope by hand until it is taut, re-seat it in the groove, then crank slowly to confirm it stays seated through the first full lift.
What preventive maintenance should I do to stop pulley rope failures before they happen?
Yes. A quick 10-minute maintenance check can include spinning the pulley wheels to ensure no grit remains, inspecting for frayed rope fibers near the pulley points, and confirming the rope anchor knot has not loosened. If you see dust buildup around the axle, that is a sign the system is starting to jam.
After the repair, how can I verify everything is adjusted correctly beyond a single open test?
Yes, especially after you fix a pulley that was jammed. Once the canopy is open, check that it locks solidly and does not rattle under light force, then try closing fully. If the canopy will open but not close smoothly, it may indicate rope tension is slightly off or the lock cleat needs a timing adjustment.
Fix a patio umbrella crank with step-by-step diagnosis, handle repair, mechanism checks, tools, reassembly, and testing.
Learn how a patio umbrella crank drives opening and tilt, then troubleshoot jams, slipping, stiffness, and locking failu
Step-by-step ways to open and close a crankless patio umbrella, troubleshoot stuck tilt or seized mechanism, and fix it