Most patio umbrella crank problems fall into one of three categories: the handle itself is broken or stripped, the crank turns but nothing happens (the cord or gear inside is the real culprit), or the mechanism is jammed because something is misaligned or corroded. If your patio umbrella crank is not working, start by identifying whether the handle is stripped, the gear inside is stripped, or the mechanism is jammed or corroded patio umbrella crank not working. In almost every case you can fix it yourself in under an hour with basic tools, without buying a new umbrella.
How to Fix a Patio Umbrella Crank: Step-by-Step

Luca Morrison
29 Apr 2026
Quick diagnosis: why the crank won't turn
Before you take anything apart, spend two minutes narrowing down exactly what's failing. The repair path is completely different depending on where the problem actually lives.
| Symptom | Most likely cause | Where to focus |
|---|---|---|
| Handle spins freely with no resistance at all | Stripped internal gear or broken cord inside the crank housing | Crank housing / gear / cord |
| Handle is stiff or won't rotate | Corrosion, debris in the socket, or a jammed mechanism | Socket, pivot points, and housing |
| Handle snapped off or cracked | Physical break in the handle itself | Handle replacement |
| Crank turns but canopy won't rise or lower | Disconnected or frayed lift cord, or slipped pulley | Cord and pulley system |
| Canopy opens but tilt won't engage | Stripped tilt gear, worn locking pin, or loose collar | Tilt mechanism and linkage |
| Everything works until halfway, then sticks | Cord knot, pulley misalignment, or bent rib catching the frame | Cord path and ribs |
The single most telling test is this: remove the crank handle from the socket, then reinsert it slowly and try turning. If you feel zero resistance, the gear or cord inside is gone. If you feel grinding, it's a stripped gear tooth. If there's solid resistance and nothing moves, you're dealing with a jam or corrosion issue. That one observation tells you whether you're replacing a handle, a gear, or clearing a blockage.
Tools, safety, and getting the umbrella into a safe position
Working on a patio umbrella sounds simple, but you can pinch fingers badly if the canopy drops unexpectedly during disassembly, and you can damage the pole or fabric if you work on it while it's still mounted in a base that lets it swing around. Always position the umbrella safely and follow the opening and closing and tilt-operation cautions, because improper handling can damage the cranking system or the tilt joint opening/closing and tilt-operation cautions. Take a few minutes to set things up safely first.
Tools you'll need
- Phillips and flathead screwdrivers (you'll use the flathead to pop retaining rings)
- Needle-nose pliers
- Adjustable wrench or socket set (8mm–14mm covers most hardware)
- Utility knife or scissors (for cutting frayed cord)
- Replacement paracord or braided nylon cord (3mm–4mm diameter is standard for most umbrellas)
- White lithium grease or a dry PTFE spray lubricant (for moving metal parts)
- A corrosion-inhibiting spray such as ZERUST Axxanol or similar rust-preventative grease (for exposed metal after reassembly)
- A clean rag
- Optional: zip ties for temporarily holding the canopy in place
Getting the umbrella into a safe working position
- If the canopy is open, close it as much as possible before starting. If the crank won't function at all, manually fold the ribs down and use zip ties or a bungee cord to hold them against the pole so the canopy can't flap or drop.
- Remove the umbrella from the base entirely. Lay it on a flat surface like a picnic table or a pair of sawhorses. This is especially important when working on the crank housing — TUUCI's repair documentation specifically calls for removing the umbrella from its mounting stem and placing it on a flat surface before any disassembly.
- Make sure the canopy is in a level, non-tilted position before you start turning or forcing anything. Treasure Garden's manuals (including the AG25T guide) are very clear on this: operating or adjusting the crank while the canopy is tilted can bind the internal mechanism and cause additional damage.
- Keep fingers and loose clothing away from the rib pivot points once you start testing the mechanism during repair — pinch injuries happen fast when a loaded spring releases.
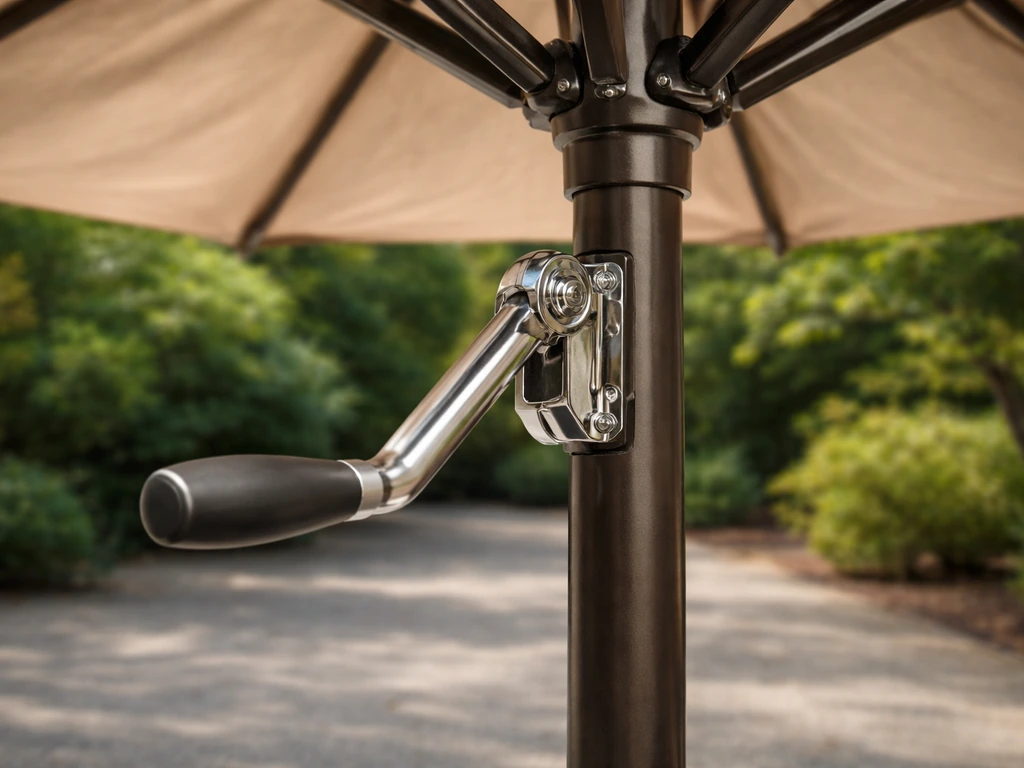
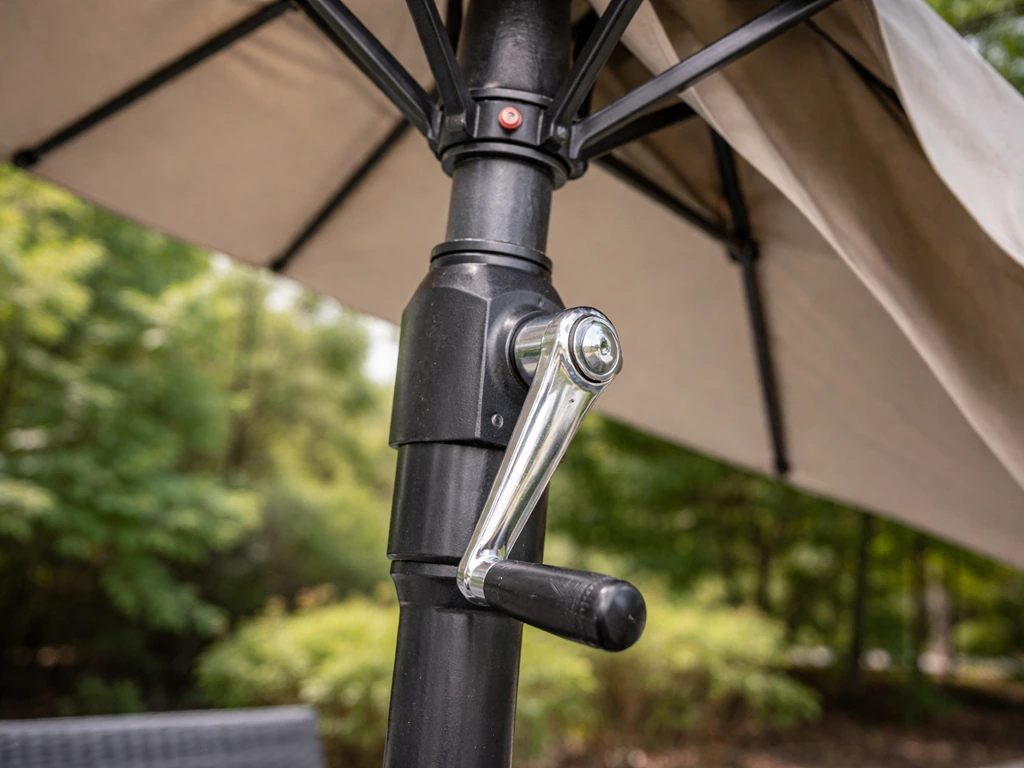
Step-by-step repair for a broken or stripped crank handle
If the handle itself is cracked, snapped, or stripped at the socket end, this is actually the easiest repair. If your patio umbrella won’t open, this step-by-step approach for the crank handle can help you get it working again how to fix a patio umbrella that won t open. The handle is almost always a separate piece from the crank housing, and replacement handles are inexpensive and widely available.
Removing the old handle
- Pull the handle straight out of the crank socket on the pole. On most umbrellas it just slides in and out — there's no threading or locking bolt.
- If the handle feels stuck, look for a small plastic retaining ring or end cap around the socket opening. On Treasure Garden AG28-style umbrellas, the crank assembly repair procedure calls for using a flathead screwdriver to gently pop this plastic ring out of the socket recess. Work around the ring's edge carefully so you don't crack it if you plan to reuse it.
- Once the ring is free, slip the cap off and the handle should pull free. Set all small parts aside in a bowl so nothing rolls away.
Inspecting the socket and fitting the new handle
- Look inside the socket opening. If the socket walls are cracked, worn smooth, or badly deformed, the handle will just spin even with a new handle inserted. In that case the entire crank housing assembly needs replacement, not just the handle (see the replacement section below).
- If the socket looks intact, clean out any grit or debris with a rag.
- Insert the new handle. It should click or seat firmly — you shouldn't be able to pull it back out without effort if there's a retaining ring involved.
- Reinstall the retaining ring or end cap by pressing it back into its groove until it snaps flush.
What to do when the gear inside is stripped
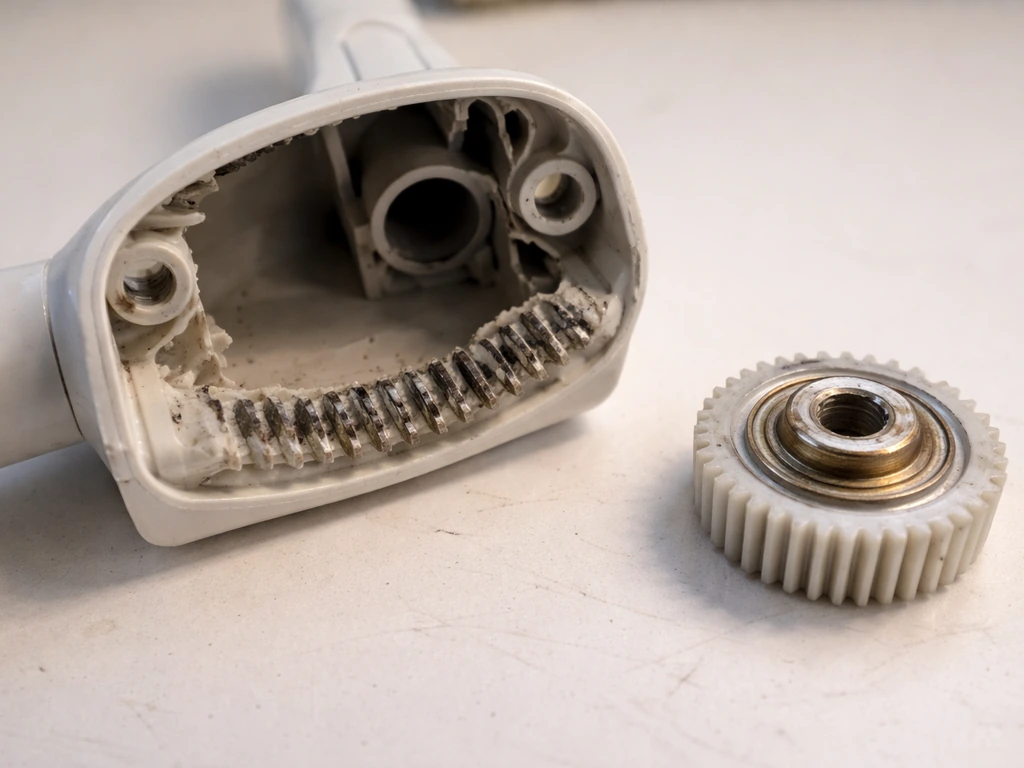
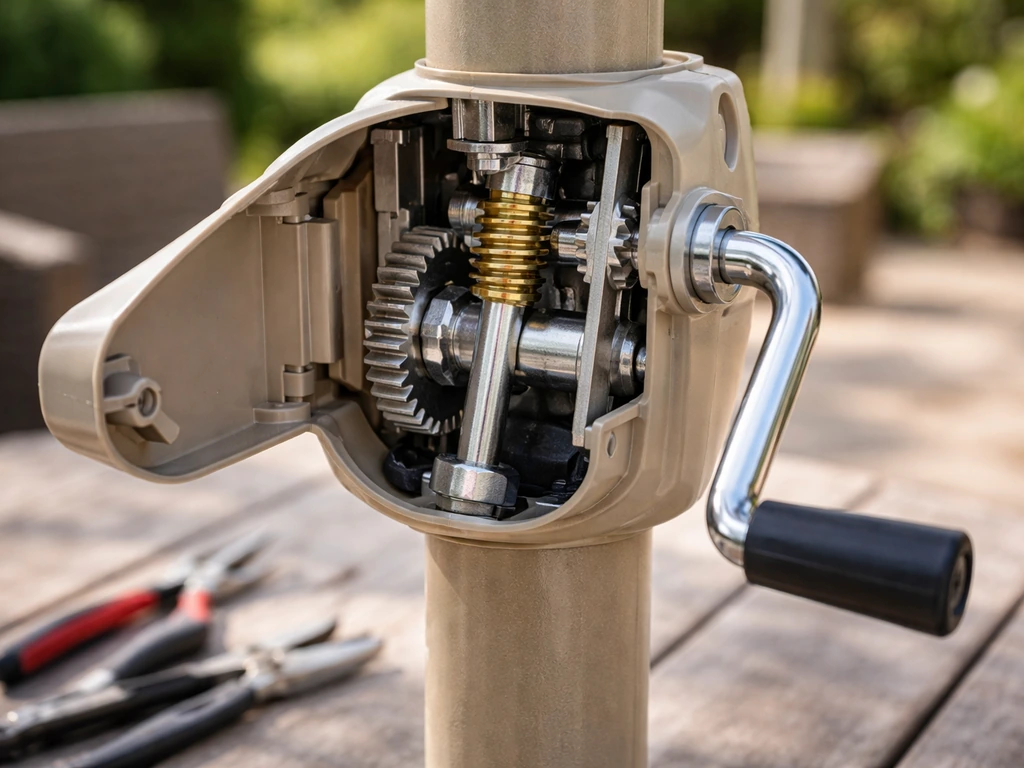
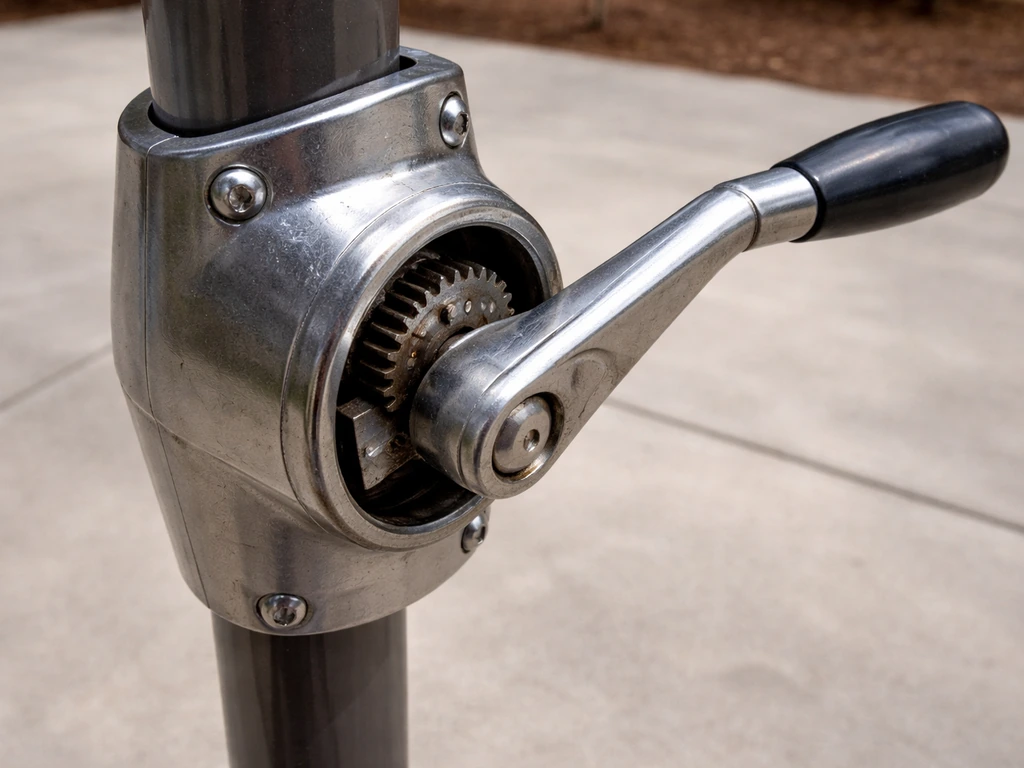
If the handle is physically fine but spins with zero resistance, the internal gear is stripped. This is the most common crank failure on umbrellas with plastic gearing, and it shows up a lot on Treasure Garden models like the AG19. The gear is inside the crank housing on the pole, and the housing typically has to be removed as a unit to access it. Some manufacturers sell just the gear as a spare part; others sell the full crank assembly. Either way, you need to get the housing off the pole first.
- Remove the handle and retaining ring as described above.
- Look for screws or bolts on the crank housing body — typically one to three Phillips or hex screws holding the housing halves together or to the pole.
- Remove those screws and gently separate the housing halves. Take a photo before you pull it apart so you remember how the gear and cord route through the assembly.
- Lift out the damaged gear. Compare it to a replacement before buying — tooth count and bore diameter both need to match.
- Seat the new gear, route the cord back through exactly as it was in your photo, and reassemble the housing.
Fixing crank-related lift and tilt issues
When the crank turns fine but the canopy won't raise or lower (or won't tilt), the problem has moved downstream from the handle into the lift cord, pulley system, or tilt linkage. If your pulley system is the issue, you can usually get it working again by checking the cord routing, pulley condition, and alignment before reassembling. These are separate issues from a broken handle but they're just as fixable.
Lift cord problems
A crank lift system works by using the crank to wind a cord through a pulley (or series of pulleys) that pulls the canopy hub up the pole. If the crank spins but the canopy doesn't move, or if the canopy gets stuck partway up, the cord is almost always the culprit, either it's frayed, knotted, jumped off a pulley, or the knot at the attachment point has slipped.
- Open the crank housing (as described above) and trace the cord from the housing drum outward toward the top of the pole.
- Run the cord through your fingers looking for fraying, sharp kinks, or sections that have gone flat from repeated bending.
- Check that the cord is properly seated in every pulley groove. A cord that has jumped its pulley will let the crank spin freely without transferring force — this is easy to miss because it looks fine from the outside.
- If the cord is frayed or has jumped the pulley, cut it free and replace it with a matching diameter braided nylon cord (3mm–4mm works for most residential umbrellas). Thread the new cord along the same path, knot it securely at both the drum and the attachment point at the hub, and trim the excess.
- If the canopy was getting stuck halfway, check the full cord path for any knot passing through a tight pulley or a section of cord that's wrapped on itself on the drum.
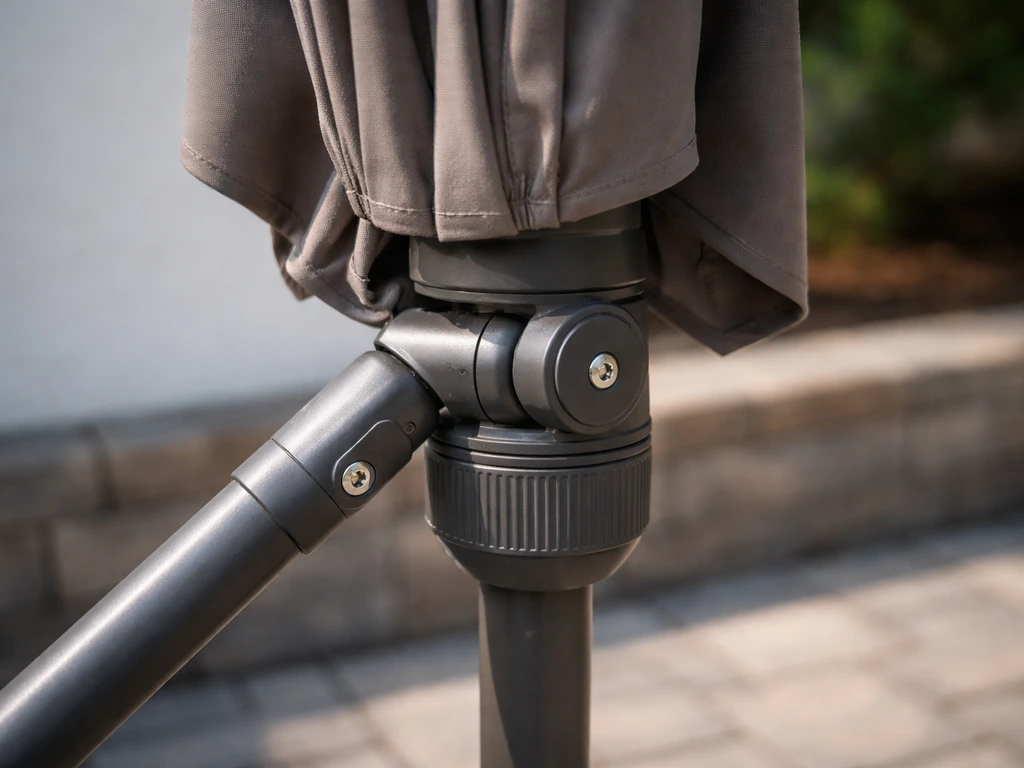
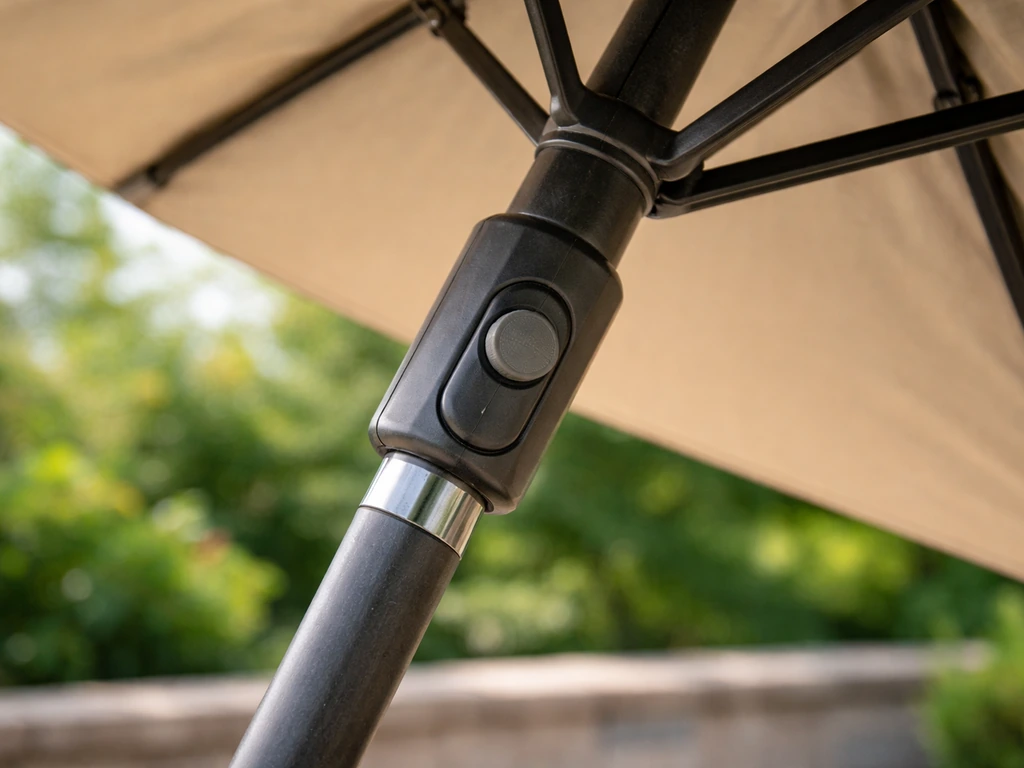
Tilt mechanism problems
Auto-tilt systems that are driven by the crank rely on a separate gear set, a locking pin, or a collar that engages after the canopy is fully open. Stripped plastic gears are the most common failure point in auto-tilt systems. You can also get a tilt that won't lock because the locking pin is worn, or one that's stuck because the pivot collar has corroded in place.
- With the umbrella open and laid flat on your work surface, locate the tilt joint — it's the angled or hinged section of the upper pole, usually about 18–24 inches below the canopy hub.
- Try moving the tilt manually with your hand. If it moves freely but won't lock, the locking pin is worn or missing. If it won't move at all, the pivot is seized.
- For a sticky pivot: apply penetrating oil (such as WD-40) to the joint and let it sit for 10–15 minutes, then work the tilt back and forth gently. Follow up with white lithium grease once it's moving freely.
- For a worn locking pin: the pin usually slides into a hole to hold the tilt angle. If it no longer holds, the pin or the receiving hole is worn. Replacement pins are inexpensive and typically available from the umbrella manufacturer.
- For a stripped tilt gear: this requires disassembling the tilt housing, which is similar in approach to the crank housing teardown. Remove the collar or cap screws, expose the gear, and replace it with a matching part.
- Remember: Treasure Garden and most other manufacturers specify that the canopy must be in a level (non-tilted) position before cranking the umbrella open or closed. If you try to crank while the tilt is engaged, you're putting sideways stress on the gear that can strip it quickly.
Inspecting and repairing common wear points
While you have the crank housing apart, it's worth a few extra minutes to check the spots that typically fail before they actually cause a problem. Catching wear early is much easier than dealing with a fully seized mechanism mid-summer.
Springs
Some crank assemblies and tilt mechanisms use a small return spring to keep a pin, collar, or gear engaged. If a spring is flattened, cracked, or corroded through, the component it controls won't stay in position. Hold the spring up to the light, a healthy spring has even coil spacing and snaps back immediately when compressed. A dead spring has visibly uneven coils or doesn't spring back. Replace it with a matching spring from a hardware store (bring the old one to match diameter, wire gauge, and free length).
Pivot points
Every place two pieces rotate against each other is a pivot point, the crank gear shaft, the tilt joint, and the rib pivot tabs are the main ones. Pivot points accumulate grit and moisture and then corrode or wear flat. Run a finger across each pivot contact surface. If you feel roughness, pitting, or chalky oxidation, clean the surface with fine steel wool or 220-grit sandpaper, wipe it clean, and apply fresh grease before reassembly.
Mounting hardware
Loose bolts in the crank housing or at the pole collar are a surprisingly common cause of cranks that feel sloppy or that make a clunking sound without actually raising the canopy. Check every screw and bolt in the crank area with a wrench or screwdriver and snug anything that has worked loose. Don't overtighten screws going into plastic housing, just firm, not cranked down hard, or you'll strip the threads in the housing itself.
Reassembly, lubrication, and testing
Putting it all back together correctly, and lubricating the right spots, makes the difference between a repair that lasts one season and one that lasts five.
Reassembly order
- Start from the inside out: seat the gear (and cord drum if applicable) first, then close the housing halves together, then reinstall all screws.
- Route the lift cord through every pulley before closing the housing. If the cord goes through a slot in the housing body, thread it first and then seat the housing.
- Reinstall the retaining ring or end cap at the socket, then insert the handle and confirm it seats firmly.
- If you disassembled the tilt joint, reassemble it and verify the locking pin engages at the correct angle positions.
Where and what to lubricate
Use white lithium grease on the gear teeth and the cord drum shaft, it stays in place, tolerates outdoor temperatures, and doesn't attract as much grit as petroleum-based greases. Use a dry PTFE spray on the cord itself so it slides smoothly through pulleys without picking up dirt. For exposed metal surfaces on the housing exterior and mounting hardware, a corrosion-inhibiting spray (like ZERUST Axxanol Spray-G or a similar rust-preventative coating) adds a protective layer against moisture between uses. Do not lubricate the socket opening itself, grease there makes the handle slip rather than grip.
Testing checklist
Before you're done, run the umbrella through at least three full open-and-close cycles. Before closing the umbrella, Treasure Garden’s AG25T manual advises ensuring the blank" rel="noopener noreferrer">canopy is level (non-tilt). Here's what to check during each cycle:
- The crank handle turns smoothly with consistent resistance — no slipping, no grinding, no dead zones
- The canopy rises evenly from the start to fully open, without sticking at any point
- If your umbrella has auto-tilt, it engages (and locks) only when the canopy is fully open, not partway up
- The canopy lowers at the same consistent rate without dropping suddenly
- Keep your fingers away from the rib pivot points during these test cycles — pinch points are real when a spring-loaded rib snaps into place
Prevention: keeping the crank working season to season
The crank is the most-used mechanical part on the umbrella, and most failures are entirely preventable with a few minutes of attention each season.
- Lubricate the gear and pivot points at the start of every season, before the first use. A few minutes in April beats an hour of repair in July.
- Always return the canopy to a level (non-tilted) position before cranking open or closed. Cranking while tilted binds the gear and strips it over time — this one habit eliminates the most common gear failure.
- Remove the crank handle when the umbrella isn't in use. Leaving it in the socket during wind or rain lets moisture wick into the mechanism.
- Close the umbrella and remove it from the base before any storm. Wind stress on an open umbrella torques the crank housing and bends the cord attachment points.
- At the end of the season, wipe the crank housing down, apply a light coat of rust-preventative spray to exposed metal, and store the umbrella horizontally in a dry location. Vertical storage with the umbrella still in the base leaves the crank hardware exposed to winter moisture and freeze-thaw cycles.
- Inspect the lift cord once a year. A cord that looks slightly fuzzy or has any visible broken strands should be replaced proactively — waiting until it snaps means you're dealing with a stuck canopy, not just a worn cord.
When to replace parts or the whole umbrella
Most crank repairs are worth doing. The exceptions are when the pole itself is bent (a bent pole puts the crank housing under constant lateral stress that no repair can fix), when the housing is cracked badly enough that it can't hold the gear assembly together, or when the cost of replacement parts approaches the cost of a comparable new umbrella.
Finding the right replacement parts
The most important thing when ordering a replacement crank handle, gear, or full crank assembly is to match by model number, not just by umbrella size or visual similarity. A replacement crank listing for Treasure Garden umbrellas, for example, specifically advises verifying model compatibility by checking the umbrella's model name and number, and confirming that the mechanism type matches (crank-to-open vs. auto-tilt are different assemblies even if they look similar). The model number is usually on a sticker on the pole just above the base, or on the original packaging.
If you can't find the model sticker, measure the socket opening diameter (most are 7/8 inch or 1 inch), photograph the existing crank housing, and contact the manufacturer's parts line directly. Treasure Garden, TUUCI, and most major brands have parts support and can identify the correct assembly from photos and dimensions.
When replacement makes more sense than repair
- The pole is visibly bent or cracked at or near the crank housing mounting point
- The crank housing itself is cracked through and can't hold the gear assembly securely
- Replacement parts cost more than 40–50% of a comparable new umbrella
- The umbrella frame has multiple simultaneous failures (broken ribs, failed tilt, AND a stripped crank gear) that suggest the overall unit is simply worn out
- You can't identify the model or find compatible parts, and the umbrella is more than 8–10 years old
If you're in a situation where the crank mechanism is failed but the canopy and frame are still in good shape, it's also worth knowing that some umbrellas can be operated manually with a different lift method while you source parts. If you need shade right away, this guide on how to open a patio umbrella without a crank can help you operate it safely while you fix the mechanism how to open patio umbrella without crank. Understanding how a patio umbrella works makes it easier to see whether the crank is driving the lift cord, pulley system, or tilt mechanism how does a patio umbrella work. Understanding how a patio umbrella crank works helps you identify whether the lift cord, pulley system, or tilt mechanism is at fault. The approach is different depending on the umbrella's design, but it's a practical short-term option if you need shade before the repair parts arrive.
FAQ
Why does my patio umbrella crank work only when I lift or press on the canopy?
If the crank handle turns but the canopy only moves when you hold the canopy hub in place, the issue is often cable/cord tension or a cord knot that has slipped at the attachment point. Recheck the cord routing through the pulleys, then verify the cord knot is seated and the pulley track is aligned before re-greasing and reassembling.
What should I do if I feel grinding when I test the crank handle?
If you feel grinding even after you remove and reinsert the handle, do not keep cranking. Grinding usually means stripped gear teeth, and repeated turning can chew up the mating plastic. Open the housing and inspect the gear teeth for missing sections or sharp fragments before deciding whether to replace the gear or the full crank assembly.
My crank feels stiff after rain, how do I tell if it is corrosion versus a stripped part?
A seized feel that gets worse after rain or storage is usually corrosion in a pivot point or a cord that absorbed moisture. Focus on cleaning and re-greasing pivot surfaces, then use a dry PTFE spray on the cord, not heavy grease, and verify the cord can move freely through the pulley runs.
Why does my umbrella crank lift the canopy but the canopy will not come back down?
If the canopy raises but will not lower, the cord may be snagged on a pulley or the pulley alignment is off, causing the cord to hang under load. Check that the cord is seated in the pulley grooves and that the pulley arms and tilt linkage (if present) move through their full range during a full open and close cycle.
Can I buy any replacement crank handle that looks the same for my umbrella size?
If you order parts by size only, you can end up with a handle or mechanism that fits the socket but does not match the internal drive and tilt type. Always confirm the model number from the sticker on the pole (above the base) and match the mechanism type (crank-to-open versus auto-tilt), even if the external crank looks identical.
What if my socket opening measurement does not exactly match the replacement part size listed?
If the socket opening diameter measures differently than the parts listing, the crank may appear compatible but bind internally or wobble. Measure carefully (use a caliper if possible), compare to the listing’s stated diameter, and if you are between sizes, send photos and measurements to the manufacturer parts line before purchasing.
Should I grease the socket opening where the crank handle inserts?
After replacing the gear or crank housing, skip forcing lubrication into the socket area. Grease in the socket opening can reduce grip and make the handle slip under load. Lubricate gear teeth and the cord drum shaft, and keep the socket opening clean and dry for proper handle traction.
How can I tell if my return spring is the reason my crank or tilt will not stay engaged?
If you see uneven coil spacing or the spring does not snap back, replace it. Also confirm you have the correct spring length and wire gauge, because a spring that is too weak will not keep the locking pin or collar engaged, even if it seems to fit.
My umbrella makes a clunking sound when I crank, but it does not lift fully. What is the first thing to check?
A clunking sound with little or no canopy movement is commonly a loose bolt in the housing or pole collar. Recheck all screws and bolts with a tool, snug them to firm (not overtight), and then repeat the open and close cycles to confirm the sound and motion both return.
Is it worth repairing if my patio umbrella pole might be slightly bent?
If the pole is bent, the crank housing can be under constant side load and will keep failing, even after replacing the gear. Inspect the pole for any visible bend or wobble when the umbrella is extended, and consider part replacement only if the pole is straight and the housing seats evenly on reassembly.
Do I always need to replace the lift cord if I see fraying, or can I patch it?
If the cord is frayed or knotted, replace or re-string it rather than trying to patch it. Frayed cord can slip and will likely re-jam mid-cycle. When routing the new cord, keep it taut enough to sit properly in the pulley grooves, then run multiple open and close cycles to confirm smooth travel.
Next Articles
How Does a Patio Umbrella Crank Work? Troubleshooting Guide
Learn how a patio umbrella crank drives opening and tilt, then troubleshoot jams, slipping, stiffness, and locking failu
How to Open a Patio Umbrella Without a Crank
Step-by-step ways to open and close a crankless patio umbrella, troubleshoot stuck tilt or seized mechanism, and fix it
Patio Umbrella Stuck in Tilt Position: Fix the Button
Step-by-step fix for a patio umbrella tilt button stuck, with diagnosis, safe release, lubrication, and prevention tips.