
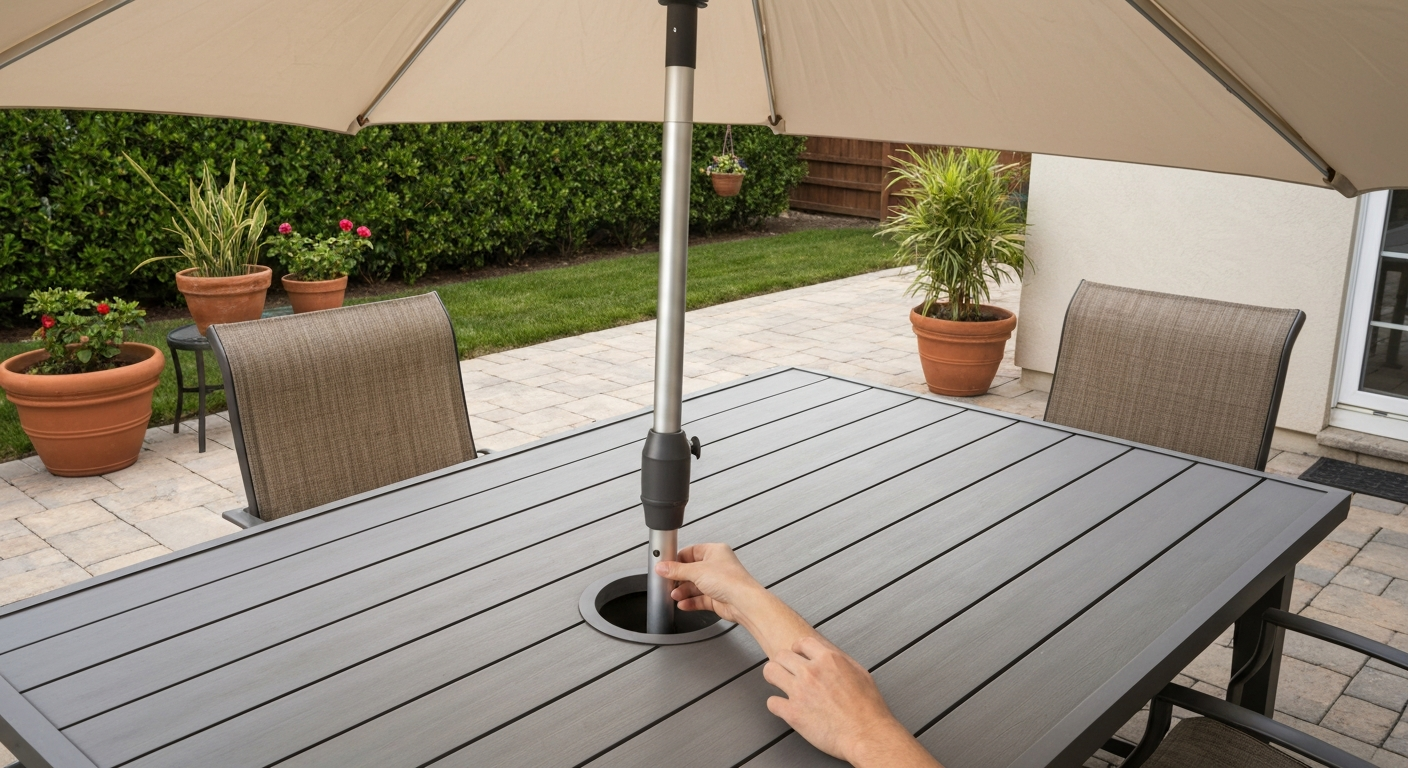
To put an umbrella in a patio table, slide the pole straight down through the center hole in the tabletop, seat it into the base or ground sleeve below, then tighten the pole collar or knob so it sits firm and upright. That is the core move, but getting it right the first time means checking that your pole diameter actually matches the table hole (most tables use a 1.5 in or 1.9 in hole), having the right adapter or reducer sleeve if they do not match, and knowing whether your umbrella is a one-piece or two-piece pole before you start. This guide walks through every step, from measuring and compatibility to installation, stabilization, wind safety, troubleshooting wobbles and stuck cranks, and seasonal care.
How to Put Umbrella in Patio Table: Fit, Install & Secure

Luca Morrison
16 Jul 2026
What This Guide Covers and a Quick Safety Note
This guide is aimed at the homeowner doing this themselves, whether you just bought a new umbrella, switched tables, or are pulling last year's setup out of storage. You will find measurements and compatibility charts, a full installation walkthrough for both center-hole tables and offset setups, adapter and collar options, stabilization and wind-safety guidance, common mechanical repairs, and tips on positioning for shade. I have also included notes on adapting beach umbrellas for patio use and some simple decorating ideas, since those questions come up constantly.
Before you start: an unsecured or improperly balanced umbrella can tip, fall, and injure someone, especially in wind. Always set up on a calm day, keep bystanders clear while inserting a heavy pole, confirm your base is rated for your canopy size, and never leave the umbrella open during strong or gusty winds. Most manufacturer manuals recommend closing and securing the umbrella at sustained winds above roughly 22 to 25 mph, and removing it from the table entirely when gusts exceed 31 to 32 mph. Keep those thresholds in mind throughout the season.
Tools and Parts Checklist
Gather these before you begin. Most installations need only a tape measure and a screwdriver, but having the full list ready prevents mid-job trips to the hardware store.
- Tape measure (to check pole OD and table hole diameter)
- Adjustable wrench
- Hex/Allen key set — M5 and M8 sizes cover most common umbrella fasteners
- Phillips and flat-head screwdrivers
- Needle-nose pliers (useful for guiding collars and fishing out dropped screws)
- Silicone spray lubricant (for tilt joints, crank gears, and sliding pole sections; avoid oil-based lubes that attract grit)
- Replacement lift cord — 3 mm braided polyester is the common size for crank systems
- Pole reducer sleeve or adapter ring (if pole OD does not match table hole — more on this below)
- Umbrella hole ring and cap (replacement trim ring for the table hole, sized to your table's hole diameter)
- Replacement set screws for the pole coupling — sizes vary by brand, but M8x20, ST6x16, and ST5.5x16 appear on many popular umbrella parts lists
- Rubber or foam grommet to cushion the pole inside the table ring
- Cone wedge or shaft shim (stabilizes a loose pole inside an oversized hole or sleeve)
If you own an Abba Patio umbrella or a similar two-piece market style, pull out the original parts bag. Those kits usually include the Allen keys and screws you need, and the parts list specifies exact fastener sizes so you can order extras without guessing. Keep the manual, because brand-specific assembly steps differ in ways that matter.
Choosing the Right Umbrella for Your Table
Canopy size relative to table size
A common rule of thumb is to choose a canopy that extends roughly 2 feet beyond the edge of your table on each side. A 48-inch round table pairs well with a 9-foot canopy. A 6-foot rectangular table typically needs a 10- to 11-foot canopy for full coverage. Going too small leaves seating in direct sun; going too large stresses the pole and base when wind catches the extra canopy area.
Center-pole vs. offset (cantilever)
A center-pole umbrella threads directly through the hole in your table. It is the simplest setup and the most stable for everyday use. An offset or cantilever umbrella mounts on a side pole and base, so the canopy hangs out over the table without a pole in the center. Offset umbrellas give you an unobstructed table surface and let you shift shade without moving furniture, but they require a much heavier ballast base (commercial cantilever bases can call for 200 to 400 pounds of fill) and are harder to keep stable in wind. If your table already has a center hole, a center-pole umbrella is the straightforward, lower-risk choice.
Material and weight considerations
Aluminum poles are lightweight, rust-resistant, and easy to handle during solo installation. Steel poles are heavier and more rigid but can rust if the finish is scratched. Wood poles look great but require more seasonal maintenance and add weight. A heavier pole and canopy combination puts more stress on the table ring and base, so if you are setting up on a lightweight glass or faux-wood table, stick with an aluminum-pole umbrella unless you are using an under-table weighted sleeve to take the load.
Measurements and Compatibility: Pole Diameters, Table Holes, and Tilt Types
This is where most installation problems originate. A pole that is even a quarter inch narrower than the table hole will wobble; one that is slightly too wide will not seat at all. Most residential patio tables have a center hole designed for a 1.5 inch (38 mm) or 1.9 to 2.0 inch (48 to 51 mm) pole. Most umbrella poles sold at major retailers are manufactured to one of those same two standard outer diameters, so they usually match, but not always.
| Pole OD | Common Table Hole Size | Adapter Needed? | Notes |
|---|---|---|---|
| 1.5 in (38 mm) | 1.5 in hole | No | Most common residential pairing |
| 1.5 in (38 mm) | 2.0 in hole | Yes — reducer sleeve or grommet | Need a collar or cone shim |
| 1.9 in (48 mm) | 2.0 in hole | Typically no, or thin grommet | Snug fit; check table ring thickness |
| 1.5 in (38 mm) | Non-standard hole (e.g. 1.75 in) | Yes — custom adapter or reaming | Ream to 2.0 in then use sleeve |
| 35 mm (metric) | 38 mm hole | Adapter ring or shim | Common on imported/beach umbrella poles |
Single-piece vs. two-piece poles
Many umbrellas sold today ship as two pieces: a lower section and an upper section that couples together. The lower pole slides into the base or table sleeve first, then the upper section (with the canopy attached) slides onto the lower and is secured by a set screw, twist-lock, or threaded collar. Knowing which type you have matters before you start, because the insertion sequence is different. With a two-piece pole, you insert and seat the lower section first, then attach the upper section. With a one-piece pole, the whole assembly goes through the table hole as a single unit, which requires more vertical clearance and is harder to manage alone.
Tilt and crank types
Three tilt mechanisms appear most often on residential umbrellas. Manufacturer manuals and repair guides commonly refer to push‑button, collar (twist‑tilt), and crank‑integrated tilt systems and advise operating each according to its specified method rather than forcing the mechanism. Push-button tilt uses a spring-loaded button on the pole; press and hold it while tilting the canopy to the angle you want, then release. Collar (or twist) tilt uses a rotating ring on the pole shaft; loosen by turning the collar, tilt, then re-tighten. Crank-integrated tilt combines canopy opening and tilt into the side-mounted crank handle. Identifying your tilt type before installation lets you test it correctly during setup and helps you troubleshoot if it sticks later.
How to Measure Your Table Hole and Umbrella Pole
- Measure the table hole diameter: Use a ruler or tape measure across the widest point of the hole opening on top of the table. Measure inside edge to inside edge, not including the decorative trim ring. Write down the number in both inches and millimeters.
- Measure the umbrella pole OD: Measure the outside diameter of the pole at the section that will sit inside the table hole. Do not measure near a joint or coupling; measure along a smooth, straight section. Common results: 1.5 in (38 mm), 1.9 in (48 mm), or 35 mm on some metric/imported poles.
- Measure table hole depth: Stick a ruler down through the hole to check how deep the sleeve or insert runs. Some table inserts are only 1 to 2 inches deep; others drop into a lower frame sleeve of 4 to 6 inches. A deeper sleeve provides more stability.
- Check tabletop thickness: If you are buying a hole ring or trim kit, the product will list a maximum tabletop thickness it is designed for. Measure your tabletop edge to confirm compatibility.
- Compare numbers: If pole OD matches hole ID within about 1/8 inch, a standard grommet will fill the gap. If the gap is larger, you need a reducer sleeve or adapter. If the pole is wider than the hole, do not force it — you need to ream the hole or choose a different umbrella.
Standard sizes you are most likely to encounter: 1.5 inch (38 mm) pole in a 1.5 inch hole (perfect fit), 1.5 inch pole in a 2.0 inch hole (needs adapter), and 1.9 inch pole in a 2.0 inch hole (snug, usually works with a thin rubber grommet). If your table hole trim is a sold-separately hole ring, the ProjectPatio-style 2-inch ring, for example, lists an internal sleeve that fits poles up to about 1 and 5/8 inches and specifies maximum tabletop thickness, so always confirm those numbers match your table before ordering.
Adapters, Collars, Reducer Sleeves, and Grommets
These four accessories solve the same basic problem (a pole that does not fill the hole snugly) in slightly different ways. Here is what each one does and when to use it.
| Accessory | What It Does | Best Used When |
|---|---|---|
| Rubber grommet | Cushions the pole inside the hole; fills a small gap (1/8 to 3/16 in) | Pole is close to hole size but vibrates or rocks slightly |
| Reducer sleeve (plastic or metal) | Steps the hole opening down to a smaller inner diameter | Pole OD is noticeably smaller than hole — e.g., 1.5 in pole in a 2.0 in hole |
| Cone wedge / shaft shim | Tapered insert that grips when pushed down around the pole | Pole is loose in a sleeve or base socket; no exact-fit sleeve available |
| Pole collar (umbrella-side) | Clamps around the pole above the table surface; prevents the pole from sliding down | Pole seats loosely or tends to sink into the hole over time |
| Adapter ring (base-side) | Changes the inner diameter of a base socket to match the pole | Using an umbrella pole with a base designed for a different pole OD |
Many bases sold at major retailers include a set of adapter rings in the box sized for 35 mm, 38 mm, and 48 mm poles. Before buying a separate adapter, check whether your base already came with one. If your pole OD falls at an odd non-standard size, look for a universal base that comes with all three ring sizes, or confirm the set includes your specific measurement.
Hole ring and cap kits, sometimes called table umbrella rings, solve a different problem: they replace a chipped, cracked, or missing decorative trim around the table hole opening. These are sold for standard 2-inch table holes and list both the internal pole size they accommodate and the maximum tabletop thickness they work with. If your table hole is a non-standard diameter, you can either find a ring that matches or have the hole professionally reamed to 2.0 inches and then use a standard ring.
Preparing the Table and Umbrella Before You Install
Inspect the table hole and ring
Look at the table hole opening closely. The trim ring (often plastic or metal) should be intact with no cracks that could catch or bind the pole. Wipe the inside of the hole clean, grit, rust flakes, or old sealant inside the sleeve will scratch the pole and create a false-tight sensation during installation. If the ring is cracked or missing, replace it before proceeding. Trying to force a pole past a cracked ring can split the ring further and leave sharp edges inside the hole.
Inspect and prep the umbrella pole
Check the pole sections for dents, bends, or corrosion. A bent lower pole section will bind in the table sleeve and never sit truly vertical. Light surface oxidation on aluminum can be wiped off with a damp cloth. If you see active rust on a steel pole, sand it lightly with fine-grit sandpaper and apply a metal primer before installation; a rusting pole sheds particles into your table sleeve and makes removal much harder later. Apply a thin film of silicone spray to the outside of the pole section that will sit inside the table hole; this makes seating and future removal much easier without attracting dirt.
Brand-specific checks
Before assembly, locate your brand's user manual or download it from the manufacturer's website. This matters more than people expect. Assembly sequence, fastener torque, and tilt operation vary meaningfully between brands. Abba Patio manuals, for example, specify the exact Allen key sizes (typically M5 and M8) for pole coupling screws, list every part number in the kit (so you can order replacements if something is missing), and spell out the exact two-piece assembly sequence. A Treasure Garden cantilever manual will specify ballast fill weight for your specific base model. If you cannot find a physical manual, search the brand name plus your model number plus 'assembly manual PDF.' Most major brands host these on their websites.
Step-by-Step Installation
For a center-hole table with a two-piece pole umbrella
- Position the table where you want it permanently. The umbrella is much harder to move once assembled, especially with a weighted base attached.
- Place your base directly under the table hole. Center the base socket under the hole so they are vertically aligned. If using a freestanding weighted base, position it so the pole will pass through the table hole and then drop cleanly into the base socket.
- Insert any adapter rings or reducer sleeves into the table hole now, before the pole goes in. Press the reducer sleeve down into the hole so it sits flush or slightly recessed with the tabletop surface.
- Take the lower pole section and slide it down through the table hole from above. Guide it slowly so it does not knock the table ring. Let it continue down into the base socket below.
- Seat the lower pole fully into the base socket. You should feel it bottom out or reach a stop point. If the base has a tightening knob, snug it enough to hold the pole upright but do not fully tighten yet.
- Check vertical alignment. Step back and look at the pole from two directions (front-to-back and side-to-side). It should look perfectly plumb. Adjust the pole position and re-check before tightening.
- If a pole collar came with your umbrella, slide it down the pole from the top until it rests on the table surface around the hole. This collar supports the canopy weight and prevents the pole from sinking. Tighten the collar's set screw with the appropriate Allen key — typically M5 or M8 depending on your brand.
- Now attach the upper pole section (with the canopy). Slide the upper pole's inner tube down over the top of the lower pole. Align any set-screw holes or keyway slots. Once aligned, insert the coupling screw or twist the lock collar until it clicks or snugs firmly. Do not overtighten — you want secure, not stripped.
- Fully tighten the base knob or set screw. For a knob-style base, tighten firmly by hand until it stops turning. For a hex-screw base, use your Allen key.
- Test the tilt and open mechanisms before considering the job done. Open the canopy slowly using the crank or pulley, watching that the ribs deploy evenly. Test the tilt (push-button, collar, or crank-integrated) through its range of motion. If anything binds or catches, close the canopy and diagnose before proceeding.
For a one-piece pole umbrella
A one-piece pole must go through the table hole as a single assembled unit, which usually means tilting it at an angle to get the top of the pole under any overhead obstruction, then slowly straightening it vertical as the bottom drops through the hole. Have a second person hold the canopy end while you guide the pole bottom through the hole and into the base socket. Once the pole is vertical and seated, attach the pole collar above the table ring and tighten as described above.
For an offset or cantilever table umbrella
An offset umbrella does not go through the table hole at all. Assemble the side pole according to the manufacturer's instructions, then set the base next to (not under) the table. Position the base so the canopy extends over the table once the arm is extended. Fill or weight the base as specified, many residential cantilever bases need 40 to 60 or more pounds of ballast, and heavier commercial bases designed for larger canopies (like the Treasure Garden BASE-13) can require up to 400 pounds of playground sand. Do not skip the ballast weight; an under-weighted cantilever base is the most common cause of umbrella tip-overs.
Stabilizing and Securing the Umbrella
Getting the pole seated is only half the job. For a full patio umbrella setup checklist and step-by-step photos, see patio umbrella setup. An umbrella that wobbles in normal use or tips in a light breeze is a hazard. Here are the most reliable stabilization methods.
- Weighted base (freestanding): Choose a base rated for your canopy size. Smaller 7- to 9-foot canopies generally need 40 to 60 pounds; larger canopies need more. Fill bases with sand or use a pre-weighted concrete base. Confirm the base's tightening knob and adapter rings match your pole OD.
- Under-table sleeve/base: Products like the Tilt the Pole V3 mount beneath the tabletop and create a weighted sleeve below the table surface. These are designed for 1.5-inch poles and provide a low-profile alternative to a freestanding base. They work well on patios where you want the base out of sight.
- Distributed weight tray: Some systems place flat concrete pavers in a low tray around a central steel tube. These keep the center of gravity very low and are harder to tip than tall column bases.
- Sandbags: Commercially available umbrella sandbags loop around the base pole and add 10 to 15 pounds each. They are inexpensive and can supplement a base that is close to but not quite heavy enough.
- Pole collar: As noted in the installation steps, a collar sitting on top of the table ring prevents the pole from sliding down and reduces side-to-side movement at the table surface.
- Rubber grommet or cone shim inside the table sleeve: Fills the gap between pole and hole so the pole cannot rock inside the sleeve even when the base is well-anchored.
Wind Safety: When to Close and When to Take It Down
This is the part homeowners most often skip reading, and it is where most umbrella damage and injuries happen. Most manufacturer manuals recommend closing the umbrella when sustained winds reach about 22 to 25 mph, and removing or fully securing it when gusts exceed 31 to 32 mph. For a lightweight table setup (pole through a table ring with a standard weighted base), use the lower threshold, because the table itself provides very little resistance to tipping.
On the Beaufort scale, force 5 (a fresh breeze, roughly 19 to 24 mph) is the point at which tree branches start swaying noticeably. If you can see that happening in your yard, close the umbrella. Force 6 (25 to 31 mph) puts serious lateral load on an open canopy and can pull a standard base across a patio or tip it entirely. ASTM wind-safety testing methods (referenced in CPSC safety publications) apply to market-style umbrellas specifically because wind tipping is a documented hazard. Check your local NOAA forecast for sustained wind and gust values, not just a general weather rating, before leaving an umbrella open unattended.
When a storm or high winds are forecast, do not just close the canopy. Remove the pole from the table if possible and store it horizontally in a garage or shed. A closed umbrella is still a significant wind sail if it is left in a table with a lightweight base. At the very minimum, close the canopy, wrap it with the Velcro strap, and move the table-and-base unit against a wall or interior corner where wind exposure is reduced.
Adapting a Beach Umbrella for Patio Table Use
Beach umbrellas typically have a pointed or spiked tip designed to push into sand, and their poles are usually 35 mm in diameter rather than the 38 mm or 48 mm standard for patio poles. Most beach umbrella poles are also one-piece and considerably longer than a patio umbrella pole, which creates a practical height and clearance problem when you try to drop one through a table hole.
That said, it can be done with the right adapter. You need a 35-to-38 mm reducer sleeve (or a 35-mm-compatible adapter ring in your base) to fill the gap between the narrower beach pole and the table hole. You also need to deal with the spike tip: cut it off flush if it is plastic and threaded, or use an end cap. The bigger challenge is height, because a beach umbrella pole combined with its canopy is often too tall for comfortable patio use, and the canopy geometry (usually a single-rib spike-frame rather than a multi-rib articulated frame) does not tilt or crank open the way a patio umbrella does. Think of this as a temporary or budget-conscious fix rather than a long-term setup. For a more detailed walkthrough on making this conversion work, including reinforcement tips for the pole joint, that topic is covered in a dedicated guide on converting a beach umbrella to patio use.
Positioning the Umbrella for Maximum Shade
Once the umbrella is installed and stable, the question becomes where to aim it. For a center-pole umbrella, the canopy is fixed above the table and you adjust shade by using the tilt mechanism. For an offset umbrella, you can rotate and reposition the canopy independently of the table.
The sun tracks roughly east to west across the sky, but the angle depends on your latitude and the time of day. In North America, afternoon sun (2 to 6 pm) comes from the southwest, which is typically the hottest and most uncomfortable direction. If you eat or use the patio mostly in the afternoon, orient your umbrella so the canopy tilts southwest and the table seating is in the shadow zone. Use the tilt mechanism (whichever type yours is) to angle the canopy toward the sun rather than leaving it flat overhead, which only provides shade directly below the peak. A 10- to 15-degree tilt toward the sun dramatically increases the shaded footprint at table level. For a full breakdown of sun-path positioning and making the most of tilt adjustments throughout the day, the umbrella positioning guide on this site covers the details.
Troubleshooting Common Problems After Installation
Pole wobbles in the table
If the pole rocks from side to side after installation, the most common cause is a gap between the pole OD and the table hole ID, or a pole collar that is not fully tightened. First, retighten the pole collar set screw. If the collar is tight and the pole still wobbles, add a reducer sleeve or cone shim inside the table hole to fill the gap. If the base below is not fully tightened, the pole can also rock in the base socket even if the table ring fit is fine, check both connection points.
Pole won't go through the table hole
Stop and measure before forcing anything. If the pole OD is genuinely larger than the hole ID, you have two options: choose a different umbrella with a narrower pole, or have the table hole reamed out to the next standard size (typically 2.0 inches). A woodworking hole saw or step drill bit with a guide jig can do this on a wood or composite table; for glass or ceramic tables, this is a job for a professional. Never pound or force a pole through an undersized hole, you will crack the table ring or damage the pole.
Crank is stuck or won't turn
A seized crank is usually caused by a tangled or frayed lift cord, a jammed gear, or corrosion in the crank housing. Start with the simplest fix: open the crank housing cover (usually two Phillips screws) and look at the cord. If it is tangled around the spool, remove the tension, untangle the cord, and rewind it evenly. If the cord is frayed or broken, replace it with 3 mm braided polyester cord of the same length. If the gear or ratchet teeth look corroded or gummed up, clean with a dry cloth and apply a light coat of silicone spray (not WD-40, which will attract grit and cause the same problem again in a few weeks). Work the crank through several rotations after lubricating. If the gear teeth are visibly stripped or broken, the crank assembly needs replacement; most brands sell this as a separate spare part identified by model number in the parts list.
Tilt mechanism is stuck
For push-button tilt: if the button does not spring back, the spring is likely corroded or bent. Disassemble the button housing (usually held by a retaining pin or clip), clean the spring, and lubricate with silicone spray. For collar tilt: if the collar will not rotate, it may be seized from corrosion or over-tightening. Spray silicone lubricant around the collar joint, wait five minutes, and try again with steady rotational pressure. Never use a pipe wrench or pliers on a tilt collar, you will deform it. For crank-integrated tilt: follow the manufacturer's operating instructions exactly; forcing the tilt without the canopy at the right open position often binds the mechanism.
Stripped set screw in the pole coupling
If the coupling screw has stripped threads, do not just leave it, the upper pole section can separate from the lower pole in wind. Remove the stripped screw with a screw extractor or by drilling it out, then replace with a matching screw from the manufacturer's parts list (M8x20 and ST6x16 are the sizes on many common brands). If the threaded hole in the pole itself is stripped, a thread repair insert (helicoil) can restore the threads without replacing the pole.
Decorating and Styling a Table Umbrella Setup
Once your umbrella is installed and working, a few simple additions make the setup look intentional rather than utilitarian. String lights looped along the ribs from the canopy edge back to the pole hub are one of the most popular options and add evening ambiance without any permanent modification. Use clip-on or wrap-style LED lights rather than stapling or puncturing the canopy fabric. A matching umbrella table ring cover (available in wood-look or stone-look finishes) can hide a utilitarian plastic hole ring on an otherwise nice table. Coordinating the umbrella canopy color with your table and chair cushions creates a pulled-together look without extra cost. For more specific styling ideas and how to work with different table configurations, the dedicated guide on decorating a patio table with an umbrella covers those options in depth.
Seasonal Care and Winterizing
At the end of the outdoor season, do not just fold the canopy and leave the umbrella in the table. Pull the pole out of the base and table sleeve, wipe it down with a damp cloth, and apply a thin coat of silicone spray to any bare metal sections, pivot points, and tilt joint. For two-piece poles, separate the sections and store them horizontally (vertical storage in a garage corner can put stress on the coupling joint over months). Store the canopy in a breathable cover bag rather than a sealed plastic bag, trapped moisture causes mold on fabric canopies over a winter.
Inspect all fasteners in the fall before storage and again in spring before reinstallation. Tighten anything that has loosened, replace any corroded screws with stainless or galvanized equivalents, and test the crank and tilt mechanisms while you can still make it to the hardware store. Five minutes of fall maintenance prevents the frustration of pulling a seized crank out of storage on the first warm day of the year.
FAQ
What tools and parts should I have before installing a patio umbrella through a table?
Checklist: tape measure (inches/mm), adjustable wrench, Phillips and flat screwdrivers, hex/Allen keys (common M5/M8), needle‑nose pliers, silicone spray or light machine grease, replacement lift cord (~3 mm braided polyester), spare screws (examples: M8x20, ST6x16, ST5.5x16), pole collars/adapters (35/38/48 mm sizes), table hole ring/trim cap, shims/shaft wedges, weighted base or ballast, and a rubber mallet. Also have the umbrella manufacturer manual and part numbers (for model‑specific fasteners or replacement parts).
How do I measure my table hole and umbrella pole for compatibility?
Measure the table hole diameter across the widest inside edge in inches or millimeters. Measure the umbrella pole outside diameter (OD) where it will pass through/seat in the table. Common residential pole ODs are ~1.5 in (38 mm) and ~1.9 in (48 mm). Many bases/adapters fit 35, 38, and 48 mm sizes. If the hole is non‑standard, either use a hole‑ring sized to that hole, install an adapter sleeve, or have the hole reamed to a standard size. Also note tabletop thickness limits for rings/under‑table sleeves in the product specs.
What's the difference between single‑piece and two‑piece umbrella poles and how does that affect install?
Single‑piece poles are one tube from base to canopy — simpler: insert through table and tighten base. Two‑piece poles separate into an upper and lower section that slide together and lock with a set screw/knob or threaded collar. For two‑piece poles: insert lower section through the table first, then connect the upper section and secure the coupling per the manual. Always seat and secure the coupling/fastener before operating tilt or crank.
How do I install a patio umbrella through a table step‑by‑step?
1) Read the umbrella and table hole‑ring/base manuals and confirm parts. 2) Close the umbrella and lay out parts/tools. 3) Fit the hole ring/trim into the table hole if using one. 4) If two‑piece pole, insert the lower pole through the hole and seat it in the table ring or base. 5) Join upper pole section to lower section and tighten the manufacturer’s coupling screw/knob (do not overtighten). 6) If using an under‑table sleeve or base, align and lower the pole into the sleeve; tighten the sleeve’s securing knob(s). 7) Install any adapter collars so the pole fits snugly in a stand or sleeve. 8) Open the umbrella slightly and test tilt/crank operation. 9) Tighten set screws/knobs and confirm no wobble; add shims if minor play exists. 10) Secure a weighted base or ballast as required before full use.
How should I seat and tighten collars, adapters, and set screws correctly?
Place the appropriate adapter/collar so the pole’s OD is centered in the sleeve. Tighten by hand first, then snug with the specified tool (often an Allen key or knob) until no movement remains. Torque lightly — avoid stripping threads or crushing poles. If there's a gap, use thin shims or a rubber sleeve to take up slack rather than overtightening. Use manufacturer‑specified screws when possible; replace stripped threads with the correct size.
What options are there to secure and stabilize a table umbrella?
Options: 1) Under‑table anchored sleeve/base (permanent or removable) that accepts the pole. 2) Heavy weighted base on the table surface (if table supports the load) or on the floor beside the table. 3) Fillable bases (water/concrete/sand) rated for canopy size; follow ballast weight guidance from the base manufacturer. 4) Weight trays or paver stacks inserted into a sleeve. 5) Sandbags or tie‑down straps attached to the base or table legs for temporary stability. 6) For permanent installs, bolted anchored plates under the table. Choose a solution sized to the umbrella’s canopy and local wind conditions — residential setups typically need 20–60+ lb depending on canopy size; heavy cantilevers can require hundreds of pounds per manufacturer specs.
Next Articles
Patio Umbrella Setup: Step-by-Step Assembly and Secure
Step-by-step patio umbrella setup with fixes for jammed cranks, misaligned ribs, cords, and secure wind protection.
How to Fix a Patio Umbrella That Won't Open or Close
Step-by-step fixes for patio umbrellas that won’t open or close, with checks for jams, cords, latches, and lubricating t
How Does a Patio Umbrella Work? Components, Use, and Fixes
Learn how patio umbrellas work: components, open close tilt, stability, and step by step troubleshooting common mechanic