If your manual retraction slope patio awning is binding, retracting unevenly, stalling halfway, or cranking with way more resistance than it used to, the slope of your mount is almost always the root cause or a major contributing factor. The good news is that most of these problems come down to arm alignment, fabric spooling issues, or tension imbalance, and you can diagnose and fix all of them today without replacing the whole awning.
Manual Retraction Slope Patio Awning Troubleshooting Guide

Luca Morrison
19 May 2026
How manual retraction actually works on a sloped mount

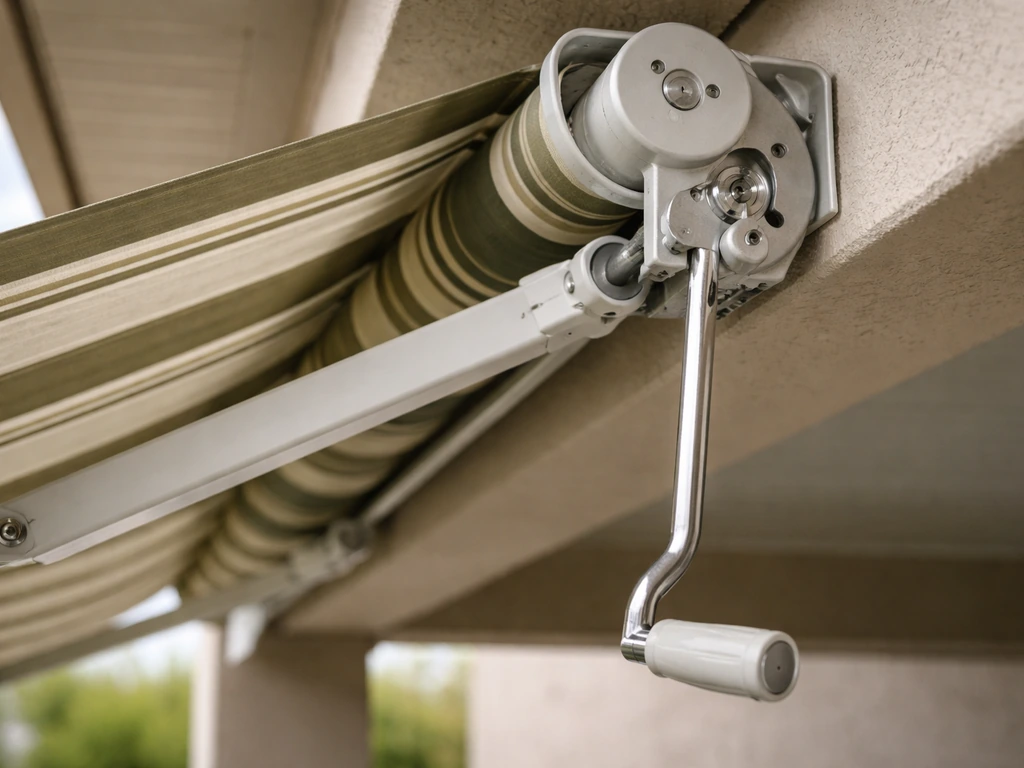
On a standard manual retractable awning, the fabric wraps around a roller tube. When you insert the universal end of your hand crank into the gear eyelet on the side of the roller tube and turn it, the roller spins and either winds the fabric onto itself (retracting) or lets it unwind while the articulating arms push outward (extending). On a flat wall, gravity works in your favor during retraction.
On a sloped mount, the pitch of the bracket changes the geometry, which shifts how much tension each arm carries and how evenly the fabric feeds back onto the roller tube. Even a small slope difference left-to-right can cause the fabric to spool unevenly, which is the number-one cause of binding and stalling.
The gear eyelet is located on either the right or left end of the roller tube depending on your brand and model. Markilux, Rolltec, Artistic Awning, and others vary on which side the transmission sits. Before you do anything else, confirm you are inserting the crank into the correct eyelet on the correct side. Engaging the wrong end or a worn eyelet opening causes inconsistent winding and can feel like a mechanical binding issue when it is really just incorrect engagement.
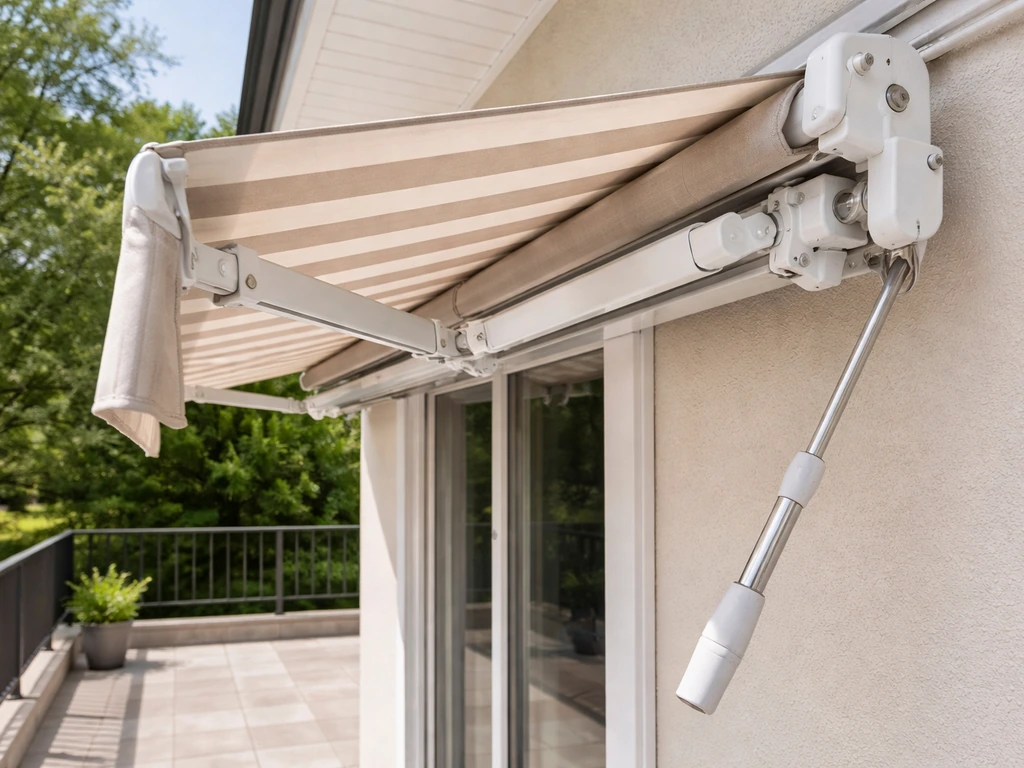
The arms and roller tube have to work in sync. As the crank rotates the roller, the fabric transitions smoothly while the arms fold inward and maintain the canopy's shape. On a sloped mount, if one arm is even slightly higher or lower than the other, the two sides retract at different effective speeds, and the fabric cones or telescopes on the roller tube. That uneven spool is what causes the stall, the hard crank, and the sag you are probably seeing on one side.
Safety first and quick diagnosis before you touch anything
Before you start adjusting anything, take five minutes to observe what the awning is actually doing. This will save you a lot of trial and error. Here is what common symptoms usually point to:
| Symptom | Most Likely Cause |
|---|---|
| Crank turns but awning does not move | Crank not fully seated in gear eyelet, or stripped gear |
| Awning retracts halfway then stops | Arm rubbing on wall or missing acorn nut stop on inner arm |
| One side retracts faster than the other | Arm misalignment or uneven bracket height on sloped mount |
| Fabric bunches or telescopes on one side of roller | Uneven spooling due to alignment or fabric feeding from wrong direction |
| Crank suddenly gets very stiff | Fabric obstruction, jammed arm pivot, or binding in track/rail |
| Awning sags on one side when extended | Tension imbalance between arms, usually related to slope compensation |
| Loud grinding or clicking sound when cranking | Worn gear teeth or debris in the gear eyelet |
On the safety side: never force the crank when you feel hard resistance. If something is binding and you keep cranking, you risk snapping a gear, tearing the fabric at the roller seam, or bending an arm. Stop the moment you feel real resistance, retract it as far as it will comfortably go, and start your inspection from there. Also, do not attempt any inspection or adjustment on a windy day. An extended awning in even moderate wind can catch like a sail and cause the whole structure to shift, especially on a sloped mount where the bracket load is already asymmetric.
Inspecting the arms, brackets, and roller alignment
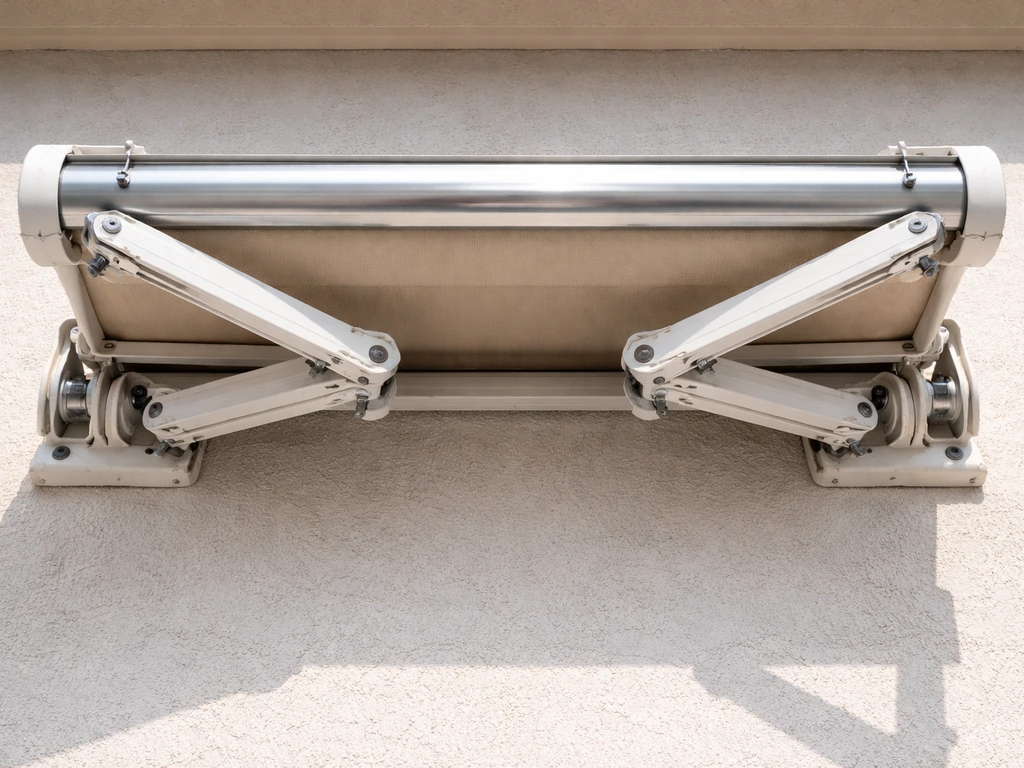
Start with a visual inspection from the ground with the awning partially extended so you can see the arms and roller tube. You are looking for three things: whether both arms are sitting at the same height and angle, whether the roller tube is parallel to the wall, and whether there are any obvious bends, cracks, or rust spots on the arm joints or brackets.
- Stand back about 10 feet and look at both arms from directly in front of the awning. The outer arms should be at the same pitch and height. If one arm appears higher, lower, or angled differently from the other, that is your misalignment.
- Walk to each side and look at where the inner arm connects to the wall bracket. On a sloped mount, the brackets must be set at heights that compensate for the wall pitch. If the brackets were installed level with each other on a sloped wall, one side is effectively lower than designed and that arm will retract at a different rate.
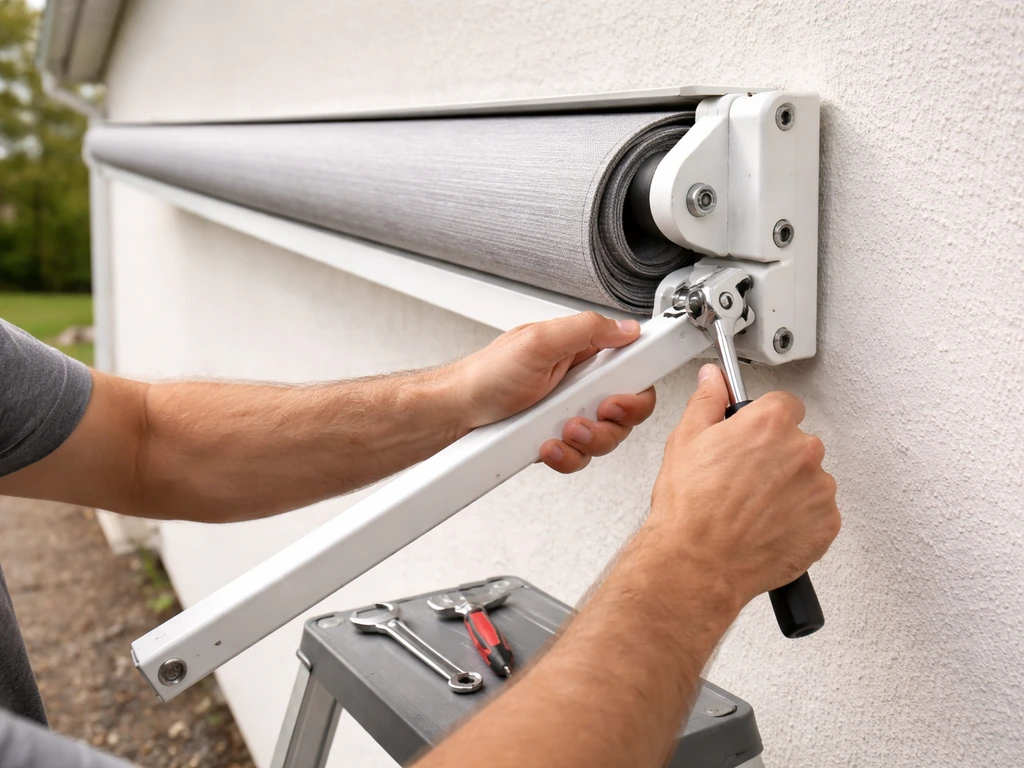
- Check every bolt and fastener on both wall brackets. Grab each bracket and try to wiggle it. Any movement in the bracket means a loose fastener, and a loose bracket on a sloped surface will cause the arm geometry to shift during operation. Tighten anything loose with the appropriate wrench (most brackets use M8 or M10 bolts, but check yours).
- Look at the roller tube itself. With the awning partially extended, stand to one side and sight down the length of the tube. It should appear perfectly straight and parallel to the wall. If it dips or curves in the middle, a support bracket or end cap may have loosened or the tube itself may be bent.
- Check the end caps on both sides of the roller tube. End caps that have cracked or worked loose allow the roller to shift sideways as it spins, which creates exactly the kind of uneven spooling that causes retraction binding.
- If your awning has a lead rail or guide track at the front, check that the rail is level and that it has not pulled away from the front bar on one side. The Dometic 9500 manual, for example, calls out a specific adjustment screw for tilting the lead rail back to level. Look for a similar adjustment point on your own model.
One failure point that catches a lot of people off guard: SunSetter 900XT and 1000XT awnings have acorn nuts that must be installed on each inner arm as a stop to prevent the arm from swinging too far back into the wall during retraction. If those acorn nuts are missing or were never installed, the inner arm can rub against the wall and physically prevent full retraction. If you have a SunSetter or similar brand and the awning stops just before it is fully home, check both inner arms for that stop hardware first.
Checking the crank, gear, and cord path for binding
Once you have ruled out arm and bracket issues, move to the manual crank mechanism itself. The crank drives everything, so if the gear is worn or the eyelet is damaged, no amount of alignment adjustment will fix your problem.
- Remove the crank from the gear eyelet completely. Inspect the universal end of the crank for wear, bent teeth, or a rounded-off tip. If the tip is visibly worn or rounded, it will slip inside the eyelet rather than turning the gear cleanly.
- Look directly into the gear eyelet opening on the roller tube end cap. You should see clean, defined gear surfaces. If you see rounded or chipped gear teeth, shiny metal where there should be ridges, or debris packed into the opening, you have gear wear or a blockage.
- Re-insert the crank and test it with the awning fully retracted (or as close as it will get). Turn it slowly in the retraction direction. The resistance should feel consistent and moderate throughout the rotation. A sudden increase in resistance at a specific point in the rotation usually means a debris obstruction or a damaged tooth on the gear wheel that is catching on each full revolution.
- If your awning uses a cord-assist or spring-assist system alongside the manual crank, check that any visible cord is not frayed, kinked, or tangled around the roller tube or arm hardware. A cord that has wrapped around a pivot point will feel like a mechanical bind that gets worse the more you crank.
- Check whether the fabric is feeding over the top of the roller tube or underneath it. Fabric should always spool over the top as it retracts. If it is feeding from underneath, the roller will bind against the fabric as it winds, especially on a sloped mount where gravity pulls the leading edge downward. If this is happening, the fabric will need to be fully unrolled and re-mounted to correct the spooling direction.
Adjusting tension and getting even, smooth retraction
If your inspection found arm misalignment or uneven bracket height as the root cause, here is how to work through the adjustment. For example, Dometic’s 9500 patio case awning procedure specifies checking the lead rail alignment against the top and end caps after retracting for adjustment blank" rel="noopener noreferrer">checking alignment of the lead rail against the top and end caps after retracting for adjustment. Most of these steps apply to the majority of manual retractable awning brands, though the specific hardware varies.
- Fully retract the awning before making any bracket or arm adjustments. You want the arms folded and the fabric rolled up so there is no tension load on the hardware while you work.
- Loosen (do not remove) the bolts on the wall bracket on the side that appears lower or higher than it should be. Most brackets have a vertical slot that allows you to shift the bracket up or down by a few millimeters without drilling new holes.
- Adjust the bracket height until both sides appear level when you sight down the roller tube from the front. On a sloped mounting surface, this often means one bracket will sit slightly higher on the wall than the other, which is correct and intentional.
- Re-tighten all fasteners fully once the bracket height looks right. Do not try to test the awning with loose fasteners.
- If your awning has a lead rail adjustment screw (common on Dometic and similar enclosed-cassette designs), use it now to re-align the front bar level. Turn the screw incrementally, retract and extend the awning a few inches to check whether the lead rail is tracking evenly, and repeat until it runs parallel.
- Extend the awning slowly about two feet and watch the fabric spread across the roller. Both sides should unroll at the same rate. If one side still moves faster, note which side, and check that arm's pivot points and connector hardware for any rotation restriction.
- Do a full test retraction. Feed it in slowly and watch for any fabric bunching at the roller. Ideally, have a second person watch from the side while you crank so they can call out if one side starts leading the other.
A note on tension: some manual awnings have a spring-assist coil inside the roller tube that adds return tension to help retraction. On a sloped mount, this spring tension can amplify any alignment imbalance because it adds uneven force to whichever side of the tube it acts on. If your awning has a spring-assist system and you have already corrected the alignment but retraction is still uneven, the spring tension may need professional adjustment. Adjusting internal roller spring tension is not something to attempt without prior experience, as a sudden release of spring energy can cause serious injury.
Maintenance, lubrication, and seasonal storage
Most manual retraction problems are slow to develop. They start as a slightly stiff crank or a minor wobble in the fabric and get worse over months until something finally binds or stalls. Staying ahead of this with basic maintenance is genuinely easy and takes less than an hour twice a year.
Lubrication: what to use and where
Lubricate the pivot points on both articulating arms at the beginning of each season. Use a dry PTFE (polytetrafluoroethylene) spray or a silicone-based lubricant on metal pivot joints and the gear eyelet area. A small amount of light lubricant on the crank handle shaft and any plastic wand components will also stop annoying squeaking. One important caution: do not use WD-40 or oil-based products on the awning's mechanical components. Several manufacturers explicitly call this out. Oil attracts dirt and debris, which packs into gear teeth and pivot joints and eventually causes worse binding than no lubricant at all. Stick to dry or silicone-based products.
Fabric care and debris clearing
Always retract the awning before debris accumulates on top of the fabric. Leaves, pine needles, and especially standing water add weight that the roller tube and arms are not designed to handle, and on a sloped mount that weight distributes unevenly. A manual lift patio umbrella can show similar binding and uneven movement when its lift mechanism or hardware is misaligned or under-maintained.
For a manual push up patio umbrella, the same idea applies: if the umbrella feels uneven or binds, check for misalignment and debris that could be adding extra resistance. Water pooling on the fabric is particularly destructive because it can cause the fabric to stretch unevenly on the roller, which is one of the harder-to-fix causes of uneven spooling.
If water pools on your awning regularly, check whether the pitch angle of the installation provides adequate runoff, and adjust the lead rail tilt if your model allows it.
Seasonal storage and winterizing
In climates where temperatures drop below freezing, always store or fully retract the awning for the winter. Moisture trapped in the fabric or in arm pivot joints will freeze, expand, and crack metal or plastic components. Before closing it down for the season: clean the fabric with a mild soap and rinse thoroughly, let it dry completely in the open position before retracting (rolling up damp fabric promotes mildew), and apply lubricant to all pivot points.
Inspect every fastener and retighten anything that has worked loose during the season. If you have a detachable awning, store it in a dry space away from direct sunlight, as UV exposure breaks down both the fabric and plastic components over time. The operational principles here apply whether you have a compact 12-foot manual retractable or a larger slope-mounted unit.
If you are trying to choose or troubleshoot a 12 ft manual patio retractable awning, pay close attention to slope, arm balance, and how evenly the fabric spools 12-foot manual retractable.
When DIY adjustments are not enough
You have worked through the alignment, checked the gear, lubricated the pivots, and confirmed the fabric is spooling correctly, but the awning still binds or retracts unevenly. At this point, the issue is either a worn or damaged component that needs replacement or an installation problem that requires re-mounting. Here is how to figure out which one you are dealing with. SunSetter’s FAQs note that manual awning models operate with the included hand crank and differ from motorized ones in how they work and what failure modes show up manual awnings work with the included hand crank and differ from motorized models in operation and failure modes.
Parts that wear out and can be replaced
- Gear eyelet assembly: If the gear teeth are visibly rounded or the crank slips even when correctly inserted, the gear eyelet cap needs replacement. This is usually a brand-specific part, so you will need your model number.
- Articulating arm set: If an arm is bent, has a cracked pivot collar, or has lost its tension adjustment range, replacing the arm set is the right call. SunSetter replacement arm kits, for example, include instructions for transferring specific stop hardware (like acorn nut stops) from the old arms to the new ones, and the procedure includes a test cycle after installation.
- Roller tube end caps: Cracked or loose end caps let the roller shift laterally. Replacement end caps are inexpensive and often available directly from the manufacturer.
- Lead rail alignment components: On cassette-style awnings, the adjustment screw or tilt mechanism for the lead rail can wear out or strip. Replacement hardware is model-specific.
- Crank handle: If the universal tip is worn, a replacement crank is one of the cheapest and easiest fixes available.
Information to gather before contacting support or ordering parts
Before you call the manufacturer or search for replacement parts, gather the following. Having this ready will cut your support call from 30 minutes to five, and it will help you avoid ordering the wrong parts.
- Brand and model name (often on a label on the roller tube end cap or on the wall bracket)
- Arm type: note whether your arms are standard articulating, rafter-style, or have a visible spring-assist coil
- Measurement of the slope or pitch of your mounting surface (measure the height difference from left to right bracket, in inches)
- Photos of the gear eyelet from both sides, both arm pivot joints, and the wall brackets
- A description of exactly where in the retraction cycle the problem occurs (immediately, halfway, near full retraction) and whether it affects both sides or only one
- Whether the awning was professionally installed or DIY, and approximately how old it is
If the brackets are anchored incorrectly for the slope of your wall (for example, installed at equal heights on a surface that required compensated heights), that is a re-installation job, not a parts replacement. A professional awning installer can re-mount the brackets in about two to three hours and it is worth the cost compared to fighting recurring retraction problems caused by a fundamentally incorrect installation angle. Models like the Monmouth manual retraction awning and similar enclosed-cassette designs are particularly sensitive to bracket-level accuracy because the cassette housing adds weight and the alignment tolerance is tighter than on open-frame designs. Manual patio shades are designed to retract smoothly, so the right crank setup and alignment matter.
The bottom line: if the problem showed up gradually over a season, lubrication and alignment adjustment will almost always fix it. If the problem started suddenly after a wind event, a hard retraction, or after winter storage, look for a specific damaged component. And if the awning never worked correctly from the day it was installed, the installation itself is the problem and no amount of tweaking will permanently solve it without correcting the mount.
FAQ
How can I tell if the hard crank is coming from the roller tube, the arms, or the wall-side mounting on my manual retraction slope patio awning?
Do a no-load test first. With the awning partially retracted, try turning the crank slowly and watch which side binds, then compare that to the arm position. If one end of the roller resists while the other turns smoothly, the issue is usually at the gear eyelet, roller tube, or that side arm. If both sides get uniformly hard right after the arms start folding, it is more likely a mount/bracket angle or a mis-seated arm, not the fabric.
Should I retract the awning fully or stop partway when I first notice uneven retraction on a sloped mount?
Stop as soon as you feel real resistance, but retract only to the point it can move comfortably. Fully forcing it can bend an arm or tear fabric at the roller seam. After stopping, inspect from that position, then correct the alignment or hardware before trying again.
Is it okay to use WD-40 or regular oil if my manual retraction slope patio awning squeaks?
Avoid oil-based products and WD-40 on the mechanical components. They can attract dust and debris, which then packs into gear teeth and pivot joints and worsens binding over time. Use a dry PTFE or silicone-based lubricant for metal pivots and the gear eyelet area instead.
My crank feels fine at first, then gets harder near the end of retraction. What is the most likely cause?
A late-stage interference or stop issue. Common causes include missing stop hardware on the inner arms (brand-specific), an arm swinging into the wall, or uneven arm height that only becomes apparent when the awning approaches fully retracted. Check the inner arms and stops first before assuming the gear is worn.
Can wind damage show up as uneven retraction later, even if the awning looks straight right now?
Yes. A wind event can shift the structure slightly, especially on sloped mounts where loads are asymmetric. Even if the canopy looks mostly aligned, the arms may retract at slightly different effective speeds, causing telescoping on the roller tube and gradual tightening over subsequent use.
How do I inspect for misalignment without taking the whole awning apart?
Partially extend the awning and inspect from the ground: confirm both arms are at matching height and angle, verify the roller tube is parallel to the wall, and look for bent or cracked arm joints, rust, or deformation at bracket points. If the roller tube is visibly not parallel during retraction, focus on bracket-level accuracy and arm seating.
What should I do if my manual retraction slope patio awning retracts unevenly after I corrected arm alignment?
Re-check for spring-assist interaction. If your model has internal spring assist, it can amplify any remaining imbalance even after visual alignment looks improved. If you already adjusted the arms and it still pulls unevenly, the safest next step is to have the internal spring tension checked by a professional, since DIY adjustment can be hazardous.
How often should I lubricate a manual retraction slope patio awning, and where exactly should I lubricate?
Lubricate at the start of each season, and focus on the metal pivot joints on both articulating arms, the gear eyelet area, and light spots on the crank handle shaft or plastic wand components if they squeak. Keep lubricant minimal, and wipe away any excess that could attract dirt.
What maintenance should I do after a lot of rain or standing water on the fabric?
First, make sure water is not pooling due to insufficient runoff. Check the installation pitch and, if your model allows it, adjust the lead rail tilt so rain drains rather than sits on the canopy. Standing water can stretch the fabric unevenly on the roller, which is one of the harder-to-fix causes of uneven spooling.
If the awning never worked right from installation, what is the best next step before buying replacement parts?
Treat it as an installation angle or remounting problem, not a worn-parts problem. If the brackets were set using equal heights on a surface that requires compensated heights, it can cause recurring binding and uneven retraction. In many cases, remounting the brackets is the permanent fix, especially for sensitive enclosed-cassette designs.
My awning works in warm weather but binds in winter. Should I keep operating it?
Do not force it. In freezing conditions, moisture in fabric or pivot joints can freeze, expand, and crack components, leading to stubborn binding. Retract fully or store it for winter, clean and dry thoroughly in the open position first, then lubricate pivots before closing for the season.
Next Articles

Manual Patio Shades: Install, Fix, and Maintain Them
Step-by-step guide to choose, install, fix, and maintain manual patio shades, with crank, cords, tilt troubleshooting.
Patio Awning Manual: How to Use, Fix, and Maintain
Step-by-step manual patio awning guide for smooth opening, fixing jams, uneven retraction, crank and tilt arm issues, an

How to Fix a Patio Umbrella That Won't Open or Close
Step-by-step fixes for patio umbrellas that won’t open or close, with checks for jams, cords, latches, and lubricating t