The best manual patio shade for your setup depends on one thing: how much flexibility you need. A manual retractable awning gives you the most coverage and control, a shade sail is the most budget-friendly fixed option, and a manual patio umbrella is the easiest to move around. If you want better control over how the fabric opens and closes, a manual retraction slope patio awning can be a practical upgrade for uneven patio setups manual retractable awning. If you want step-by-step guidance, a patio awning manual will help you operate the crank smoothly and know what to check when the fabric jams. All three are operated by hand, cost less than motorized versions, and can last years with basic upkeep. Here's how to pick the right one, install it, use it correctly, and fix it when something stops working.
Manual Patio Shades: Install, Fix, and Maintain Them

Choosing the right manual patio shade type
There are three main manual shade options for a patio, and they solve different problems. Before you buy anything, figure out what you actually need.
| Type | Best for | How it's operated | Typical coverage | Biggest tradeoff |
|---|---|---|---|---|
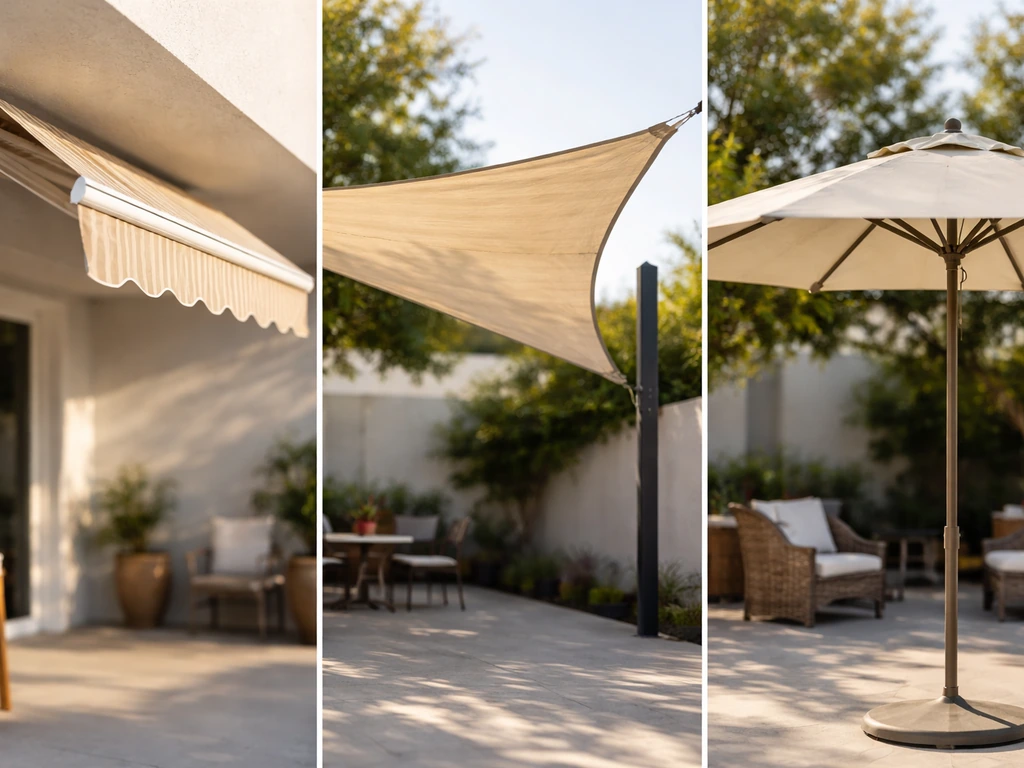
| Manual retractable awning | Decks/patios attached to a house wall | Hand crank wand | 8 to 20+ ft wide | Permanent wall mount required |
| Shade sail | Freestanding areas, gardens, pool decks | Set-and-forget tensioning | Up to ~20 ft per side | Not retractable; needs removal for high winds |
| Manual push-up or crank umbrella | Tables, small seating areas | Push-up pole or hand crank | 7 to 11 ft diameter | Limited coverage; needs base/stand |
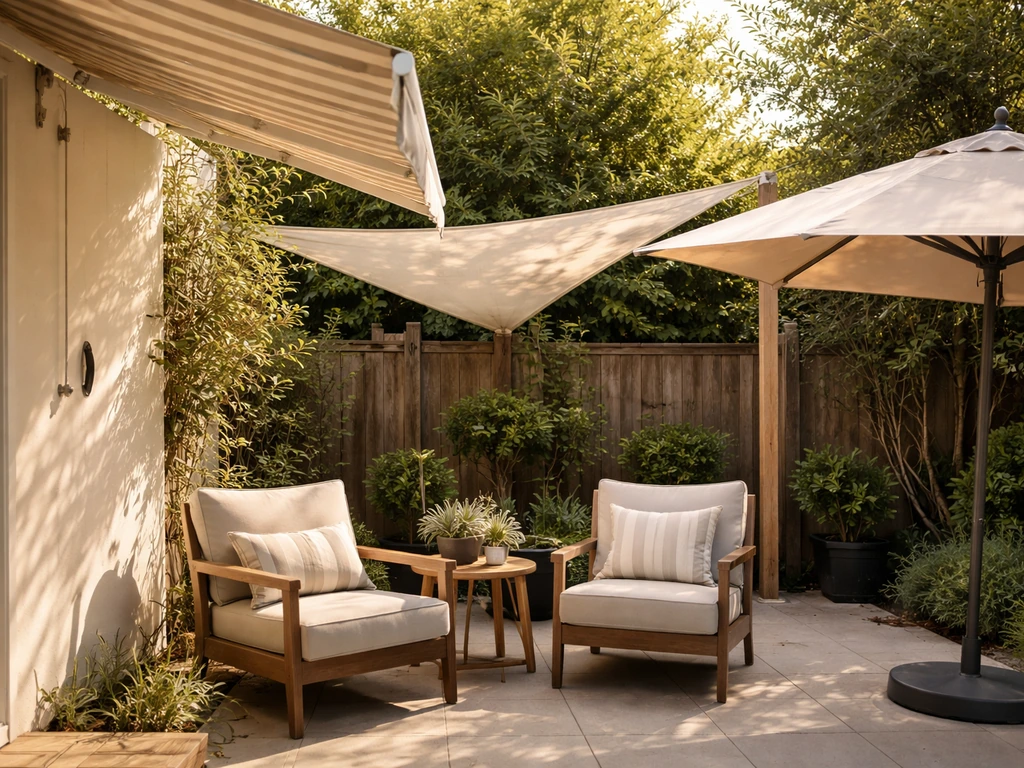
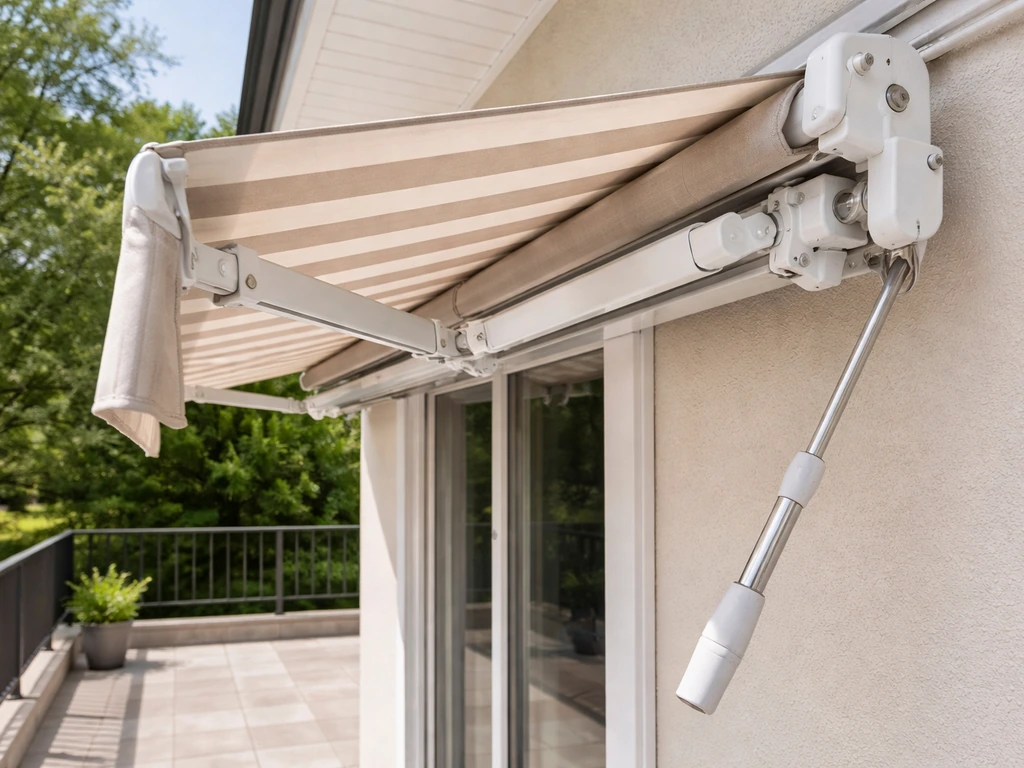
Manual retractable awnings are the most practical choice for homeowners who want real shade over a large area and the ability to retract when the weather turns. They use a hand crank wand to extend and pull the fabric back into a compact housing mounted to your house wall. If you have a large deck and want the option to open up the sky when it's cloudy, this is the one to buy. Related shade types like manual push-up patio umbrellas and manual lift patio umbrellas are better suited for smaller areas around a table, while retractable awnings are the go-to for whole-deck coverage.
Shade sails are a great middle ground if you don't have a wall to mount to. You anchor each corner to a fixed post, fence, or structure and tension the sail with turnbuckles. They're not retractable, so you'll take them down for storms and winter, but they're affordable and look clean. If you go this route, understand that the sail puts real load on each anchor point, especially in wind, so the anchoring hardware matters as much as the sail itself.
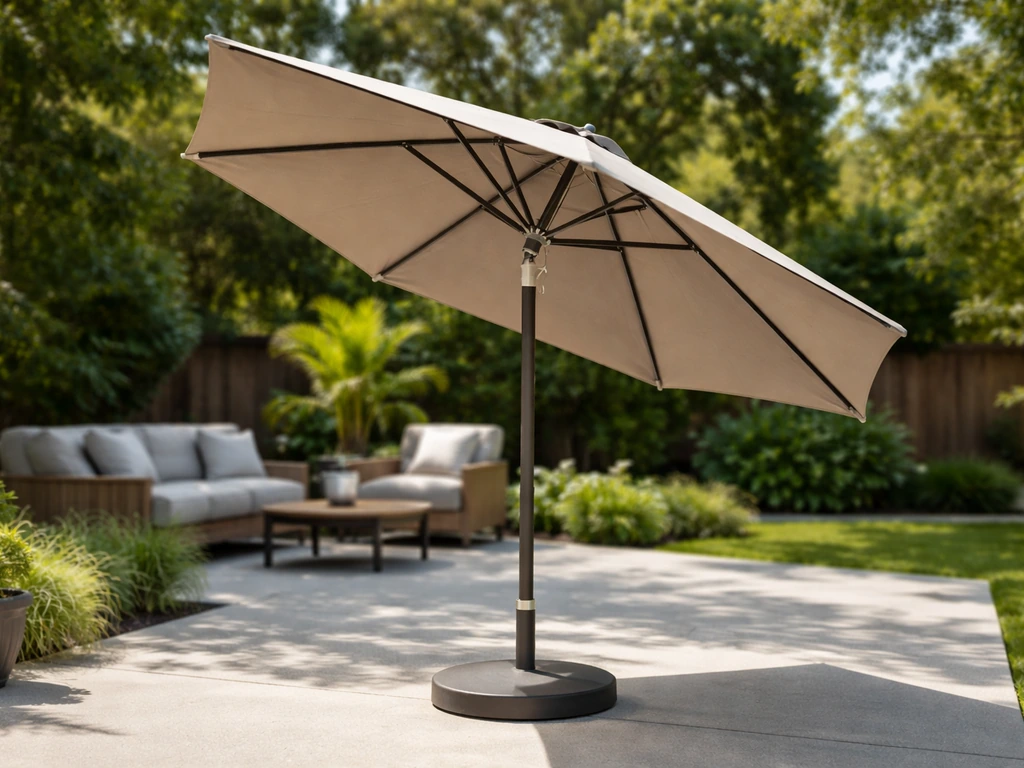
Manual crank or push-up umbrellas work best at a dining table or small seating cluster. If you have a manual push-up patio umbrella, check the tilt control and crank or push-up mechanism for smooth movement before trying any adjustments. They're portable, easy to store, and don't require any installation, but they won't cover a 400 sq ft deck. If that's what you need, look at the other two options above.
Measuring and planning mounting or placement
Getting the measurements right before you drill anything is the step most people skip, and it's the one that causes the most headaches afterward. Here's what to check for each shade type.
For manual retractable awnings
Start with clearance height. You need at least 7 feet 6 inches from your deck or patio floor up to the bottom of any roof, eave, or overhang where the awning will mount. That's a real minimum, not a suggestion. Below that, the arms won't extend properly and the fabric may drag or bind. Along the full width of the awning, you also need 8 inches of clear, unobstructed horizontal wall space at your mounting height so the brackets seat flat against the surface.
Measure the width of the area you want to shade, then subtract a few inches on each side since the awning frame typically runs a bit wider than the fabric coverage. A 12 ft manual patio retractable awning is a great fit when you want broad, adjustable coverage over a larger seating area. Check whether your wall is wood, masonry, or stucco, because your anchor hardware and drill bits will differ. For masonry, you'll need to pre-drill pilot holes before setting any anchors (more on that in the installation section).
For shade sails
The key with shade sails is that they don't install flat. You attach each corner to a fixed anchor point at slightly different heights to create an angled geometry. This angle is what sheds water and keeps the sail taut rather than pooling and flapping. Plan your anchor points so no two adjacent corners are at the same height, and make sure each anchor point is genuinely solid: a buried post, a structural beam, or a concrete-anchored bracket. A wobbly fence post will fail under wind load.
For manual umbrellas
Measure the diameter of the umbrella you're considering and compare it to your table or seating footprint. A standard 9 ft umbrella covers roughly a 6 ft dining table with some overhang on each side. Check the pole diameter your base or table hole accepts (usually 1.5 in or 1.75 in) before buying so you're not swapping hardware on delivery day.
Installation walkthrough for manual systems
Installing a manual retractable awning
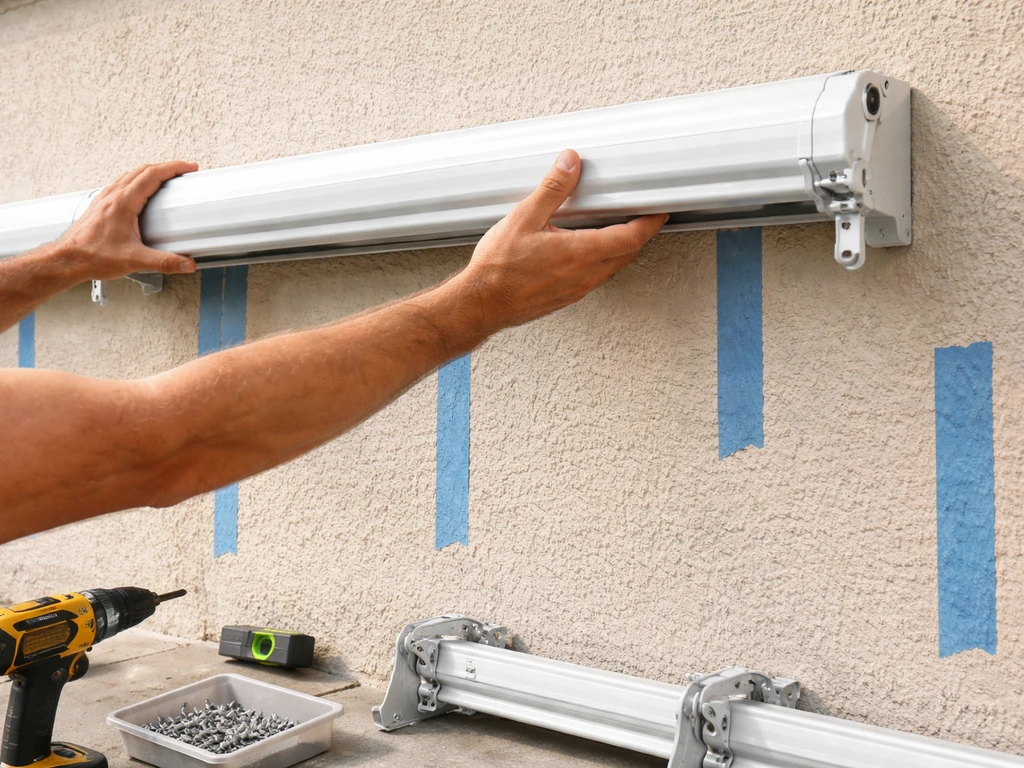
- Locate your studs or structural anchor points along the mounting wall. Use a stud finder and mark each one with painter's tape so you can see them clearly while positioning the bracket rail.
- Hold the bracket rail (or individual brackets) at your target mounting height and confirm you have at least 7 ft 6 in of clearance from the floor. Mark all bracket hole positions with a pencil.
- If mounting to masonry, drill pilot holes first. A typical pilot hole is 1/4 inch diameter, about 3 inches deep. Use a masonry bit and hammer drill. For wood, use a standard drill bit slightly smaller than your screw diameter.
- Insert wall anchors if required by your wall type, then attach the mounting brackets. Check that each bracket is level before final tightening.
- With a second person helping, lift the awning unit onto the mounting brackets. The housing is heavier than it looks. Have your helper hold the weight while you secure the mounting clips or bolts.
- Attach the lateral arms to the brackets or housing according to your specific model's sequence. Most systems connect the arms last, after the housing is secured.
- Insert the crank wand into the drive socket and extend the awning a foot or two to check that both arms extend evenly and the fabric isn't binding on either side.
- Test three full cycles (extend fully, retract fully) before calling the job done. If one arm lags behind the other, check bracket level and arm pivot points.
Installing a shade sail
- Install your anchor points at the planned locations. Use appropriately rated hardware: stainless steel eye bolts, D-rings, or post brackets rated for the sail size.
- Attach the sail's D-ring corners to the anchor points loosely, starting with the highest anchor first.
- Attach turnbuckles between the D-rings and anchor hardware at each corner. Leave them fully open (slack) at this stage.
- Begin tensioning by tightening turnbuckles evenly, moving from corner to corner rather than fully tightening one corner at a time.
- Once the sail is roughly flat, do a final tension check: the sail should have gentle curve (catenary), not a pool in the middle or extreme tautness that strains the anchors. Adjust as needed.
- Check all anchor points for movement or flex under hand pressure. Re-secure anything that shifted during tensioning.
How to operate manual shades correctly
Hand crank awnings
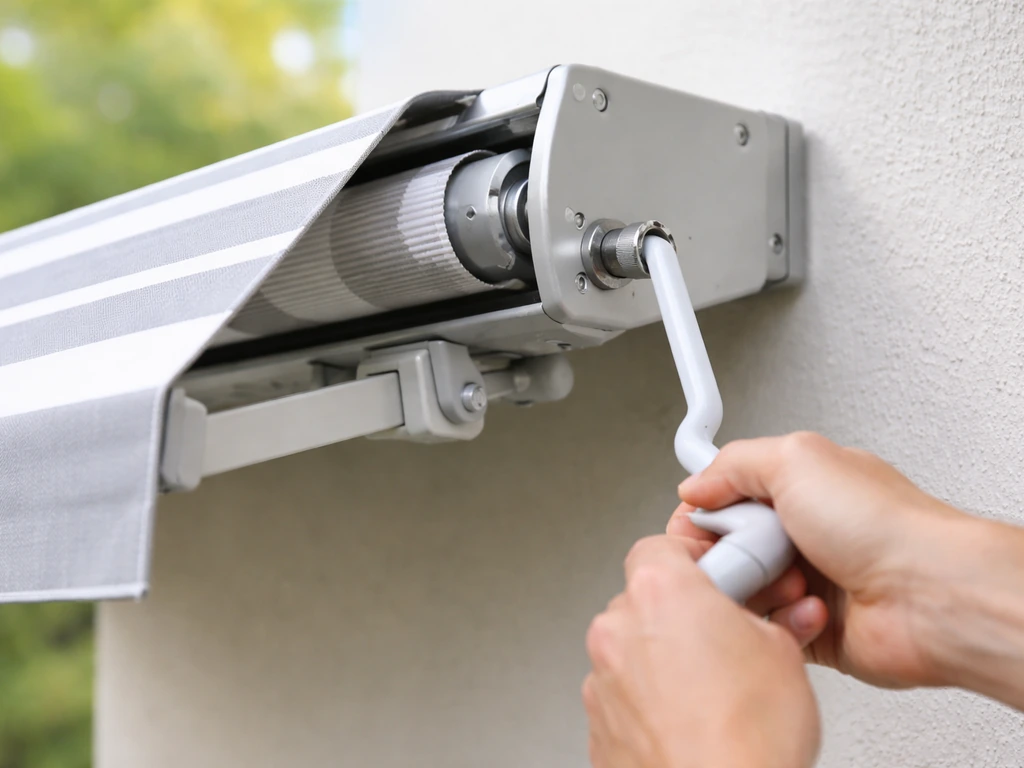
Operating a manual retractable awning is straightforward once you know what to feel for. Insert the crank wand into the drive socket (usually on one end of the housing) and turn steadily. Don't crank fast or force it. You should feel consistent, moderate resistance as the spring tension in the roller engages. To extend, crank in one direction until the arms are fully open. To retract, reverse direction. Some models have a stop point that tells you the awning is fully retracted. Stop when you feel it, rather than forcing extra turns, which can strip the gear.
Tilt mechanisms on umbrellas
Manual tilt on a patio umbrella is usually either a push-button tilt (press and angle the pole) or a collar tilt (twist the collar to lock and unlock). For collar-style tilts, you have to loosen the lock knob or collar before you try to change the angle. Forcing the tilt while the collar is locked is one of the top ways the mechanism cracks or strips. If the tilt won't engage, check that the lock collar is actually released before applying any pressure to the canopy angle.
Cordlock roller shades (porch or pergola panels)
For blank" rel="noopener noreferrer">cordlock-operated roller shades, lowering works by pulling the cord down slightly to release the cordlock mechanism, then allowing the shade to drop to your desired height. To raise, pull the cord at a slight angle away from center (the exact direction depends on your brand), then guide the shade upward. To lock the position, move the cord toward center until the cordlock catches. If the shade drifts down after you set it, the cordlock isn't catching fully. For Duette and Applause honeycomb shades with standard cordlock, Hunter Douglas notes that if the shade drifts, the cordlock mechanism may not be catching fully and may require cordlock component replacement per its repair guidance blank" rel="noopener noreferrer">drifts down after you set it. That's a separate troubleshooting issue covered below.
Troubleshooting common mechanical problems
Before you assume a part is broken, go through this checklist. At least half the time, the fix is a simple adjustment rather than a replacement.
| Symptom | Most likely cause | First thing to check |
|---|---|---|
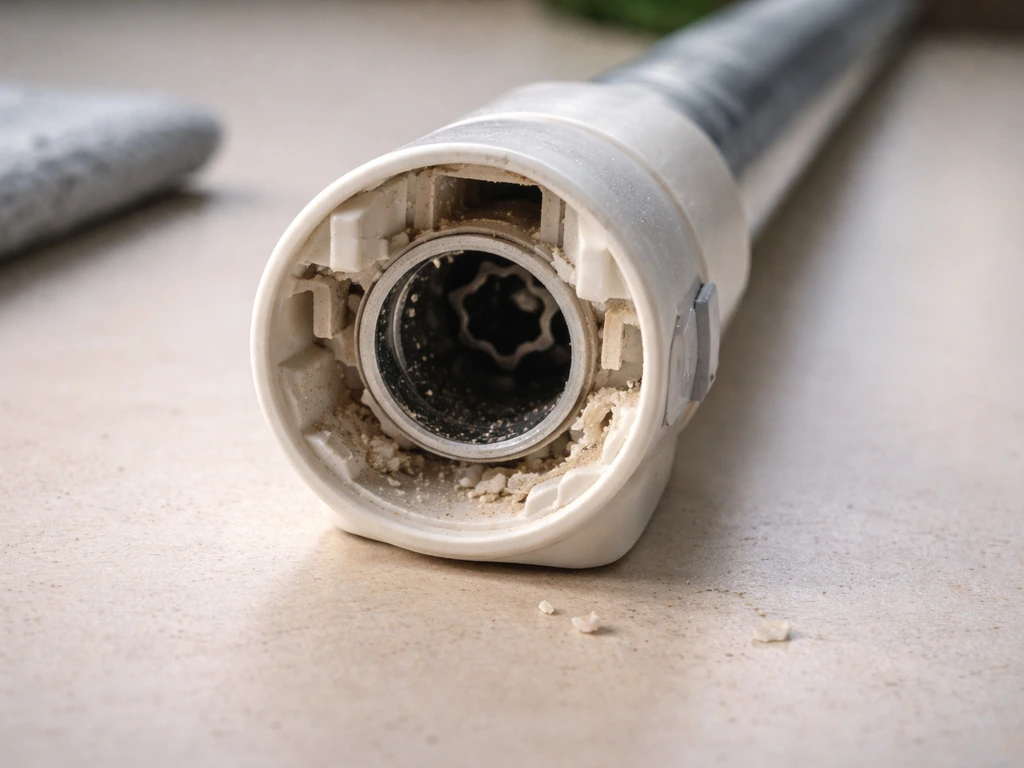
| Crank turns but awning doesn't move | Stripped drive gear or disconnected roller | Look inside the drive socket for visible gear damage; confirm roller tube is seated |
| Awning retracts unevenly (one side ahead of the other) | Arms out of level or rafter rubbing on wall | Check bracket level; confirm arms aren't contacting wall during retraction |
| Fabric bunches on one side of roller bar | Fabric off-center on roller or front bar | Re-center fabric on roller before retracting; run a test cycle |
| Crank is stiff or grinding | Dry pivot points or debris in gear path | Lubricate roller bar bushing and arm pivot points; inspect for grit |
| Umbrella tilt won't engage | Lock collar not released, or tilt cord/strap snapped | Check collar is loose; look for broken strap inside the pole housing |
| Cordlock won't hold shade position | Cordlock roller jammed or worn out | Check cord angle and cordlock roller position; replace cordlock if needed |
| Shade sail flapping or pooling water | Insufficient tension or flat geometry | Tighten turnbuckles evenly; confirm anchor heights differ between corners |
For awning retraction problems specifically, the first question to answer is whether the issue is mechanical or not. For a manual system, it's always mechanical. Narrow it down further: does the crank turn freely but nothing happens (gear or roller issue), or does it resist turning at all (friction, obstruction, or binding in the arm path)? Classifying it that way tells you where to look.
DIY repair steps for broken cranks, cords, and misaligned mechanisms
Broken or stripped crank
If the crank wand spins without resistance, the drive gear inside the wand socket is likely stripped. Remove the wand and inspect the socket opening for plastic fragments or gear teeth debris. If you see that, the drive unit gear needs replacement, not just the wand. Drive units are model-specific, so note your awning brand and model number (usually on a sticker inside the housing) before ordering. Replacement drive units for popular brands like SunSetter typically cost $30 to $80 and swap in with a few bolts. If the wand itself is bent or cracked but the socket is fine, a replacement wand is usually under $20.
Stiff movement and grinding
- Retract the awning fully so you can access the pivot points on each arm elbow and the roller bar bushing at each end of the housing.
- Apply a silicone-based lubricant or the manufacturer's recommended lube (not WD-40, which evaporates quickly) to the roller bar bushing, each arm elbow pivot, and the plastic crank housing.
- Extend and retract the awning two or three times to work the lubricant into the joints.
- If stiffness persists, check whether the arm assemblies are rubbing against the wall or any structural element during travel. Even 1/4 inch of contact creates significant resistance.
- Loosen and re-set the offending bracket slightly away from the wall if rubbing is found, then retest.
Umbrella tilt mechanism repair
If the tilt won't move at all, start by releasing the lock collar completely. Then try gently tilting the canopy by hand while someone else looks inside the pole housing (on push-button tilts, there's often a viewing hole). What you're looking for is the tilt slider or gear moving when you tilt. If the slider moves but the canopy doesn't respond, the tilt cord or strap is broken. If nothing moves, there's probably debris or grit jamming the gear path. Clean the inside of the housing with compressed air, then lubricate lightly and try again. For a broken tilt strap, you can thread a replacement strap (available from most umbrella parts suppliers for under $10) through the pole yourself with a thin wire or fish tape as a guide.
Cordlock repair for roller shades
- Lower the shade fully and examine the cordlock body, which is typically a small plastic housing at the top of the shade where the cord enters.
- Check whether the internal roller inside the cordlock has shifted out of position. In some cases, this happens during shipping or rough handling and the roller just needs to be re-seated.
- If the roller is intact but the cord slips through anyway, the locking surface is worn. Order a replacement cordlock that matches your shade brand and cord diameter.
- To replace: remove the shade from its brackets, pull the cord out of the old cordlock, thread it through the new cordlock following the manufacturer's cord path diagram, then re-hang the shade.
- Test by raising the shade halfway and releasing the cord. It should hold without drifting. If it still slips, confirm the cord is routed correctly through the new cordlock.
Uneven retraction and misaligned fabric
If the fabric bunches up on one side of the roller when retracting, the canopy has walked off-center. Before retracting, manually re-center the fabric on both the roller bar and the front bar, then retract slowly while watching to see which side leads. If one side consistently leads, that arm's mounting bracket may be slightly out of square. Loosen the bracket, shift it a millimeter or two, retighten, and test again. It takes patience but it's fixable without new parts in most cases.
Maintenance, seasonal storage, and winterizing
Spring startup checklist
- Extend the awning fully and inspect the fabric for winter mildew, staining, or small tears before the first use of the season.
- Lubricate the roller bar bushing, arm elbow pivot points, and the plastic hand crank housing with silicone-based lubricant.
- Check all mounting brackets and hardware for loose bolts and tighten any that shifted over winter.
- Test three full extend/retract cycles and listen for grinding, squeaking, or uneven arm travel.
- Apply a fabric protectant rated for outdoor use (products like 303 Fabric Guard work well) after cleaning and drying the canopy completely.
Regular cleaning during the season
Don't let dirt, pollen, and mold build up on the fabric. Use a soft brush to remove dry debris before it embeds. For deeper cleaning, use mild soap and cool water on the fabric while it's extended, then rinse thoroughly and let it air dry completely before retracting. Never retract a wet awning and leave it stored for days; that's how mildew establishes itself in the rolled fabric. The same principle applies to shade sails: unclip and rinse them if they're collecting debris.
Winterizing and seasonal storage
For retractable awnings, retract the awning fully at the end of the season. If you're in a region that gets snow or heavy ice loads, consider installing a cover over the housing. Don't leave the awning extended through freeze-thaw cycles; ice forming in the fabric and arm joints can crack pivot points and split seams. For shade sails, remove them entirely before your first frost and store them clean and dry, loosely folded (not tightly compressed) in a breathable bag in a dry space. For manual umbrellas, remove the canopy from the frame, rinse and dry it, and store the pole and base indoors or in a weatherproof location.
Neglecting these steps is genuinely the number one reason manual shades need early replacement. A 20-minute end-of-season routine can add years to the life of the fabric, the crank mechanism, and the mounting hardware. It's always cheaper than a new awning.
When repair isn't worth it
If the fabric has large UV-degraded sections that are thin or cracking, replacement fabric is worth pricing out before you sink money into mechanism repairs. If the mounting brackets have corroded through or the roller tube has structural damage, the repair cost will approach or exceed the cost of a new unit in the same size class. For most crank, gear, and cordlock issues though, DIY repair is absolutely worth it. Parts are inexpensive, and swapping a drive unit or cordlock is a one-hour job with basic tools.
FAQ
Can I use manual patio shades in light rain or must I close them right away?
Yes. For manual retractable awnings, operate only when the fabric is dry and the arms have clearance. If you feel grinding or see the fabric dragging, stop immediately and inspect for debris, off-center roller position, or a jammed arm path before trying again.
My manual awning crank turns, but nothing moves. What should I check first?
For retractable awnings, the crank should move with steady, moderate resistance. If the crank turns freely but the arms do not engage, the drive gear or wand-to-socket connection is the likely problem. If the crank resists strongly, focus on obstruction, binding at the arm pivots, or fabric walking rather than ordering parts right away.
How can I tell if my shade sail is sagging because of tension versus bad anchor points?
Shade sails should be tensioned so they are taut, but not over-tightened. Uneven corner heights create the waterproofing shape, so if the sail starts flapping, first verify all anchor points are secure and at the correct height pattern, then re-check turnbuckle tension before replacing hardware.
I measured clearance once, but my manual awning still binds. What measurement mistake most often causes this?
Use a measuring tape and confirm the mounting height relative to any overhang along the entire span, not just at one end. If you are close to the minimum clearance, the awning may extend but bind on retraction, causing repeated fabric bunching and early wear.
My patio umbrella tilt will not move. How do I troubleshoot the lock mechanism correctly?
Tilt problems on umbrellas are frequently lock-related. Make sure the collar or lock knob is fully released before attempting any angle change, and try moving the canopy slightly by hand while someone observes the internal slider or cord movement.
The awning bunches up on the same side every time I retract. Should I adjust right away or keep cleaning?
If the fabric is off-center, re-centering before retracting is usually enough. Loosen and re-square the bracket only if the same side consistently leads after multiple slow retraction attempts, shifting it by a very small amount (about a millimeter or two) each adjustment.
Why does my manual patio umbrella feel wobbly or hard to tilt even though it looks intact?
For manual umbrellas, confirm the base hole or hardware spec matches the pole diameter before installing the umbrella. If the pole fits too loosely, you can get wobble and tilt binding, and that can make the crank or tilt feel “stuck” even when nothing is broken.
What should I use (and avoid) when lubricating a manual retractable awning that’s starting to feel rough?
Avoid lubrication that attracts dirt or makes a paste. When the article suggests light lubrication, it is meant for moving metal parts after cleaning, use minimal product, wipe off excess, and keep lubricant away from fabric and any roller surfaces that contact the canopy.
Is it ever okay to force the crank if the awning doesn’t fully retract?
In most cases, yes. If you can stop the issue early, you can prevent bigger damage by backing off once you notice the first resistance spike, then checking for debris, misalignment, and lock release. Forcing extra turns can strip gears or deform arm components.
My cordlock shade creeps down after I set the height. What’s the most likely cause?
Cordlock roller shade drift usually means the cordlock is not catching firmly. Re-check that the cord is moved toward center to engage fully, and inspect the cord for fraying or misrouting before assuming the cordlock is defective.
How often should I clean manual patio shades if my area has lots of pollen and dew?
Manual patio shades often last longer when you clean at the right time. Finish with a thorough rinse, air-dry completely, then retract or store. If your area has heavy pollen or frequent dew, schedule cleaning more often rather than waiting for a full end-of-season routine.
Can I leave my manual shade installed through winter, or should I always remove it?
Yes, but you need to be careful with storms and winter. Retractable awnings should not be left extended through freeze-thaw periods because ice can crack joints or seams. Shade sails should be removed before your first frost and stored dry and loosely folded.
Step-by-step manual patio awning guide for smooth opening, fixing jams, uneven retraction, crank and tilt arm issues, an

Step-by-step fixes for patio umbrellas that won’t open or close, with checks for jams, cords, latches, and lubricating t
Learn how patio umbrellas work: components, open close tilt, stability, and step by step troubleshooting common mechanic