You can operate, troubleshoot, and fix most manual patio awnings yourself without calling a pro or buying a replacement. The key is knowing which mechanism you have (crank, cord/chain, or push-up roll), then working through a short checklist before anything else: check for obstructions in the rail or arms, confirm the fabric is rolled correctly, and make sure no hardware has worked loose. Most "won't open" or "won't retract" problems come down to one of those three things.
Patio Awning Manual: How to Use, Fix, and Maintain

Luca Morrison
15 May 2026
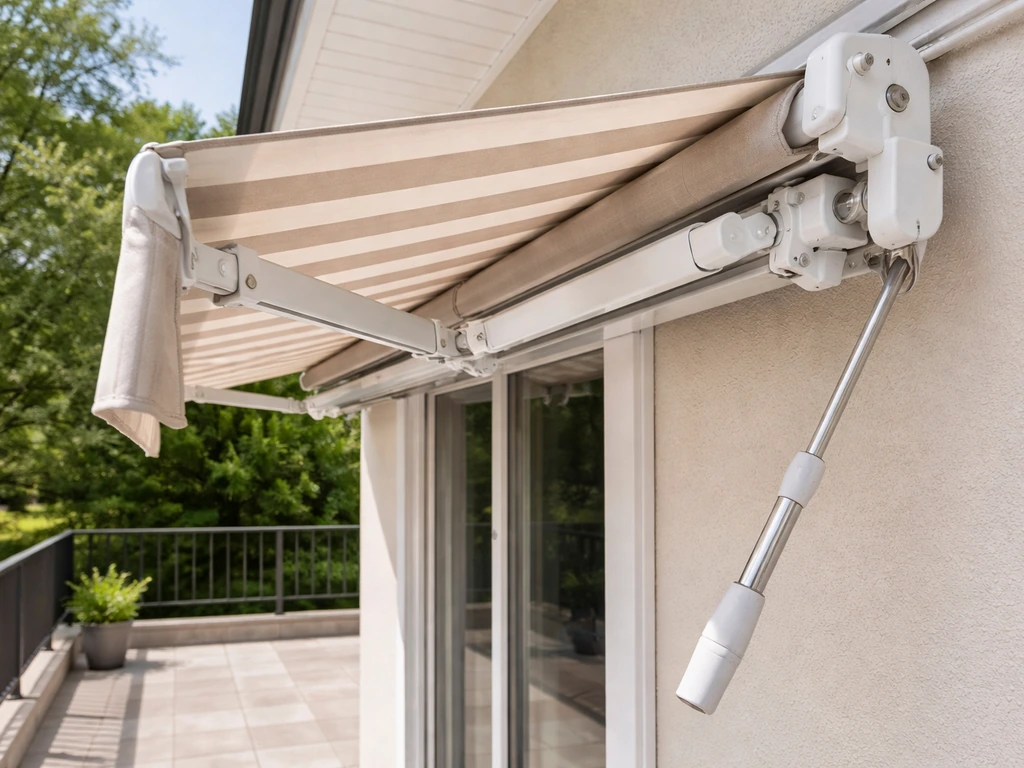
Figure out which manual awning mechanism you have first
Before you touch anything, spend 60 seconds identifying your mechanism type. The fix for a stuck crank is completely different from a jammed cord system, so getting this right saves a lot of frustration.
| Mechanism Type | How It Looks | Common Brands/Styles |
|---|---|---|
| Hand crank (wand or handle) | A removable or fixed pole/handle that inserts into a gear housing on the side of the awning; turning it winds or unwinds the roller tube | SunSetter Essentials, SunSetter 900XT/1000XT, most mid-range retractable awnings |
| Cord or chain pull | A looped cord or chain hangs from one end of the awning; you pull one side to extend, the other to retract | Older awnings, some budget roll-up styles, some Lippert Solera variants |
| Push-up / manual lift arms | You physically lift the front bar and prop it open with a support rod; no winding mechanism | Simple patio shade structures, manual push-up umbrella-style awnings |
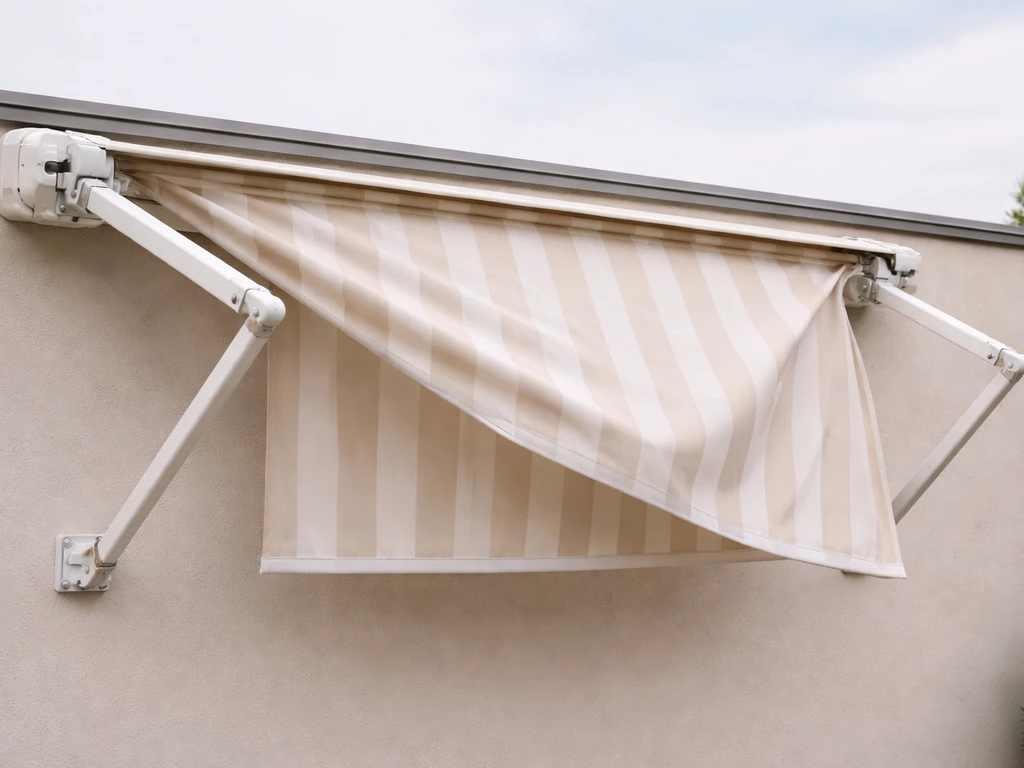
| Lateral arm retractable (crank + scissor arms) | Has two folding articulated arms on either side that extend and lock when cranked open; fabric rolls over a front roller bar | SunSetter, Awntech, most full-width retractable awnings |
If you have a lateral-arm retractable, that's the most common setup on residential patios and the one most of this guide focuses on. The other mechanisms share most of the same troubleshooting logic, but the specific steps for push-up and cord-pull awnings are simpler and noted where they differ.
How to open, extend, tilt, and close your manual awning safely
Opening and extending a lateral-arm crank awning
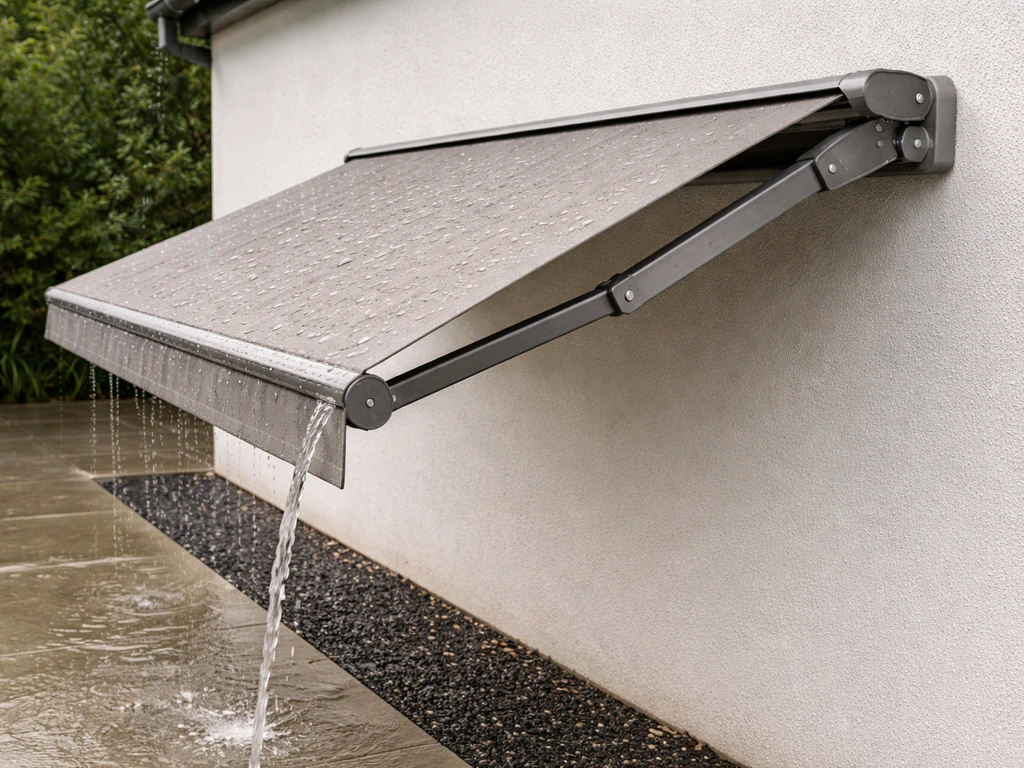
- Check the area in front of the awning for obstructions (furniture, planters, kids, pets). The arms swing outward as the fabric extends and can knock things over.
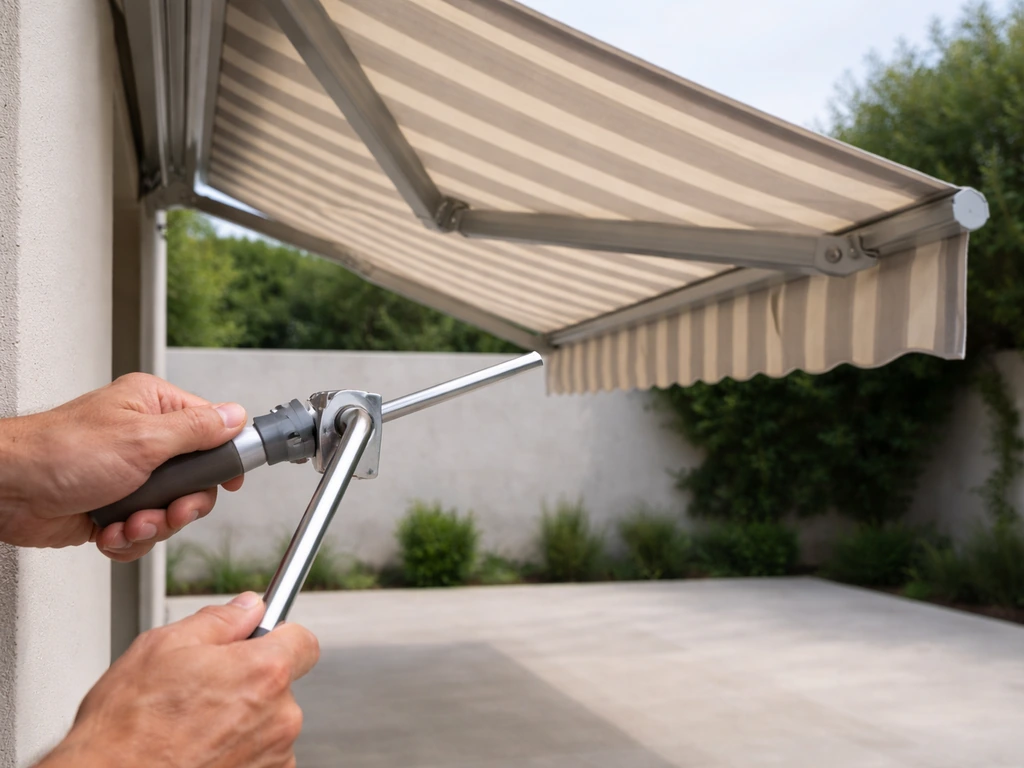
- Insert the crank wand into the gear socket on the side of the housing if it's removable. Most sockets are hex-shaped and located on the right side when you're facing the wall.
- Turn the crank counterclockwise (in most models) to begin extending. The fabric will start unrolling over the top of the roller bar and the lateral arms will begin to unfold.
- Keep cranking steadily until the arms extend fully and bend slightly at the elbow joint. On SunSetter models, the front roller should reach roughly waist to head height depending on how high the awning is mounted and what pitch angle is set.
- Stop cranking as soon as you feel resistance or hear the stop-limit click. Forcing past the stop limit is one of the most common ways to strip the gear assembly.
- Step back and confirm both arms are extended evenly. If one side is lower than the other, stop and see the troubleshooting section below before using the awning.
Adjusting the tilt (pitch) angle
Most lateral-arm awnings let you adjust the pitch so water runs off instead of pooling in the fabric. On SunSetter Essentials models, there's a pitch adjustment mechanism at the wall bracket. To change it, loosen the arm clamp lock nut, set the desired angle, then re-tighten the large lock nut firmly before operating the awning again. After changing pitch, you'll often need to re-set the open and close stop limits too, because the awning's resting position changes with the angle. If you skip this and the awning now sags or doesn't sit right fully open, that's why.
Closing and retracting safely
- Clear the area under the awning again. As it retracts, the front bar drops toward the wall and the arms fold back.
- Turn the crank clockwise (reverse of opening) at a steady, moderate pace. Don't rush it.
- As the fabric rolls back onto the roller tube, keep light tension on the crank so the fabric winds evenly and doesn't bunch to one side.
- Stop when you feel the close-limit stop engage or the awning is fully flush against the housing. Again, don't force it.
- For cord/chain systems: pull the retract side of the loop slowly and evenly. If it starts to bind, stop and check for a tangle or debris in the channel before continuing.
- For push-up awnings: support the front bar with one hand, remove the prop rod with the other, then lower the bar gently back to the closed bracket.
Won't open, extends unevenly, or won't retract: quick troubleshooting
Run through these checks in order before disassembling anything. At least 70% of the time, one of these catches the problem.
Awning won't move at all
- Check for visible debris (leaves, a twig, a wasp nest) jammed in the rail channel, arm joints, or around the roller tube. Clear it out and try again.
- Confirm the crank wand is fully seated in the gear socket. A partial connection means the gear isn't engaging.
- Look for a locking pin or travel latch that gets used during storage or shipping. These are easy to forget and will prevent any movement.
- If the crank turns but nothing happens (you hear spinning but no fabric movement), the gear assembly is likely stripped or the wand is slipping on the socket. See the gear fix section below.
- For cord/chain systems: check that the cord isn't tangled around itself or caught on the housing. A knotted cord will lock the whole system.
Awning extends unevenly (one side lower than the other)
- One lateral arm is likely more extended than the other because of an imbalance in the torsion spring or a block on one side. Retract fully and re-extend slowly, watching which arm lags.
- Check that both arm pivot bolts at the wall bracket are equally tight. A loose bolt on one side lets that arm sag.
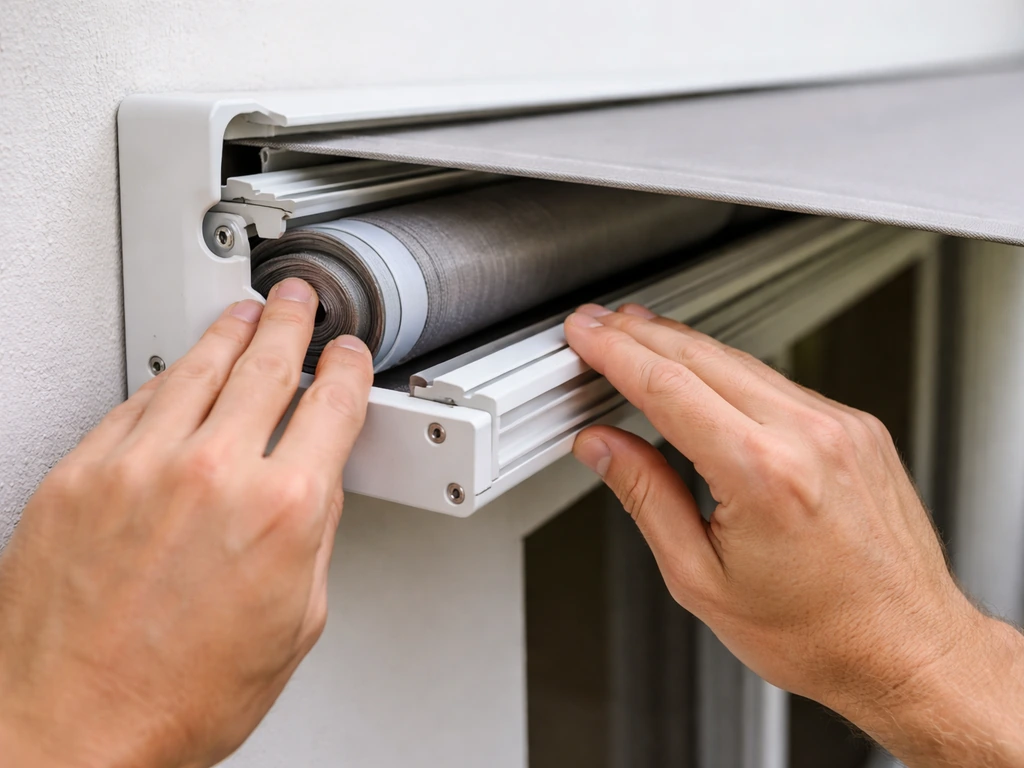
- Inspect the roller tube end caps. If one end of the tube has slipped or is seated at a different depth, the fabric will roll unevenly.
- On Lippert Solera models, check that the roll tube centerline is level with or slightly higher than the awning rail centerline. If it's sitting lower on one end, re-seat the tube before extending again.
Awning won't retract (or retracts partially)
- First, check for obstructions in the guide rails or along the roller tube path. This is the number-one cause of stuck retraction.
- Look at the fabric: if it has bunched or folded on itself during the last extension, it can jam the roller. Extend fully again to straighten the fabric, then retract slowly.
- Check whether the stop-limit is set too early. If the awning always stops a few inches short of fully closed, the close-limit needs adjustment (see below).
- If the awning retracts fine by hand (you can push the fabric in manually) but won't crank in, the problem is in the gear, not the fabric or arms.
Fixing the mechanical parts yourself
Crank and gear problems
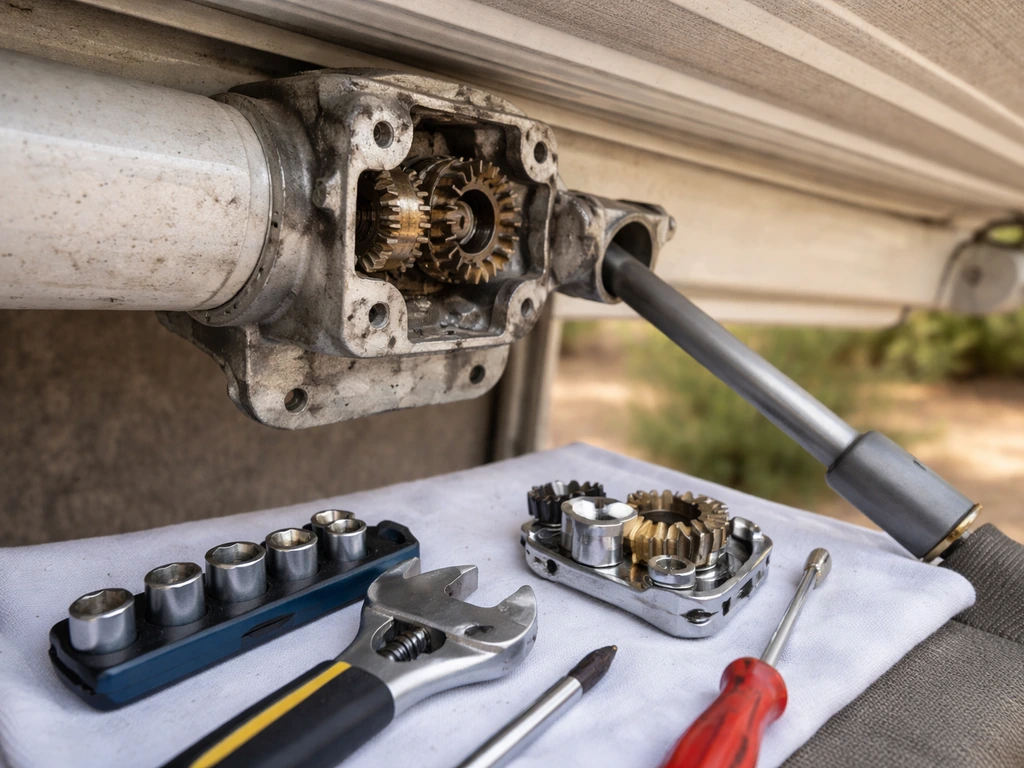
A slipping or spinning crank almost always means a worn gear assembly. On SunSetter manual awnings, the gear assembly is a replaceable part and [SunSetter provides specific "Gear Assembly Replacement Instructions for Manual Awnings" documentation. ](https://support. sunsetter.
com/SunSetterData/SUNSETTERTECHNICALSUPPORT/1cMotorizedMotorizedXLVISTAAwningsand%20Accessories/4ReplacementPartsInstructionsandProcedures/03. ManualGearReplacement. pdf) The process generally involves removing the end cap on the gear side of the housing, sliding out the old gear cassette, and pressing in the new one. It's a 20-30 minute job with basic tools if you're comfortable with that kind of work.
If the crank handle squeaks rather than slips, that's much simpler: add a small drop of light lubricant (like silicone spray or a light machine oil) to the plastic handle pivot where it meets the wand shaft. SunSetter's own maintenance guidance calls this out specifically for squeaking during manual operation.
Stop-limit issues (the awning doesn't reach fully open or fully closed) are adjusted at the gear housing. There are typically two small set screws or adjustment cams labeled "open" and "close" on the housing face. Loosen the relevant one, run the awning to where you want it to stop, then re-tighten. SunSetter's owner manuals include a dedicated section on adjusting open and close stop limits, and it's worth pulling up the PDF for your specific model before adjusting, since the exact location of the screws varies.
Lateral arm and tilt joint repairs
Lateral arms have a few failure points: the elbow pivot (where the arm bends), the wall bracket pivot, and the arm clamp that holds the pitch setting. If an arm droops, won't hold its angle, or makes a grinding sound when extending, start by tightening all bolts at these three points. Most require a socket wrench (typically 10mm or 13mm).
On SunSetter models with arm clamp lock nuts, the large lock nut at the arm clamp is what holds the pitch position: if the awning keeps losing its angle, this nut is almost certainly loose. Tighten it firmly after setting your desired pitch. If the elbow pivot is cracked or the arm has physically bent, that arm section needs to be replaced rather than repaired.
Cord and chain fixes
For cord-operated awnings, most problems are a frayed or broken cord, a tangled loop, or a cord that has jumped off its pulley. Inspect the full length of the cord from the pull point back to where it attaches to the roller drum. If it's tangled, work it free gently and re-thread it around the pulley in the correct direction (usually indicated by an arrow on the housing). A frayed cord should be replaced before it breaks fully, not after.
Replacement cord is sold by the foot at hardware stores; match the diameter and use a braided nylon or polyester cord rated for the load. For chain systems, check each link for stretching or rust, and look at the sprocket on the roller drum for worn teeth.
Tension and alignment
If the fabric sags in the middle when extended, or billows unevenly, the torsion spring tension inside the roller tube may need adjustment. On most lateral-arm awnings, you can add tension by retracting the awning fully, then manually rotating the roller tube a few turns in the wind-up direction before re-securing the end bracket. Do this in small increments (2-3 turns at a time) and test between each adjustment.
Over-tensioning makes the awning snap back too fast and can stress the fabric. For alignment, Lippert Solera guidance is a good benchmark for any brand: the roll tube should be level with or slightly higher than the rail centerline. If it's visibly lower on one end, the mounting bracket on that side needs to be shimmed or repositioned.
Maintenance that keeps your awning moving smoothly
Most of the mechanical failures above are preventable with 30 minutes of maintenance twice a year. Here's what actually matters:
Fabric cleaning
Always clean fabric dry first. Vacuum the surface, gently beat it, or brush off loose dust before applying any water or cleaner. Wet dirt becomes embedded in woven acrylic fibers and encourages mildew. For deeper cleaning, use mild soap and lukewarm water, scrub gently with a soft brush, rinse thoroughly, and let the fabric dry completely in the open position before retracting. Never retract a damp awning: moisture trapped in the rolled fabric is the fastest way to grow mold that stains and weakens the material. SunSetter's fabric care guidance is consistent on this point, and it applies to virtually all woven acrylic awning fabrics regardless of brand.
Lubrication
Use silicone lubricant spray (not WD-40, which attracts dirt) on the following points every season: the lateral arm pivot joints, the roller tube end bearings, the rail channel interior, and the crank wand handle pivot if it squeaks. Lippert Solera's manual specifically calls for spraying silicone lubricant inside the awning rail channel, which is good advice for any awning with a guide rail. Avoid oil-based lubricants on any part that contacts fabric, since they can stain.
Hardware checks
Every spring and fall, go over every mounting bolt and bracket screw with the appropriate wrench. Awnings vibrate in the wind constantly, and hardware loosens over a season. Pay special attention to the wall mounting bolts (these carry the entire load), the arm clamp lock nuts, and the elbow pivot bolts on each lateral arm. Loose fasteners cause almost every alignment and sagging issue people blame on the mechanism.
Handling wind, storms, and the off-season
Wind and rain: when to retract
The simplest rule: retract the awning any time you're not actively using it and wind picks up above about 20 mph, or whenever a storm is incoming. Manual awnings have no automatic wind sensor, so this is entirely on you. Because a manual retraction slope patio awning relies on you to pull it back at the right time, retracting promptly can prevent strain on the arms and fabric Manual awnings have no automatic wind sensor.
Extended awnings act as sails: even a brief gust can bend lateral arms, strip gear teeth, or tear fabric at the seam attachment points. If you're leaving the house for more than a few hours, retract it. [Lippert's Solera manual explicitly advises retracting during high wind, heavy rain, or any extended absence](https://www. manualslib.
com/manual/3668237/Lippert-Solera-1000-Series. html), and that advice holds for any retractable awning regardless of brand.
Winterizing and seasonal storage
- Clean the fabric thoroughly (see above) and let it dry completely. Any moisture trapped in the rolled fabric over winter will cause mold and can freeze, stressing the seams.
- Lubricate all pivot joints, the rail channel, and the crank mechanism before closing up for the season.
- Inspect every bracket and bolt. Tighten anything that has worked loose over summer.
- Retract the awning fully and confirm it's seated flush against the housing.
- If you're in a climate with heavy snow or ice, add a breathable protective cover or wrap around the retracted awning. Products like Awntech's winter covers (described as protective "blankets" that wrap fully around the retracted unit) shield the fabric, frame hardware, and crank mechanism from snow, ice, moisture, and UV without trapping condensation the way plastic tarps do.
- In very cold climates, inspect the awning before the first spring use for any cracked or brittle plastic components (especially end caps and crank housings) that may have become fragile over winter. Replace before operating.
If your setup is a simpler manual retraction design (without the full lateral-arm structure), the winterizing steps are the same but the inspection points differ slightly: focus on the pull cord condition, the roller tube end brackets, and the guide channel instead of the arm joints. If you have a Monmouth manual retraction patio awning, check the pull cord, roller tube ends, and guide channel before storage to prevent retraction problems next season simple manual retraction design.
If your patio umbrella is the simple manual push-up style, the winter storage checklist focuses on keeping the guide channel and pull mechanism free of debris and damage manual push up patio umbrella. If you have a slope patio awning with manual retraction, double-check the pull cord or crank path so it retracts smoothly along the incline manual retraction slope patio awning.
Manual retractable awnings with a steeper pitch setting drain water better and tend to handle shoulder-season weather (light frost, autumn rain) more gracefully than nearly-flat installations.
When repair is worth it and when to replace
A good manual patio awning should last 10 to 15 years with decent maintenance. Mechanical parts like gears, cords, and arm pivot hardware are nearly always replaceable at a fraction of the cost of a new awning, so if the frame is straight and the fabric is in reasonable shape, fix the mechanism.
If you are dealing with a manual patio umbrella instead of an awning, the same careful approach to binding, tension, and hardware will help you narrow down the cause quickly. The clearest case for replacement is when the main roller tube is bent, a lateral arm is cracked at the weld (not just a loose bolt), or the fabric has major tears at the seam attachment points that can't be stitched or patched.
If you're spending more than about 40-50% of a new awning's cost on parts alone, it's worth getting a quote on replacement. Otherwise, work through the fixes above and you'll almost certainly get several more good seasons out of what you have.
FAQ
What should I do if my manual patio awning is partially open and won’t fully extend?
If your patio awning manual is stuck with the fabric partway open, start by locating the mechanism (crank, cord/chain, or push-up roll) and check for obstructions in the rail or arm path before forcing the handle. For crank models, forcing a slipping crank can worsen a worn gear cassette, so stop if the handle spins without moving the roller tube and inspect the gear side end cap area first. For cord systems, do not pull hard if the cord is tangled, instead free the loop and re-thread it in the correct pulley direction.
Can I lubricate my patio awning’s parts right away, or do I need to clean first?
You generally should not “lubricate everything” before you clean. Clean and fully dry the fabric first, then apply silicone lubricant only to metal friction points (arm pivot joints, roller tube end bearings, guide rail channel interior, and the crank handle pivot if it squeaks). Avoid oil-based products on any surface that the fabric contacts, because staining and residue transfer are common.
My awning got retracted while wet. Should I open it, or will it be fine?
For manual patio awnings, a damp-fabric issue is a preservation problem, not just a smell problem. Retracting a wet awning traps moisture in the rolled fibers and can lead to mold staining and fabric weakening. If it is already retracted while damp, open it as soon as possible and let it dry completely in the open position before running it back and forth.
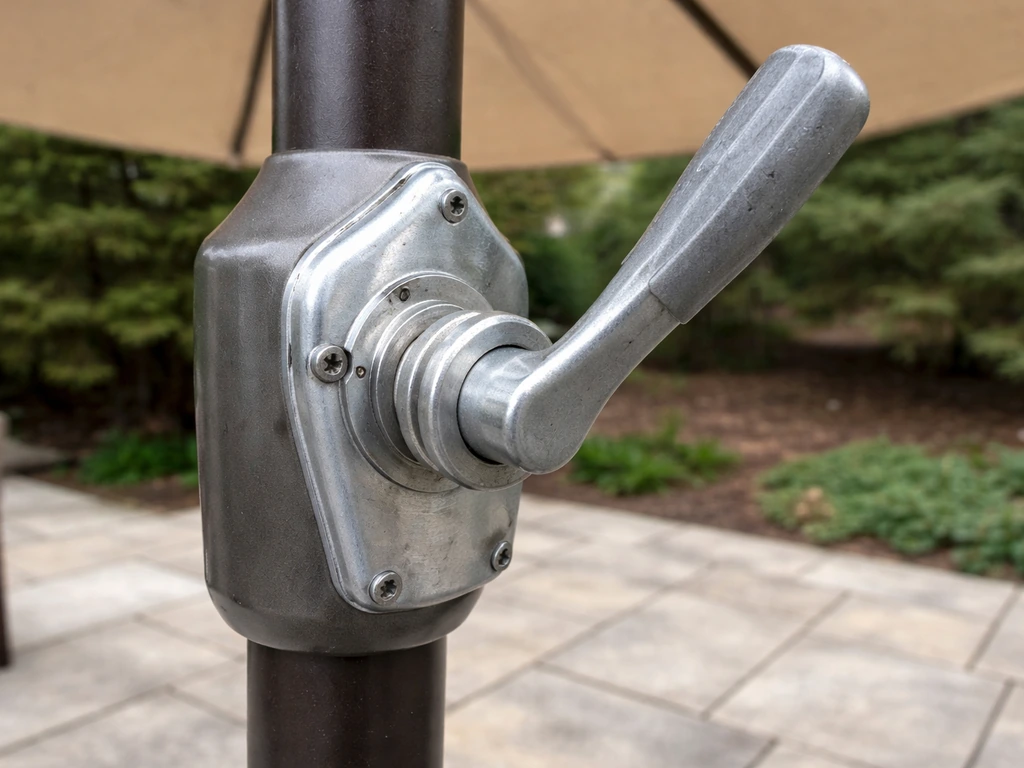
What’s the difference between pitch issues and stop-limit issues on a manual patio awning?
If the awning “retracts but stops short,” use the stop-limit adjustment at the gear housing, not the pitch angle. Pitch affects how the fabric sits and drains, while stop limits control the fully open and fully closed endpoints. Adjust the labeled open or close set screws or cams one change at a time, then test the full cycle after each adjustment.
I adjusted the pitch, but it won’t hold the angle. What should I check first?
If your pitch keeps drifting after you set it, the large lock nut at the arm clamp (on models with arm clamp lock nuts) is the first thing to check. Re-set the pitch angle, then re-tighten the large lock nut firmly before operating again. Also re-check the other bolts at the elbow pivot and wall bracket pivot, since looseness there can make the pitch feel like it is “slipping” even when the clamp nut is tight.
My manual awning crank squeaks. Is that a gear problem or something else?
A squeaky crank handle usually points to a friction point at the handle pivot, not necessarily the gear assembly. Add a small drop of light lubricant to the plastic handle pivot where it meets the wand shaft, then test. If the crank instead slips or spins under load, that indicates a worn gear assembly, and the gear cassette may need replacement rather than additional lubrication.
My cord awning is jerky and the cord looks worn. Can I keep using it?
For cord-operated patio awnings, a frayed cord is a stop-and-replace situation before it breaks fully. Inspect from the pull end to where the cord attaches on the roller drum, and check the cord’s run at the pulley for a correct wrap direction (often marked by an arrow on the housing). If you find stretching or the cord jumped off the pulley, re-thread it correctly, then test slow, full travel before using normally.
How do I fix sagging in the middle without over-tensioning the springs?
For torsion spring tension tuning, adjust in small increments by retracting fully, rotating the roller tube a few turns in the wind-up direction, then re-securing and testing between adjustments. If you over-tension, the awning can snap back too fast and stress the fabric and seams. If sagging persists after reasonable increments, the mounting alignment and bracket position may be contributing.
What’s the best troubleshooting order so I don’t take apart the wrong part?
Run the maintenance checks in the same order every time: remove obstructions first, confirm the fabric roll is correct, verify that hardware is tight, and only then disassemble. Most “won’t open” and “won’t retract” cases trace back to those basics, so it prevents unnecessary part replacement and keeps you from chasing symptoms.
What lubricant should I use in the rail channel, and what should I avoid?
If your patio awning manual has a guide rail and you lubricate it, stick to silicone lubricant and apply it to the rail channel interior, not to areas that contact fabric. Use silicone spray specifically, because it is designed to reduce friction without creating oil residue. Also, don’t use WD-40, since it can attract dirt and make the rail channel gunkier over time.
What should I focus on for winter storage of a simple manual retraction awning?
In winterizing, the key is protecting the retraction path and preventing hardware issues, not just covering the fabric. Make sure the pull cord (or crank path) and roller tube end brackets are clear and not binding, and that the guide channel is free of debris before storage. For longer-term storage, also confirm the awning is fully retracted and the fabric is dry to reduce the chance of mold during the off season.
My lateral-arm awning droops and grinds. Should I adjust the mechanism or inspect the arm joints?
Re-tighten first, then retest. If the awning droops, won’t hold its angle, or makes grinding during extension, check and tighten bolts at the elbow pivot, wall bracket pivot, and the arm clamp. Use the correct socket size for your hardware (commonly 10 mm or 13 mm). If an arm is cracked at the weld or physically bent, that section generally needs replacement rather than repair.
Next Articles

How to Fix a Patio Umbrella That Won't Open or Close
Step-by-step fixes for patio umbrellas that won’t open or close, with checks for jams, cords, latches, and lubricating t
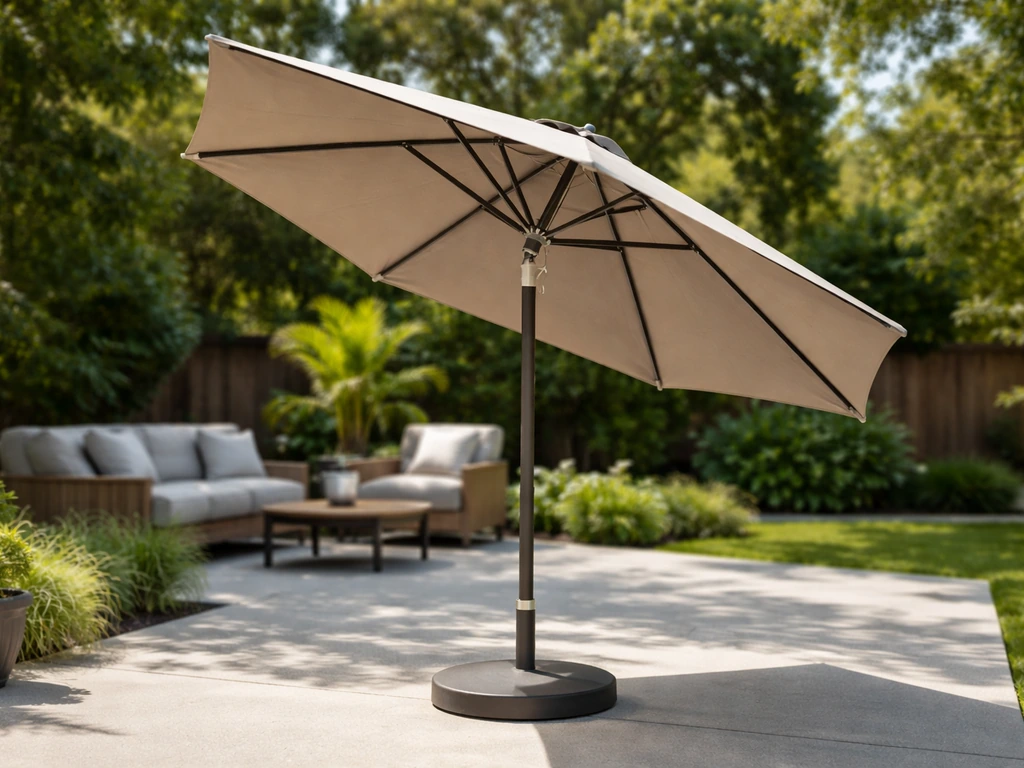
How Does a Patio Umbrella Work? Components, Use, and Fixes
Learn how patio umbrellas work: components, open close tilt, stability, and step by step troubleshooting common mechanic
Patio Umbrella Crank Not Working: DIY Fix Guide
Fix a patio umbrella crank that won’t work with safe step-by-step jam, gear, and base troubleshooting and repair tips.