
To assemble a Threshold solar patio umbrella, you slot the pole sections together, attach the canopy hub and ribs, thread the crank cord, seat the solar receiver puck at the crown, and flip the on/off switch (usually just above the crank handle) to the ON position before your first use. The solar light charges automatically in direct sunlight for 6 to 8 hours and then switches on at dusk by itself. Most Threshold solar umbrellas are sold at Target as house-brand products and share the same basic push-button tilt and worm-gear crank design, so these instructions apply across the line with only minor variations in pole diameter and canopy size.
Threshold Solar Patio Umbrella Instructions: Repair & Care

Luca Morrison
12 Aug 2026
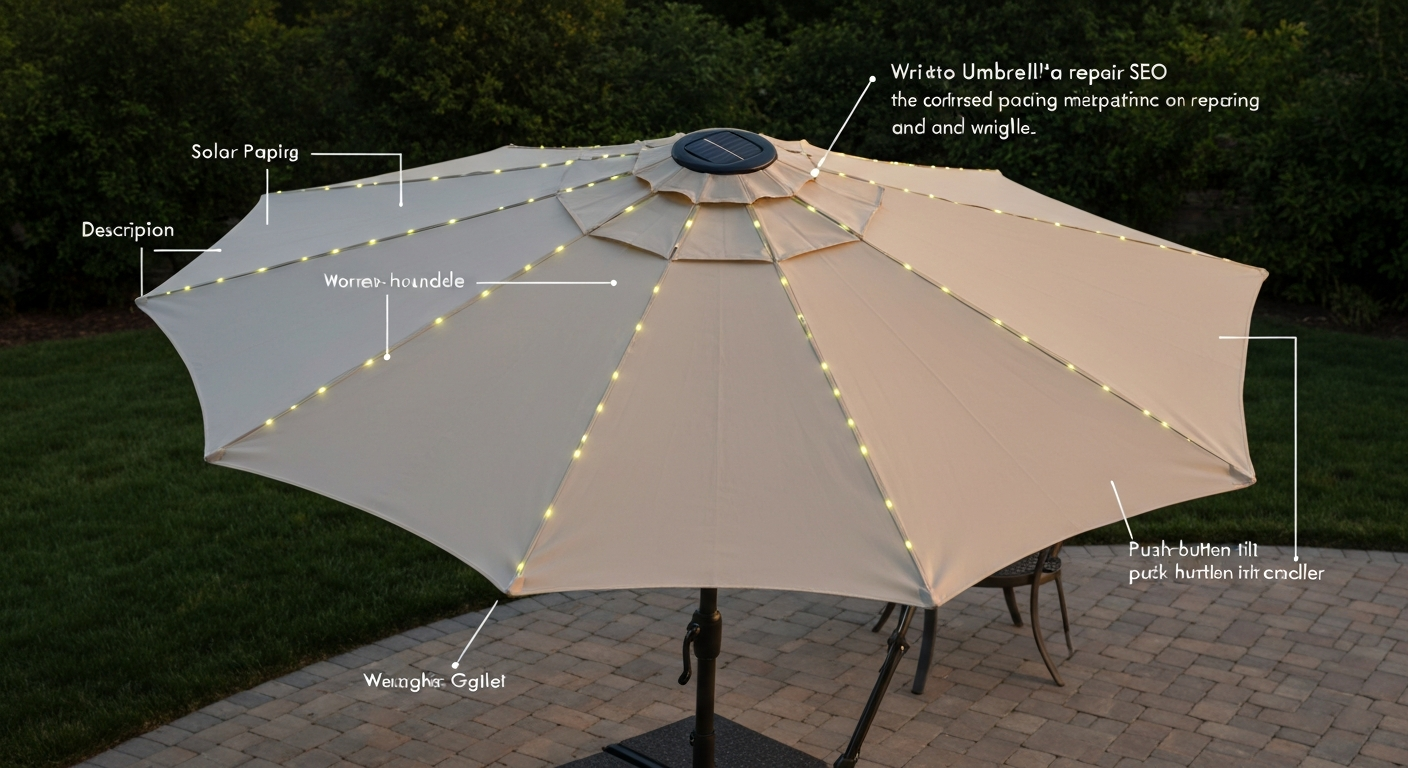
What to Expect From These Instructions
This guide walks you from unboxing to first use, then covers every common repair and maintenance task you'll run into over the life of the umbrella: solar battery swaps, broken ribs, crank cord replacements, tilt mechanism fixes, canopy swaps, and seasonal storage. I've worked through these same steps on Threshold models and closely related designs (Hampton Bay, Mainstays, East End, SunnyGlade), and the hardware is similar enough across brands that most of what you read here transfers directly. Where a step is model-specific, I'll call that out.
Threshold umbrellas don't come with a thick owner's manual. The instruction sheet in the box is usually a single folded sheet with an exploded diagram. This article is designed to fill that gap, especially for troubleshooting and repair tasks the sheet doesn't cover at all.
Safety Notes Before You Start
Personal safety and working at height
The solar receiver puck sits at the very top of the umbrella pole, which puts it 7 to 9 feet off the ground depending on your model. Use a sturdy step stool or a low ladder rated for your weight whenever you need to remove or reseat the puck. Have a second person stabilize the pole if the umbrella is still in its base while you work at the top.
Electrical and solar panel safety
The solar module operates at low voltage (the panel's open-circuit voltage is typically under 5 V, and the battery cell is under 4 V), so shock risk from the panel itself is minimal. That said, never short the battery terminals, puncture the cell, or expose a damaged cell to heat. A CPSC recall of SunVilla solar LED umbrellas sold at Costco was issued specifically because the integrated lithium-ion battery in the solar puck overheated and caused fires. While that recall targeted a different brand, the hazard exists across any umbrella with a lithium-based solar cell. Treat a swollen, leaking, or unusually hot battery as a fire risk: do not charge it, do not store it indoors, and dispose of it properly.
Battery handling and disposal
Before you remove or replace any rechargeable cell, flip the umbrella's power switch to OFF. Tape the terminals of the old battery with electrical tape before placing it in a separate bag for disposal. Do not put rechargeable batteries in household trash or recycling bins. The EPA and Call2Recycle both provide drop-off locator tools at call2recycle.org for finding a nearby recycling point, typically at hardware stores or electronics retailers. If your Threshold model uses a LiFePO4 cell (common in newer units, sometimes labeled 3.2 V 14430), the same disposal rules apply.
Wind and base safety
Close and lower the canopy any time wind picks up above a light breeze. Manufacturer guidance consistently calls for closing the umbrella in adverse weather and using a base weighted appropriately for the canopy size. For an 8-foot round canopy, a 50-pound base is a reasonable minimum on a paved surface; go heavier (65 to 100 pounds) if your patio is exposed or elevated. An open umbrella in a 20+ mph gust becomes a sail that can tip the base, damage the ribs, or pull the crank cord housing apart.
Parts and Tools Checklist
Identifying your parts
The exploded diagram that ships with Threshold umbrellas uses letter callouts. The manufacturer's instruction PDF 3.04 M / 10 FT Solar LED (exploded/assembly diagram PDF) includes an exploded/assembly diagram with lettered part callouts for canopy, ribs, hubs, pole sections, crank housing, and the solar receiver. Here are the main components you need to recognize before you start assembly or any repair:
- Upper pole section (houses the crank cord runner and connects to the crown hub)
- Lower pole section (inserts into the base; the power switch is typically on this section just above the crank housing)
- Crown hub (top hub, holds the main ribs and the solar receiver puck)
- Runner hub (slides up and down the pole on the cord; connects the stretcher ribs)
- Main ribs (8 on most 8-foot round models; slot into the crown hub)
- Stretcher ribs (connect the runner hub to the main ribs at a midpoint joint)
- Canopy (attaches to main ribs with fabric sleeves and usually a Velcro or tie strap at the crown)
- Solar receiver puck (the round module at the very top; contains the PV panel, battery, charge circuit, and dusk sensor)
- LED light harness (wire loom routed along or inside the main ribs to LED nodes)
- Crank handle assembly (worm-gear housing with a folding or fixed handle; sits at mid-pole)
- Tilt button and collar (push-button mechanism just above the crank; allows the canopy to tilt)
- Crank cord or lift cord (internal cord connecting the crank reel to the runner hub)
Common replacement parts and where to find them
Threshold umbrella replacement parts are not stocked at Target stores, but they are widely available through third-party suppliers. The solar puck and LED harness are the most model-specific items; measure your pole diameter (most Threshold poles are 1.5 inches OD or 38 mm) and crown hub diameter before ordering. Canopy replacement sets and rib kits are sold by size (8-foot, 9-foot, 10-foot) and rib count (typically 8). Crank cord and crank handle assemblies are largely universal across 1.5-inch aluminum pole umbrellas.
- Solar receiver replacement puck (match pole crown diameter; 3.2 V LiFePO4 14430 cell format is common in newer units, but some budget models use NiMH AA packs at 1.2 V per cell — confirm before ordering)
- Replacement rechargeable battery cell (record the cell format printed on the old battery before disposing of it)
- Umbrella rib (order by length and hub attachment type; bring a broken rib to match if possible)
- Crank cord/lift cord (typically 3 mm braided polyester; sold in 10-foot lengths)
- Crank handle housing assembly (universal fit for 1.5-inch poles is common)
- Canopy (sold by diameter and rib count; specify pole vent style if your model has a double vent)
- Tilt collar and pin (push-button style; often sold as a crank-and-tilt combo unit)
Tools you'll need
- Phillips-head screwdriver (size #2 for crank housing and solar puck screws)
- Flathead screwdriver (for prying open battery compartments)
- Needle-nose pliers (for reseating rib pins and routing crank cord)
- Small adjustable wrench or 10 mm open-end wrench (for pole collar bolts on some models)
- Multimeter (for diagnosing solar panel output and battery charge; optional but very useful)
- Zip ties (for cable management on LED harness)
- Electrical tape (for taping old battery terminals before disposal)
- Sturdy step stool or 4-foot ladder
- Work gloves
Pre-Assembly Checks and Site Preparation
Before you touch a single bolt, spend five minutes on site prep. It will save you from reassembling the umbrella twice.
- Check the base weight. For an 8-foot canopy, use at least a 50-pound filled base. The Threshold umbrella box will list the compatible pole diameter (1.5 inches is standard), and your base opening should match. A loose pole fit lets the umbrella rock and accelerates wear on the tilt collar.
- Confirm ground clearance and overhead clearance. You need roughly 10 feet of vertical clearance for a standard 8-foot market umbrella to open fully without binding on an overhead structure.
- Inspect the box on arrival. Dents or crushed corners on the box often mean a bent upper pole section or cracked rib. Open the box before the delivery driver leaves if possible.
- Lay out all parts on a clean flat surface and match them to the parts diagram. Threshold umbrellas have been known to ship with a missing stretcher rib or an unlabeled hardware bag tucked under the canopy fabric — find everything before you start.
- Check the wind forecast. Don't assemble an umbrella if sustained winds above 15 mph are expected that day. First assembly outdoors in calm conditions is much easier and safer.
- Verify the solar puck is intact. Look for any cracks in the PV panel surface, loose wiring at the crown connection point, or signs that the battery compartment has been compromised in shipping. If the puck is damaged, contact Target for a replacement before proceeding.
Step-by-Step Assembly: Unboxing to First Open
These steps follow the standard Threshold 8-foot round solar market umbrella. Larger 9-foot or 10-foot models add one pole section and have more ribs, but the sequence is identical.
- Unpack carefully. Cut the box open along the seams, don't pull the pole sections out forcefully — they're often nested inside the rolled canopy and pulling hard can crack a rib.
- Connect the pole sections. The lower pole slides into the upper pole. You'll see a spring-loaded button on one section that clicks into a hole on the other. Push the sections firmly together until the button pops through. Do not force it — if it doesn't click, rotate the upper pole 180 degrees and try again.
- Attach the crank housing. If it's not pre-installed, slide the crank handle collar over the pole at the mid-point and tighten the set screw with your Phillips screwdriver. The crank handle should fold out to the right when you're facing the umbrella.
- Connect the tilt collar. The tilt button assembly slides onto the pole just above the crank housing and is usually secured by a bolt through a collar. Hand-tighten, then snug with a wrench — do not overtighten or you'll crack the plastic collar.
- Route the internal crank cord. The lift cord runs from the crank reel, up through the pole interior, and connects to the runner hub above. On Threshold models, the cord is usually pre-threaded at the factory. If yours is not, thread the cord up through the lower access hole in the pole, over the internal pulley at the upper pole end, and tie or clip it to the runner hub ring.
- Install the crown hub and ribs. Set the crown hub onto the top of the upper pole — it typically slides on and is secured by a bolt or a friction collar. Insert each main rib into its slot on the crown hub. The ribs have a flat tab end; press the tab in and down until it seats. Most Threshold hubs have 8 slots.
- Attach the runner hub and stretcher ribs. Slide the runner hub onto the pole below the crown hub. Connect each stretcher rib between the runner hub and the midpoint joint of its corresponding main rib. There's a pin-and-slot connection at each end; press firmly until you feel it click.
- Thread the canopy. Slide each main rib through its fabric sleeve in the canopy. Start from the crown and work outward. Once all ribs are sleeved, secure the crown tie strap or Velcro loop around the crown hub.
- Connect the LED harness. The LED wire harness runs from the crown hub connection down through the ribs to LED nodes at or near the rib tips. Plug the harness connector at the crown into the matching socket. On most Threshold models this is a small two-pin JST-style connector. Route any excess wire through the zip-tie loops on the ribs.
- Seat the solar receiver puck. The puck snaps or screws onto the crown hub at the very top of the pole. On most Threshold designs, two Phillips screws hold it in place. Connect the puck's output lead to the harness crown socket before tightening the screws. The PV panel faces up; the LED indicator or switch faces down toward the pole.
- Insert the assembled umbrella into the base. Lower the pole into the base tube and confirm the base locking pin or screw seats properly.
- Flip the power switch to ON. The switch is typically a small toggle or slider on the lower pole just above the crank housing. Leave the canopy closed and let the puck charge for a full day before the first use. On the first evening, the lights should activate automatically at dusk.
Operating the Solar Light: Charging, Modes, and Runtime
Charging the battery
The solar puck charges entirely from sunlight hitting the PV panel on top of the umbrella. For best charging, open the canopy fully on a clear day so the panel is unobstructed. A full charge takes 6 to 8 hours of direct sunlight. Partial shade or overcast conditions will extend that time significantly, and the lights may not reach full brightness after a cloudy day. The panel's open-circuit voltage on a sunny day typically measures between 4 and 5 V with a multimeter, if you're getting less than 2 V in direct sun, the panel or its wiring is likely damaged.
Light modes and the on/off switch
Most Threshold solar umbrella models have two controls: a power switch on the pole (which must be ON for the lights to function at all) and an automatic dusk sensor inside the solar puck. When the power switch is ON and ambient light drops below the sensor's threshold, the LEDs activate automatically. There is no manual brightness control on most Threshold models, though some versions have a single-press mode button on the puck housing that cycles through steady-on and slow-flash modes. Check your specific puck for a small rubber-covered button. If your model has one, pressing it while the lights are on will cycle through available modes.
Expected runtime and battery life
A fully charged battery will typically run the LEDs for 6 to 8 hours. Runtime degrades over time as the battery ages. Most rechargeable cells in solar garden products are rated for 300 to 500 charge cycles before capacity drops noticeably. In practice, running the lights daily through a 6-month patio season means you'll start seeing shorter runtimes after 2 to 3 seasons. Many manufacturers recommend replacing the rechargeable battery at least once annually to maintain performance, that's a reasonable benchmark for heavy-use installations.
Using the Tilt and Crank Mechanisms
Opening the umbrella with the crank
Unfold the crank handle so it sticks out perpendicular to the pole, then rotate it clockwise (when viewed from the handle end). The worm gear inside the crank housing winds the lift cord, which pulls the runner hub upward and pushes the ribs into the open position. Turn slowly and steadily, cranking hard and fast strips the gear teeth over time. Stop cranking the moment you feel firm resistance; the canopy is fully open. Continuing to crank past that point is the single most common cause of stripped crank gears.
Tilting the canopy
The tilt collar sits just above the crank housing. To tilt, press the push button on the collar inward with your thumb and hold it while you push the pole top away from you (or toward you) to the desired angle. Release the button and the detent pin locks the tilt into one of the preset positions, typically 0, 15, and 30 degrees from vertical. Do not force the pole past a detent, it cracks the collar housing. To return to vertical, press the button again and push the pole back to upright.
Closing the umbrella safely
Return the canopy to vertical before closing. Crank counterclockwise slowly to lower the runner hub and allow the ribs to fold in. Guide the canopy fabric inward with your free hand to prevent a rib from catching on the fabric as it folds, a caught rib is the most common cause of a bent or snapped rib. Once fully closed, secure the canopy wrap or Velcro strap. If your model came with a protective cover, use it whenever the umbrella will be closed for more than a day or two.
Safe operation tips
- Always close the umbrella before tilting the base or moving it to a new location.
- Never leave the umbrella open and unattended in variable weather.
- If the crank feels unusually stiff or grinds, stop immediately and inspect the cord and gear before continuing.
- Return the canopy to vertical before closing — tilting and cranking simultaneously binds the cord.
- Fold the crank handle back against the pole when not in use to prevent it from snagging clothing or catching a gust.
Quick Troubleshooting Reference
Use the table below as a first-stop diagnostic. Work through the First Action column before moving on to deeper repairs. A photograph or close-up diagram of each component (crank housing, solar puck underside, tilt collar, rib-to-hub joint) placed alongside this table makes fault identification much faster.
| Symptom | Likely Cause | First Action |
|---|---|---|
| Lights never come on at dusk | Power switch OFF, or battery fully depleted/dead | Confirm power switch is ON; charge umbrella in direct sun for a full day; test again |
| Lights come on but dim quickly | Battery near end of service life | Replace the rechargeable cell inside the solar puck (see battery replacement section) |
| Lights flicker or stay off after a full charge | Loose JST connector between puck and LED harness, or damaged LED strand | Unplug and re-seat the harness connector at the crown; inspect LED strand for broken wire |
| Solar panel not charging (battery stays dead) | Cracked PV panel, broken panel lead wire, or failed charge circuit | Measure panel Voc with multimeter in direct sun; below 2 V means panel or wiring fault; replace puck |
| Crank turns but canopy doesn't open | Frayed or disconnected lift cord | Open the crank housing access panel; inspect and re-seat or replace the lift cord |
| Crank is very stiff or grinds | Stripped or debris-fouled worm gear, or kinked cord | Remove crank handle, inspect gear teeth and cord path; clear debris; replace gear if stripped |
| Tilt collar won't lock into position | Worn detent pin or cracked collar housing | Remove collar, inspect pin spring; replace collar/pin assembly if spring is broken or housing is cracked |
| Rib won't stay open / droops | Broken stretcher rib or failed rib-hub pin connection | Inspect joint; re-seat pin if loose; replace stretcher rib if snapped |
| Canopy tears along rib sleeve | UV degradation or rib tip cap missing, causing abrasion | Replace rib tip cap; patch minor tears with outdoor fabric repair tape; replace canopy if tears are large |
| Umbrella leans in base | Wrong base tube diameter or loose base locking pin | Check pole-to-base fit (1.5-inch OD standard); replace or add a pole adapter sleeve if needed |
| Battery compartment is warm/hot to the touch | Cell overheating — potential fire hazard | Switch OFF immediately; do not charge; remove battery using insulated gloves; dispose of it per EPA/Call2Recycle guidance |
Step-by-Step Repair Procedures
Replacing the solar battery
This is the most common repair you'll do. The battery is inside the solar receiver puck at the crown. Before you start, flip the power switch OFF and let the puck cool to ambient temperature if it's been in the sun.
- Use your step stool to reach the puck at the crown. Unscrew the two Phillips screws holding the puck to the crown hub.
- Gently lift the puck, keeping the harness connector attached. Have your helper hold the puck while you work, or rest it on the open canopy fabric.
- Locate the battery compartment. On most Threshold/generic solar umbrella pucks, it's a small slide-off or screw-off cover on the underside of the puck housing.
- Open the compartment and note the battery format. It will be either a NiMH AA or AAA pack (1.2 V per cell, black or white shrink-wrapped) or a single LiFePO4 cylinder (labeled 3.2 V 14430 on the cell body). Do not substitute a Li-ion 3.7 V cell for a LiFePO4 3.2 V cell — the charge circuit is matched to the specific chemistry.
- Tape the old cell's terminals and set it aside for proper disposal.
- Insert the matching replacement cell. Confirm polarity (positive terminal toward the marked + end of the compartment).
- Close the compartment cover, reconnect the harness lead, and re-seat the puck on the crown hub. Replace the two screws.
- Turn the power switch ON and leave the canopy open in sun for a full charge cycle before testing.
Replacing or rethreading the crank cord
A frayed or snapped lift cord is the number-two repair on these umbrellas. You'll need 3 mm braided polyester cord and needle-nose pliers.
- Close the canopy as far as it will go manually. Remove the umbrella from the base.
- Unscrew and remove the crank handle housing from the pole. There are typically two or four screws on the housing halves.
- Note how the old cord is routed: it runs from a knot on the reel drum, up through the interior of the pole via a small guide hole, and ties to a ring or loop on the runner hub. Take a photo before removing the old cord.
- Cut the old cord and remove it completely. Measure it or use a pre-cut replacement length (typically 8 to 10 feet for an 8-foot umbrella).
- Tie a stopper knot in one end of the new cord and thread it through the bottom guide hole in the pole, then up through the pole interior to the runner hub connection point at the top.
- Tie the cord to the runner hub ring. Pull from below to confirm the knot holds.
- Thread the lower end onto the crank reel: tie a knot, seat it in the reel groove, and wind 3 to 4 turns onto the reel before reassembling the crank housing.
- Reassemble the crank housing, test the crank through a full open-and-close cycle, and adjust cord length if the canopy doesn't open fully.
Repairing or bypassing a stripped crank gear
If the worm gear inside the crank housing is stripped, the handle turns freely without moving the cord. The only true fix is replacing the crank assembly, stripped plastic gear teeth can't be repaired. Replacement crank assemblies for 1.5-inch aluminum pole umbrellas cost roughly $10 to $20 online and swap in directly. As a temporary bypass while you wait for parts, you can open the canopy manually by reaching inside the pole from the bottom access point, pulling the lift cord by hand to raise the runner hub, and then clipping or tying it in place with a short length of cord through the base of the crank housing hole. This is not a permanent fix but it lets you use the umbrella while a replacement ships.
Fixing a stuck or broken tilt mechanism
If the tilt collar won't release, the most common cause is a broken detent spring inside the push-button assembly. Remove the collar by unscrewing the retaining bolt, then pry the two halves of the collar apart with a flathead screwdriver. Inside you'll find the push button, a small coil spring, and a steel pin. If the spring is flat or the pin is bent, replace the collar assembly as a unit. Tilt collar/pin kits are sold as combos and are nearly universal across 1.5-inch umbrella poles. If the collar housing itself is cracked (very common after UV exposure over several seasons), replacement is the only option.
Replacing a broken rib
Order a replacement rib matched to your umbrella's rib length and hub attachment style. Close the canopy, then unthread the canopy sleeve from the broken rib (work the fabric off carefully). Depress or remove the retention pin at the crown hub to release the rib's flat tab end, then disconnect the stretcher rib pin at the midpoint joint. Slide the broken rib out. Seat the new rib's tab into the crown hub slot, reconnect the stretcher rib, and reroute the canopy sleeve. Reconnect any LED wire clip on that rib if your model has one.
Replacing the canopy
A canopy replacement is the most time-consuming repair but also one of the most cost-effective: a replacement canopy for an 8-foot umbrella runs $25 to $60 versus $80 to $150 for a full new umbrella. Order by canopy diameter and rib count (8 ribs for most Threshold models) and confirm whether your model has a single or double vent at the top. To swap the canopy, close the umbrella fully, un-sleeve each rib from the old canopy fabric, untie the crown strap, and remove. Thread the new canopy's sleeves over the ribs in reverse order, tie the crown strap, and open the canopy to check tension.
Routine Maintenance and Weatherproofing
A little maintenance each season extends the life of both the canopy and the mechanical components significantly. Here's what to do and when:
- At the start of each season: Inspect all rib joints and hub pins for corrosion or wear. Lubricate the crank worm gear and cord guide holes with a light silicone spray (avoid petroleum-based lubricants, which degrade plastic gears). Check the solar puck connection and the LED harness connectors for corrosion.
- Monthly during use: Wipe the solar panel surface with a damp cloth to remove dust, pollen, and bird droppings. A dirty panel can reduce charging efficiency by 20 to 30 percent.
- After any heavy rain: Allow the canopy to fully dry before closing and covering. Storing a wet canopy accelerates mildew and weakens the fabric coating.
- Annually: Replace the rechargeable battery in the solar puck regardless of apparent performance. This is inexpensive insurance against a mid-season failure and reduces the risk of an aged lithium cell becoming a safety issue.
- Canopy cleaning: Spot-clean with a mild soap and water solution and a soft brush. Do not use bleach or solvent-based cleaners on polyester or acrylic canopy fabric — they break down the UV-protective coating.
- Aluminum pole and hardware: Wipe with a damp cloth and dry thoroughly. Apply a thin coat of car wax to the pole exterior once per season to slow oxidation.
Securing the Umbrella in Wind
The base weight is your first line of defense, but there are additional steps for exposed patios. A bungee cord or lashing strap wrapped around the folded canopy and secured to a deck railing keeps the canopy from unfurling in a gust even when the umbrella is closed. Umbrella base anchor straps (sold online for about $10) bolt through the base feet and anchor to deck hardware. For umbrellas in ground sleeves, a sleeve lock pin through the sleeve collar prevents the pole from lifting out. If a serious storm is forecast, the safest option is always to remove the umbrella from the base entirely and lay it flat or bring it indoors.
Seasonal Storage and Winterizing
Before storing for winter, clean and dry the canopy thoroughly, then apply a spray fabric protector designed for outdoor textiles. Flip the solar puck's power switch to OFF and ideally remove the battery from the puck housing for cold-weather storage, rechargeable cells (especially lithium-based) lose capacity when stored in a fully discharged state at freezing temperatures. Store the battery at room temperature in a dry container. Disassemble the pole sections, wrap the LED harness loosely to avoid kinking, and store everything in the original box or a large contractor bag in a garage or shed. Avoid storing the canopy compressed for months; fold it loosely with the fabric sleeve side out.
Notes on Similar Models and Brands
Threshold solar umbrellas share their basic mechanical architecture with a wide range of store-brand and OEM designs. If you're working on a Mainstays solar umbrella from Walmart, you'll find the crank, tilt, and solar puck layout nearly identical to what's described here. For step-by-step mainstays patio umbrella instructions and diagrams that match these components, check the Mainstays product manual or Walmart's support pages. East End umbrellas use the same 1.5-inch pole standard and compatible rib sets in most cases. SunnyGlade and Hampton Bay (Home Depot) models are also close mechanical relatives; Hampton Bay's published manuals are among the most detailed available for solar umbrella battery replacement and specifically identify the 3. For step-by-step SunnyGlade patio umbrella instructions, consult the SunnyGlade patio umbrella instructions. The Hampton Bay 27929 Instructions / Assembly manual identifies a 3.2 V LiFePO4 '14430' cell as the replacement battery used in some of their solar puck modules blank" rel="noopener noreferrer">Hampton Bay 27929 Instructions / Assembly identifies a 3.2 V LiFePO4 14430 cell for the solar puck. 2 V LiFePO4 14430 cell format used in some of their solar pucks, which can guide parts selection for Threshold models that share the same puck supplier. If your Threshold umbrella has an auto-tilt mechanism rather than a push-button collar, the tilt repair procedure differs in that the tilt motion is linked to the crank rather than a separate push-button, consult the guidance for auto-tilt designs in that case, as the detent and collar service steps are different. For step-by-step auto tilt patio umbrella instructions, see a focused guide that explains crank-linked tilting systems and their specific service steps. Cantilever-style offset umbrellas share the LED harness and solar puck design but have a completely different hub and rib geometry, so rib and canopy parts are not cross-compatible with standard market umbrellas like the Threshold line. For step-by-step guidance specific to off-set models, see cantilever patio umbrella instructions.
When to Repair vs. When to Replace
Most repairs on a Threshold solar umbrella cost under $30 in parts and an hour of your time. Battery replacement, rib swaps, crank cord rethreading, and tilt collar replacements all fall into this category and are worth doing. The math changes when the canopy fabric is severely UV-degraded, multiple ribs are broken, the pole sections are bent, and the solar puck needs replacement all at the same time. At that point you're approaching or exceeding the cost of a new umbrella. A cracked or bent pole section is the one repair I'd skip: straightening an aluminum pole is not practical and a cracked section is a safety hazard. If the pole is damaged, replace the umbrella. Similarly, if the solar puck shows signs of a swollen or leaking battery that has damaged the housing, don't try to salvage the housing, replace the entire puck module.
FAQ
What primary product information should I collect before writing DIY instructions for Threshold solar patio umbrellas?
Gather exact model names/SKUs, retailer product pages (Target/Threshold listings), any published 'Use & Care' or PDF manuals, and customer Q&A on product pages. Record canopy size, pole diameter, number of ribs, presence/location of solar puck, type of tilt (push-button, crank, auto-tilt) and whether it is center‑pole or cantilever. Save screenshots or URLs for each model variant.
Which authoritative sources are required to document safe battery replacement and disposal guidance?
Use official manufacturer/retailer manuals that specify battery chemistry and replacement instructions (e.g., Hampton Bay, Outsunny PDFs), CPSC recall notices about lithium battery hazards (e.g., SunVilla recall), and EPA/Call2Recycle guidance for lithium and NiMH battery recycling and safe transport. Record citations and relevant text snippets (e.g., recommended cell type, disposal steps).
What electrical/spec tests and measurements must be included to diagnose solar module and battery problems?
List and document multimeter tests: open‑circuit solar panel Voc (in daylight), panel Vmp under load if possible, battery resting voltage and loaded voltage, continuity checks of wiring and connectors, diode/polarity checks on the module. Record expected ranges for common chemistries (NiMH pack ≈1.2 V per cell; single LiFePO4 ≈3.2 V nominal; typical small PV Voc ≈3–5 V). Include stepwise meter procedures and safety notes about live terminals and short risks.
What visual assets and diagrams must be gathered or created?
High‑resolution photos (or diagrams) of: entire umbrella assembled, crown/top with solar puck, solar puck removed (battery compartment exposed), battery pack close‑up with label, underside canopy and rib/LED wiring, crank housing and gearbox internals, hub/rib connections and pins, exploded/labelled parts diagram (pole sections, hub, ribs, canopy, crank, base). Use manufacturer exploded PDFs where available and add close‑up photos during a teardown to illustrate each repair step.
Which parts lists and tools inventories are essential to include for readers?
Provide a labeled parts list per model: canopy, ribs, hub, upper/lower pole, crank assembly, tilt mechanism, solar puck/module, battery cell/pack (chemistry/type and size), LED strip/harness, connectors (JST/2‑pin), screws/retaining pins, replacement ribs or hub halves. Tools list: multimeter, small Phillips/flat drivers, hex keys, needle‑nose pliers, wire strippers/crimpers, soldering iron, heat‑shrink, replacement cord/para‑cord, epoxy/UV adhesive, small clamps, silicone sealant, safety gloves and eye protection.
What safety notes and warnings must be included?
Warn about electrical hazards (do not short battery terminals), fire risk with damaged Li‑ion/LiFePO4 cells (follow CPSC recall precedent), and crushing/pinching hazards when opening saddles or collapsing ribs. State to disconnect batteries before soldering, tape terminals during disposal, and close/stow umbrella when servicing in windy weather. Include guidance to seek professional help for damaged battery cells, suspected thermal damage, or structural compromises to the pole/hub.
Next Articles
Sunnyglade Patio Umbrella Instructions: Complete DIY Guide
Sunnyglade patio umbrella instructions: step-by-step assembly, repair, troubleshooting, and maintenance guide.
East End Patio Umbrella Instructions: Setup, Use, Fixes
Step-by-step East End patio umbrella setup, tilt and crank use, wind securing, and fixes for won’t open or bind issues.
Mainstays Patio Umbrella Instructions: Setup and Troubleshooting
Step-by-step Mainstays patio umbrella instructions for setup, safe opening, crank tilt fixes, stability, wind safety, st