
Sunnyglade patio umbrella instructions vary by model, but the core process is the same: identify your umbrella type (standard pole, auto-tilt, or cantilever/offset), gather a few basic tools, follow the assembly sequence specific to your frame style, and learn the handful of operating habits that prevent the most common failures. This guide walks through all three Sunnyglade form factors in detail, including step-by-step assembly, daily operation, routine maintenance, and the repair procedures you are most likely to need.
Sunnyglade Patio Umbrella Instructions: Complete DIY Guide

Luca Morrison
10 Aug 2026
What this guide covers and a quick safety note
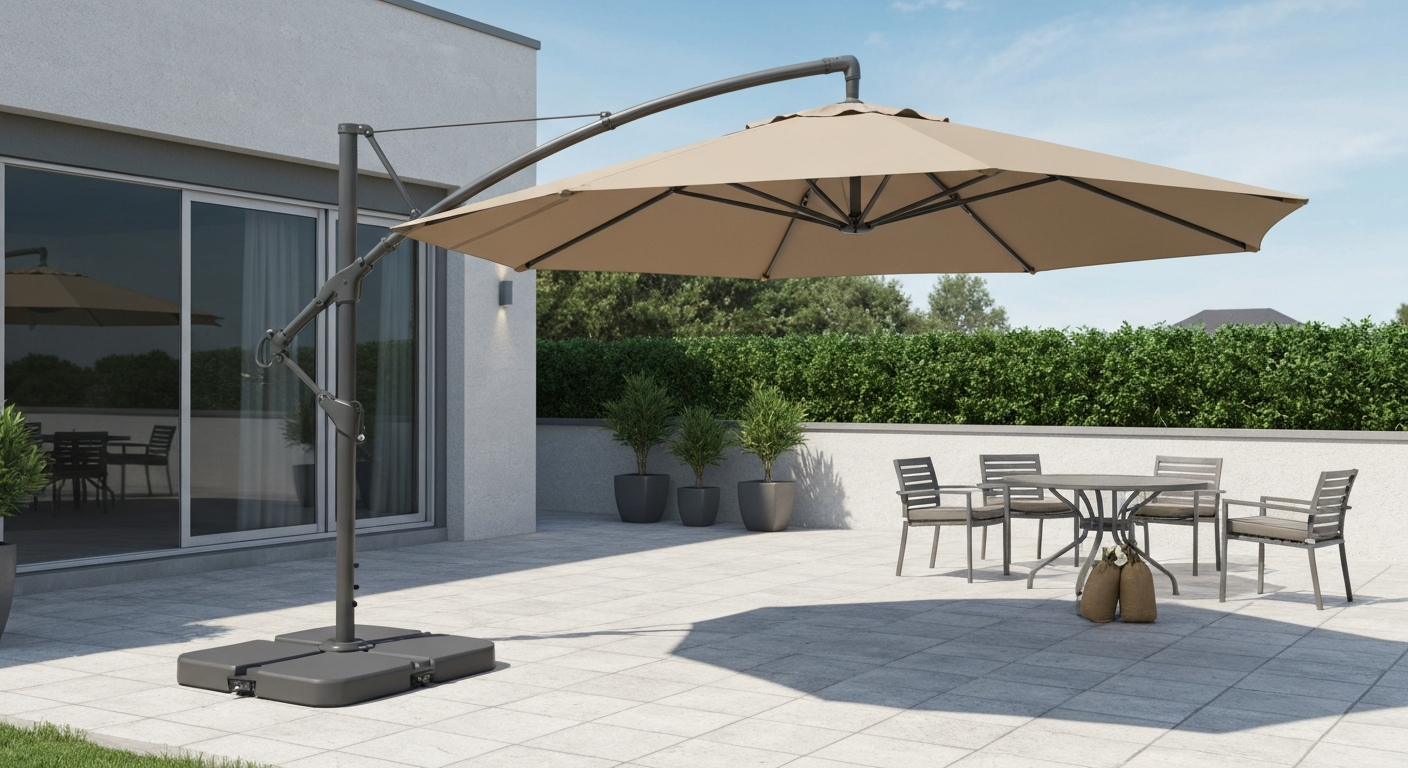
Sunnyglade sells several distinct patio umbrella lines: standard market/table umbrellas (typically 7.5 ft and 9 ft), solar-LED crank models (9 ft), and cantilever or offset umbrellas in 10 ft, 10x13 ft, and 11 ft configurations. Most of the 10 ft and larger cantilever models share the same 8-rib aluminum frame, 250 gsm polyester canopy with PA coating, crank-lift system, and 360-degree rotation via a foot pedal. The assembly sequences for the 10x10, 10x13, and 11 ft cantilever variants are nearly identical, so the cantilever section below applies to all three unless a difference is specifically noted.
Before you open any box, a few safety points worth taking seriously: always use a weighted base rated for your umbrella size (Sunnyglade's own manuals explicitly require this for cantilever models); close any Sunnyglade umbrella at the first sign of wind or adverse weather; never leave a fully open umbrella unattended on a gusty day. Wind is the number one cause of umbrella injuries and equipment damage, and emergency department data consistently shows it is a dominant injury mechanism. For cantilever models especially, an unsecured or under-weighted base turning over a 56-plus-pound frame is a real hazard.
Tools, parts, and materials you will need
You do not need specialized tools for most Sunnyglade assembly and maintenance work. Here is what I keep on hand before I start any job on these umbrellas, organized by task type.
Tools
- Phillips head screwdriver (medium and large)
- Hex/Allen key set (metric 3 mm, 4 mm, 5 mm cover the majority of Sunnyglade hardware)
- Needle-nose pliers (essential for cords, rib clips, and small fasteners)
- Rubber mallet (for seating pole sections without damaging the finish)
- Adjustable wrench or channel-lock pliers
- Tape measure
- Clean rags or microfiber cloths
Replacement parts and materials to keep on hand
The parts that fail most often on Sunnyglade models, based on aggregated buyer reviews, are the crank gearbox, the lift cord, individual rib clips or ferrules, and the canopy fabric. Stocking a few of these before you need them saves a frustrating mid-season wait.
- 1/8-inch braided nylon replacement cord (10-12 ft for a standard pole umbrella, 15-20 ft for cantilever lift systems)
- Replacement crank assembly compatible with your pole diameter (measure the pole OD before ordering — Sunnyglade standard poles are typically 38 mm or 48 mm depending on model)
- Rib repair clips or rib splints (universal aluminum splints work on 6 mm and 8 mm rib profiles)
- Silicone-based lubricant spray (do not use WD-40 as a lubricant; it dries out and attracts dirt)
- Replacement canopy — Garden Winds makes a compatible canopy for the Sunnyglade 10x13 offset, and similar aftermarket options exist for other sizes; match rib count and canopy diameter
- UV-resistant fabric patch tape or sail repair tape (for small canopy tears)
- Zip ties and stainless steel hose clamps (splinting ribs on the fly)
- Touch-up paint or clear coat spray matched to your frame color (prevents rust on any exposed bare metal)
Per-model notes on parts
Standard 7.5 ft and 9 ft pole models use a simpler crank-and-cord system with fewer internal pulleys, so cord replacement is straightforward. The 9 ft solar-LED models add a solar panel module and LED string in the hub area; if the LEDs stop working, the most common culprit is the rechargeable battery in the hub, not the panel itself. Cantilever models have a more complex internal rope routing through the main arm and head assembly, which I cover in detail in the cantilever repair section. Always download or locate the PDF manual for your specific ASIN before starting a repair on a cantilever model, because internal pulley routing can differ between the 10 ft and the 10x13 variants.
Quick-reference: time, difficulty, and skill level by task
| Task | Estimated Time | Difficulty | Skill Level |
|---|---|---|---|
| Assemble standard pole umbrella | 20–30 min | Easy | Beginner |
| Assemble auto-tilt pole umbrella | 25–40 min | Easy–Moderate | Beginner |
| Assemble cantilever/offset umbrella | 45–75 min | Moderate | Intermediate |
| Open, close, and tilt (daily operation) | 1–2 min | Easy | Beginner |
| Clean canopy and frame | 20–30 min | Easy | Beginner |
| Lubricate crank and tilt mechanism | 10–15 min | Easy | Beginner |
| Replace lift cord | 60–90 min | Moderate | Intermediate |
| Replace crank assembly | 45–60 min | Moderate | Intermediate |
| Splint or replace a broken rib | 30–45 min | Moderate | Intermediate |
| Replace full canopy | 30–45 min | Easy–Moderate | Beginner–Intermediate |
| Repair or replace solar/LED module | 30–60 min | Moderate | Intermediate |
| Seasonal storage preparation | 20–30 min | Easy | Beginner |
Assembling a standard Sunnyglade pole umbrella
Standard Sunnyglade market and table umbrellas (7.5 ft and 9 ft) come in a single box with a two-section or three-section pole, a crank collar, a hub assembly with ribs, a canopy, and a finial cap. Total assembly time is 20-30 minutes for most people. Lay everything out on a clean surface before you start so you can confirm all parts are present.
- Identify the pole sections: the lower section has the crank housing already attached or pre-drilled for it, and the upper section has the hub receiver at the top. (Photo opportunity: label diagram of lower pole with crank, upper pole with hub socket.)
- Insert the lower pole section into your table hole or base. Make sure the base is rated for your umbrella size and is either weighted or filled with sand/water per the base manufacturer's guidance.
- Slide the crank collar onto the lower pole if it is not pre-attached. The crank handle should face outward when assembled — thread the winding mechanism onto the pole and tighten the set screw with your hex key.
- Connect the upper pole section to the lower section. Most Sunnyglade pole umbrellas use a push-button pin locking connector — push the button, slide the upper section over the lower, and release to lock. You will hear or feel a click. (Photo opportunity: close-up of pin connector in locked position.)
- Thread the lift cord through the pole if it is not already pre-threaded. On most 7.5–9 ft models, the cord comes pre-threaded from the factory. Verify the cord runs from the crank drum up through the center of the pole and exits through the hub.
- Attach the hub assembly to the top of the upper pole. The hub slides over the finial stub and secures with a bolt or set screw. Snug it down — a loose hub is a common cause of canopy sag.
- Spread the ribs. On most Sunnyglade standard models, the ribs are already attached to the hub. Fan them out evenly and clip the canopy sleeves (the fabric channels sewn into each canopy panel) over each rib tip. Start with two opposite ribs to keep the canopy centered, then work around. (Photo opportunity: overhead view showing canopy being clipped to all 8 rib tips symmetrically.)
- Attach the runner (the sliding collar on the upper pole) to the stretchers — the secondary rods that support the canopy from below. Most runners clip on with spring hooks or snap pins. (Photo opportunity: close-up of runner with stretcher hooks attached.)
- Test the crank. Turn the crank handle clockwise to open; the runner should rise, pulling the canopy taut. If the canopy opens unevenly, check that all stretcher clips are fully seated.
- Install the finial cap at the top of the hub to protect the cord exit point from rain.
- Final check: tug each rib tip gently to confirm the canopy is evenly tensioned, and verify the pole is fully seated in the base with no wobble.
Estimated time: 20-30 minutes. Difficulty: Easy. One common gotcha at this step, do not crank the umbrella fully open before all stretcher hooks are attached. I have seen runners jam against partially attached hardware and strip the crank gear.
Assembling a Sunnyglade auto-tilt model
Sunnyglade auto-tilt pole umbrellas follow the same basic assembly sequence as the standard model, with one important difference: the tilt mechanism is built into the pole connector between the upper and lower sections, and it is activated by the crank handle rather than a separate push-button or collar knob. If you are comparing this to other brands with push-button tilt systems, the auto-tilt setup on Sunnyglade is cleaner but requires a little extra attention during assembly to make sure the tilt linkage is aligned correctly.
Auto-tilt-specific parts to identify first
- Tilt joint housing: the larger-diameter collar at the connection point between the upper and lower pole sections — this houses the tilt pivot and the cord routing for the tilt function
- Tilt cord or tilt linkage rod (model-dependent — check your manual): connects the crank-winding action to the tilt pivot
- Secondary crank detent: on auto-tilt models, the crank typically has two functions; turning in one direction raises the canopy, continuing past a detent engages the tilt
- Locking collar or tilt lock knob: secures the tilt angle once set
- Complete steps 1-2 from the standard assembly sequence (pole into base, crank collar).
- Before connecting the upper pole, inspect the tilt joint housing. You will see a pivot pin or hinge point and a cord exit hole. Make sure the tilt cord (if separate) is routed through the housing before you join the sections — you cannot easily thread it after assembly.
- Connect the upper pole to the tilt joint housing. The upper pole sits in the housing at a slight angle when the tilt is engaged; when fully upright, it should sit plumb. Tighten the housing bolts finger-tight first, then snug them with a hex key — do not overtighten or the tilt pivot will bind.
- Route the lift cord from the crank drum up through the lower pole, through the tilt joint housing (there is a dedicated cord channel — do not run it around the outside), and up through the upper pole to the hub.
- Attach the hub, spread the ribs, clip the canopy, and attach the runner and stretchers exactly as in the standard assembly sequence (steps 6-9 above).
- Test the tilt: crank the umbrella fully open, then continue turning the crank slowly past the resistance detent. The canopy should begin to tilt. Stop at your desired angle and engage the tilt lock. (Photo opportunity: side-view showing 15-degree and 30-degree tilt positions with lock engaged.)
- To return to upright, reverse the crank direction past the detent. The canopy should return to the vertical position before you begin lowering.
- Final check: open and close the umbrella twice, testing tilt each time, to confirm smooth operation with no cord binding.
Estimated time: 25-40 minutes. Difficulty: Easy to Moderate. The most common assembly mistake on auto-tilt models is overtightening the tilt joint housing bolts, which prevents the pivot from moving freely. If your tilt feels stiff right out of assembly, loosen those bolts a quarter turn. For a deeper look at how auto-tilt mechanisms work across multiple brands, the auto-tilt patio umbrella instructions guide on this site goes into useful additional detail. Patent US9642421B2 – Umbrella canopy tilt mechanism, Google Patents describes canopy tilt mechanisms that combine rope‑winding/crank systems with tilt linkages and internal pulleys, illustrating common routing and crank-driven auto‑tilt designs blank" rel="noopener noreferrer">US9642421B2 – Umbrella canopy tilt mechanism — Google Patents.
Assembling a Sunnyglade cantilever or offset umbrella
Cantilever assembly is the most involved of the three types, but it is very doable in under 90 minutes with a second person to help. The Sunnyglade 10 ft, 10x13 ft, and 11 ft cantilever models all use an aluminum frame with a vertical base pole, a horizontal cross arm, a hanging arm extending over the seating area, and an 8-rib hub at the end. The crank controls canopy lift, and a foot pedal controls 360-degree rotation. Tilt is adjusted manually at the hanging arm joint in 4 preset positions.
Base and counterweight setup
This step is more important for cantilever models than for any other umbrella type. The fully assembled frame weighs approximately 56 lb without the base, and the canopy arm extends several feet to the side, creating significant lateral torque. Sunnyglade's manual requires a filled base; a typical recommendation is a cross-base with at least 100-150 lb of fill (sand or water in the base bags). Do not use a base that is too small just because it came in the same box, if the umbrella tips, it can cause serious injury. Position the base on a flat, stable surface before you attach any frame components.
- Assemble the cross-base by connecting the four base arms to the central hub using the provided bolts. Tighten firmly with your wrench. (Photo opportunity: overhead view of assembled base cross showing all four arms locked in place.)
- Insert the vertical main pole into the base pole sleeve and secure with the locking pin or bolt.
- Attach the horizontal support arm to the top of the vertical pole. This arm usually pivots or slides into a collar and locks with a pin — do not skip the pin, as this joint bears the full canopy weight.
- Connect the hanging/canopy arm to the end of the horizontal arm. This is the section that extends out over your seating area. The joint typically uses a hinge bracket and a tension bolt — set the bolt to allow movement during assembly, then tighten after the canopy is positioned at the correct height.
- Before attaching the hub and canopy, feed the lift cord through the hanging arm. The cord runs from the crank (usually located near the base of the horizontal arm) through internal channels in the hanging arm and exits at the hub. On the 10x13 model, there is a pulley at the elbow joint — make sure the cord seats fully in the pulley groove before proceeding. (Photo opportunity: close-up of elbow pulley with cord seated correctly, and again with cord routed incorrectly for comparison.)
- Attach the hub assembly to the end of the hanging arm. The hub has a threaded connection or a locking collar — hand-tighten first, then snug with your wrench.
- Spread the 8 ribs and attach the canopy by feeding each rib through its canopy sleeve. Clip the canopy ties or Velcro straps at the hub center. (Photo opportunity: angled view showing canopy fully spread on all 8 ribs before closing for the first time.)
- Attach the runner to the stretchers on the underside of the canopy exactly as described in the standard assembly section.
- Test the crank: turn clockwise to open. The canopy should rise smoothly. If you feel excessive resistance, check for cord binding at the elbow pulley.
- Test rotation: press the foot pedal at the base to unlock rotation, then swing the canopy arm to your desired position and release the pedal to lock.
- Test tilt: locate the tilt adjustment collar or lever on the hanging arm near the hub. Sunnyglade cantilever models offer 4 preset tilt positions — click through them to confirm each locks cleanly.
- Once everything operates correctly, fill the base bags with sand or water per the manufacturer's guidance. Do this last so you are not fighting a fully weighted base during assembly.
- Final check: with the canopy fully open, give the hanging arm a firm lateral push and confirm the base does not rock or lift. If it does, add more weight.
Estimated time: 45-75 minutes. Difficulty: Moderate. A second person is strongly recommended for steps 3-5 to hold sections in place while you secure fasteners. If you are working solo, use a step ladder to prop the hanging arm while you manage the hardware. If you have already dealt with similar frame designs on other offset models, the cantilever patio umbrella instructions guide on this site provides additional context on base sizing and counterweight calculations.
How to open, close, tilt, and secure your Sunnyglade umbrella
Opening and closing
For all Sunnyglade crank models: turn the crank handle clockwise to open, counterclockwise to close. Turn at a steady, moderate pace, cranking fast can snap the cord or strip the gearbox. You will feel the resistance increase as the canopy reaches full extension; stop cranking when you feel firm resistance, not before. Cranking past full extension stresses the crank drum and is one of the most common causes of cord breakage. On solar-LED models, be careful not to let the solar panel hub rotate against the frame when closing, guide the canopy down manually if needed to prevent impact.
Manual tilt operation (standard models)
Push-button tilt models: open the umbrella fully, then push the tilt button on the upper pole collar while applying gentle lateral pressure to the upper pole. The upper section will pivot to your desired angle. Release the button to lock. To return upright, push the button again and push the pole back to vertical.
Auto-tilt operation
Open the canopy fully by cranking clockwise. Once fully open, continue turning the crank slowly, you will feel a soft detent or increased resistance as the tilt function engages. Keep turning to increase the tilt angle. When you reach your desired angle, stop and engage the tilt lock collar. To return to upright, reverse the crank direction past the detent, then crank counterclockwise to close as normal. Never try to force the tilt when the canopy is partially open, always open fully first.
Cantilever rotation and tilt
Press the foot pedal at the base to unlock the 360-degree rotation. Swing the canopy arm to the desired position, then release the pedal to lock. For tilt, locate the tilt collar or lever on the hanging arm near the hub and click through the 4 preset tilt angles. Always lock the tilt before walking away, an unlocked tilt can swing freely in a breeze and damage the hub joint.
Locking and securing positions
Any time wind picks up to the point where the canopy is flexing or vibrating, close the umbrella. No wind rating from a manufacturer eliminates the risk of tip-over in gusts. For extended periods away from home during warm months, close and secure the umbrella rather than leaving it open. On cantilever models, consider using a Velcro umbrella tie-down strap around the folded canopy and hanging arm when closed, especially overnight. If you use a separate pole-mounted umbrella, store the umbrella indoors or in a cover when not in use for more than a day or two.
Preventive maintenance schedule
Most Sunnyglade umbrella problems I have seen, stripped cranks, cord breaks, rib failures, canopy tears, trace back directly to skipped maintenance. A 20-minute seasonal check prevents the majority of mid-season failures. Here is the schedule I follow and recommend.
Every use (1-2 minutes)
- Check that the base is stable and fully weighted before opening
- Listen for unusual sounds (grinding, snapping) when cranking — address these immediately rather than ignoring them
- Close the umbrella before leaving the patio unattended
Monthly during the season (15-20 minutes)
- Wipe down the canopy with mild dish soap and warm water; rinse thoroughly and allow to air-dry fully before closing — closing a damp canopy is the fastest way to grow mildew in the fabric folds
- Inspect the lift cord for fraying where it exits the crank drum and where it contacts any pulleys; replace at the first sign of wear
- Check all pole connection pins and bolts for tightness — vibration loosens them over time
- Inspect each rib for bends, cracks, or deformation at the hub connection; a partially cracked rib will fully break at the first wind gust
- Apply a light spray of silicone lubricant to the crank gearbox shaft and to the tilt pivot (wipe off excess)
- On cantilever models: inspect the elbow pulley and the cord routing at the pulley; re-seat the cord if it has shifted off the groove
Start of season (30 minutes)
- Unroll or unpack the canopy and inspect the full fabric surface for UV degradation (fading, brittleness) and tears
- Check all metal frame joints for oxidation or rust; treat bare spots with touch-up paint or a rust inhibitor
- Lubricate all moving parts: crank, tilt joint, rotation foot pedal, and rib-to-hub joints
- Test the full range of crank, tilt, and (on cantilever models) rotation before you need them on the first warm day
- Verify the base fill level — water evaporates, and sand can compact and reduce effective weight over winter storage
End of season / winter storage (20-30 minutes)
- Clean the canopy thoroughly (soap, rinse, fully dry) before storing — storing a dirty or damp canopy accelerates mold, mildew, and fabric breakdown
- Disassemble the frame into its major sections and store flat or in the original box if possible
- Remove base fill (water especially — ice expansion can crack base bags and the pole sleeve)
- Apply a light coat of silicone lubricant to all metal joints before storing to prevent oxidation
- Store canopy and cover in a dry, cool location out of direct sunlight — UV breaks down polyester even through a garage window
- On solar-LED models: remove or disconnect the battery in the hub before storing; lithium cells degrade faster if stored fully discharged or in freezing temperatures
If you also use or are comparing Sunnyglade to Mainstays or Threshold solar models, many of the same maintenance steps apply. If you use or are comparing Sunnyglade to Mainstays or Threshold solar models, consult Threshold solar patio umbrella instructions for model‑specific guidance and assembly/maintenance differences. The Mainstays patio umbrella instructions guide and the Threshold solar patio umbrella instructions guide on this site cover brand-specific quirks for those models, including LED battery management and pole connector differences that require slightly different maintenance approaches.
Common repairs: what breaks and how to fix it
Replacing a broken or frayed lift cord
A broken cord is one of the most common failures on all Sunnyglade models. The fix is straightforward on pole models and moderately more involved on cantilever models due to the internal pulley routing. Use 1/8-inch braided nylon cord. For a 7.5-9 ft pole model, cut about 10-12 ft; for cantilever models, use 15-20 ft. Open the crank housing (usually two Phillips screws), remove the old cord from the drum, tie or tape the new cord to the drum anchor pin, wind 6-8 wraps in the correct direction (watch which way the old cord was wound before removing it), thread the cord up through the pole to the hub, and attach to the runner hook. Test by cranking through a full open-close cycle. Time: 60-90 minutes. BestPatioUmbrella benchmark estimates give typical DIY times and cost ranges for planning: cord/string replacement 60–90 minutes, $5–$15; crank assembly replacement 45–60 minutes, $15–$30; full canopy replacement 30–45 minutes, $30–$80; single rib splint 30–45 minutes, $5–$10. Cost: $5-$15 for cord.
Fixing a stripped or binding crank
If the crank handle spins freely without moving the canopy, the plastic gearbox teeth have likely stripped, a very common complaint in buyer reviews of budget Sunnyglade models. Replacement crank assemblies are available from umbrella parts suppliers and on eBay; measure your pole diameter before ordering. Remove the old crank housing by unscrewing it from the pole, transfer the cord to the new drum, and remount. If the crank feels gritty or stiff rather than spinning freely, lubrication is the fix: open the housing, clean out old grease and debris, and apply fresh silicone grease to the gear teeth before reassembling. Time: 45-60 minutes. Cost: $15-$30 for a replacement crank assembly.
Splinting or replacing a broken rib
A cracked or bent rib causes the canopy to sag on one side. For a clean break, slide an aluminum rib splint tube over the break point, center it, and secure with two hose clamps or wrap tightly with several layers of zip ties as a temporary fix. For a permanent fix, source a replacement rib of the same diameter and length (measure the original; most Sunnyglade ribs are 6 mm or 8 mm aluminum). Detach the canopy from the affected rib, unclip the rib from the hub, and reverse the process to install the new rib. Time: 30-45 minutes. Cost: $5-$10 for splint hardware.
Replacing the full canopy
If the canopy fabric is faded, brittle, or has multiple tears, replacement is faster and more cost-effective than patching. For the Sunnyglade 10x13 cantilever, Garden Winds makes a direct-fit replacement canopy. For other sizes, match the canopy by rib count and diameter. To remove the old canopy, close the umbrella, detach all stretcher hooks from the runner, unclip each rib tip from the canopy sleeve (or untie the lace-in attachment), and slide the canopy off. Reverse the process for the new canopy, starting with two opposite ribs to keep alignment. Time: 30-45 minutes. Cost: $30-$80 depending on size.
Solar and LED module failures (9 ft solar model)
The most reported issue with the Sunnyglade 9 ft solar-LED model is the LEDs not illuminating after a full day of sun. Before assuming the solar panel is faulty, check the rechargeable battery in the hub housing. Open the hub cover (usually two small Phillips screws), locate the 18650-style or flat lithium cell, and test its voltage with a multimeter. A dead or degraded battery is the culprit in the majority of cases. Replacement batteries of the correct type are available for a few dollars online. If the LEDs work when the battery is charged externally but the battery will not hold charge, the panel may have a failed charge controller, at that point, assess whether the cost of the controller module (if available separately) is worth the repair versus buying a replacement umbrella.
When to stop repairing and replace instead
I am generally a fix-it-first person, but some situations make replacement the smarter call. If the main pole or cantilever arm is kinked or bent (a real failure mode in high-wind events, per buyer review data), structural integrity is compromised and repair is not safe. If the crank housing, hub, and a rib all need replacement simultaneously, the parts cost will approach or exceed the cost of a new umbrella. And if a cantilever model has a cracked or deformed elbow joint or arm, replacement is the right answer, these carry the full canopy load and a repaired joint is not reliable. For these situations, the cost is real, but so is the risk of a failing component injuring someone under the shade.
Parts sourcing and cross-brand compatibility
Sunnyglade does not operate a dedicated parts store, so sourcing replacement components requires a bit of cross-referencing. The most reliable approach is to use your ASIN from the original Amazon listing (check your order history or the label on the box) to search for the matching manual PDF on Manuals.plus, then use the part names from the exploded diagram to search eBay, Amazon, and umbrella parts specialists. For canopies, Garden Winds is the most consistent aftermarket supplier and explicitly lists Sunnyglade models in their compatibility catalog. For cords, crank assemblies, rib clips, and ferrules, search for universal parts matched to your pole diameter and rib profile, these are largely interchangeable across Sunnyglade, East End, Mainstays, and Threshold-style frames since they share similar aluminum extrusion dimensions. The East End patio umbrella instructions guide on this site includes a parts-sourcing section that overlaps significantly with Sunnyglade repair needs due to shared component geometry. If you are ever uncertain whether a part will fit, measure the OD of your pole (most common Sunnyglade sizes are 38 mm and 48 mm) and the rib diameter (6 mm or 8 mm) before ordering.
FAQ
What primary manufacturer documentation is required?
Model-specific Sunnyglade instruction manuals and exploded diagrams (all SKUs: 7.5', 9', 10', 10×13', cantilever/offset, solar‑LED variants). These PDFs provide exact part names, assembly order, safety warnings, materials/specs (canopy GSM, rib count, shaft/rib material, item weight), and any model‑specific tilt/crank details. Example source: Sunnyglade 10×10 cantilever PDF (Manuals.plus).
Which regulatory and safety standards must I consult and cite?
ASTM standards and published guidance for market/patio/beach umbrellas (F15.79 subcommittee activity, ASTM F3681 context), any ASTM test methods referenced for wind/durability, and CPSC voluntary standards reports and safety advisories. Use these to set wind/anchoring thresholds, base‑weight recommendations, and safety warnings.
What patent and technical literature should inform mechanism explanations and repair steps?
Relevant patents describing offset/cantilever/crank/tilt mechanisms (e.g., US8104492, US9642421) to explain typical gearbox, pulley, rope routing, and tilt linkages. Use patent diagrams to reverse‑engineer likely internal paths and safe disassembly order for crank/tilt repairs.
Which third‑party sources are useful for real‑world failure modes and field visuals?
Teardown and product review videos (YouTube), consumer review aggregators and marketplace Q&A (Amazon/Walmart/ShopAbunda) to prioritize common failures (crank stripping, ribs breaking, canopy tears, pole kinking, LED battery failures) and to obtain photographic/shot‑list ideas for stepwise repair procedures.
What aftermarket and supplier resources are needed for parts lists and sourcing guidance?
Catalogue pages and supplier listings for replacement canopies, cords, crank assemblies, rib clips and rib splints (Garden Winds, eBay, Wayfair, KINSPORY listings). Retail product pages for Sunnyglade SKUs to cross‑reference OEM part sizes and compatible third‑party replacements.
What field‑testing and empirical data should be gathered to make the guide safe and accurate?
Controlled assembly and operation tests for each representative model (assembly time, difficulty, torque/load feel for crank, range of motion for tilt/rotation). Wind‑resistance tests (bench or empirical backyard trials) to validate base weights/closing thresholds, plus durability cycling of crank/tilt to detect failure modes. Document test protocols and pass/fail criteria.
Next Articles
East End Patio Umbrella Instructions: Setup, Use, Fixes
Step-by-step East End patio umbrella setup, tilt and crank use, wind securing, and fixes for won’t open or bind issues.
Mainstays Patio Umbrella Instructions: Setup and Troubleshooting
Step-by-step Mainstays patio umbrella instructions for setup, safe opening, crank tilt fixes, stability, wind safety, st
Cantilever Patio Umbrella Instructions: Step by Step
Step-by-step cantilever patio umbrella instructions for assembly, tilt and crank troubleshooting, and stable, safe setup