
If you're standing on your patio cranking the handle and nothing is moving, or the crank is spinning freely with zero resistance, the most likely culprits are a stripped or disengaged drive gear, a worn clutch or ratchet, a jammed fabric fold near the roller tube, or a seized pivot point that's fighting the whole mechanism. In most cases you can fix this yourself in under an hour with basic hand tools and a can of silicone spray. This guide walks you through every common cause in the order you should check them, with repair steps, a parts list, and clear criteria for when to stop and call a pro.
Manual patio awning won t retract? Troubleshooting & Fixes

Luca Morrison
22 Jul 2026
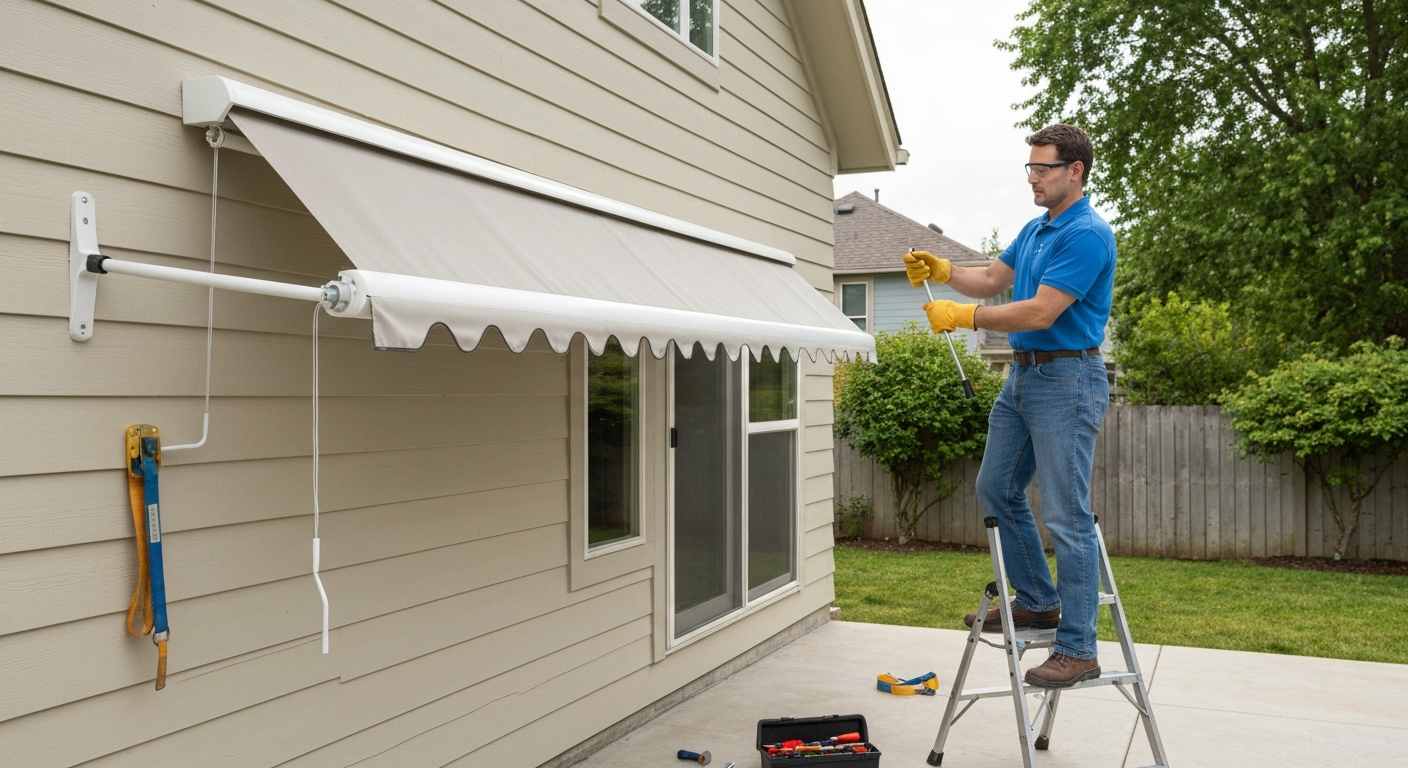
What this guide covers (and who it's written for)
This is a repair-first troubleshooting guide for homeowners dealing with a manual (non-motorized) patio awning that refuses to retract. If you own a wall-mounted 10 ft retractable awning, a Diensweek 12x10 style unit, an Advaning-type freestanding canopy, or any comparable crank-operated awning, this guide applies directly. It covers the full diagnostic flow from crank to roller tube, including broken or slipping drive heads, ratchet and clutch wear, spring tension issues, jammed fabric, corroded fasteners, and stuck locking pins. Motorized awnings are a different animal and are not covered here.
Spot your problem fast: symptom checklist
Before you touch anything, match what you're seeing to this list. It will point you straight to the right section and save you from chasing the wrong fix.
- Crank handle turns but nothing moves: likely a stripped gear, broken drive head, or disengaged shaft
- Crank is extremely stiff or immovable: seized pivot pin, corroded roller bearing, or overly tensioned torsion spring
- Awning retracts partway then stops: fabric jam, a misaligned fold hitting the roller tube lip, or an incorrectly set stop plug
- Crank skips or clicks without engaging: worn or slipping ratchet/clutch mechanism inside the drive head
- One side rolls up faster than the other (uneven roll): spring tension imbalance or one arm pivot pin binding
- Grinding or crunching sound when cranking: debris inside the gearbox or damaged gear teeth
- Awning creeps back out after retraction: weak or broken torsion spring, or a failed one-way ratchet
- Locking pin or cable is stuck: corrosion on the pin housing or a kinked pull cable
- Fabric is stuck and won't feed into the roller: wet or mildewed fabric bonded to the roller tube surface
Safety first before you pick up a tool
Manual awnings store a surprising amount of energy in their torsion springs and tensioned arms. I've seen arms snap open unexpectedly when a pivot bolt was removed without restraining the arm first. Before you begin any inspection or repair, treat the extended awning as a loaded mechanism, because it is.
- Wear safety glasses for any work near the roller tube, drive head, or spring housing. A gear chip or spring fragment travels fast.
- Wear work gloves when handling the fabric and metal arm hardware. Sheet metal edges on arm extrusions are sharp.
- Install the plastic safety sleeves (supplied with most SunSetter-type awnings) onto both lateral arms before removing any fasteners. These prevent the arms from flying open if tension releases unexpectedly.
- If you don't have safety sleeves, use a ratchet strap or bungee cord to restrain each arm against the wall bracket before loosening anything.
- Never disassemble the torsion spring housing or roller tube end caps while the spring is under load. The spring preload in a residential awning can cause serious injury if released suddenly. This is a job for a trained technician unless the OEM service manual explicitly provides a safe procedure for your specific model.
- Most bracket and roller work requires two people. One person steadies the awning while the other works the fasteners. Do not prop the awning on a ladder and work alone.
- Work in dry conditions. A wet ladder or wet fabric adds unnecessary risk.
- Check the wall bracket anchor bolts before starting. A retraction job can turn into an emergency if a loose bracket lets go mid-repair.
Tools and parts to have ready before you start
Most manual awning repairs need nothing exotic. The list below covers the typical hardware for wall-mounted 10 ft models, 12x10 format awnings like the Diensweek, and freestanding canopy frames like Advaning-type units. Exact fastener sizes vary by brand, so pull your model's instruction sheet before buying sockets.
Tools
- 1/2" socket and wrench (common bracket bolt size on residential awnings)
- 7/16" socket and wrench (used on many Solera/Lippert-type drive heads and override nuts)
- 6 mm and 5 mm hex/Allen keys (used on drive head set screws and arm pivot collars on many models)
- Phillips and flat-head screwdrivers
- Cordless drill (useful for manual override retraction technique, see crank section)
- Needle-nose pliers (for cable ends, cotter pins, retaining clips)
- Step ladder rated to your working height
- Ratchet straps or bungee cords to restrain lateral arms
- Flashlight or headlamp for inspecting inside roller tube ends and drive head cavities
Common replacement parts and spares
- Crank wand or replacement handle (match your drive socket size, typically a 7/16" or 1/2" square drive)
- Drive head / gearbox assembly (get the OEM part number from your model's exploded diagram; generic replacements exist for common 10 ft wall-mount models)
- Clutch or ratchet cartridge (some drive heads allow replacement of just the clutch without replacing the whole gearbox)
- Roller tube end cap and idler bracket (commonly needed on 12x10 models when the idler side seizes)
- Arm pivot pin and retaining clip set (applicable to all sizes including freestanding canopy frames)
- Plastic safety sleeves (SunSetter-supplied; replacements available through SunSetter support)
- Silicone spray lubricant (do not substitute with WD-40, petroleum grease, or oil-based lubricants on fabric-adjacent parts)
- Replacement locking pin and pull cable (for models with manual locking pins at the arm pivot)
- M10 or 3/8" stainless hex bolts and lock washers for wall bracket re-anchoring
- Touch-up fabric repair tape or awning patch kit (if fabric damage is discovered during inspection)
DIY, order parts, or call a technician?
Not every retraction problem is worth the same investment of time. Here's how I think about the decision before starting any disassembly.
| Situation | Recommended action | Why |
|---|---|---|
| Crank handle is cracked, stripped, or lost | DIY — order replacement crank | Direct swap, no disassembly of loaded parts, 15 minutes |
| Drive head spins freely (gears stripped) | DIY or order parts — replace gearbox | Moderate difficulty; gearbox units are available and bolt-in on most 10 ft and 12x10 models |
| Clutch/ratchet skips but gears are intact | DIY — replace clutch cartridge if serviceable, or full drive head | Low-to-moderate; follow OEM diagram closely |
| Fabric is jammed or bonded to roller tube | DIY — manual release and clean | Easy if fabric is accessible; no spring or structural work needed |
| Pivot pin is seized or corroded | DIY with penetrating oil and patience | Moderate; replace pin if it won't free with lubricant |
| Locking pin or cable is stuck | DIY — lubricate, inspect, replace cable if kinked | Easy to moderate |
| One-way spring tension is wrong (awning creeps out) | Call a technician or follow exact OEM spring procedure | Torsion spring adjustment carries injury risk without proper tooling and OEM guidance |
| Roller tube is bent or cracked | Replace roller tube — professional recommended | Structural repair; misalignment will cause repeated failure |
| Wall bracket anchor bolts are pulling out of wall | Stop use immediately, call a professional | Safety-critical structural issue; do not operate awning |
The right order to diagnose the problem
Always work from the simplest external checks inward toward the more loaded, structural components. This order is based on how OEM service documentation from blank" rel="noopener noreferrer">SunSetter, Lippert/Solera, and Dometic structures their own diagnostic flowcharts. Skipping ahead wastes time and risks disturbing a loaded spring before you've ruled out a simpler cause.
- Visual inspection first: Walk around the awning and look for obvious problems before touching anything. Check whether the fabric has a visible fold or bulge near the roller, whether an arm is bent or off its bracket, and whether the crank socket is visibly cracked or deformed.
- Check the locking pin or travel lock: Many awnings have a locking pin or travel lock that prevents retraction during transport or storage. Confirm it is fully disengaged before concluding there's a mechanical failure.
- Test crank engagement: Insert the crank and feel whether it bites into the drive socket or spins freely. Spinning freely with no resistance almost always means a stripped gear or disengaged shaft. Heavy resistance suggests a downstream jam or seized bearing.
- Inspect the fabric and arms for jams: With the crank removed, have a second person gently try to push one arm toward the wall while you watch the fabric fold near the roller. If something is catching, you'll see it here. Never force the arm.
- Check arm pivot pins and bracket mounts: Look at each pivot pin where the arm connects to the wall bracket and to the roller tube end. Inspect for corrosion, cracked retaining clips, or pins that are no longer seated properly.
- Inspect the drive head and idler end cap: Remove the cover plate (usually two Phillips screws) from the drive head. Look for broken plastic gear teeth, metal shavings indicating wear, and whether the shaft is still connected to the roller tube.
- Assess the roller tube: With arms restrained, check whether the roller tube itself spins freely when rotated by hand. Significant resistance or grinding at the idler end (the end without the drive head) suggests a seized bearing or damaged end cap.
- Check spring preload only by feel and result, not by disassembly: If the roller tube turns freely and the drive head is intact but the awning still won't pull in, a torsion spring problem may be present. Do not open the spring housing yourself. Note the symptom and consult the OEM manual or a technician.
Symptom-to-fix reference table
| Symptom | Most probable cause | Immediate fix | Parts needed |
|---|---|---|---|
| Crank turns, nothing moves, no resistance | Stripped drive gear or broken gearbox shaft | Replace drive head/gearbox assembly | Drive head unit (model-specific) |
| Crank turns, nothing moves, heavy resistance | Seized roller bearing or jammed fabric | Lubricate idler bearing; clear fabric jam | Silicone spray, possibly replacement idler bracket |
| Crank skips or clicks every few turns | Worn clutch or ratchet inside drive head | Replace clutch cartridge or full drive head | Clutch cartridge or gearbox assembly |
| Grinding or crunching when cranking | Debris in gearbox or damaged gear teeth | Remove drive head, clean, inspect teeth; replace if damaged | Drive head if gear teeth are broken |
| Awning retracts partway then stops | Fabric jam or mis-set stop plug/rafter stop | Clear fabric jam; adjust stop plug per OEM manual | None if adjustable; replacement stop plug if broken |
| One side retracts faster than the other | Binding pivot pin or spring tension imbalance | Lubricate both pivot pins; check spring preload (tech if spring) | Silicone spray, pivot pin replacement if corroded |
| Awning creeps back out after cranking in | Weak or failed torsion spring or failed one-way ratchet | Replace ratchet if accessible; call tech for spring work | Ratchet unit or professional spring service |
| Crank handle feels loose or wobbles | Cracked crank socket or worn drive socket | Replace crank wand or tighten set screw | Replacement crank wand |
| Fabric is stuck, won't feed into roller | Wet or mildewed fabric bonded to roller surface | Fully dry fabric, clean roller surface, re-attempt retraction | Fabric cleaner, awning patch tape if fabric is torn |
| Locking pin won't release | Corroded pin or kinked pull cable | Apply penetrating lubricant, work pin free; replace cable if kinked | Replacement locking pin and cable set |
Crank and handle problems: the most common fix
In my experience, crank and drive head issues account for the majority of manual awning retraction failures. The good news is that most of these repairs don't require touching the torsion spring or removing the roller tube. Here's how to work through them.
Identify exactly what's failed
Insert the crank wand into the drive socket and apply gentle rotational pressure. There are three distinct failure feels: (1) the crank spins freely in both directions with zero resistance, which almost always means the gearbox shaft has snapped or the gear teeth are completely stripped; (2) the crank engages in one direction but clicks or skips rather than turning the roller, which points to a worn ratchet or clutch; (3) the crank engages and transmits force but the roller barely moves or grinds, which suggests the problem is downstream (seized bearing, jammed fabric, or structural obstruction). Knowing which of these three you have determines whether you need a new crank, a new gearbox, or a different repair entirely.
Step-by-step crank and drive head repair
- Restrain both lateral arms with ratchet straps before removing the drive head cover. Arms under tension can swing out when a drive component is loosened.
- Remove the drive head cover plate. On most residential awnings this is two to four Phillips screws. Set the screws somewhere you won't lose them.
- Inspect the gear teeth visually with a flashlight. Broken, missing, or heavily worn teeth are obvious. Metal shavings at the bottom of the housing confirm gear damage.
- Check the set screw where the drive shaft meets the roller tube end. On many models a 5 mm or 6 mm Allen set screw locks the shaft to the tube. If this has backed out, the gearbox spins but the tube doesn't move. Tighten it. This fix takes two minutes.
- If the gear teeth are intact but the ratchet is slipping, locate the ratchet cartridge (a round spring-loaded unit usually sitting between the input shaft and the drive gear). On models where this is a replaceable cartridge, pull it out and press in the new one. On integrated gearboxes, the full unit will need replacement.
- If you need to replace the full gearbox, note the roller tube diameter and drive socket orientation before ordering. Common sizes for 10 ft wall-mount models and 12x10 models differ slightly. Bring the old unit to a hardware or awning-supply store, or photograph the part number stamped on the housing.
- Fit the new gearbox onto the roller tube end, align the shaft with the set screw hole, and tighten the set screw firmly. Do not overtighten on aluminum tube — snug plus a quarter turn is enough.
- Reinstall the cover plate and test crank engagement before removing the arm restraints.
- Once you confirm the crank is engaging and the roller is turning smoothly, remove the restraints and slowly retract the awning.
Emergency retraction when the crank won't work at all
If the drive head is completely non-functional and you need to get the awning retracted immediately (incoming weather, for example), many manual awnings include a manual override socket on the drive-end or idler-end cap. On Solera and Lippert-type units this is a 7/16" hex or square socket that accepts either a standard crank wand or a cordless drill with the matching socket. Using a drill set to its lowest torque setting, you can spin the roller tube in the retract direction without the gearbox. This is an accepted emergency technique in OEM service documentation. Go slowly and have someone watch the fabric fold as you retract.
Temporary workarounds while you wait for parts
- If the awning is extended and parts are on order, install the supplied plastic safety sleeves (or improvised ratchet strap ties) on both lateral arms to prevent unexpected extension in wind.
- Do not use the awning in any wind while the drive head is compromised. A damaged or missing gearbox means you have no reliable retraction mechanism.
- Use a tiedown strap across the valance rail to hold the fabric against the wall if you cannot retract at all. This is a short-term safety measure only, not a repair.
- Cover the drive head opening with painter's tape if you've removed the cover plate and are waiting for parts. This keeps insects and moisture out of the mechanism.
Difficulty and time estimate for crank repairs
Tightening a loose set screw: 5 to 10 minutes, beginner level. Replacing a crank wand: 5 minutes, beginner. Replacing a ratchet cartridge on a serviceable gearbox: 20 to 30 minutes, intermediate. Replacing the full drive head/gearbox assembly: 30 to 60 minutes, intermediate. You'll need a second person for the gearbox swap if the roller tube is at height.
Other causes that stop retraction
Jammed or bonded fabric
If the awning was rolled up while wet and left that way, the fabric can literally stick to itself or to the roller tube. You'll feel this as increasing resistance partway through retraction, or the roller will stop turning even though the drive head is fine. The fix is to extend the awning fully, allow the fabric to dry completely (sunlight and airflow, at least several hours), then gently work any stuck sections apart by hand before attempting retraction again. Wash the fabric with mild soap and water, rinse thoroughly, and let it dry completely in the extended position before rolling. Jayco owner & maintenance manual, Awning Cleaning and Care advises mixing mild soap with water, drenching and rinsing the fabric, and fully air-drying before rolling; do not roll up awnings while wet Jayco owner & maintenance manual — Awning Cleaning and Care advises mixing mild soap with water, drenching and rinsing the fabric, and fully air-drying before rolling; do not roll up awnings while wet.. Never roll wet fabric. If any section is torn during this process, apply an awning patch tape immediately to prevent the tear from spreading.
Seized pivot pins and corroded fasteners
Pivot pins at the arm joints are a common victim of neglect. When they seize, they add resistance that can make retraction feel impossible even when the gearbox is fine. Apply a penetrating lubricant (not WD-40 long-term, but WD-40 is fine as a penetrant to free a seized pin) and work the arm back and forth by hand to distribute it. Once the pin moves freely, clean off the penetrant and apply silicone spray as the maintenance lubricant going forward. If the pin is visibly corroded, pitted, or bent, replace it. A seized or bent pivot pin will keep causing problems no matter how many times you lubricate it.
Stop plugs and rafter stops preventing full retraction
Some awning models (notably Dometic Sunchaser-type units and similar cassette designs) have adjustable stop plugs or rafter stops that physically limit how far the awning travels. If yours was adjusted incorrectly at installation, or has shifted over time, it can prevent full retraction even when everything else is working perfectly. Check your OEM manual for the stop plug adjustment procedure. On most models this is a simple knob or set screw inside the cassette housing. Do not guess at the adjustment; go by the manual's diagram because setting a stop plug too far in the wrong direction can prevent the arms from seating properly and put stress on the bracket mounts.
Freestanding canopy-specific issues
Freestanding awnings like Advaning-type units have additional flex in their frame because they're not anchored to a wall at the roller end. This means the roller tube can deflect under tension and bind against its support brackets if the frame legs are not perfectly plumb and square. Before diagnosing any mechanical fault on a freestanding model, check that all four legs are vertical and that the frame is not racked (twisted). Re-square the frame, re-level the roller tube support brackets, and test retraction again before opening the drive head. Also inspect the roller tube support brackets (the saddle-style brackets that hold the tube mid-span on wider 12x10 models): if one has shifted, the tube can cant at an angle and bind.
Model-specific notes
10 ft wall-mounted retractable awnings
Standard 10 ft wall-mount manual awnings from most residential brands share a very similar drive head format: a crank wand socket on the right or left end of the roller tube, two lateral arms on swing brackets, and a front valance bar. The drive head on these models is usually a bolt-on cassette held by two to four screws, making gearbox replacement straightforward. The most common failure point I see on these is the set screw backing out of the drive shaft, which is a two-minute fix. The second most common is a worn ratchet after several years of seasonal use. Replacement gearboxes for generic 10 ft wall-mount models are widely available online for roughly $15 to $40.
Diensweek 12x10 retractable awnings
The extra width on a 12x10 format awning means the roller tube is longer and heavier, which puts more stress on both the drive head and the idler end bearing. On Diensweek and similar 12x10 models, idler bracket failure is more common than on 10 ft models. If you hear grinding specifically from the non-crank end of the roller tube, inspect the idler bracket and its bearing surface first. The fabric on these models is also heavier, making wet-fabric bonding a more serious problem if the awning is left rolled up with moisture inside. Replacement drive head units for this format are less universally interchangeable, so get the model number from the label on the roller tube housing and order directly from the manufacturer or a compatible parts supplier.
Advaning and freestanding retractable models
Advaning-type freestanding awnings (including models sold under several house brands) use the same basic crank-and-roller mechanism as wall-mounted units, but the frame geometry adds complexity to the diagnostic process. If you need compatible parts or replacement drive heads for Advaning-style units, search your model as a garden patio manual awning canopy to find matching components and supplier listings. For model-specific diagrams and parts lists, consult the Advaning 10 manual free-standing retractable patio awning which shows the crank, roller, and bracket layout used on these units. The lateral arm pivot pins on freestanding units see more loading because the frame flexes slightly with every extension and retraction cycle. These pins need lubrication at least once per season. The roller tube support saddle brackets on wider freestanding models should be checked for cracking or loosening each spring, as they are a common failure point that can cause the tube to bind. Always retract the awning when wind picks up: freestanding frames have far less inherent stability than wall-mounted awnings, and wind loading on an extended freestanding awning can bend arm extrusions and rack the frame permanently.
Keep it working: maintenance, lubrication, and seasonal storage
The most effective way to prevent retraction failures is a 20-minute maintenance routine twice a year: once at the start of the season and once before winter storage. Here's what to do.
- Lubricate all pivot pins, arm joints, and roller tube end bearings with silicone spray. Use silicone specifically, not oil-based lubricants, which attract dirt and can damage fabric coatings. Work the arms through a full cycle after applying to distribute the lubricant.
- Check and re-torque wall bracket anchor bolts. Brackets can work loose over a season of wind loading. Use the correct bolt size for your model (commonly 1/2" or M10) and re-torque to snug-firm. If anchors are in masonry, check for cracking around the holes.
- Inspect the drive head cover for cracks and the crank socket for wear. A crank socket that has started to round off will strip completely when you need it most.
- Clean the fabric with mild soap and warm water. Apply it with a soft brush, let it soak briefly, then rinse thoroughly. Extend the awning fully and allow it to dry completely in the sun before retracting.
- Before storing for winter, extend the awning, clean and dry the fabric as above, then retract and apply a breathable awning cover. Do not store with a vinyl tarp directly against the fabric, as condensation trapped underneath promotes mildew.
- Check the torsion spring tension by slowly extending the awning and noting whether the arms open smoothly and hold position at mid-extension. If the arms drop immediately or shoot open without control, the spring preload may need adjustment. Note this symptom and address it before next season, either via OEM adjustment procedure or by a technician.
Wind security and when to retract
Every major awning manufacturer, including SunSetter and Dometic, states plainly in their owner manuals that the awning must be retracted in wind. This is not a legal boilerplate: an extended manual awning in wind puts enormous force on the arm pivot brackets and the wall anchor bolts, and failures happen fast. A rough guideline used by most residential awning owners is to retract any time wind gusts exceed 20 to 25 mph. If you're going inside and won't be watching the weather, retract it. The few minutes it takes are far less costly than repairing a bent arm extrusion or re-anchoring a pulled-out bracket. A damaged arm from one wind event can make retraction permanently difficult by binding the roller tube even after the arm is straightened.
FAQ
What are the first quick checks if my manual patio awning won’t retract?
Check these fast: (1) Is the crank/handle present and engaged? (2) Any visible jammed fabric or foreign objects on the roller or arms? (3) Are arm locking pins or safety sleeves installed and preventing motion? (4) Do the brackets or fasteners look corroded or broken? (5) Can the roller tube be turned by hand (with arms supported)? These narrow the symptom to drive, fabric, or hardware problems.
What safety steps and tools should I prepare before troubleshooting?
Safety: work with a helper, wear gloves and eye protection, never disassemble a loaded torsion spring, and use the supplied plastic safety sleeves or lash the arms closed before working. Tools: adjustable wrench, 7/16" and 1/2" sockets, Allen keys (4–6 mm), flat-head screwdriver, silicone spray, penetrating oil (PB Blaster), replacement crank wand/socket, cotter pin pliers, drill with 7/16" socket (for emergency retraction), tape, and ratchet straps.
How do I follow a logical diagnostic flow to find the exact failure?
Follow this order: (1) Visual: fabric, arms, pins, brackets. (2) Drive: try to engage crank and note resistance (no spin, slipping, grinding). (3) Roller test: with arms restrained, try spinning roller tube by hand to isolate roller bearings vs drive. (4) Clutch/ratchet: inspect drive-head for visible damage or missing pawls. (5) Spring/tension: uneven roll or partial retraction suggests weak/incorrect spring preload—stop and call pro if unsure. (6) Hardware: check for seized fasteners, corroded pivot pins, or jammed locking pins.
What are step-by-step repairs for a crank or handle that won’t engage?
1) Inspect the crank socket and drive square for debris or deformation. 2) Remove any obstruction and clean the socket. 3) Replace a worn or stripped crank wand with a matching OEM or universal replacement. 4) If the drive square is rounded, remove end-cap and inspect drive adapter — replace the adapter/drive-head per parts diagram. 5) Re-test engagement; if drive still spins freely with no resistance, proceed to inspect clutch/gearbox.
How do I diagnose and fix a slipping clutch/ratchet (awning spins but won’t retract)?
Diagnosis: audible slipping or repeated free-spinning under load. Fix: 1) Remove cover/end-cap to inspect ratchet pawls and spring. 2) Clean and lubricate pivot points with silicone spray (do not use heavy grease on fabric-contact surfaces). 3) Replace worn pawls, ratchet ring, or clutch assembly using OEM part numbers. 4) Reassemble and test. If gearbox teeth are damaged or missing, replace the gearbox/drive-head assembly.
What do I do if the roller tube or bearings are seized or the fabric is jammed?
Seized roller: support arms, remove end-cap, apply penetrating oil to bearings, work roller back and forth, then re-lubricate with silicone spray. Replace roller bearings or end-cap if damaged. Jammed fabric: fully extend (if possible) to free wrinkles, remove foreign objects, carefully realign fabric on roller, and re-tension spring preload if needed. Never force-roll wet fabric — dry fully first.
Next Articles
How to Fix a Patio Umbrella That Won't Open or Close
Step-by-step fixes for patio umbrellas that won’t open or close, with checks for jams, cords, latches, and lubricating t
How Does a Patio Umbrella Work? Components, Use, and Fixes
Learn how patio umbrellas work: components, open close tilt, stability, and step by step troubleshooting common mechanic
Patio Umbrella Crank Not Working: DIY Fix Guide
Fix a patio umbrella crank that won’t work with safe step-by-step jam, gear, and base troubleshooting and repair tips.