
Yes, you can use a beach umbrella on a patio, and a patio umbrella at the beach. The catch is that the two styles are built around different pole diameters, base systems, and canopy fabrics, so you usually need a sleeve adapter, a freestanding base, or a few hardware tweaks to make it work safely. Get the measurements right first, pick the correct mounting method, and you can absolutely repurpose one for the other without buying new gear.
How to Use Beach Umbrella on Patio: Fit, Mounting & Safety

Luca Morrison
10 Aug 2026
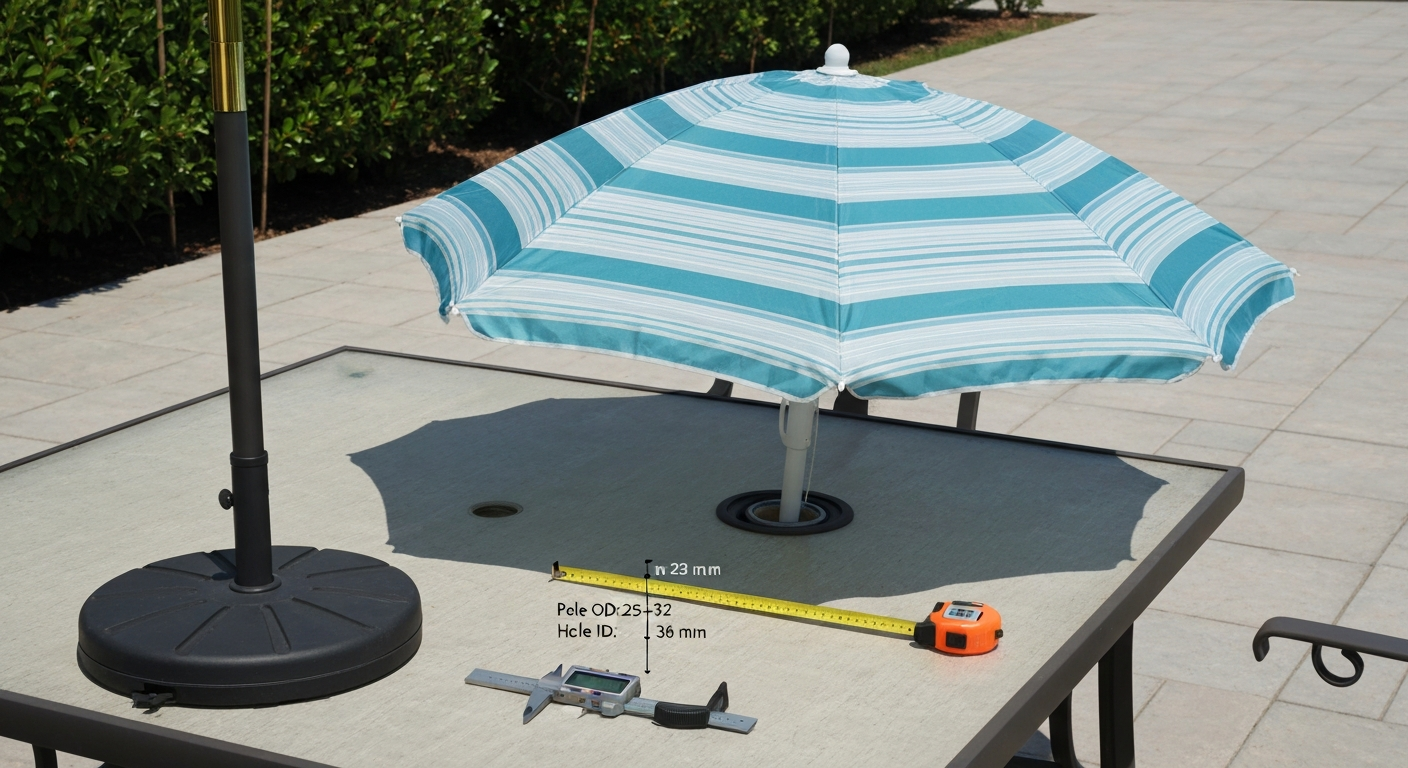
When it actually makes sense to swap beach and patio umbrellas
Beach umbrellas are light, compact, and cheap. If you have one sitting in the garage after summer and your patio needs shade, it is tempting to just stick it in a base and call it done. The same logic runs in reverse: a nice 9 ft market umbrella travels surprisingly well to a beach picnic area with a concrete pad or a soft-sand anchor. Both scenarios are genuinely workable, but each comes with tradeoffs you should know before you start drilling holes or buying adapters.
Beach umbrellas are designed for portability, not longevity in fixed outdoor settings. Their poles are thinner (commonly 25 to 32 mm, or roughly 1 to 1.25 inches), their canopies are often coated polyester rather than solution-dyed acrylic, and their ribs are usually steel, which corrodes quickly in humid or salty air. Patio umbrellas, by contrast, are built for repeated daily use in one spot, with heavier poles (1.5 to 2.0 inches is the residential standard), sturdier rib systems, and UV-stable fabrics. Knowing this difference shapes every decision that follows.
Suitability check: ask these questions before you commit
Before you touch a wrench or order an adapter, run through this quick compatibility check. It takes about ten minutes and saves you from buying the wrong hardware or, worse, ending up with a wobbly umbrella that becomes a hazard in a gust.
Pole diameter
Measure the outside diameter of your pole with a caliper or wrap a piece of paper around it and measure the circumference, then divide by 3.14. Beach umbrella poles commonly run 25 to 32 mm (about 1 to 1.25 inches). Residential patio poles are almost always 1. Most manufacturers report residential patio pole outside diameters clustering at 1.5 in (38 mm) and 2.0 in (50 mm); see Standard Patio Umbrella Pole Size - Whatpatio for typical size ranges. 5 inches (38 mm) or 2.0 inches (50 mm). Commercial and heavy-duty market umbrellas go 2.5 inches and up. If your beach umbrella pole is 1 inch and your patio table hole is cut for 1.5 inches, you have a 0.5-inch gap to fill, which is exactly what sleeve adapters are for. Write your measurement down before you do anything else.
Canopy size and shade coverage
Beach umbrellas typically run 6 to 7 feet in diameter. Most residential patio tables need an umbrella at least 2 feet larger than the table width to provide usable shade overhang. A standard 48-inch (4 ft) round table therefore wants at least a 7 ft canopy, ideally 9 ft. A compact beach umbrella might just barely cover the table itself, with no coverage for the chairs. Measure your table and decide whether the canopy span is actually large enough for your use case before going further.
Canopy material and durability
High-end patio canopies are often made from solution-dyed acrylic (the Sunbrella brand is the most recognized example), rated at around 260 g/m² with strong colorfastness and mildew resistance. Mid-market options use olefin or Recacril polypropylene fabrics, which still offer decent UV stability. Budget beach umbrella canopies are usually coated polyester, which fades significantly faster in full sun and does not handle pooled water well. If you plan to leave a beach umbrella on your patio every day, expect the canopy to show wear within one or two seasons.
Wind rating
Most residential patio umbrellas are tested or rated for use up to about Beaufort 5, which is roughly 18 to 24 mph (30 to 38 km/h). Premium brands like Umbrosa publish specific limits (around 30 km/h when the base is permanently fixed). Beach umbrellas have no meaningful wind rating because they are designed to be taken down quickly. The ASTM F3512-21 standard establishes repeatable wind safety tests for market umbrellas, and manufacturers who cite this standard on their spec sheets have actually tested their product. Beach umbrellas almost never do. Bottom line: treat any beach umbrella on a patio as a low-wind-day-only setup unless you can verify its frame strength.
| Feature | Beach Umbrella | Residential Patio Umbrella | Commercial Market Umbrella |
|---|---|---|---|
| Pole OD (typical) | 25–32 mm (1–1.25 in) | 38–50 mm (1.5–2.0 in) | 50–64 mm (2.0–2.5 in+) |
| Canopy diameter (typical) | 6–7 ft | 7–11 ft | 9–13 ft |
| Common canopy fabric | Coated polyester | Olefin or solution-dyed acrylic | Solution-dyed acrylic (Sunbrella, etc.) |
| Rib material | Steel (usually) | Fiberglass or aluminum | Fiberglass or steel |
| Wind rating | None published | ~18–24 mph (Beaufort 5) | ~24–30+ mph (tested to ASTM F3512) |
| Corrosion resistance | Low (uncoated steel hardware) | Medium to high | High (316 SS fasteners, anodized aluminum) |
| Typical pole wall thickness | Thin (1–1.5 mm) | ~2.0 mm (e.g., California Umbrella 9 ft spec) | 2.5 mm+ |
Precise fit and measurement steps
Do not skip this section and guess. Wrong measurements are the number one reason adapter sleeves wobble, poles crack under load, or a canopy goes airborne in a breeze. This takes ten minutes and costs nothing.
- Measure the pole outside diameter (OD): use a digital caliper at the thickest point of the pole shaft, usually just below the hub. Record in millimeters for accuracy. If you only have a tape measure, wrap a strip of paper tightly around the pole, mark where it overlaps, measure that length, and divide by 3.14159. That gives you the OD.
- Measure the ferrule or spike: the ferrule is the collar at the bottom of the pole where it meets the base or spike. Some beach umbrella ferrules are flared wider than the pole shaft. Measure both the ferrule OD and the pole shaft OD, because the sleeve must accommodate the larger of the two.
- Measure the table hole diameter: most patio table umbrella holes are 1.5 inches or 2.0 inches (38 mm or 50 mm). Measure across the hole with a ruler or caliper. If there is already a plastic insert or ring in the hole, measure the inner opening of that insert, not the outer ring.
- Measure canopy span: open the umbrella fully and measure edge to edge across the widest diameter. For octagonal canopies, measure across opposite panels (flat-to-flat), not corner to corner, to get the practical shade footprint.
- Measure pole length and hub height: measure the total pole length and, separately, the height from the base or table surface to the hub (the joint where ribs connect). This tells you whether the canopy will clear seated adults (you want at least 7 ft of clearance from ground to canopy edge) and whether the pole is long enough for your base depth.
- Record everything before ordering: pole OD (mm), ferrule OD (mm), table hole ID (mm), canopy span (ft/m), pole length (in/cm), and hub height (in/cm). These six numbers answer almost every mounting question.
Mounting and attachment options at a glance
Once you know your measurements, you have several ways to mount a beach umbrella on a patio or a patio umbrella at the beach. Each has a different cost, stability level, and effort requirement. Here is a plain-language overview before the deeper installation steps below. For a full walkthrough of mounting, adjusting, and anchoring a patio umbrella, see our patio umbrella setup guide.
| Method | Best for | Stability | Approximate cost | Notes |
|---|---|---|---|---|
| Patio table center hole (with adapter sleeve) | Patio table with existing hole | Medium | $5–$20 for sleeve | Works when pole is narrower than hole; sleeve fills the gap |
| Freestanding weighted base | Any surface, no table needed | Medium to high | $30–$120 | Fill base with sand or water; heavier = safer in wind |
| Clamp-on mount (rail or deck clamp) | Deck rails, fence posts, table edges | Medium | $20–$60 | Good for slim beach poles; check rail diameter compatibility |
| Bolt-down plate / flange | Concrete, pavers, wood decking | High | $20–$80 + hardware | Most secure patio option; requires drilling |
| Portable sand anchor / auger | Sand at the beach | Medium (soft sand) to high (compacted) | $15–$40 | Beach-specific; screw type outperforms spike type |
| Sandbag anchor set | Any surface for temporary use | Low to medium | $10–$30 | Good supplement to a base; not a standalone fix in wind |
Adapter sleeves, inserts, and simple conversions
A sleeve adapter (sometimes called a pole insert, coupler, or reducer) is a short tube machined or molded to slip over a narrower pole and fill the gap inside a wider hole. They are the single most useful accessory when repurposing umbrellas between uses. Most hardware stores and online patio suppliers sell plastic or aluminum sleeves in common size combinations: 1-inch to 1.5-inch, 1.25-inch to 1.5-inch, 1.5-inch to 2.0-inch, and so on.
To select the right sleeve, you need three numbers: the pole OD, the hole or base socket ID (inside diameter), and the ferrule OD. The sleeve inner bore must fit over the pole OD with minimal slop (less than 1 mm of play is ideal), and the sleeve outer diameter must snugly fill the hole or socket. A sleeve that wobbles or rattles is not safe to use in wind. If you cannot find a commercial sleeve in the exact size you need, a local machine shop can turn one from aluminum round stock for $15 to $30. This is genuinely worth doing for a quality patio umbrella rather than leaving a dangerous gap.
For a truly DIY approach with small gaps (under 5 mm), some people wrap the pole shaft with two or three layers of electrical tape or self-amalgamating silicone tape to build up the diameter, then slide it through the table hole. This works as a temporary fix but is not reliable in wind because tape compresses. Use it only in calm weather or as a placeholder while you order a proper sleeve.
If you are interested in a more permanent conversion from one umbrella type to the other, the process overlaps with a full pole-swap or coupler installation, which goes deeper than a simple sleeve. That kind of swap involves checking hub compatibility and rib attachment points, topics covered in the guide on how to convert a beach umbrella to a patio umbrella elsewhere on this site.
Step-by-step installation and adjustment
These steps apply whether you are mounting a beach umbrella in a patio base or setting up a patio umbrella in a new location. Read through the whole sequence before you start, because a couple of these steps are easier to do before the umbrella is in the base.
- Set up the base or mount first. If using a weighted base, position it where you want the umbrella and fill it with sand or water before inserting the pole. If using a table center hole, confirm the sleeve or insert is seated flush in the hole. If using a bolt-down plate, check that all fasteners are fully tightened.
- Insert the pole into the base or table hole with the umbrella still closed. Lower it straight down; do not angle it in from the side or you risk cracking a plastic socket. Push the pole down to the manufacturer's recommended depth, which is usually marked with a line or stop pin. If there is no mark, aim for at least 8 to 10 inches of insertion depth in a standalone base.
- Lock the base collar or tighten the set screw. Most modern bases have a thumbscrew, a bolt, or a locking ring at the top of the socket. Finger-tighten first, then give it a quarter-turn more with a wrench if the fitting accepts one. Do not overtighten a plastic collar; you will crack it.
- Raise the canopy slowly using the crank, pulley cord, or push-up mechanism. If your umbrella uses a cord (common on beach and lower-cost models), pull the cord hand-over-hand with even tension so the canopy rises level. Watch the ribs: if one rib catches or does not extend fully, stop and free it before continuing.
- Lock the canopy at full open. A crank-style umbrella locks automatically at the fully open position. A push-up style usually has a pin or ring that slides into a groove on the pole to hold it open. Make sure this locking mechanism is engaged before you let go of the pole.
- Set the tilt. Many patio umbrellas have a tilt mechanism at the hub: a button-tilt that clicks into preset positions, a collar-tilt that twists, or a crank-tilt that adjusts with the crank handle. Beach umbrellas typically have no tilt. For patio use, tilt toward the sun so the canopy edge faces the strongest light angle, usually tilting south in the northern hemisphere during midday hours.
- Align the vent. If the canopy has a top vent (the small opening or raised cap at the crown), position it so it faces into the predominant wind direction. The vent lets wind pass through rather than lift the canopy, which is one of the most important wind-safety features. Do not block the vent with anything.
- Rotate the umbrella to maximize shade coverage. Stand where most people will sit and check whether the canopy edge extends at least 2 feet past the table or seating area edges. Rotate the pole in the socket to optimize coverage. If the pole has a flat face or key slot, mark the correct orientation with a small piece of tape so you can reset it quickly after closing.
Adjusting height on two-piece poles
Some patio umbrellas use a two-piece pole that joins at a mid-shaft coupler. If your canopy sits too low (under 7 feet of clearance at the canopy edge), loosen the coupler collar, raise the upper section, and re-tighten. Check that the coupler pin or set screw re-engages in its alignment hole after adjustment. A loose coupler is a common cause of umbrellas that lean and eventually fall in a gust, so this is a spot worth checking every few weeks.
Positioning for effective shade coverage
Umbrella shade moves with the sun, so think about when during the day you use the space most. Morning sun typically comes from the east, afternoon sun from the west. If you have a tilt mechanism, use it to follow the sun rather than repositioning the whole base. For a deeper look at sun angle, coverage geometry, and how canopy shape affects shade footprint, the article on how to position a patio umbrella on this site walks through the full calculation. For a deeper walkthrough of placement steps and diagrams, see the guide how to position patio umbrella (internal content ID 880cb148-7d7a-4569-a68a-95565816094c). For creative ideas on styling a patio table around an umbrella, see our guide on how to decorate patio table with umbrella.
Patio anchoring and wind safety
Wind is the main hazard with any umbrella, and it is amplified when you are using a beach umbrella (no wind rating) or a narrow pole in a too-large socket. Wind pressure scales with the square of wind speed, so a gust that doubles from 15 mph to 30 mph quadruples the force on the canopy. Even a modest 7 ft beach umbrella canopy presents several square feet of surface area. Take anchoring seriously.
Weighted freestanding bases
A standard resin or plastic base filled with sand weighs around 50 to 60 lbs when full. That is the minimum I would use with any umbrella over 7 ft. For a 9 ft patio umbrella, 80 to 100 lbs of base weight is more appropriate. To fill a base with sand: open the fill cap, use a funnel, pour dry sand in gradually, tap the base to settle it, and close the cap tightly. Water-filled bases work but weigh less per volume (water is 8.3 lbs/gallon; sand is about 12 to 13 lbs/gallon), so you get more anchoring mass from sand. In freezing climates, drain water-filled bases before winter or the freeze cycle will crack them.
Sandbag anchors
Sandbag sets designed for umbrellas typically include two to four fabric bags that hang from or wrap around the base struts. They add 10 to 30 lbs of additional weight and are a good supplement to a base, especially on a windy day. They are not a standalone solution. Stacking sandbags around the base perimeter is fine, but leaving them in direct sun over weeks degrades the bag fabric; check them monthly if you leave them in place.
Bolt-down plates and flanges
A bolt-down plate (also called a flange mount) is a flat steel or aluminum plate with a center socket for the pole and four or more holes for lag screws or concrete anchors. This is by far the most secure patio mounting method. Installation steps: mark the plate position on your patio, drill pilot holes (for wood decking, use 3/8-inch lag screws; for concrete, use wedge anchors or concrete screws at least 2 inches deep), seat the plate, and torque fasteners evenly in a cross pattern to avoid warping. Always use stainless steel or hot-dipped galvanized hardware outdoors; zinc-plated screws rust within one season.
Anchor spacing and placement best practices
Place the base or plate as close to the center of the canopy footprint as your furniture layout allows. An off-center canopy increases the lever arm and puts more torque on the base in wind. Keep the umbrella at least one full canopy radius away from walls, fences, or overhead structures where turbulent wind reflects and creates unpredictable gusts. If your patio is in a wind corridor (between two buildings, for example), consider a lower-profile 7 ft umbrella rather than a 9 ft one, and close it when wind exceeds 15 to 18 mph.
When to close and take it down
Close any umbrella when sustained winds exceed about 18 to 20 mph or when gusts are forecast. This applies to high-end patio umbrellas too, not just beach models. A permanently closed umbrella on a well-anchored base survives most weather fine. An open canopy in a 30 mph gust is a different story. Make it a habit to close the umbrella whenever you go inside for more than a few minutes.
Beach anchoring and corrosion protection
Using a patio umbrella at the beach introduces two problems: getting it to stay upright in sand, and protecting the frame and hardware from salt corrosion. Both are solvable with the right gear and a post-use cleaning habit.
Sand anchors and augers
The standard beach umbrella spike works in firm, damp sand but fails in dry, loose sand above the tide line. A screw-type sand auger (a helical metal spiral that threads down into the sand) holds dramatically better. To use one: insert the auger tip into the sand, turn clockwise while pressing down, and screw it in until only the top collar is above the surface. Most augers take 6 to 10 full rotations to reach working depth (about 12 to 18 inches). Then insert your umbrella pole into the auger socket and tighten the locking collar. On dry sand, go deeper: 18 to 24 inches gives much more pull-out resistance.
Using a patio umbrella pole in a sand auger
Most sand augers are sized for beach umbrella poles (25 to 32 mm). A standard 1.5-inch (38 mm) patio pole will not fit most auger sockets without an adapter. Options: bring a sleeve adapter that fits over the patio pole shaft and reduces the OD to match the auger socket, or purchase a beach umbrella-style sand auger with an adjustable collar (some accept poles from 28 to 38 mm). Check the auger's maximum pole diameter before you head to the beach.
Portable screw anchors and sleeves for soft sand
For very soft sand (dry beach areas, dunes), a wider auger or a two-piece sleeve anchor works better. These have a wider helix diameter (4 to 6 inches) and spread the hold over more sand volume. Insert the outer sleeve first, then drop the umbrella pole through it. Some models include a set screw to lock the pole inside the sleeve, which prevents the umbrella from spinning in a gust.
Protecting metal parts from salt corrosion
Salt air attacks steel hardware fast. Even stainless steel fasteners (grade 304) will show surface rust at the beach within a season; only marine-grade 316 stainless resists saltwater well over time. For a patio umbrella used occasionally at the beach, the practical protection steps are: rinse the entire frame (pole, hub, ribs, and all hardware) with fresh water immediately after each beach use, dry it fully before storing, and apply a thin coat of marine-grade silicone spray or corrosion inhibitor (products like Boeshield T-9 or WD-40 Specialist Corrosion Inhibitor) to all metal joints and fasteners once or twice a season. Pay special attention to the hub, the rib ferrules, and any set screws, because these small parts corrode first and are usually the most expensive to replace. If you see white or orange oxidation forming on aluminum or steel parts, sand it lightly with 400-grit wet/dry paper, clean with a vinegar solution, dry, and apply inhibitor.
If your umbrella frame was not built with marine-grade components (316 stainless fasteners, anodized or powder-coated aluminum, fiberglass ribs), repeated beach use will shorten its life noticeably. Fiberglass ribs are the most corrosion-resistant rib option for coastal use; steel ribs on a beach umbrella used weekly will start pitting within two or three seasons even with regular rinsing.
Maintenance, troubleshooting, and common repairs
Repurposing an umbrella often means dealing with a few years of deferred maintenance at the same time. Here are the failure points I see most often and the practical fix for each.
Split or cracked poles
Thin-wall beach umbrella poles (aluminum or fiberglass) crack under lateral load, especially near the hub or at the point where the pole exits the base socket. A crack longer than 2 inches, or any crack that goes through the full wall thickness, means the pole needs replacement. A crack under 1 inch at a non-critical location can be temporarily splinted by sliding a slightly larger-diameter tube (a sleeve about 4 to 6 inches long) over the crack and securing it with two hose clamps. This is a temporary field fix, not a permanent repair.
Bent ribs
Steel ribs bent more than about 20 degrees out of plane from a gust or overtension rarely return to their original shape cleanly; trying to bend them back usually creates a stress crack at the kink. Fiberglass ribs that flex under a gust and stay bowed (rather than springing back) are telling you they have exceeded their elastic limit at that spot. In both cases, replacement ribs are the right call. Rib replacement on most consumer umbrellas is a 15 to 20 minute job: the rib attaches to the hub with a pin or bolt and to the canopy hem with a sleeve. Replacement ribs are available from the umbrella manufacturer or aftermarket suppliers for $5 to $20 per rib. It is absolutely worth repairing rather than replacing the whole umbrella.
Corroded or seized fasteners
Hub bolts, set screws, and tilt mechanism pins are the first hardware to seize on umbrellas used in damp or coastal conditions. Before forcing a stuck fastener, apply penetrating oil (PB Blaster or similar) and let it soak for 15 to 30 minutes. Use the correct-size driver or wrench, not an undersized one that will strip the head. If a hex set screw is already stripped, use a screw extractor set. Once the fastener is out, replace it with a 316 stainless equivalent before reassembly. Wire-brushing any surface rust from the socket before reassembly and applying anti-seize compound will prevent the same problem next season.
Loose fittings and wobbly poles
A pole that wobbles inside a base socket or table hole is the most common problem when repurposing umbrellas between different mounts. First, check whether the sleeve or insert has shifted or cracked. Replace cracked inserts immediately; a split plastic insert offers almost no lateral support. If the socket itself is worn or oversized, a larger-OD sleeve or a shim made from aluminum sheet can restore a snug fit. Never use the umbrella with more than about 2 to 3 mm of lateral play at the pole-to-socket contact point.
Torn or worn canopy fabric
Small tears (under 2 inches) in the canopy body can be repaired with self-adhesive outdoor fabric repair tape (Tear-Aid Type B for coated fabrics, or Tenacious Tape for heavier canopy materials). Apply the patch to both sides if possible, and press firmly for 60 seconds. Tears at the rib tips or hem are more structurally significant because they allow the rib to poke through and extend the tear rapidly. Fix these with a sewn patch using UV-resistant polyester thread (do not use cotton) and a curved needle, then cover the stitching with repair tape. A canopy with multiple large tears or significant fading from UV degradation is past the point of practical repair; replacement canopies for many popular umbrella models are available for $30 to $100, which is far less than a new umbrella.
Stuck or broken crank mechanisms
If the crank handle turns but the canopy does not rise, the issue is usually a slipped cord or a worn gear inside the crank housing. On most consumer umbrellas, the crank housing is held by two or three screws; removing it exposes the gear and cord path. A cord that has jumped its pulley can be re-routed by hand in about five minutes. A stripped gear needs a replacement crank assembly (available for $10 to $25 online by searching your umbrella brand plus 'crank replacement'). The repair articles elsewhere on this site walk through specific crank models step by step.
Tools and supplies you will actually need
- Digital caliper or accurate measuring tape (for pole OD and hole ID measurements)
- Adapter sleeve or reducer insert in the correct size combination
- Penetrating oil (PB Blaster or similar) for seized fasteners
- Anti-seize compound (Permatex or equivalent) for reassembly of metal fittings
- Marine-grade silicone spray or corrosion inhibitor (Boeshield T-9 or WD-40 Specialist)
- Hose clamps (for temporary pole repair splints)
- Stainless steel replacement fasteners (316 grade for coastal use, 304 for inland)
- Self-adhesive outdoor fabric repair tape (Tear-Aid Type B or Tenacious Tape)
- UV-resistant polyester thread and curved upholstery needle
- Sand auger (for beach use) sized for your pole OD
- Torque wrench or driver for bolt-down plate installation
- 400-grit wet/dry sandpaper for surface rust treatment
Seasonal storage and when not to use it
At the end of the season, close the canopy, wipe it down with a mild soap solution, rinse with fresh water, and let it dry completely before covering or storing. Storing a damp canopy (especially coated polyester) invites mildew that you cannot fully reverse. Loosen all set screws slightly before storing to prevent the screw from bonding to the pole over winter, and apply a thin coat of corrosion inhibitor to all metal joints.
If your patio gets hard freezes, bring the umbrella indoors or into a garage, because repeated freeze-thaw cycles crack plastic hubs, split water-logged canopy seams, and corrode any steel that still has surface moisture on it. A basic umbrella storage bag ($15 to $25) keeps the closed canopy clean and reduces UV degradation from winter sun. Do not wrap the canopy tightly in plastic sheeting; that traps moisture.
There are a few situations where you should not use a repurposed beach umbrella on your patio at all: if the pole has any through-wall cracks, if more than two ribs are bent or broken, if the canopy fabric has significant UV degradation (it feels thin, papery, or tears easily when you pull it gently), or if you cannot get the pole to sit securely with less than 3 mm of lateral play in its base. In those cases, a replacement canopy or a new umbrella is the safer and honestly cheaper long-term call. The goal is always to repair and extend life where it makes sense, not to patch something that has become a safety issue.
Brand and model notes
California Umbrella 9 ft models (sold widely at Home Depot) use a 1.5-inch two-piece aluminum pole with approximately 2.0 mm wall thickness and an olefin canopy. The mid-shaft coupler on these models sometimes loosens after one season; check it before each summer and apply a drop of threadlocker (Loctite Blue 242, removable) to the set screw if it has been backing out. Replacement crank assemblies for California Umbrella are widely available online and take about 20 minutes to swap.
Umbrosa umbrellas (Nano UX and Versa UX) publish specific wind limits on their technical sheets (around Beaufort 5, or 30 km/h, when the base is permanently fixed), use 316 stainless hardware throughout, and specify Sunbrella canopy fabric. The Umbrosa Versa UX technical sheet lists Sunbrella canopy fabric and 316 stainless hardware and repeats the published wind limits for the model Umbrosa Versa UX technical sheet (specifies Sunbrella canopy and stainless components). These are at the high end of residential quality and are genuinely suitable for frequent coastal or beach-adjacent use. Their pole diameters are in the 50 mm range, so beach umbrella sand augers will not accept them without a reducer sleeve.
For general beach umbrella brands (AmazonBasics, Sport-Brella, and similar), pole ODs are almost always in the 25 to 28 mm range, canopy materials are coated polyester, and there is no published wind rating. These are workable for calm-day patio use in a properly sized weighted base, but treat them as temporary solutions rather than permanent installations.
If you are setting up any umbrella in a patio table for the first time, the guide on how to put an umbrella in a patio table covers table-hole sizing, insert selection, and tightening procedures in more detail. See our how to put umbrella in a patio table guide (615c91f9-507d-48ad-984a-e34f6b16fb76) for detailed table-hole sizing, insert selection, and tightening procedures. And if you want to walk through a full, permanent conversion rather than a temporary adapter setup, the article on how to convert a beach umbrella to a patio umbrella is the right next read.
FAQ
Is a beach umbrella suitable for use on my patio (and vice versa)?
Suitability depends on pole diameter, pole wall thickness, canopy size/shape, frame materials and wind rating. Measure the pole outside diameter (OD) — beach poles are commonly 25–32 mm (≈1.0–1.26 in) and patio poles typically 38–50 mm (1.5–2.0 in) or larger. Check wall thickness (thinner tubular beach poles bend more easily). Compare canopy span (6'–11' typical patio sizes). Check materials: beach umbrellas often use thinner aluminum or steel and polyester canopies; patio umbrellas use thicker aluminum/fiberglass poles and higher‑grade acrylic fabrics (e.g., Sunbrella) and stainless fasteners for coastal use. Finally review any manufacturer wind guidance (many patio umbrellas list safe wind limits in Beaufort/kmh or reference ASTM F3512). If pole diameter or materials differ, plan to use adapters, sleeves, or a different mounting method and limit wind exposure.
What exact measurements do I need before attempting to mount a beach umbrella on a patio table or base?
Measure and record: 1) pole outside diameter (OD) at narrow and widest sections in mm/in; 2) pole insertion depth available (table hole depth or base socket depth) in mm/in; 3) canopy diameter/span (edge‑to‑edge) and canopy rib length; 4) total collapsed length (for storage clearance); 5) if tilt mechanism exists, measure the distance from base to tilt hinge and the maximum tilted height; 6) table hole diameter and thickness, or base socket inner diameter. These let you pick adapters, sleeves, or drill sizes and calculate required insertion length (rule of thumb: at least 6–12 inches/15–30 cm of pole seated for portable bases; 8–12 in/20–30 cm for secure bolt‑down sleeves).
What mounting and attachment options will adapt a beach umbrella pole to patio hardware?
Options include: 1) Adapter sleeves: thin‑wall reducer/expander sleeves (removable) that accept smaller beach poles into larger patio bases; 2) Universal clamps/collars: adjustable stainless steel hose clamps or purpose umbrella collars with set screws; 3) Insert dowels: PVC or wooden dowel sized to fill excess gap inside a larger base (use marine epoxy for semi‑permanent fit); 4) Twist‑lock or friction adapters sold for converting 1"–2" poles; 5) Table hole use with bungy or rubber gaskets to stabilize smaller poles; 6) Bolt‑down sockets/ground sleeves (for permanent patio mounting) sized to pole with internal sleeve/liner; 7) Portable weighted bases with sand/water fill or heavy cast‑iron bases designed for smaller poles; 8) Custom machined stainless adapters for long‑term or heavy‑use conversions. Always protect contact points with non‑marring sleeves and ensure adapters clamp securely with anti‑rotate and anti‑tilt features.
How do I install a beach umbrella into a patio table hole safely—step by step?
1) Verify table hole diameter and thickness and pole OD. 2) If pole is smaller than hole, install a rubber gasket, neoprene sleeve, or split rubber bushing sized to the pole to remove play. 3) Insert the pole into the bushing and seat fully; ensure at least 6–8 in (15–20 cm) of pole is supported under the table top if possible. 4) Tighten any table clamps or collar; use a removable hose clamp or stainless set‑collar if table has no integral clamp. 5) Add a base weight under table (sandbags or a filled base) to resist uplift; secure pole with a discreet under‑table plate and bolts if permanent support is needed. 6) Check vertical alignment and test for wobble before raising canopy. 7) Use tilt feature carefully and do not operate umbrella in winds above the recommended limit.
How do I install a beach umbrella into a freestanding patio base or bolt‑down sleeve—step by step?
1) Choose a base or sleeve sized for the pole OD (or plan an adapter/sleeve). 2) For portable bases: fill with sand/water to rated weight (follow manufacturer weight guidance—usually 40–100+ lb depending on canopy size). For filled bag bases, center the base. 3) Insert umbrella pole into socket; if loose, add an insertion sleeve, split rubber liner or clamp collar. 4) Seat at least 6–12 in (15–30 cm) of pole into the base; tighten set screws or bolts incrementally and evenly. 5) If using a bolt‑down sleeve: set sleeve plumb in concrete/under patio per sleeve instructions (typical embed depth 6–8 in for heavy‑use); allow concrete cure. 6) Once seated, secure with anti‑rotation pin, set screw, or epoxy if permanent. 7) Check alignment and test stability before opening canopy.
What anchoring and wind‑safety methods should I use on patios?
answer":"Use a layered approach: 1) Proper base mass: heavy cast‑iron or filled concrete/metal bases sized to canopy (rule of thumb: 50–100+ lb for 9' canopy; increase for larger canopies). 2) Bolt‑down sleeves or permanent plates fixed into concrete or decking (use stainless hardware and correct anchors for substrate). 3) External tie‑downs: ratchet straps to structural points or discrete turnbuckles to ground anchors for extra security in high wind zones. 4) Weight redundancy: pair base with sandbags or heavy planter boxes. 5) Ventilation: choose vented canopies and avoid full horizontal deployment in gusts. 6) Wind limits: follow manufacturer guidance; many recommend not using in winds above ~18–30 mph (≈30–50 km/h) depending on fixity. 7) Lowering and latching umbrellas during forecasts and overnight reduces long‑term fatigue. "},{
Next Articles
How to Position Patio Umbrella: Setup, Tilt, Anchoring Guide
How to position patio umbrella: step-by-step setup, anchoring, wind safety, repairs & seasonal care.
How to Decorate Patio Table with Umbrella: Install, Style & Secure
Step-by-step guide to choose, install, style and secure a patio table umbrella, hole fit, bases, adapters, repairs.
How to Put Umbrella in Patio Table: Fit, Install & Secure
Install, secure, and troubleshoot a patio-table umbrella: measurements, adapters, wind safety, and seasonal care.