
Most offset umbrella problems, whether a crank that won't turn, a tilt joint that won't hold, or a canopy that sags on one side, come down to a handful of worn or jammed mechanical parts that you can diagnose and fix in an afternoon with basic tools. Offset (cantilever) umbrellas are more complex than center-pole models, but their extra moving parts also mean more fixable failure points. In the sections below I'll walk you through a complete repair process, from a quick safety check and parts identification all the way through crank, tilt, pulley, and cable fixes, plus when to throw in the towel and just replace the whole unit. If you need a focused how-to, see our step-by-step guide to fix a patio umbrella.
How to Repair Offset Patio Umbrella: Complete DIY Guide

Luca Morrison
12 Jul 2026
Quick assessment and safety checklist before you touch anything
Before you start disassembling anything, do a five-minute safety walkthrough. Offset umbrellas carry a lot of load through a single side arm, and a structural failure mid-repair can drop a heavy canopy frame on you or damage your patio. The CPSC has logged real injury incidents with cantilever umbrellas, including a 2010 recall of solar-lighted cantilever models where plastic connectors fractured and caused the canopy to collapse suddenly. If your umbrella is on an active recall list, stop here and check the CPSC recall database before attempting any repair.
- Close and lower the canopy fully before inspecting or disassembling any component.
- Check the base for cracks, split welds, or instability. If the base rocks, do not raise the canopy until the base is fixed or replaced.
- Inspect the main pole and offset arm for visible bends, cracks, or corrosion pitting deeper than surface rust.
- Look at the plastic hub and connector pieces: any fractures, white stress lines, or crumbling plastic are a stop-and-replace signal, not a repair signal.
- Check all fasteners for missing bolts or stripped threads. Cantilever arms put heavy bending loads on their connection hardware.
- If your umbrella has an LED or solar lighting system built into the frame, disconnect the battery or power source before disassembling.
- Work with the umbrella in a stable position. Lay the arm flat or have a second person steady it while you work.
- Cross-check your model number against the CPSC recall database and the manufacturer's current safety notices before proceeding.
If you find cracked structural plastic at a load-bearing joint, bent pole sections, or any frame member that shows fatigue cracking (not just surface rust), replacement rather than repair is the honest call. I'll cover that decision in more detail toward the end, but a structural failure on an offset umbrella is a different hazard than one on a cheap center-pole model, because the canopy is hanging out from the side and the collapse is less predictable.
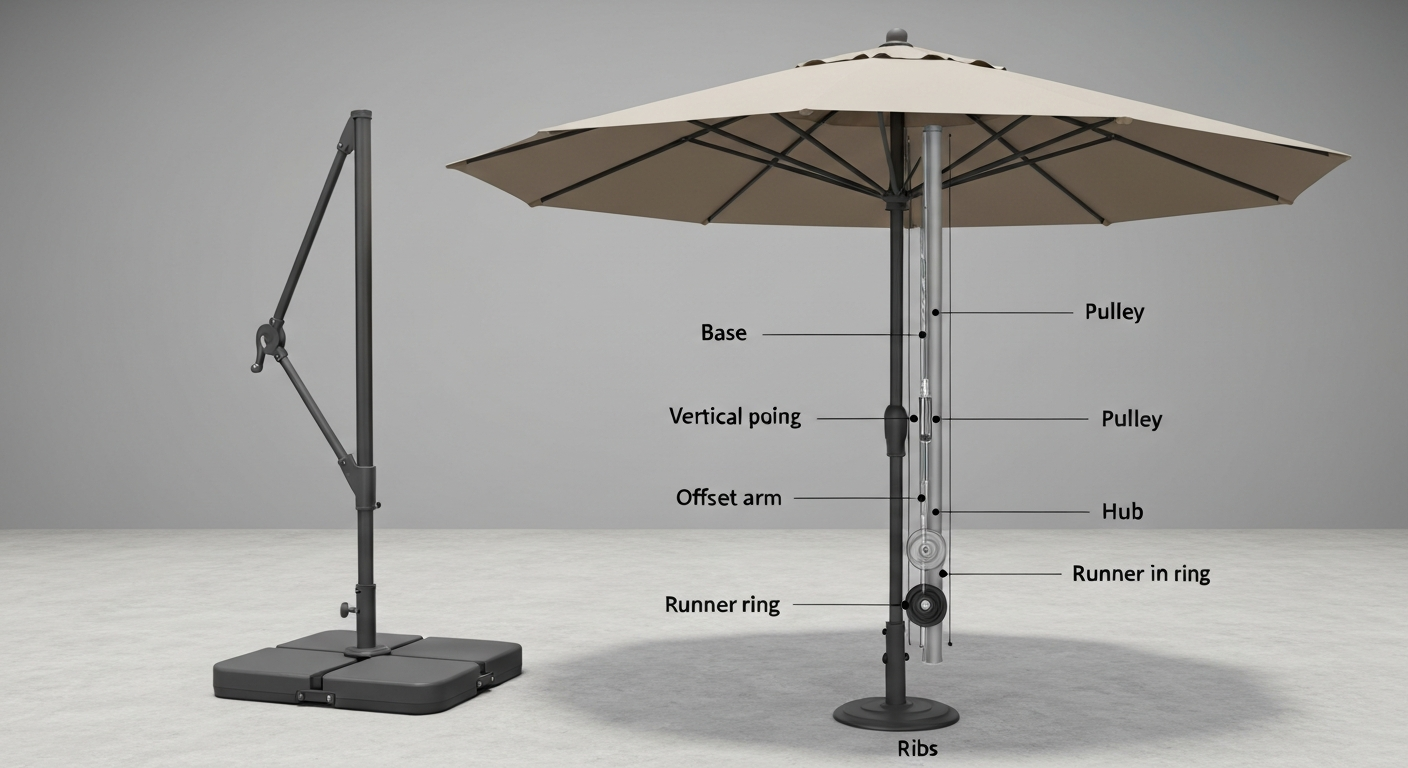
How an offset umbrella actually works, parts you need to know
If you've only ever worked on center-pole umbrellas, the cantilever design will feel unfamiliar at first. Once you understand the mechanical chain, every repair makes more sense. Here's how the major components interact.
- Base: The weighted platform that stabilizes the whole assembly. Most are concrete-filled plastic forms, fillable with sand or water, or dedicated steel-plate designs. A heavy enough base is what keeps the side-offset load from tipping the umbrella over.
- Vertical pole: The main upright that mounts to the base. On most offset models this is a 2-inch to 3-inch aluminum extrusion.
- Offset arm (cantilever arm): The horizontal or angled arm that extends from the top or mid-section of the pole, putting the canopy out over your seating area. This is the defining feature of the design.
- Hub (spider): The central casting or molded piece at the top of the canopy frame where all ribs connect. It's the load-transfer point for the whole canopy.
- Ribs: The radial arms that extend from the hub and support the canopy fabric. Main ribs run from the hub to the canopy edge. Stretcher ribs (sometimes called spreaders or secondary ribs) connect from a lower runner ring upward to the mid-point of main ribs, forming the canopy's curved shape when open.
- Runner ring: The sliding collar that moves up and down the center tube or pole inside the canopy frame. Pulling the runner up via the crank and cable system raises the stretcher ribs and opens the canopy.
- Crank mechanism: A hand-operated worm gear or rotary gear assembly, usually mounted on the pole or arm, that winds a cable or rope to raise and lower the runner ring.
- Pulley system: One or more redirect pulleys that route the crank cable from the crank housing up through the pole or along the arm to the runner ring. Cantilever umbrellas often have more complex pulley paths than center-pole models because the cable must turn corners through the arm.
- Tilt/pivot joint: A joint, often a knuckle or pin-and-collar style, that lets you angle the canopy relative to the sun. On offset models this is usually located where the arm meets the canopy frame, and it may be controlled by a separate locking lever, a push-button, or a secondary hand wheel.
- Rotation collar: Many offset umbrellas also rotate the canopy 360 degrees around the vertical axis. This is a bearing or bushing assembly at the top of the pole or at the arm connection point.
Tools, replacement parts, and materials to gather first
You won't need a shop full of tools, but having the right ones before you start saves a frustrating mid-repair parts run. Most offset umbrella hardware uses metric fasteners, though some North American brands use imperial sizes, so having both sets of hex keys on hand is worth it.
| Item | Why you need it | Notes |
|---|---|---|
| Hex key / Allen wrench set (metric and imperial) | Virtually every adjustment bolt and set screw on cantilever umbrellas uses hex socket heads | 3mm, 4mm, 5mm, 6mm cover most brands |
| Combination wrench set | Nuts on pivot bolts, base hardware, and crank housing bolts | 8mm–17mm covers most applications |
| Needle-nose pliers | Routing cable ends, removing cotter pins, working in tight channels | Snap-ring pliers also useful if your hub uses circlips |
| Flathead and Phillips screwdrivers | Removing access panels on crank housing, terminal caps | |
| Utility knife and scissors | Fabric patching and cord cutting | |
| Replacement cable or cord | Crank/pulley cable is the most common consumable failure | Match diameter: most cantilever cables are 1.5mm–3mm braided stainless or polyester cord. Stainless wire rope is typically 1/16" (0.062") nominal, with a minimum breaking strength around 480 lb for quality wire rope — far more than needed, but spec it correctly to match the original. |
| Aluminum crimping sleeves and crimp tool | Terminating replacement stainless cable | Match sleeve I.D. to cable O.D. exactly |
| Silicone spray lubricant | Pivot joints, pulley sheaves, sliding collar | Safe on plastic and powder-coat; won't attract grit the way oil does |
| White lithium grease or gear grease | Crank gear teeth and worm gear | Use a weather-resistant formulation |
| LOCTITE Blue (medium-strength, #243) threadlocker | Re-securing bolts that loosened through vibration without permanent lock | For stainless fasteners, apply Loctite 7471 primer first — stainless's passive oxide layer reduces threadlocker cure strength without activation |
| Replacement hub, ribs, or tilt hardware (if diagnosed needed) | Part-specific replacement | Order by brand and model number before disassembling; measure existing parts |
| Outdoor UV-resistant repair tape or fabric patch kit | Small canopy tears | Solvent-weld vinyl patches or purpose-made awning tape for polyester/acrylic canopies |
| CPSC recall search printout | Safety verification | cpsc.gov recall search for your model before you start |
Check the manufacturer manual and part compatibility before disassembling
This step gets skipped constantly and it causes real problems. Offset umbrellas from different brands look similar but use proprietary cable routing, hub geometries, and fastener specifications that do not cross-brand-substitute cleanly. Treasure Garden, Tropitone, Purple Leaf, and the various retailer-house-brand cantilever umbrellas all publish assembly and parts manuals, and most are available as PDFs from the brand's website, ManualZZ, or the retailer's product page. Find yours before you start. A good manufacturer manual gives you an exploded parts diagram, a labeled parts list with bolt sizes, the exact cable routing path through the arm, and any model-specific safety warnings. For European purchases, consult DS/EN 13561:2015 - External blinds - Performance requirements including safety, ANSI/Webstore for region‑specific performance and safety requirements for parasols and related shading products For European purchases, consult DS/EN 13561:2015 - External blinds - Performance requirements including safety — ANSI/Webstore for region‑specific performance and safety requirements for parasols and related shading products.. These diagrams are genuinely worth the ten minutes it takes to find them.
When ordering replacement parts, cross-reference the part number from your manual against what the supplier or the manufacturer's parts department lists. Rib lengths, hub pin diameters, and cable anchor hardware are all brand-specific. A rib from a 9-foot model won't fit a 13-foot model even from the same brand. If you're buying a replacement canopy, measure your existing canopy diameter and rib count and compare both against the replacement spec, not just the diameter label on the box. Canopy compatibility is its own subject worth digging into, and fabric options from solution-dyed acrylic suppliers like Sunbrella include published care and UV resistance data that should guide your material choice when replacing.
Also check for active recalls before ordering parts. If your model is subject to a CPSC recall, the recall notice will sometimes specify that the unit should be discarded, not repaired. Ordering replacement parts for a recalled product and continuing to use it puts you outside the intended safety guidance.
Step-by-step diagnostics: find the failing system before you start wrenching
Work through this quick troubleshooting flow in order. Each symptom points to a specific system, and most repairs only involve one system at a time. Diagnosing accurately saves you from tearing apart a working crank when the real problem is a frayed cable three feet away.
| Symptom | Most likely cause | Section to go to |
|---|---|---|
| Crank turns but canopy doesn't move | Cable slipping, broken, or off the pulley | Pulleys, cables, and internal lines |
| Crank won't turn at all (hard stop) | Seized gear, jammed cable wrap, or crank housing packed with debris | Crank mechanism |
| Crank turns but feels stripped or spins freely with no resistance | Stripped worm gear or ratchet pawl failure | Crank mechanism |
| Canopy tilts but won't stay locked in position | Worn tilt collar, loose lock lever bolt, or damaged tilt pin | Tilt and pivot joints |
| Canopy slowly droops after tilting | Tilt friction surface worn, locking detent worn | Tilt and pivot joints |
| Canopy opens unevenly (one side higher than the other) | Single rib bent or broken, or cable misrouted through one pulley | Pulleys and cables; inspect ribs |
| Canopy opens stiffly or makes grinding noise when cranking | Dry or corroded pulley sheave, debris in cable channel | Pulleys and cables; clean and lubricate |
| Rib won't extend fully or collapses inward | Bent rib, broken rib ferrule, or detached stretcher rib connector | Rib and hub inspection (see structural assessment) |
| Umbrella won't rotate (on rotating models) | Corroded or dry rotation bearing/bushing | Tilt and pivot joints section; lubricate rotation collar |
| Clicking or skipping during cranking | Worn ratchet pawl or gear tooth, or debris in gear housing | Crank mechanism |
Once you've matched your symptom to a system, go directly to that repair section. If your umbrella has multiple issues (which isn't unusual after a season of neglect), address structural and safety items first, mechanical function second, and cosmetic repairs last.
Repairing the crank mechanism
Diagnosing the crank before you open the housing
The crank handle on an offset umbrella is usually a fold-down grip that rotates a worm gear or spur gear assembly housed in a plastic or cast-aluminum body. Before opening the housing, try to isolate whether the problem is in the gear assembly itself or in the cable. Disconnect the cable from the crank drum (you can usually do this by opening the housing cover and lifting the cable off the drum anchor pin) and try turning the crank with no load. If the gears turn smoothly with no cable attached, the problem is in the cable or pulley system, not the crank. If the gears are stiff, clicking, or skipping without any cable load, the crank mechanism itself is the issue.
Disassembling the crank housing
- Lower the canopy fully before opening the crank. This releases cable tension.
- Locate the crank housing cover. On most models it's secured by two to four Phillips or hex screws. Some snap together with plastic clips, which you can release with a flathead screwdriver by gently pressing the clip tab.
- Remove the cover and photograph the internal layout before touching anything. This is the single most useful thing you can do. You want a reference photo showing how the cable wraps around the drum and which direction it feeds out.
- Inspect the cable attachment point on the drum. Look for a small pin, screw, or crimp ferrule that anchors the cable end. Note its condition.
- Inspect the gear teeth. On worm-gear cranks, look at the bronze or plastic worm wheel for stripped or broken teeth. On simpler spur-gear cranks, spin each gear and feel for binding or rough spots.
- Inspect the ratchet pawl and spring if present. The pawl is a small pivoting arm that clicks into gear teeth to hold the canopy at height. If the spring is broken or the pawl is worn flat, the crank will turn freely in both directions without holding position.
Common fixes and reassembly
Debris and dry lubrication cause a surprising number of crank problems. Before declaring gears worn out, clean the housing thoroughly with a dry brush and compressed air, then apply white lithium or gear grease to the gear contact surfaces. A crank that was grinding often works fine after this. If the worm gear is genuinely stripped (you'll see bright metal where teeth have sheared), you need a replacement gear set. Contact the manufacturer's parts department with your model number. Generic replacement worm gears rarely fit correctly because the shaft diameter and gear pitch are model-specific.
For a worn or broken ratchet pawl, replacement pawl and spring kits are sold by some brands separately, or you may need to replace the entire crank housing assembly. These typically run between $15 and $45 depending on the brand. When reassembling, apply a small amount of medium-strength LOCTITE Blue (product 243) to the housing cover screws before reinstalling them. These screws vibrate loose over a season. If your housing uses stainless fasteners, remember that stainless steel's passive surface layer reduces threadlocker cure effectiveness, so wipe on Loctite 7471 primer and let it flash off before applying the threadlocker. Consult the Stainless Steel Fasteners Designer Handbook (installation torque guidance) for recommended torque ranges and anti‑galling/anti‑seize notes when installing 304 or 316 stainless fasteners. Torque the screws snugly but do not overtighten into plastic housings.
Repairing tilt and pivot joints
Understanding the tilt mechanism
The tilt joint on a cantilever umbrella lets you angle the canopy face toward the sun. Most designs use one of three mechanisms: a collar-and-friction-ring design locked by a hand knob, a push-button pin that engages detents at preset angles, or a gear-tooth knuckle locked by a lever. The most common failure in all three is wear on the friction or locking surfaces, which causes the canopy to drift out of position under wind load.
Loosening a seized tilt joint
- Lower and close the canopy fully before working on the tilt joint. An open canopy adds significant leverage and can shift suddenly.
- Locate the tilt joint, usually at the junction where the offset arm connects to the canopy frame, or at a knuckle on the arm itself.
- For a hand-knob style: back the knob out fully. If the joint is seized from corrosion, spray a penetrating lubricant (not WD-40 as a primary fix, but as a penetrant) into the joint gap and let it sit 10 to 15 minutes, then try working the tilt back and forth gently.
- For a pin-button style: check that the button spring is intact. Depress the button fully and verify it retracts freely. Corrosion in the pin barrel is common on aluminum frames in humid environments.
- Once the joint moves, clean out all old lubricant and debris with a small brush, then apply fresh silicone spray to the bearing surfaces.
Tightening a loose tilt joint that won't hold position
If the canopy tilts freely but won't hold position, the friction surface is worn or the locking hardware is loose. For knob-style joints, first try simply tightening the knob further. If it bottoms out without creating enough friction, the friction washer inside the joint is worn. These are flat plastic or nylon washers, typically 2mm to 4mm thick, that sit between the pivoting and fixed parts of the joint. Remove the knob and the pivot bolt, slide out the old washer, measure its thickness and outer diameter, and replace it. Hardware stores stock nylon washers in standard sizes, and most friction washers in cantilever joints are standard metric sizes.
Bearing replacement and lubrication
Higher-end offset umbrellas use an actual ball bearing or bushing in the rotation collar (the part that lets the canopy spin 360 degrees around the pole). If rotation feels rough or gritty, remove the collar assembly by locating the set screw or snap ring that retains it on the pole, pull the collar off, and inspect the bearing race. Light grit can often be flushed out with water, dried, and re-lubricated with silicone grease. If the ball bearing races are visibly pitted or the balls are corroded, replacement is straightforward: measure the bearing's outer and inner diameter plus width, and order a matching stainless or corrosion-resistant rated bearing from any bearing supplier. Standard open-format bearings in common sizes cost a few dollars each. Press the new bearing in by hand or with a correctly-sized socket as a driver, never hammer directly on the race.
Repairing pulleys, cables, and internal lines
Why this is the most common repair on cantilever umbrellas
The crank cable on an offset umbrella has to travel a much longer and more complex path than on a center-pole model. It typically starts at the crank drum, runs up through the vertical pole, turns a corner at the top through one or more redirect pulleys, travels along the offset arm (sometimes through a channel inside the arm extrusion), and anchors to the runner ring on the canopy hub assembly. Any of those direction changes is a wear point. Frayed cable, seized pulley wheels, and mis-routed cables after a previous hasty repair are the three most common culprits when a crank turns but doesn't move the canopy.
Inspecting the cable and pulleys
- Lower the canopy fully and release all cable tension by cranking out any remaining line.
- Starting at the crank drum, trace the cable path by feel and by sight. Run your fingers along every accessible section of cable looking for broken strands, kinks, or worn flat spots. A frayed section anywhere means the whole cable should be replaced, not just spliced at the damage point.
- At each pulley, check that the cable sits in the groove of the pulley wheel, not wedged alongside it. A cable that jumped off a pulley sheave is a common post-storm failure.
- Spin each accessible pulley wheel with your finger. It should spin freely with no grinding. A seized pulley (wheel won't turn at all) creates a dragging load and will rapidly abrade the cable even if you fix everything else.
- Check the cable termination points: where the cable anchors to the drum at the crank end, and where it attaches to the runner ring at the canopy end. These termination points are usually a loop crimped with an aluminum or copper sleeve, or a simple stop knot. Look for the sleeve sliding on the cable, pulled-through knots, or cracked crimp sleeves.
Replacing the cable
Before cutting the old cable, photograph the complete routing path from every accessible angle. If you lose track of how the cable threads through the arm interior, you may spend an hour re-routing. On many cantilever models you can tape the new cable end to the old cable's tail and pull the new cable through as you pull the old one out. This works beautifully when it works and saves enormous frustration.
For replacement cable, match the original's diameter and construction. Most cantilever umbrella crank systems use either a small-diameter braided polyester rope (2mm to 4mm) or a 1/16-inch to 3/32-inch stainless wire rope. Stainless wire rope of 1/16-inch nominal diameter has a minimum breaking strength around 480 pounds in quality wire rope, which is far beyond what an umbrella crank needs, but using undersized or lower-grade cable will fail faster. Do not substitute polypropylene or cotton rope; they degrade rapidly outdoors. If the original was wire rope, use wire rope. If it was polyester braid, use UV-stabilized polyester or a purpose-made shade-structure cable.
Terminate the new cable using proper aluminum crimping sleeves sized to match the cable's outer diameter. Use a dedicated cable crimp tool, not pliers. Properly swaged/compressed sleeves maintain near-full cable strength at the termination. A termination made with pliers or a generic crimper will likely pull through. Thread the cable through the routing path following your photographs, ensure it sits fully within each pulley groove, then reconnect to the drum anchor point and test the crank through a full open-and-close cycle before finalizing any fasteners.
Pulley replacement and routing tips specific to cantilever arms
Seized pulley wheels are easy to overlook because the cable still routes through the pulley housing even if the wheel itself won't spin. The fix is usually to remove the pulley axle pin (a small cotter pin or snap ring in most designs), clean and re-lubricate the axle with silicone grease, and reinstall. If the sheave groove is visibly worn into a sharp V shape where a round cable has cut in over years of use, the pulley needs replacement. Replacement pulleys need to match the original sheave groove width and diameter; a too-narrow groove will pinch the cable, and a too-wide groove allows the cable to flip off sideways under slack conditions. Cantilever arms often have internal cable channels that are only accessible by removing end caps from the arm extrusion. Look for press-fit plastic end caps at the arm tip and at the arm-to-pole junction. These pull off with a flathead screwdriver or a thin pry tool and reveal the cable channel and any internal pulleys.
Canopy fabric: patching small tears and deciding when to replace
Small tears under about 4 inches in length on a structurally intact canopy are worth patching. Larger tears, multiple tears, or canopies with general UV degradation (fabric that's faded to gray, feels brittle, or sheds fibers) are better candidates for full canopy replacement. Offset umbrella canopies typically use polyester, solution-dyed acrylic (Sunbrella being the most recognizable brand), or an olefin blend. Solution-dyed acrylic canopies are significantly more UV-stable than standard polyester; Sunbrella publishes technical data showing their solution-dyed fabrics retain color and structural integrity considerably longer than yarn-dyed alternatives.
For a small tear, clean the area with mild soap and water and let it dry completely before patching. Use a purpose-made awning and outdoor fabric repair tape (not standard duct tape) or a matching fabric patch with a waterproof adhesive. Apply the patch to both sides of the tear if possible, overlap the tear by at least 1 inch in every direction, and press firmly. UV-resistant fabric repair tapes from awning suppliers typically last two to three seasons before re-application is needed. For detailed, step-by-step instructions and recommended materials on patching and restoring canopy textiles, see our guide on how to repair patio umbrella fabric. For more durable results, a vinyl-welded patch kit or a hot-bond repair tape designed for shade cloth gives a stronger bond on synthetic canopy fabrics.
If you're replacing the canopy entirely, measure the canopy diameter (tip to tip across the fully-opened frame, not just the fabric), count the number of ribs, and note the hub attachment style before ordering. For step-by-step guidance on replacing canopy fabric, see can you replace fabric on patio umbrella. Different hub designs use different canopy attachment methods: pocket-and-pin, umbrella-tip sleeves, or hook-and-ring. Order a canopy that matches all three: diameter, rib count, and attachment type. Canopy replacement is a well-traveled path and worth exploring in depth as its own topic. For a full, illustrated how-to covering cable splicing, pulley replacement, crank repairs, and canopy reattachment, see how to repair patio umbrellas.
Securing your offset umbrella against wind
An offset umbrella has a much higher tipping moment than a center-pole design because all the canopy weight and wind load is acting at the end of a horizontal arm, not directly over the base. If your umbrella blows over, see how to recover a patio umbrella for safe righting and damage inspection. Even a moderate gust can tip a poorly-weighted base. ASTM F3512-21 establishes laboratory wind-safety and durability test methods for market umbrellas and base mounting systems, and manufacturers who test to this standard publish rated wind speeds. Check whether your base meets the manufacturer's minimum weight recommendation for your canopy size.
- Use a base weighted to the manufacturer's minimum specification. Most 10-foot to 13-foot offset canopies require a base weighing 150 to 200 pounds or more when filled.
- Add supplemental tie-down anchors or stake the base to a concrete pad with lag hardware if your area experiences regular afternoon wind.
- Close and lower the canopy when winds exceed about 20 mph. No offset umbrella base is designed for sustained wind loads on an open canopy.
- Do not leave the umbrella open and unattended for extended periods, particularly at the end of the day.
- Check the base connection hardware (the bolt or pin that attaches the pole to the base) annually. These loosen over time and a loose pole connection dramatically increases the risk of tipping.
Seasonal storage and winterizing
Proper off-season storage prevents most of the mechanical failures covered in this article. Moisture is the enemy of cantilever umbrella hardware: it corrodes metal cable strands, swells wooden handle components, and causes plastic connector pieces to become brittle through freeze-thaw cycling.
- Close and lower the canopy fully, then apply a light coat of silicone spray to all pivot joints, pulley axles, and the crank gear (wipe off any excess so it doesn't attract dirt).
- Loosen any set screws or locking collars that were under sustained load during the season. Leaving load on a friction joint through a winter of temperature cycling can cause the joint to seize by spring.
- Disconnect the offset arm from the pole if your model allows it. This reduces storage space and protects the arm-to-pole connection from bearing all the arm's weight at one angle for months.
- Store the canopy fabric in a breathable cover or bag. Plastic covers trap condensation. If the canopy is removable, bring it indoors.
- Store the base in a garage or shed if possible. Concrete-filled bases are particularly vulnerable to freeze-thaw cracking if water has infiltrated any cracks.
- Check all cable terminations and pulley seating before the umbrella goes into storage. Fixing a frayed cable in fall is easier than discovering it in spring when you want to use the umbrella.
Sourcing parts and what repairs actually cost
Parts for major brands (Treasure Garden, Tropitone, Purple Leaf, California Umbrella) are available through the manufacturer's website, dedicated patio parts retailers, and sometimes through the original retailer. If you prefer professional help, look for local specialists who fix patio umbrellas or contact the manufacturer's service department for authorized repair options who fixes patio umbrellas. For house-brand or off-brand umbrellas sold through large-box retailers, the manufacturer's parts department is often the only source, and they may only sell complete subassemblies rather than individual small components. If a brand has discontinued your model, check specialty outdoor-furniture repair suppliers and measure your parts carefully for cross-brand dimensional matches.
| Repair type | Typical DIY parts cost | Typical pro repair cost | Worth repairing? |
|---|---|---|---|
| Crank cable replacement | $8–$20 | $60–$100 | Yes, almost always |
| Pulley replacement (one or two) | $10–$30 | $50–$80 | Yes |
| Crank housing/gear assembly | $20–$50 | $80–$150 | Yes if umbrella is <5 years old |
| Tilt friction washer | $2–$5 | $40–$70 | Yes |
| Tilt knuckle/joint replacement | $25–$60 | $80–$130 | Yes if umbrella is quality brand |
| Single rib replacement | $15–$40 | $50–$90 | Yes |
| Hub replacement | $30–$80 | $100–$200 | Marginal — assess overall umbrella age |
| Canopy replacement | $60–$200 (fabric only) | $150–$350 | Yes if frame is sound |
| Full umbrella replacement (9–13 ft offset) | $200–$1,500+ | N/A | Consider when frame is structurally compromised |
As a general rule: if the total repair cost (parts plus your time at a reasonable hourly rate) exceeds 50 to 60 percent of the cost of an equivalent new umbrella, and the umbrella is more than five to seven years old, replacement starts to make more financial sense. The exception is a high-quality frame in excellent structural condition, where the canopy and mechanical parts are simply worn and the frame itself has many years of life left.
When to repair vs. when to replace
Repair makes sense when the problem is clearly mechanical (cable, pulley, tilt hardware, crank) and the frame is structurally intact. Replace when you're looking at cracked or fractured structural plastic at a load-bearing joint, a bent or kinked pole or arm, severe corrosion that has pitted through a structural extrusion wall, an active CPSC recall with a replace-don't-repair directive, or a situation where the cumulative repair cost approaches the cost of replacement. An offset umbrella that tips or collapses under normal use is a genuine injury hazard, not just an inconvenience. If you can't restore solid structural integrity with a clean repair, a new umbrella is the right answer.
On the other hand, most mechanical failures on a quality offset umbrella are eminently fixable. A frayed cable, a seized pulley, a worn tilt washer, and even a stripped crank gear are all afternoon repairs that cost well under $50 in parts and can add years of service life to an umbrella that's otherwise in good shape. The repairs outlined in this guide cover the vast majority of issues homeowners encounter. Work methodically, consult your manufacturer's manual, verify your parts compatibility before you disassemble anything, and you'll almost always be back in the shade before the weekend is over.
FAQ
Which industry standards and test methods should be consulted to define wind‑performance, anchoring, and 'when to replace' criteria for offset (cantilever) patio umbrellas?
Consult ASTM standards (e.g., F3512 for wind safety/durability of market umbrellas and related base mounting components, F3681 for umbrella anchoring/consumer safety), and regionally applicable standards (e.g., EN/DS standards such as DS/EN 13561). Use these to derive objective wind‑speed thresholds, fatigue/durability expectations, and anchoring performance benchmarks for homeowner guidance.
What government and safety databases should be checked to identify known hazards, recalls, and incident patterns for cantilever umbrellas?
Search the U.S. Consumer Product Safety Commission (CPSC) recall and incident database and equivalent national agencies (e.g., Health Canada, EU RAPEX) for past recalls and incident reports involving cantilever/offset umbrellas, broken connectors, base failures or other systemic hazards. Use recall language and incident patterns to build 'stop/replace' safety checklists and liability cautions.
Which categories of manufacturer documentation are essential for brand‑agnostic parts identification and accurate repair sequences?
Gather: OEM assembly/service manuals, exploded parts diagrams, parts lists, and installation/maintenance instructions from multiple major brands and common retailer manuals. These provide standard part names (crank, pulleys, cables, hub, ribs, tilt joints), bolt sizes, and typical repair/assembly sequences that allow creation of brand‑agnostic diagnostic steps and parts‑matching guidance.
What research questions should be asked about canopy fabrics and suppliers to advise fabric repairs, cleaning, and replacement?
Identify common canopy materials (solution‑dyed acrylic/Sunbrella, olefin, polyester), their UV and water resistance properties, care/cleaning guidelines, recommended repair methods (patching, seam repair), and vendor re‑cover availability. Consult fabric suppliers' technical care guides (e.g., Sunbrella) for solvent/cleaner compatibility, re‑proofing treatments, and expected service life to advise repair vs replacement.
What technical data on cables, wire‑rope, and terminations is required to specify safe replacement parts and DIY splices?
Collect wire‑rope diameter vs minimum breaking strength tables (military/industry specs), acceptable safety factors for human‑suspended/loaded systems, compatible termination methods (swaged sleeves, Nicopress, wedge sockets), recommended materials and corrosion resistance (stainless vs galvanized), and step‑by‑step crimping/swaging guidance from rigging catalogs and supplier datasheets to recommend safe replacement cables and reliable terminations.
Which resources should be consulted for mechanical components (crank, gears, pulleys, bearings) maintenance, lubrication, and compatible replacement parts?
Review manufacturer maintenance sections, generic pulley/crank component suppliers, and lubricant technical data sheets (TDS). Consult appliance/garage‑door maintenance guidance and manufacturer TDS to choose weather‑resistant lubricants (silicone, white‑lithium, gear greases), and check plastic/paint compatibility. Cross‑reference replacement gear and crank assemblies from multiple brands for interchangeability notes.
Next Articles
How to Repair Patio Umbrella Fabric Step by Step
Step-by-step guide to repair or replace patio umbrella fabric, fix tears and mildew, and reattach so it stays taut.
How to Repair Patio Umbrellas: Step-by-Step Fixes
Step-by-step fixes for torn fabric, holes, and malfunctioning patio umbrella mechanisms, including cantilever models.
How to Replace Patio Umbrella Canopy Step by Step
Step-by-step how to replace patio umbrella canopy, match attachment types, fix tension and fit issues, and test after.