To attach a patio umbrella to a deck post, you need a post-mount clamp or bracket sized to your umbrella pole diameter (almost always 1.5" or 2"), fasten it to the post with 3/8" lag bolts or U-bolts into solid wood, then slide the umbrella pole into the mount and lock it down with the set screw or thumb knob. That's the core of it. The rest is making sure your hardware actually fits your pole, your fasteners hit structural wood (not just decking planks), and the whole thing doesn't wobble in the first gust of wind.
How to Attach a Patio Umbrella to a Deck Post

Luca Morrison
20 Jun 2026
First: figure out exactly what you're mounting to and what umbrella you have
Before you buy a single piece of hardware, you need to answer two questions: Where on the deck are you mounting? And what kind of umbrella are you working with? Getting these wrong is the most common reason people end up with the wrong kit or a wobbly umbrella that won't stay put.
Deck post vs. deck surface: they're different problems
Mounting to a deck post means you're clamping or bolting hardware onto a vertical post (a 4x4, 6x6, or similar structural support). This keeps your umbrella off the deck floor entirely, which is great for space but requires hardware specifically designed for post attachment. Mounting to the deck surface means bolting a base plate flat into the decking and joists below. That's a completely different approach with different hardware. If you want to attach to a fence post instead, that's its own variation worth understanding separately. If you want to attach a patio umbrella to a fence post instead, use a post-mount clamp or bracket designed for that vertical support and fasten it into solid wood. This guide is focused on deck posts and deck surfaces.
Center-pole vs. offset (cantilever) umbrella
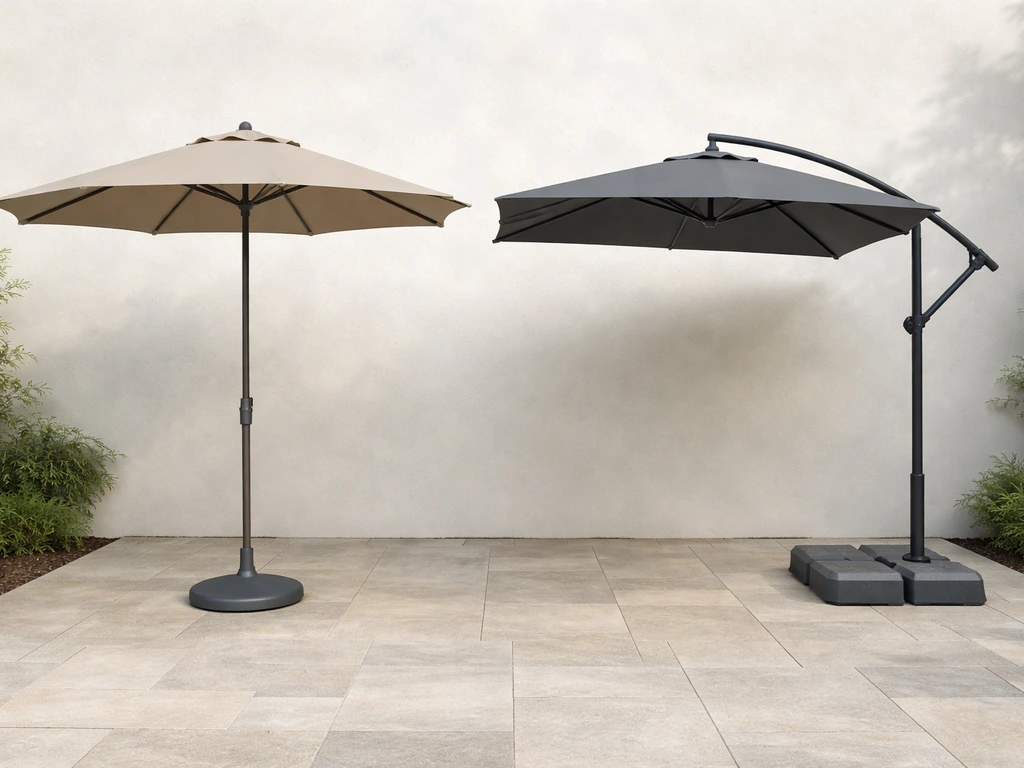
A center-pole umbrella has a straight pole running through the middle of the canopy. Most residential versions use a pole that's 1.5 inches or 2 inches in diameter. An offset or cantilever umbrella has its pole off to one side with the canopy hanging out. Cantilever umbrellas typically mount via a surface plate bolted to the deck, and that plate needs to be fastened through the decking into the structural joists below, not just into the deck planks. Companies like Treasure Garden sell specific wood mount kits for this, and Shadowspec's installation manuals are explicit: the surface plate must be anchored into the substantial structure of the deck, not just the surface boards. Both umbrella types can be attached to a deck, but the hardware and method are different.
Pick the right hardware and confirm your pole diameter
Standard residential patio umbrella poles run between 1.5 inches (38mm) and 2 inches (51mm) in diameter. Measure yours before buying anything. Most mounting hardware is built around these two sizes, and a lot of products offer both options or come with reducers. For example, some umbrella base systems ship with reducer inserts for 1.38", 1.5", and 1.9" poles in the same kit. If you're buying a clamp-style post mount, like the JEWLS Aluminum Deck Upright Umbrella Holder or the Pier of d'Nort leg mount, check that the listed diameter matches your pole exactly. A loose fit will wobble; too tight can dent or crack thin aluminum poles.
Types of mounting hardware for deck posts
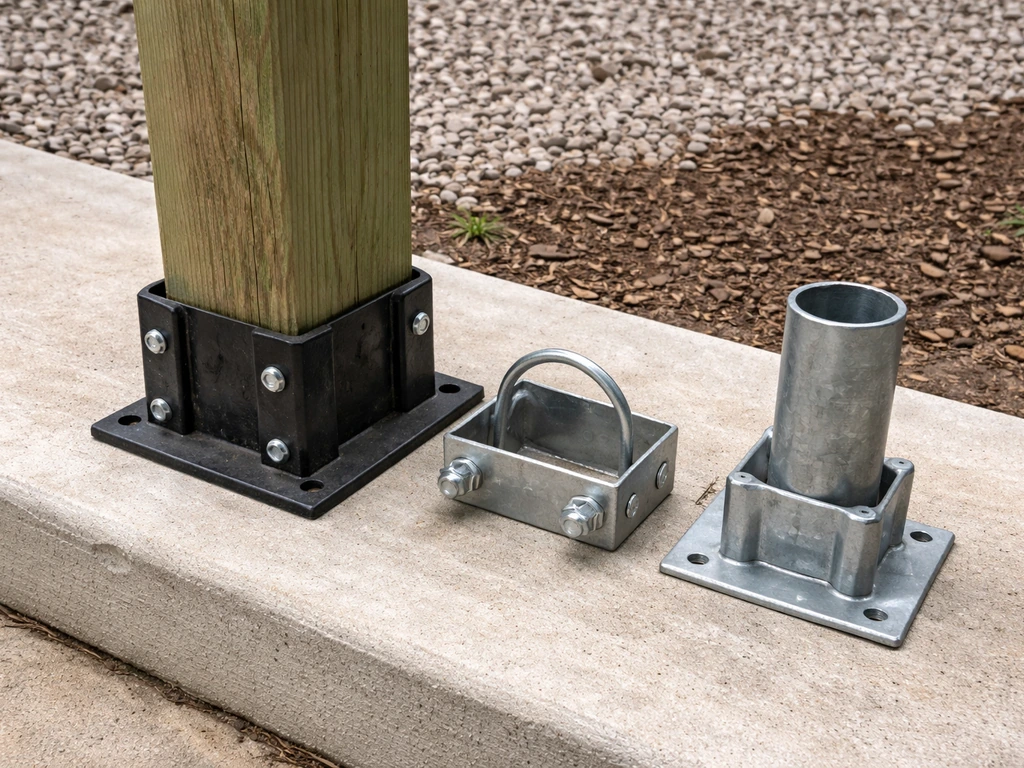
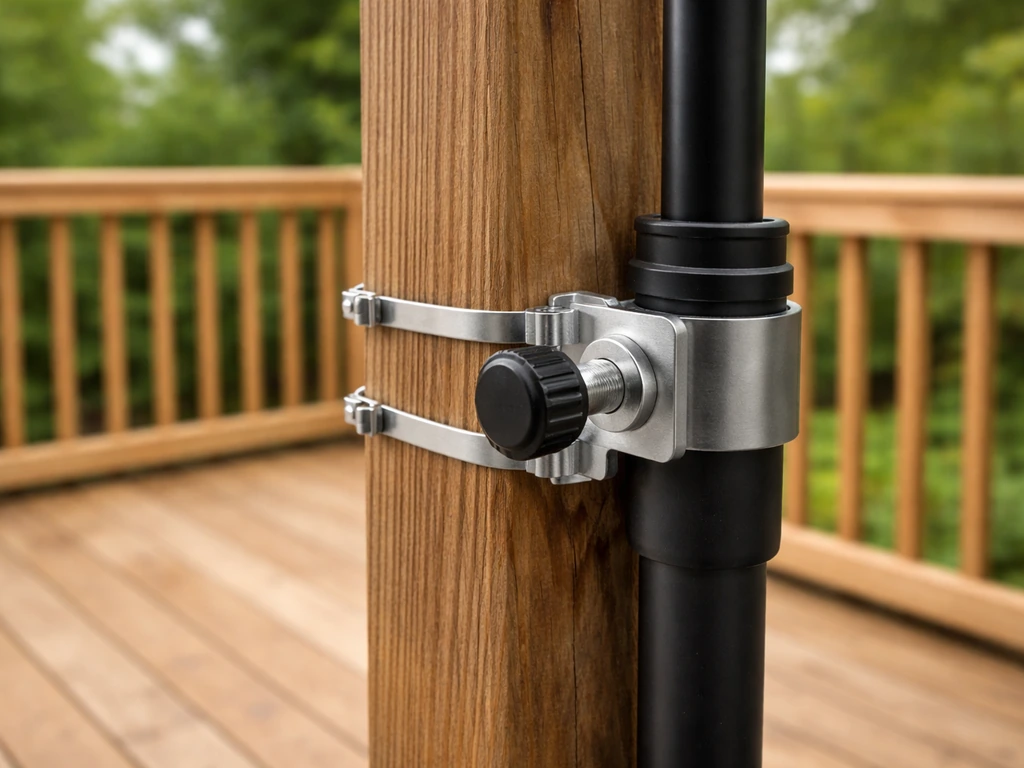
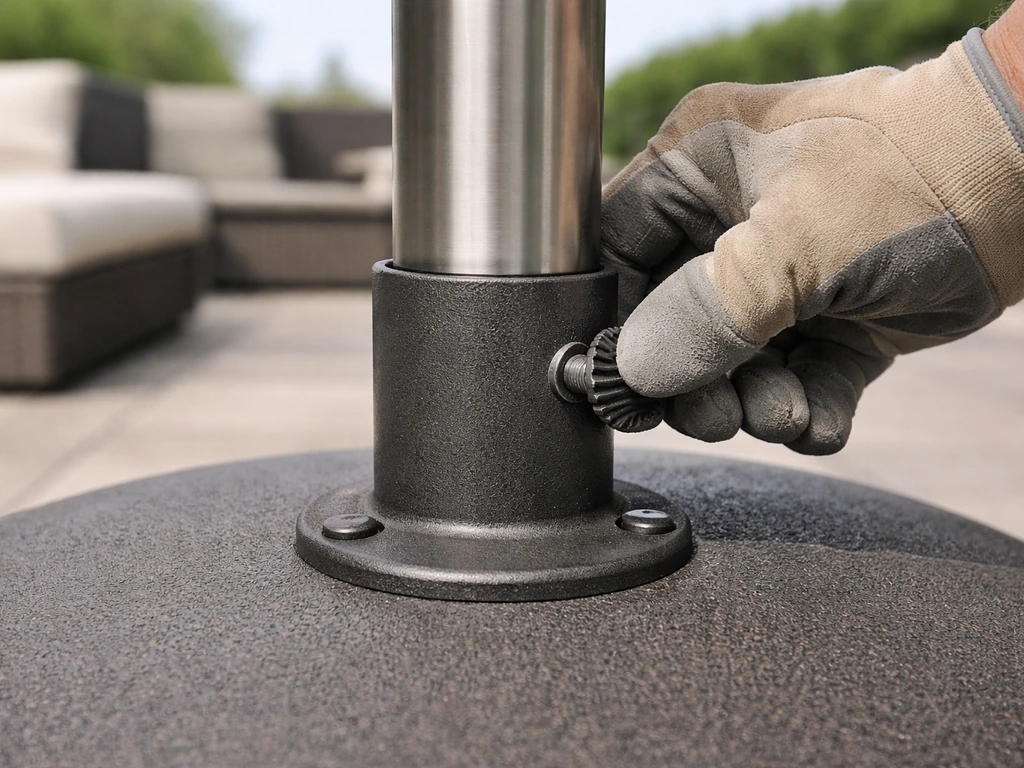
- Post clamp or leg mount: A bracket that wraps around the post and includes a sleeve or tube that holds the umbrella pole. Secured with lag bolts or U-bolts. Best for 4x4 or 6x6 posts. The JEWLS heavy duty rim joist mount, for example, fastens with 3/8" lag bolts or 3/8" bolts, nuts, and washers.
- U-bolt sandwich method: A DIY-friendly approach where you sandwich a block of pressure-treated lumber against the post and drill through for U-bolts. The U-bolts wrap around the post and clamp the block, which holds a sleeve or tube for the umbrella. Works well on round or square posts and distributes torque from wind loading.
- Hose clamp or jubilee clamp method: Multiple large hose clamps looped around the post and around a pipe or sleeve. This is a real-world budget solution that works in a pinch, but it's not the most secure option in high-wind areas.
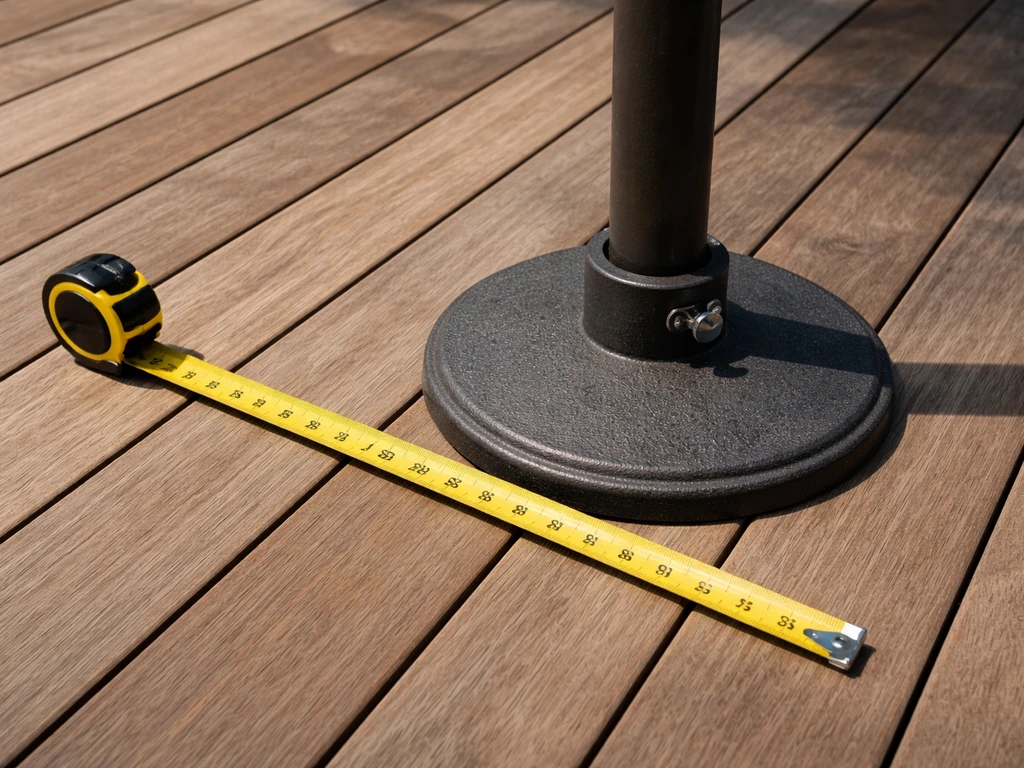
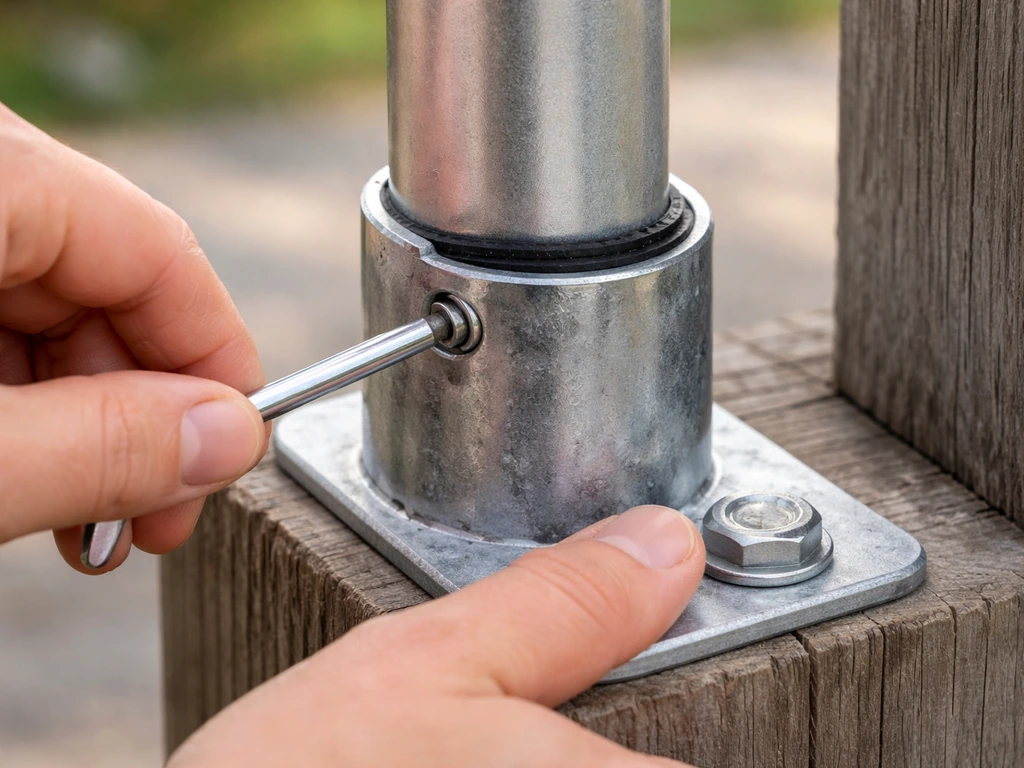
- Surface plate with through-bolts: For cantilever umbrellas or center-pole umbrellas you want low to the deck, a flat plate bolted down with fasteners that run through the decking into the joists below. Use at least 3.5-inch (9cm) screws or bolts to reach solid framing.
- Adapter kits: Some manufacturers like Treasure Garden and AMK sell specific mount kits for their umbrella models. If your umbrella came with one, use it. The fit and hardware specs are dialed in.
| Hardware Type | Best For | Typical Fasteners | Pole Size |
|---|---|---|---|
| Post clamp / leg mount | 4x4 or 6x6 deck posts | 3/8" lag bolts or U-bolts | 1.5" or 2" |
| U-bolt sandwich block | Any square/round post, DIY builds | U-bolts + pressure-treated block | 1.5" or 2" |
| Hose clamps (jubilee) | Temporary or budget installs | Hose clamps only | Varies |
| Surface plate (through-bolt) | Cantilever/offset umbrellas, deck floor | 3.5"+ screws or bolts into joists | Per umbrella model |
| Manufacturer adapter kit | Brand-specific cantilever models | Supplied hardware | Model-specific |
Step-by-step: attaching your umbrella to a deck post
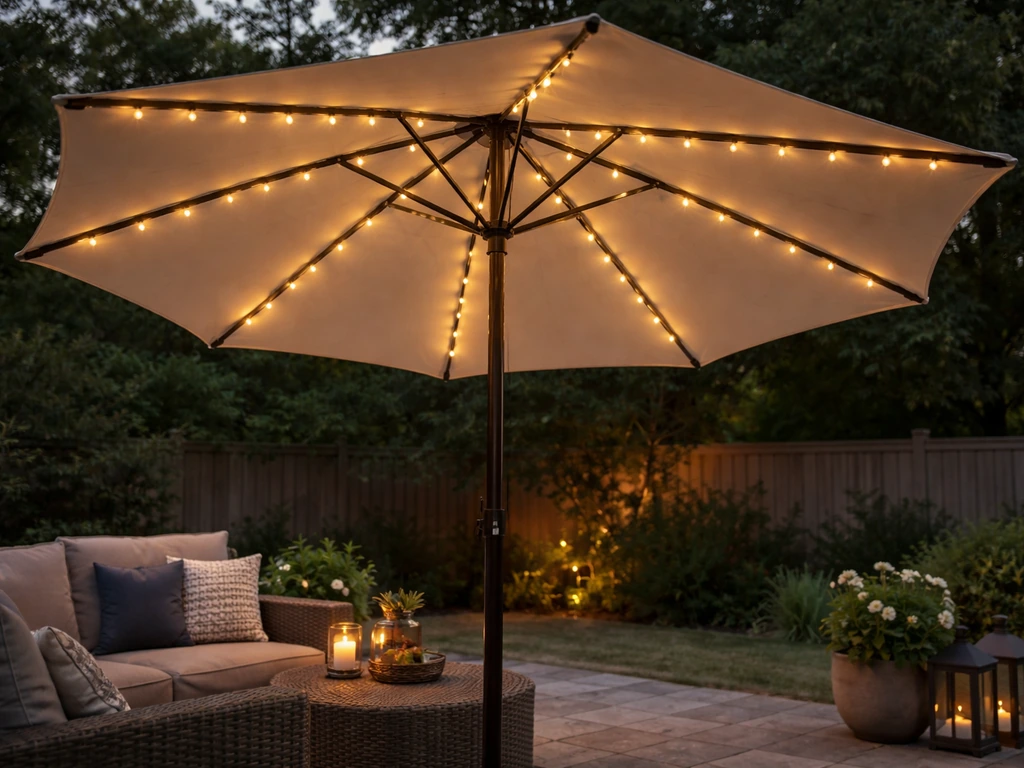
This walkthrough covers the post clamp method, which is the most common and most secure approach for attaching a center-pole umbrella to a deck post. Have your hardware, a drill, a level, and the correct bits ready before you start. If you also want lighting on your patio umbrella, plan where the solar light will attach and how you will route the solar panel safely.
- Measure your pole diameter. Use a tape measure or calipers around the umbrella pole. Write it down. 1.5" and 2" are the two most common sizes. Your mount hardware must match.
- Choose your post and height. Pick a deck post that's structurally solid (give it a firm shake). Decide how high you want the umbrella mount so the canopy clears your head and any furniture below. Mark the height on the post with a pencil.
- Hold the mount bracket against the post at your marked height. Use a small level to make sure the bracket's umbrella sleeve is plumb (straight up and down). If it's even slightly off-angle, your umbrella will lean and the crank mechanism will bind.
- Mark your drill hole locations through the bracket's mounting holes onto the post. Double-check alignment before drilling.
- Drill pilot holes at each mark. For lag bolts into a 4x4 or 6x6 post, use a bit slightly smaller than your lag bolt diameter. This prevents splitting the wood.
- Fasten the bracket to the post. If using lag bolts, drive them in with a socket wrench until snug and firm. Don't strip the wood by over-torquing. If using U-bolts around the post, tighten the nuts evenly on both sides so the bracket doesn't tilt.
- If your mount came with a guide-hole step (like the AmaZulu installation guide describes), drill a small clearance hole through the pin holes in the sleeve before inserting the umbrella pole. This step lets you run a locking pin through the pole later.
- Slide the umbrella pole into the mount sleeve. The pole should drop in smoothly without forcing. If it binds, check that the sleeve diameter matches your pole.
- Tighten the set screw or thumb knob on the mount until the pole is held firmly. For set screw mounts, snug it down so it bites into the pole but don't whale on it hard enough to dent a thin aluminum pole.
- Open the umbrella and check that the canopy is level and the crank or tilt mechanism operates freely. Then close it and verify the pole didn't shift in the mount.
For cantilever umbrellas: surface plate installation
If you're mounting a cantilever umbrella's base plate to the deck surface, the single most important rule is this: your bolts must reach the joists, not just the deck planks. Deck planks alone can't handle the lateral force of a big offset canopy in wind. Use bolts or screws at least 3.5 inches long. Place washers under the base plate (between the plate and the deck) to create a small gap that lets water drain instead of pooling under the plate and rotting your deck. Shadowspec explicitly calls this out in their installation guidance. Before tightening down the plate, use a level to confirm it's flat. A tilted base plate is one of the main reasons cantilever umbrellas won't lock or rotate properly after installation.
Making it stable in wind: tightening, alignment, and stopping the wobble
A well-mounted umbrella still needs a few extra checks to stay stable when the wind picks up. Wobble and rotation are the two most common complaints after installation, and both are usually fixable without starting over.
Stopping pole rotation in the mount
If your umbrella pole is spinning inside the mount every time the wind pushes the canopy, your set screw or thumb knob isn't engaging firmly enough, or your pole diameter is slightly smaller than the mount's sleeve. First, try tightening the set screw more. If that doesn't hold, add a thin shim (a strip of rubber, sheet metal, or even a few layers of electrical tape around the pole) to take up the gap before re-tightening. This is a real-world fix that works. A Reddit discussion on cantilever umbrella locking issues specifically points to shimming as the right first step when rotation or locking failure happens after wear.
Stopping lateral wobble (side-to-side movement)
If the whole mount feels loose on the post, check that your lag bolts are fully seated and that they're actually biting into solid wood and not just a thin decking board. For post-mounted brackets, all lag bolts should be snug with no play. If the bracket is shimming back and forth on the post surface, add a small shim of pressure-treated plywood or composite material between the bracket back plate and the post to fill any gap before re-fastening. The Deckorators post connector guide mentions shimming between the deck and base plate as a standard alignment step, and it applies here too.
Alignment matters more than you'd think
If the mount sleeve isn't perfectly plumb when you install it, the umbrella pole will lean slightly. Over time, that lean puts uneven pressure on the crank mechanism and tilt hardware at the top of the pole. Check plumb before you final-tighten any fasteners. This is easier to fix before the lag bolts are fully driven than after.
Test it properly before you call it done
After the mount is installed and the pole is secured, run through these checks before walking away. These are the exact failure points that tend to show up on day one if you skip them. If you want ambiance after dark, you can add lights to your patio umbrella by using a safe outdoor lighting setup designed for the pole and canopy area how to add lights to patio umbrella.
- Open and close the canopy using the crank. It should operate smoothly without grinding or resistance. If the crank feels stiff, the pole is probably leaning in the mount and binding the crank shaft. Loosen the set screw, re-plumb the pole, and re-tighten.
- Test the tilt mechanism if your umbrella has one. Push the canopy to full tilt in each direction. If it binds or the tilt collar feels stiff, check that the pole isn't under lateral stress from a crooked mount.
- Check the cord if your umbrella uses a pulley-and-cord system to open. Run it through its full range. If the cord catches or snags, the pole angle may be putting extra tension on the cord path near the top fitting.
- Give the whole assembly a firm push sideways and check for movement at the mount. There should be zero play between the bracket and the post, and minimal movement of the pole inside the sleeve.
- Check canopy clearance. Walk the full arc under the umbrella and make sure no one will bump their head on a tilt arm or edge of the canopy. If you're close to the minimum, adjust the mount height before fully setting all fasteners.
- Verify the pole can be removed for storage. Practice loosening the set screw and lifting the pole out. If it's seized up immediately after install, check whether any fastener is inadvertently pinching the pole.
Common problems and quick fixes
| Problem | Likely Cause | Fix |
|---|---|---|
| Pole spins in mount | Set screw too loose or pole undersize for sleeve | Tighten set screw; add rubber or tape shim to pole |
| Mount wobbles on post | Lag bolts not in solid wood, or gap behind bracket | Re-drill into joist/post; add shim behind bracket |
| Crank binds after install | Pole not plumb in mount | Loosen, re-plumb, and re-tighten mount |
| Tilt mechanism stiff | Pole under lateral stress from crooked mount | Check and correct mount alignment |
| Pole won't fit in sleeve | Wrong diameter hardware | Return and get correct size; do not force |
| Cantilever won't lock | Base plate not level, or rotation mechanism worn | Re-level base plate; shim rotation lock if needed |
Keeping the mount solid over time: maintenance and seasonal storage
A good installation doesn't stay good forever on its own. The combination of UV exposure, rain, and wind cycles will loosen fasteners and degrade hardware over time. A quick seasonal check takes ten minutes and saves you from a collapsed umbrella mid-summer. If your patio umbrella solar lights are not working, start by checking the battery and making sure the solar panel is clean and getting direct sun before troubleshooting the light wiring patio umbrella solar lights not working.
Every spring before use
- Check every lag bolt or U-bolt fastener on the post mount for looseness. Re-tighten anything that has any play.
- Inspect the sleeve or tube inside the mount for corrosion, cracks, or deformation. Stainless or aluminum mounts hold up best; cheap zinc alloy castings can crack after a few freeze-thaw cycles.
- Look at the deck surface or post wood around the fastener holes. If you see rot or the wood feels soft, the fasteners have lost their bite. You may need to move the mount to a solid section of post or replace the post.
- Re-check the mount's plumb and level. Posts can shift slightly over winter, especially on floating decks. Correct any lean before reinstalling the umbrella.
- Lubricate the crank mechanism and tilt collar with a light silicone spray before first use of the season.
Removing the umbrella for seasonal storage or winter
Leaving a mounted umbrella out through winter is hard on both the canopy and the pole, and it puts continuous wind-load stress on your mount hardware. Most AMK-style mount kits and post-clamp systems are designed so removal is just the reverse of installation: loosen the set screw or thumb knob, lift the pole out of the sleeve, and the bracket stays on the post. Store the pole and canopy in a dry location, ideally in a storage bag. The AMK wooden deck mount kit specifically notes that umbrella removal for seasonal storage happens by reversing the adapter connection, which is worth doing rather than leaving hardware stressed through a winter.
Protecting the deck around the mount
If you have a surface plate mount (for a cantilever or base-plate style installation), keep the washers under the plate in place so water can drain underneath. Remove the plate entirely once a year to let the deck boards below dry out completely and check for rot under the footprint. Shadowspec is pretty direct about this: washers aren't just for leveling, they're for water management. Trapped moisture under a steel or aluminum plate will rot wood decking faster than almost anything else.
Wind events and storm prep
Even the best post mount isn't rated to hold an open umbrella in high wind. Close and lower the canopy whenever sustained winds exceed about 20-25 mph or when a storm is approaching. If your umbrella has a tilt feature that locks at a low angle, you can tilt it down rather than fully closing in mild breezes, but when real wind is coming, close it completely and consider removing the pole from the mount sleeve entirely. This takes less than a minute if your mount is properly set up for quick removal. It's the single most effective thing you can do to extend the life of both the umbrella and the mount hardware.
FAQ
What if my deck post isn’t solid wood, like it’s hollow or metal-wrapped?
If the post is hollow or only has a thin outer layer, lag bolts may not bite into structure. Use a post-mount bracket that accepts through-bolts or uses U-bolts over the post, and confirm the bracket includes hardware appropriate for non-wood posts. If you cannot verify solid anchoring, consider mounting to an adjacent structural member instead of the decorative post skin.
Can I mount the post clamp to a 4x4 deck post that’s pressure-treated, cedar, or composite?
Yes, but choose fasteners for the material. For pressure-treated wood, lag bolts and exterior-rated brackets are fine, but you should pre-drill to reduce splitting. For cedar or other softwoods, use the correct bit size and avoid over-tightening. For composite posts, check the clamp maker’s guidance, since some composite surfaces need backing plates or through-bolting for secure grip.
How do I measure umbrella pole diameter correctly before buying a mount?
Measure the pole in two spots 90 degrees apart and take the larger reading, because some poles are slightly oval after manufacturing or after exposure to weather. Measure near where the clamp sleeve will grip, not at the very top or bottom where hardware transitions may change diameter.
My clamp kit came with reducers, how do I know which one to use?
Use the reducer that creates a snug sleeve fit without forcing the pole. If the pole can be moved by hand with the knob tightened, go to the next larger reducer size or add a proper shim. If the clamp requires excessive force or leaves dents, you likely need the next smaller reducer or a mount sized for your pole.
What shim material is best, and should I use it long-term?
Rubber or thin sheet metal works well as a temporary-to-permanent gap filler, electrical tape can work in a pinch but degrades faster outdoors. If you shim, re-check after a week and then monthly during the first season, since movement can either loosen the set screw or cause the shim to bunch.
How tight should the set screw or thumb knob be?
Tighten until there is no pole rotation when you push the canopy side-to-side with moderate force, then stop. Over-tightening can dent thin aluminum poles and make the problem worse later. After tightening, mark the knob position with a small line, then re-check that mark after the first windy day.
My mount feels stable at first, then loosens after rain. What’s happening?
Rain and drying cycles can slightly compress wood fibers around lag bolts. Also, corrosion between steel fasteners and damp wood can reduce snugness over time. Use exterior-grade hardware, pre-drill and seat bolts fully into solid wood, and do a quick seasonal torque check, especially after the first heavy rain season.
Should I use washers under a post-mount bracket too, or only for surface plates?
Washers are mainly critical for surface-plate mounts to support water drainage and alignment, but adding washers may also help with leveling on some post brackets if the bracket design allows them. Don’t stack excessive washers that change clamp fit, confirm the bracket manufacturer permits washers in the interface, and keep the sleeve-to-pole connection tight.
Can I mount an umbrella to a deck ledger or railing instead of the deck post?
Not unless the structure is rated for lateral loads and the bracket is specifically designed for that attachment point. Deck rails are often not designed to handle wind forces from an offset canopy. If you want a railing-based approach, use hardware intended for rails or attach to a structural member behind the rail.
How far from the edge of the deck post should the umbrella be mounted?
Aim for a position that leaves clearance for the canopy to open without striking the house, stairs, or railing, and keep the pole centered over a solid structural area. A good rule is to avoid mounting near corners where wind can create extra torsion on the post. If the umbrella swings wide, test the open angle before final drilling.
Is it safe to use an open umbrella during mild wind?
You should not treat open umbrellas as “wind-proof.” If sustained winds reach roughly 20 to 25 mph, close and secure the canopy, and for storms fully close it. Even when the mount seems solid, gusts can create fatigue on the crank mechanism and loosen fasteners over time.
What’s the best routine for winter storage and hardware removal?
For the longest hardware life, remove the umbrella pole from the sleeve when temperatures are low, then fully remove and store the pole and canopy in a dry location. Leave the bracket on the post only if it is designed for permanent attachment and you can keep it from catching winter debris. In spring, re-check plumb and fastener snugness before use.
Next Articles
How to Add Solar Lights to a Patio Umbrella
Step-by-step guide to install solar lights on a patio umbrella, including mounting, wiring, wind-safe securing, and trou

How to Fix a Patio Umbrella That Won't Open or Close
Step-by-step fixes for patio umbrellas that won’t open or close, with checks for jams, cords, latches, and lubricating t
How Does a Patio Umbrella Work? Components, Use, and Fixes
Learn how patio umbrellas work: components, open close tilt, stability, and step by step troubleshooting common mechanic