
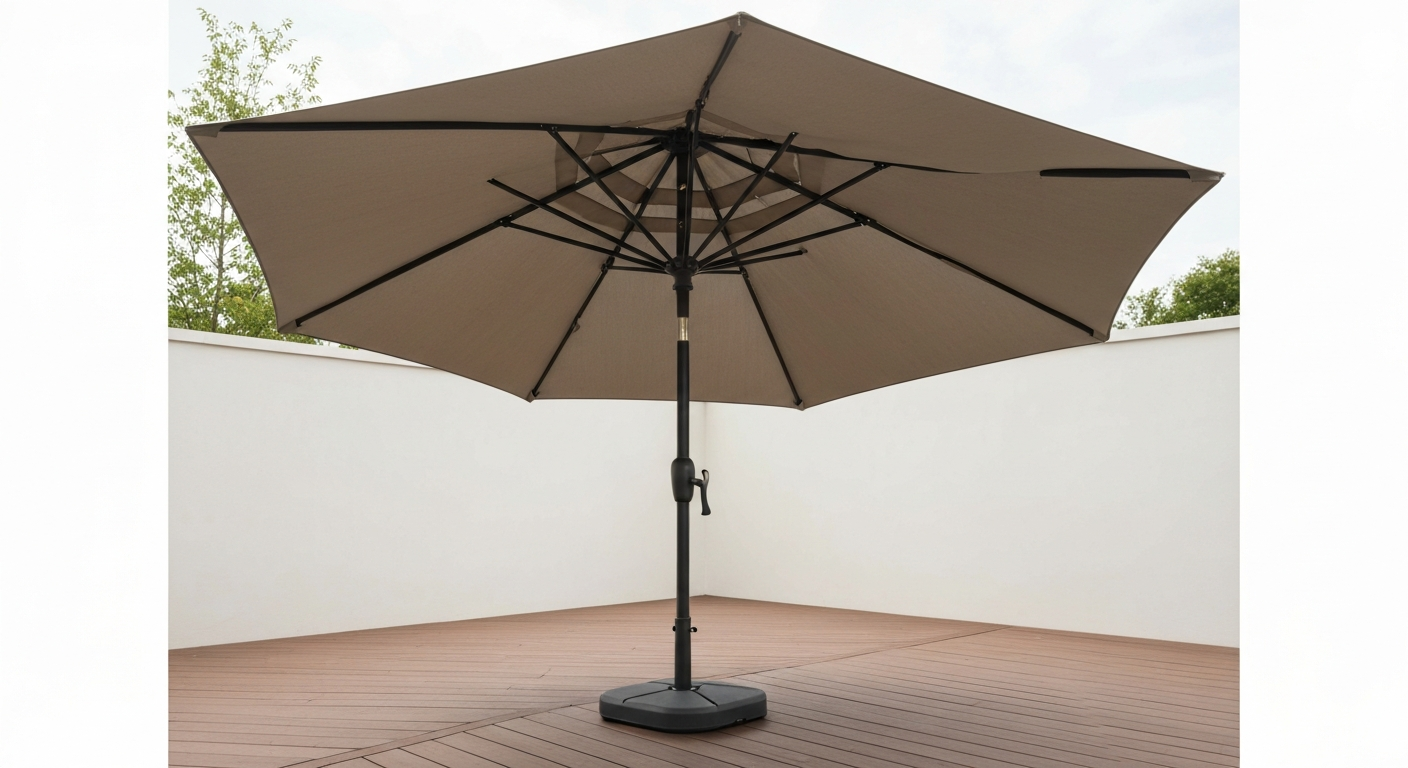
The Real Living Triple Vent patio umbrella is a 15-foot market-style umbrella sold through Big Lots under model numbers BS17031, BS19080-LI, BS19081-NA, BS19081-MO, BS19081-GE, BS19081-RE, and BS21107. Assembling it correctly, operating the crank and tilt mechanisms, and keeping the triple-vent canopy properly seated are all straightforward once you understand how the parts fit together. This guide walks you through every stage: unboxing and inspection, full assembly, daily operation, solar-light setup and repair, DIY fixes for the most common mechanical failures, and seasonal storage. Whether you lost the original manual or are troubleshooting a stuck crank or a dead solar light, you are in the right place.
Real Living Triple Vent Patio Umbrella Instructions & Guide

Luca Morrison
8 Aug 2026
Which Models and Variants This Guide Covers
This guide applies to the full Real Living Triple Vent Umbrella family in the 15-foot canopy size. The base frame and assembly procedure are the same across all color variants. The solar-light variant (most commonly identified by SKU BS19080-LI, also marketed as the 'Legion Triple Vent Umbrella' in some Big Lots promotional materials) adds an integrated solar panel at the top cap, a small battery pack inside the pole or top-cap housing, and LED modules attached to the ribs or center hub. Sections covering solar lights are marked clearly so non-solar owners can skip them. If you have a different Real Living umbrella, including the standalone solar model, the Real Living Solar Patio Umbrella guide on this site covers that variant separately. For a different but related manual, see bluu patio umbrella instructions (reference id 66bc94e5-9964-43a9-94b0-309155fce47f). For detailed assembly and troubleshooting of the solar-equipped model, see the real living solar patio umbrella instructions on this site. For additional assembly tips and alternative crank/tilt examples, see the Blissun patio umbrella instructions for a complementary walkthrough. For similar models from other brands, including Allen Roth, see the Allen Roth patio umbrella instructions page on this site for model-specific assembly and repair steps. Readers who also own or are comparing umbrellas from other brands will find parallel assembly and repair logic in the Abba Patio umbrella instructions, Allen Roth patio umbrella instructions, Blissun patio umbrella instructions, and Bluu patio umbrella instructions guides on this site.
How the Triple-Vent Canopy Works and Why It Matters
A standard single-layer canopy traps air underneath when wind hits it, which puts enormous stress on the ribs and hub and can flip or collapse the whole umbrella. The Real Living triple-vent design solves that by adding three separate vent panels layered at the top of the canopy. Each vent is a smaller secondary canopy panel sewn above the main fabric with a gap between them. When a gust hits, air flows up through those gaps and escapes rather than building up underneath. This pressure-relief effect dramatically reduces the load on the frame during moderate wind events.
Beyond wind performance, the vents extend the life of the canopy and the frame. Without venting, the repeated flex-and-snap cycle of gusts bending and releasing the ribs fatigues the metal at the pivot pins and rib-clip sockets. Vented designs reduce that flex amplitude. The canopy fabric itself is 350D polyester with a UPF 50+ rating, water-resistant finish, and CPAI-84 fire-retardant treatment, so it is built to handle outdoor exposure, but it still depends on the vent seams being correctly seated to function as designed. A misaligned vent seam that traps air defeats the whole system, which is why vent alignment gets its own section in this guide.
Tools and Parts Checklist Before You Start
Tools You Will Need
- Phillips-head screwdriver (medium, #2)
- Flat-head screwdriver (small, for prying vent-cap clips)
- Adjustable wrench or 10mm open-end wrench
- M6 Allen key (hex wrench, 5mm is a common backup size; verify against your hardware pack)
- Needle-nose pliers (for seating rib pivot pins and wire connectors on solar models)
- Soft mallet or rubber mallet (for seating hub without marring finish)
- Tape measure
- Clean dry cloth
Named Components to Identify Before Assembly
| Part Name | What It Does | Location on Umbrella |
|---|---|---|
| Finial | Decorative cap at the very top; covers the top-vent assembly | Apex of canopy |
| Vent caps (x3) | Secure the vent panels to the vent frame; align vent seams | Top of canopy, above main panel |
| Top cap / crown | Houses hub for uppermost ribs; anchor point for solar panel on LI variant | Top of pole |
| Hub (runner) | Sliding collar on the pole; rib-stretcher pivot point; moves up/down to open/close canopy | Center of pole, slides vertically |
| Ribs (x8) | Structural arms that support the canopy; pivot at top cap | Radiate outward from top cap |
| Stretchers / stays (x8) | Diagonal braces connecting hub to mid-point of each rib | Angled from hub to ribs |
| Spider / bracket | Multi-arm connector at top cap joining all ribs at one pivot point | Top cap attachment |
| Pole sections (upper + lower) | Main structural column; typically two sections that join at mid-pole | Vertical center |
| Crank assembly | Worm-gear winch that raises/lowers hub to open/close canopy | Lower pole, above base insert |
| Tilt joint | Pivot mechanism that angles the canopy; usually push-button or collar-twist style | Upper pole, below top cap |
| Hardware pack | Bolts, washers, and nuts (typically M6 metric) for frame joints | Packaged separately in box |
| Base insert / pole sleeve | Bottom of pole that fits into the umbrella stand | Bottom of lower pole section |
| Solar panel (LI variant) | Small PV panel, approx. 1-2 W, charges battery pack | Top cap or finial housing |
| Battery pack (LI variant) | Rechargeable NiMH or Li-ion pack, typically 1200-2000 mAh | Inside top-cap or pole top |
| LED modules (LI variant) | Light strips or ring modules, one per rib or hub-mounted | Attached to ribs or hub |
Consumables and Where to Buy Replacements
- Replacement canopy: Garden Winds LCM1313N-RS is the purpose-built replacement for this family; available from Garden Winds directly, GardenTrailGoods, Walmart third-party listings, and Amazon. Always confirm the model number (BS17031, BS19080-LI, BS19081-NA/MO/GE/RE, or BS21107) matches before ordering.
- Replacement ribs and hub assemblies: Specialty suppliers including Galtech International and Alibaba OEM listings carry modular umbrella frame parts; measure rib length and diameter before ordering.
- Fasteners: M6 bolts, M6 nuts, and M6 washers are standard in consumer patio assemblies; available at any hardware store. Verify your exact sizes against the hardware pack sheet included in the original box.
- Crank gearbox: Sourced from umbrella parts specialists or the original retailer's parts line; match worm-gear tooth count and pole-mount diameter.
- Tilt joint: Match the joint style (push-button vs. collar) and pole diameter (typically 38mm or 48mm for 15-ft market umbrellas).
- Solar battery pack: Replace with identical chemistry and voltage; NiMH AA cells are available everywhere; proprietary Li-ion packs are sourced from the original retailer parts line or compatible packs from umbrella solar-parts suppliers.
- LED replacement modules: Match voltage (typically 3-5V for rib-mounted LEDs) and connector type; available from solar umbrella parts suppliers or electronics supply stores.
- Lubricant: White lithium grease or silicone spray for crank gears, tilt joint, and hub slider.
Pre-Assembly Inspection and Layout Checklist
Before you start threading bolts, spend 10 minutes on inspection. Lay every part on a clean surface, preferably a padded tarp or grass, so pole sections and ribs do not get scratched. Owner/assembly manuals such as FOR LIVING Outdoor/Patio Market Umbrella Owner Manual (Manualzz) include exploded views, hardware packs, and step‑by‑step assembly/troubleshooting sections, which are helpful when verifying parts during the pre-assembly layout. This step catches missing hardware and damaged parts before you are halfway through assembly.
- Open the box fully and remove all parts without forcing them out. Cut zip ties rather than yanking.
- Locate the hardware pack. Count and sort bolts, washers, and nuts into small cups or rows. Note the sizes; most are M6.
- Lay out both pole sections and check for dents, cracks at the weld points near the tilt joint, and smooth operation of the crank handle.
- Lay out all eight ribs. Flex each one slightly by hand. A good rib springs back; a bent or cracked rib will feel weak or show a visible kink. Set any suspect ribs aside.
- Lay out all eight stretchers. Check the pivot-pin holes at each end for cracks.
- Inspect the hub (runner): slide it along the lower pole section. It should glide without binding. If it sticks, apply a small amount of silicone spray now.
- Unroll the canopy on a clean surface. Check all eight rib pockets, the three vent panels, and the vent-cap grommets for tears. Inspect the finial hole and the vent-seam stitching.
- On the solar variant: inspect the solar panel for cracks in the PV surface, check that all LED-module wiring connectors are intact, and confirm the battery pack compartment opens and closes cleanly.
- Confirm your base: a 15-foot umbrella requires a base rated for a minimum 15-gallon water fill or 100 lbs of ballast; verify your base meets this before proceeding.
Step-by-Step Assembly: Hub, Ribs, Stretchers, and Canopy
Assembly goes much faster with a second person, especially for steps 5 through 9 when you are holding ribs in place while threading connectors. If you are working alone, use a tall ladder or work table to prop the pole upright during rib attachment.
- Join the two pole sections. Align the pole-join collar and insert the upper pole into the lower section. Thread the join bolt (M6 x 20 typically) through the collar holes and hand-tighten the nut. Then snug with a wrench, but do not over-torque — you are threading into aluminum.
- Verify the crank assembly is already mounted to the lower pole. If not, slide the crank housing onto the lower pole at the designated slot, align the mounting hole, insert the mounting bolt, and tighten.
- Slide the hub (runner) onto the pole from the bottom before attaching ribs. The hub should sit in its lowest position (collapsed) during rib installation.
- Attach the top cap / spider to the upper end of the pole. Align the spider arms with the rib-count markers (eight positions, 45 degrees apart). Insert and tighten the spider mounting bolt.
- Attach the eight ribs to the spider. Each rib end has a pivot pin; seat the pin into the spider socket and confirm it clicks or is secured with a retaining clip. Work around the spider in a star pattern (attach opposite ribs in sequence: rib 1, rib 5, rib 2, rib 6, and so on) to keep tension even.
- Attach the eight stretchers: each stretcher connects the hub to the midpoint of a rib. Seat the lower pivot pin of the stretcher into the hub socket, then seat the upper pivot pin into the rib bracket. Repeat for all eight, again working in an opposite-pair sequence.
- With all ribs and stretchers attached, test the open-close action by hand before fitting the canopy. Push the hub upward gently. All ribs should rise evenly. If one rib lags, check that its stretcher pivot pins are fully seated.
- Slide the canopy over the ribs. Start by threading the finial/center hole over the top of the upper pole. Then work outward, sliding each rib into its corresponding fabric pocket. Work around in the same star pattern as step 5 to avoid pulling the canopy off-center.
- Pull each rib pocket snug so the rib tip seats fully into the pocket end. A rib tip that does not reach the pocket end will stress the fabric and eventually tear it.
- Once all eight rib pockets are seated, check that the canopy fabric is evenly distributed. There should be no bunching between panels and no gaps at the seams near the hub.
Fasteners, Vent Seams, Finial and Vent-Cap Installation
The vent caps and finial are the last things that go on, and they are the most commonly skipped or incorrectly seated. Misaligned vent caps mean the vent panels flap instead of venting cleanly, which over time stresses the vent-seam stitching and defeats the triple-vent wind-relief function.
- Before installing vent caps, lay each of the three vent panels out flat on top of the main canopy. They should overlap the main canopy by an even margin all around the vent perimeter. If one vent panel is twisted, un-twist it now.
- Locate the three vent-cap grommets on the canopy. These are reinforced holes at the top of each vent panel where the vent cap will anchor.
- Seat vent cap 1: align the cap's anchor post with grommet 1 and press firmly until the post clicks through or the retaining tab engages. The vent seam on either side of the cap should lie flat and even.
- Repeat for vent caps 2 and 3. Space them evenly at approximately 120 degrees apart. Step back and look down from above to verify the three caps are symmetrically positioned.
- Check each vent seam by running your finger along the seam line. The vent panel edge should sit on top of the main canopy edge with a clean, consistent gap of roughly 2-3 cm to allow airflow. No part of the vent should be tucked under the main canopy.
- Install the finial. Thread or press the finial over the pole tip at the apex. Most Real Living finials have an internal thread or a friction-fit collar. Thread clockwise if threaded; press and rotate to lock if friction-fit. The finial should cover the raw pole tip completely and compress the top of the canopy fabric against the top cap.
- Give the finial a firm tug upward to confirm it is locked. A loose finial is the most common reason vent caps work loose over the season.
- Do a final hardware check: re-snug (do not over-torque) all M6 bolts at the pole join, spider, and crank mount. Check that all eight rib pivot pins are fully seated in their spider sockets.
Setup, Operation, and Daily Use
Mounting to a Base and Initial Setup
- Insert the pole base sleeve into the umbrella stand hole. For a 15-foot canopy, use a stand rated for at minimum 100 lbs ballast or a 50 lb+ weighted cross-base. Under-weighted bases are the leading cause of tip-overs.
- If the stand has a tightening bolt or set screw at the pole sleeve, hand-tighten it first, then snug with a wrench once the umbrella is vertical.
- Position the stand and umbrella before filling a water-fill base. It is much easier to move before the base is full.
- Fill a water-fill base to the marked fill line. Do not overfill; the base needs room to expand in heat.
Opening, Closing, and Crank Operation
- To open: turn the crank handle clockwise (viewed from the handle end). The crank drives the hub upward along the pole, pushing the stretchers and ribs outward until the canopy is fully open. Stop cranking when you feel resistance or the canopy is fully taut.
- Do not force the crank past resistance. Over-cranking strips the worm-gear teeth, which is the most common crank failure on this model.
- To close: turn the crank counter-clockwise. Lower the hub slowly, especially in a breeze, so the canopy does not swing and catch wind while partially collapsed.
- After closing, engage the canopy wrap or Velcro tie straps if included to keep the canopy from billowing in wind while stored.
- To use the tilt function: open the canopy fully first, then engage the tilt. On push-button tilt models, press the button on the tilt collar and lean the upper pole to the desired angle, then release. On collar-twist models, rotate the collar counter-clockwise to unlock, tilt, then rotate clockwise to lock.
- Check vent seating after tilting. Tilting can shift vent caps slightly; press them back to full seat if needed.
- Always close and secure the umbrella if wind speeds exceed 20-25 mph. The triple-vent design manages moderate gusts well, but no patio umbrella is designed to stay open in sustained high wind.
Installing, Servicing, and Troubleshooting the Integrated Solar Lights
This section applies to the BS19080-LI solar variant. The solar subsystem is simple: a small PV panel (approximately 1-2 watts) at the top cap charges a rechargeable battery pack stored inside the pole top or top-cap housing. The battery pack feeds LED modules mounted on the ribs or hub. On a full charge of 6-8 hours in direct sun, you can expect 4-8 hours of evening runtime depending on battery age and LED count. If the lights are dim or not working, 80% of the time the fix is cleaning the panel, reseating a connector, or replacing the battery pack. Here is the full procedure.
- Initial charge before first use: open the umbrella fully, position it in full unobstructed sunlight, and allow 6-8 hours of charging before expecting the lights to work at full brightness. First-use failures are almost always incomplete charging.
- To activate the lights: most solar umbrella light systems use a single push button on the battery pack or pole housing. Press once for on, press again to cycle modes (some models have steady-on and dim modes), press again for off.
- If lights do not come on after a full charge: open the top-cap housing by removing the finial (counter-clockwise or pull-to-release) and then removing the top-cap cover screws (typically two Phillips screws). Lift the cover to access the battery pack and connector block.
- Check the connector between the solar panel wiring and the battery pack. This connector works loose more often than any other solar component. Unplug it, inspect the pins for corrosion (light corrosion can be cleaned with a cotton swab and electrical contact cleaner), and reseat firmly.
- Check the connector between the battery pack and the LED wiring harness. Reseat the same way.
- If connections are good but lights still do not work: test the battery pack voltage with a multimeter. A healthy NiMH pack reads approximately 1.2V per cell; a healthy Li-ion pack reads approximately 3.7V. A pack that reads significantly below these values needs replacement.
- To replace the battery pack: note the voltage, chemistry (NiMH or Li-ion), and capacity (mAh) printed on the pack label. Purchase an identical or equivalent replacement. Disconnect the old pack from the wiring harness connector, connect the new pack, and reinstall the top-cap cover.
- If using NiMH AA cells in a replaceable-cell housing: open the cell holder, remove old cells, insert fresh cells of the same mAh rating observing polarity (+/-) markings, and close the holder.
- If LEDs on one rib are out but others work: trace the LED wiring harness from the non-working rib back to the harness junction inside the hub or top cap. A loose connector at the junction is the most likely cause. Reseat the connector.
- If an entire LED strip is dead after a connector check: the LED module itself may be failed. Remove the rib-mounted module by releasing its mounting clips (typically two small plastic clips per module), disconnect the wiring, and replace with a compatible voltage module (typically 3-5V; match the connector type).
- Solar panel cleaning: clean the PV panel surface with a damp cloth every 2-4 weeks during peak use season. Dust and pollen reduce charging efficiency noticeably. Never use abrasive cleaners on the panel.
- Winterizing solar components: before winter storage, remove the battery pack from the housing and store it indoors at room temperature. Cold storage dramatically shortens rechargeable battery life. Disconnect all LED wiring harness connectors to prevent slow discharge.
Fixing the Most Common Mechanical Failures
Stuck or Slipping Crank
A crank that spins without raising the hub (slipping) has stripped worm-gear teeth or a broken handle-spline. A crank that will not turn at all (stuck) is usually a seized hub slider or a jammed gear due to lack of lubrication. Start with the simplest fix: with the umbrella closed, spray the hub slider track with silicone lubricant and work it up and down by hand several times. Then try the crank. If the hub moves freely by hand but the crank still spins uselessly, the gearbox is stripped.
To access the gearbox: remove the crank handle by pulling it straight off its spline shaft (some have a retaining pin you push out with a nail or small punch). Then remove the crank housing cover, usually held by two to three Phillips screws. Inspect the worm gear and driven gear for missing or chipped teeth. If teeth are stripped, replace the crank assembly as a unit. Crank assemblies for this pole diameter are available from umbrella parts specialists; match the pole diameter and winch-gear ratio. Before reassembly, pack the gear cavity with fresh white lithium grease.
Jammed or Stiff Tilt Joint
Tilt joints seize when water gets into the collar and causes corrosion, or when the locking pin gets bent. Close the canopy before attempting any tilt repair. On push-button tilt models, press the button and try wiggling the upper pole gently while pressing. If it gives, the pin just needs to be freed. If it does not, remove the tilt collar by unscrewing the housing bolts, extract the pin assembly, clean off corrosion with a wire brush, apply anti-seize lubricant, and reassemble. A bent tilt pin should be replaced rather than straightened, as a re-bent pin will fail again quickly.
Bent or Broken Ribs
A single bent rib causes the canopy to sit unevenly and puts stress on adjacent ribs. Do not leave it. Measure the rib length and outside diameter, then source a replacement from Galtech International, an umbrella parts OEM supplier, or from the original retailer's parts channel. To swap a rib: close and collapse the canopy, slide the canopy off the affected rib pocket, release the stretcher pivot pin at the mid-rib bracket, then release the rib pivot pin at the spider socket. Reverse the process to install the new rib. Straightening a moderately bent aluminum rib is possible but not recommended for load-bearing ribs on a 15-foot canopy, where flex forces are significant.
Torn Canopy or Vent Seam Failure
Small tears at rib-pocket seams can be repaired with a UV-resistant outdoor fabric repair tape or by hand-stitching with polyester thread and seam sealer. For tears larger than about 3 inches, or for any tear at the vent-seam junction, a full canopy replacement is the better call. The Garden Winds LCM1313N-RS replacement is purpose-built for this family and costs considerably less than a new umbrella. When installing a replacement canopy, follow the same star-pattern rib-pocket seating procedure from the assembly section above.
Loose Hub or Wobbly Canopy
A hub that wobbles on the pole or does not stay at the open position usually has worn hub-slider bushings or a missing retaining clip at the top of the hub travel. Check that the upper stop clip (a small C-clip or set screw at the fully-open position mark on the pole) is present and seated. If the hub bushing is worn, the hub will rattle and allow the canopy to droop slightly on one side. Hub assemblies are available from OEM parts suppliers; replacing the hub is a moderate repair that requires removing all eight stretchers, swapping the hub, and reattaching.
Vent Misalignment
If you notice one vent panel flapping or sagging rather than sitting evenly above the main canopy, the vent cap on that panel has either come loose or was never fully seated. Close the umbrella, climb a step stool to reach the top, press the vent cap firmly until it clicks or re-engages its retaining tab, and check the vent seam gap. While you are up there, check the finial tightness. A loose finial is almost always the root cause of progressive vent-cap loosening.
Troubleshooting Quick-Reference
| Symptom | Most Likely Cause | First Fix | If First Fix Fails |
|---|---|---|---|
| Crank spins freely, canopy does not rise | Stripped worm gear in gearbox | Lubricate hub slider; try again | Replace crank assembly |
| Crank is very stiff or will not turn | Seized hub slider or dry gears | Spray silicone lube on hub track and gear | Open gearbox, clean and re-grease |
| Tilt will not engage or release | Corroded or bent tilt pin | Press button and wiggle upper pole | Disassemble collar, clean/replace pin |
| Canopy droops on one side | Rib not fully seated or bent rib | Re-seat rib pocket; check pivot pin | Replace bent rib |
| Vent panel flapping in light wind | Loose vent cap or finial | Re-press vent cap to seat; tighten finial | Replace cracked vent cap |
| Canopy tears at rib pocket | Rib tip not fully in pocket; normal wear | Repair tape for small tears | Replace canopy (LCM1313N-RS) |
| Solar lights dim after full charge | Aged battery pack | Clean solar panel; test after another full charge | Replace battery pack |
| Solar lights not turning on at all | Loose connector or dead battery | Reseat all connectors in top cap | Replace battery pack or LED module |
| One rib of LEDs out | Loose harness connector at junction | Reseat harness connector at hub/top cap | Replace that LED module |
| Hub wobbles or rattles on pole | Worn bushing or missing stop clip | Check and reseat stop clip | Replace hub assembly |
Wind Safety, Base Sizing, and Anchoring
The triple-vent design gives this umbrella better wind tolerance than a comparable non-vented canopy, but it is not a wind-proof structure. Always close the umbrella when sustained winds exceed about 20-25 mph. Even with a correctly weighted base, an open 15-foot canopy in a gust above that threshold creates enough sail force to tip or walk the stand across a deck, which is a real injury risk.
- Minimum base weight for 15-foot canopy: 100 lbs ballast (water-fill) or a 50 lb+ weighted cross-base; heavier is always better on an exposed patio or deck.
- On a wood deck, consider a deck anchor plate or patio umbrella anchor that bolts through the decking for permanent installations.
- On pavers or concrete, a heavy fill-base is the standard solution; consider a double-base or base weight collar for extra stability on open exposed patios.
- Never leave the umbrella open and unattended during a storm or overnight in a forecast with overnight gusts.
- The canopy is rated for water resistance but is not designed to be left open in heavy rain for extended periods; repeated pooling water accelerates seam and fabric fatigue.
Seasonal Maintenance and Storage Schedule
| When | Task |
|---|---|
| Start of season | Inspect all rib pivot pins, stretcher pins, and hub for corrosion; lubricate hub slider and crank gears; check all M6 fasteners; clean and re-seat vent caps; charge solar battery pack fully before first use |
| Monthly during use | Clean canopy with mild soap and water; clean solar panel surface; check vent cap seating; inspect rib pocket seams for early fraying |
| After any high-wind event | Inspect ribs for bends; check finial and vent-cap seating; check all pivot pins |
| End of season | Clean canopy thoroughly and allow to dry completely before folding; remove solar battery pack and store indoors; lubricate all pivot points; store pole horizontal or in a protective cover in a dry location; do not store in a wet or freezing environment |
When to Replace Parts vs. Replace the Whole Umbrella
Most failures on this umbrella are worth repairing. A replacement canopy runs significantly less than a new umbrella. Retail listings such as 'Replacement Canopy Compatible with the Real Living Triple Vent Umbrella 15ft - Walmart' advertise third‑party canopies as compatible with Real Living 15ft Triple Vent models (for example, BS17031, BS19080‑LI, BS21107). A crank assembly or tilt pin costs a few dollars to a few tens of dollars. Even a full hub assembly is a fraction of replacement cost. The repair-versus-replace math only tips toward full replacement when the pole itself is bent or cracked (frame structural integrity is compromised), when three or more ribs are bent or broken simultaneously, or when the pole weld at the tilt joint has cracked. At that point the repair cost approaches or exceeds the cost of a comparable new umbrella and the structural risk is not worth it.
If you are not comfortable opening the gearbox or replacing LED wiring, both of those repairs are well within reach of a handyperson at a local hardware or electronics shop. The actual parts are inexpensive and the labor is not more than 30-45 minutes for someone who has done basic home repairs. The only scenario where I would suggest calling a pro is if the base anchor has damaged deck framing or if a tip-over has bent the pole at the base insert and you need to assess structural damage to the deck.
FAQ
What product identifiers and official manuals should I collect before writing the guide?
Gather the Real Living model numbers (e.g., BS17031, BS19080‑LI, BS19081‑NA/ MO/ GE/ RE, BS21107) and SKU references (Big Lots listings). Obtain the OEM replacement canopy manual (Garden Winds LCM1313N‑RS PDF) and any Real Living/Big Lots product pages or packing inserts. Also collect similar owner manuals from comparable brands (For Living, Hampton Bay, Berkley Jensen) to model exploded diagrams and hardware lists if OEM diagrams are incomplete.
What technical specifications and material data are essential to include?
List canopy fabric (350D polyester, UPF50+, water‑resistant, CPAI‑84 rated), nominal canopy diameter (15 ft), pole diameter and section lengths, rib/stretcher materials and diameters (aluminum/steel, mm), common fastener sizes (typical M6 hardware as starting point—verify OEM), crank gearbox type (worm gear), tilt mechanism type (push‑button or crank tilt), and solar subsystem specs (approx. PV wattage 1–2 W, battery chemistry and capacity — note typical NiMH AA packs 1200–2000 mAh or proprietary Li‑ion, charge times 6–8 hours, runtime 4–10 hours). Cite OEM specs where available; label other values as typical ballpark ranges.
Which components and parts should I diagram and name for readers?
Include an exploded parts diagram with labels: finial/top cap, vent/vent cap, canopy panels and vent seams, ribs, stretchers/stays, rib clips/pivot pins, hub/runner (slider), crank/winch assembly, crank handle/splines, tilt joint, pole sections, base interface, hardware pack (bolts, washers, nuts, cotter pins), solar panel, wiring, battery pack, LED module. Provide a parts checklist with common replacement sources (OEM, GardenTrailGoods, Garden Winds, Galtech, Alibaba/specialty suppliers, major retailers’ third‑party listings).
What tools and consumables should I list in the checklist?
Hand tools: Phillips and slotted screwdrivers, 4/5/6/8 mm Allen keys, adjustable wrench, socket set (metric, e.g., 10–13 mm), pliers, needle‑nose pliers, snap‑ring/circlip pliers, small hammer, punch. Repair tools: lubricant (white lithium grease), silicone spray, threadlocker (medium strength), wire strippers/crimpers, heat‑shrink, multimeter. Consumables/parts: replacement fasteners (M6 bolts/nuts/washers), replacement rib repair sleeves/tubes, cotter pins, replacement canopy, replacement solar batteries (matching chemistry/voltage), epoxy/fabric adhesive/patch kit, UV fabric protector. PPE: safety glasses, gloves.
What step‑by‑step assembly sequences must be documented?
Provide numbered procedures for: (1) unboxing and inventory check, (2) assembling pole sections and inserting hub/runner, (3) attaching ribs and stretchers to the hub and canopy (show alignment of rib pivot pins and rib clips), (4) installing canopy onto ribs and fastening vent seams and finial/top cap, (5) installing crank handle and testing gearbox engagement, and (6) initial tensioning and final inspection. For each step include fastener torque guidance, alignment tips (matching vent seams and canopy panels), and photos/diagrams for critical joins.
How should opening, closing, tilt, and vent seating operations be explained?
Provide clear numbered operation steps: (1) secure base and pole vertical, (2) check canopy vents free of debris, (3) use crank to open slowly until runner seats under hub stops, (4) engage tilt by push‑button or crank tilt per mechanism instructions, (5) to close, release tilt, slowly crank down while stabilizing canopy, (6) ensure vent caps/finial are seated and vent seams align. Include safety reminders: do not crank under load, keep hands clear of ribs, never use in high winds, and always lower during storms.
Next Articles
BluU Patio Umbrella Instructions: Assemble, Repair, Maintain
BluU patio umbrella instructions: step-by-step assembly, repairs, maintenance, parts checklist & troubleshooting for hom
ABBA Patio Umbrella Instructions: Assembly, Tilt, Setup
Step by step ABBA patio umbrella setup, assembly, tilt, cantilever and canopy adjustments, plus carport shade safety tip
Allen Roth Patio Umbrella Instructions: Setup, Use, Fixes
Step-by-step Allen Roth patio umbrella instructions for setup, tilt, stability, and quick fixes for common issues.