To take apart a patio umbrella, start with it fully closed, lay it down on a soft flat surface, then work from the top down: remove the finial, slide off the canopy, disconnect the ribs from the runner, open the crank housing to access the cord and gear mechanism, and finally separate the pole sections. If you are removing the canopy for replacement or cleaning, follow the canopy section steps in this guide before disconnecting any ribs or cord remove patio umbrella canopy. The exact steps vary depending on whether you have a center-pole crank umbrella, a push-button or collar tilt model, or a cantilever, but the core sequence stays the same. This guide walks through all of it in order, including the mechanical parts most people get stuck on.
How to Take Apart a Patio Umbrella Step by Step

First, figure out what type of umbrella you have
Before you touch a single screw, spend two minutes identifying your umbrella type. The disassembly steps are similar across most models, but the order and specific access points differ enough that knowing your type upfront saves a lot of frustration.
- Center-pole crank umbrella: The most common backyard style. A hand crank sits near the base of the pole and winds a cord that lifts and lowers the canopy. Many also have a collar tilt, push-button tilt, or auto-tilt mechanism built into the pole.
- Pulley/cord lift umbrella: No crank handle—instead a pull cord loops out of the pole and you hoist the canopy up by pulling it. Treasure Garden's quad-pulley models work this way.
- Cantilever (offset) umbrella: The pole is off to the side and the canopy hangs over your seating area. These usually have a more complex crank and locking arm mechanism, and canopy removal works slightly differently.
- Base-mounted market umbrella: A straight pole drops into a weighted base. Usually the simplest to disassemble because there are no built-in tilt gears.
Check the pole near the crank housing for a brand name or model sticker. Treasure Garden, Tropitone, and similar brands often stamp the model number there or on the base. If you can find it, a quick search for the model's PDF manual is worth the two minutes, it will show you exactly where the hidden screws and access covers are, which is the single biggest gotcha in umbrella disassembly.
Safety prep before you start
Patio umbrellas are awkward, not heavy, but they can tip, swing, or pinch fingers if you are not set up properly. A few quick checks will prevent most injuries. If your goal is to lower the patio umbrella instead of fully taking it apart, check the crank or tilt mechanism for stuck parts how to lower patio umbrella.
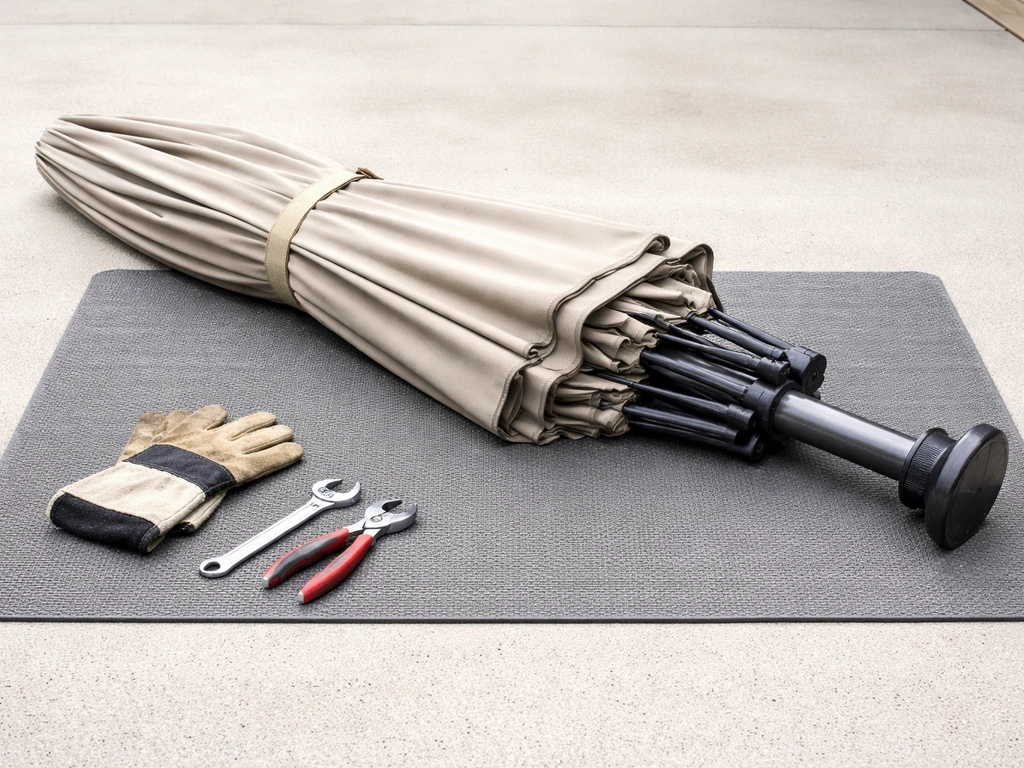
- Close the umbrella completely before doing anything else. Trying to disassemble an open or partially open umbrella is the fastest way to have a rib spring loose and hit you.
- Remove it from the base and table hole before laying it down. If the pole is in a weighted base, loosen any set screws or pins at the base collar and lift the pole straight up.
- Lay it horizontally on a soft, flat surface—a lawn, a moving blanket, or even a folded tarp on a driveway. This is the recommended method for rib and runner work. It keeps everything stable and protects the canopy fabric.
- For cantilever umbrellas, have a second person help. The canopy arms on a cantilever are heavy and awkward, and Treasure Garden specifically calls out a two-person team and a ladder for canopy removal on their offset models.
- Work in calm weather. Even a closed umbrella on a table can act like a sail if a gust catches it mid-disassembly.
Tools and workspace setup
You do not need a specialty toolkit. Most patio umbrellas were designed to be serviced with basic hand tools, and the following list covers nearly every model on the market.
- Phillips head screwdriver (the most-used tool in umbrella disassembly)
- Flathead screwdriver (for prying off plastic caps and accessing hidden screw covers)
- Needle-nose pliers (for gripping cord ends, pins, and small retaining clips)
- Allen wrench set (some brands use hex-head set screws on the crank handle and pole collars)
- Silicone spray lubricant (not WD-40—silicone is safe on plastic gears and cord)
- Clean rags
- Small zip-lock bags or a muffin tin for keeping screws and small parts sorted by step
- A stiff piece of solid-core wire or a wire fish tape (for re-routing cord through the pole later)
- Painter's tape and a marker (to label cord ends and pole sections before you pull them apart)
Set up on a surface with enough room to lay the full pole flat. A 9-foot umbrella pole needs at least 10 feet of clear space. Work near an outlet if you want to use a cordless screwdriver, but hand tools are fine and give you better feel for resistance, which matters a lot when you are trying to tell the difference between a stuck screw and a stripped one.
Step-by-step: disassembling the umbrella frame
Follow this sequence in order. Skipping steps, especially trying to pull the canopy off before the ribs are fully detached, is how fabric tears and rib tips break.
Step 1: Remove the finial (the cap at the top)
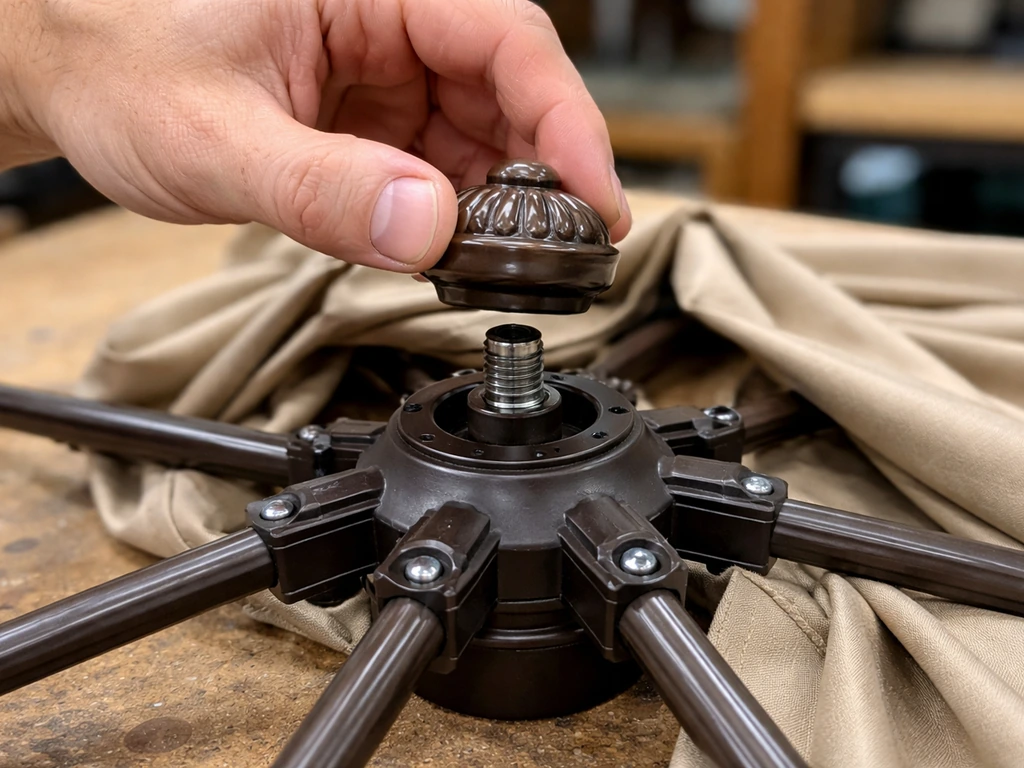
The finial is the decorative cap screwed or pressed onto the top of the center hub. It usually unscrews counterclockwise by hand. On some Tropitone and similar aluminum models, there is a screw inside the top of the pole that must be removed first, look down into the hub before you force the finial. Set it aside carefully; finials crack if dropped on concrete.
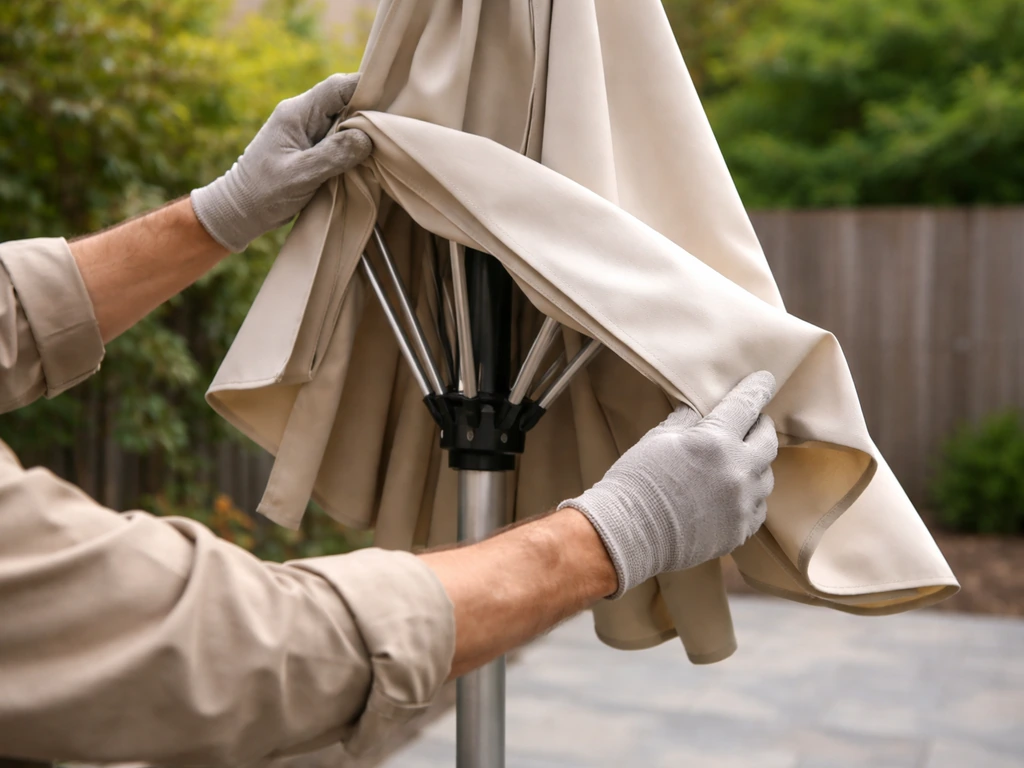
Step 2: Slide the canopy off the ribs
Most canopy panels have sleeves that thread over each rib. With the umbrella closed and lying flat, slide each sleeve off toward the rib tip. Some styles use Velcro tabs at the hub center, undo those first. On square or rectangular cantilever canopies (common in Treasure Garden models), each rib tip has a spring-loaded end cap held by screws. You need to unscrew all of them, sometimes as many as 8 screws total, before the end caps can release and the canopy can come free. Do not yank the canopy before those screws are out or you will bend the rib tips.
Step 3: Disconnect the ribs from the runner
Each rib connects at two points: the upper hub at the top of the pole, and the runner (the sliding ring that travels up and down the pole to push the ribs open). The runner is where most of the structural tension lives, so work here carefully. For Treasure Garden collar tilt, auto tilt, and push-button series umbrellas, the instructions are specific: crank the pole counterclockwise until the runner is at eye level, then remove the two runner screws and gently separate the runner halves. The critical caution is to not dislodge the other ribs or any of their pins while you are working on a single rib joint. Separate each rib from the runner one at a time, and place each pin into a labeled bag immediately.
Step 4: Remove the ribs from the hub
Once the ribs are free from the runner, each rib tip at the top hub is usually held by a small bolt or pin. On aluminum-frame umbrellas, these are often small Phillips screws with a protective plastic cap over them. Pop the cap with a flathead screwdriver, unscrew, and slide the rib free. Keep each rib, its bolt, and its cap together in the same labeled bag.
Taking apart the crank, tilt mechanism, and cord system
This is where most people get stuck, because the cord and mechanical parts are hidden inside the pole and the crank housing. Take your time here and resist the urge to force anything.
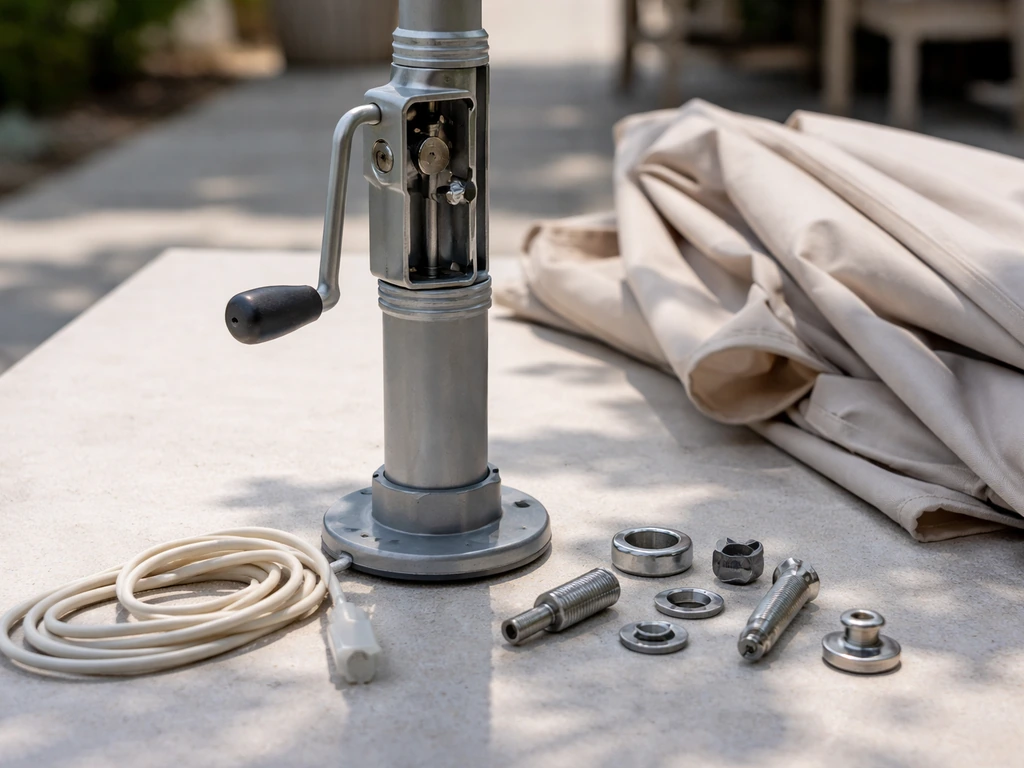
Opening the crank housing
The crank housing is the plastic or metal box near the bottom of the pole where the crank handle attaches. It is held together by 2 to 4 small self-tapping screws or, on some budget models, plastic rivets. Look for screws on the underside and sides of the housing, some brands (ProShade is a commonly reported offender) place screws in awkward spots that require you to feel around rather than see them directly. Once you find them, use a Phillips screwdriver to remove them and then gently pry the two halves apart with a flathead. Do not yank, the cord is still attached inside and can snap if you pull too hard.
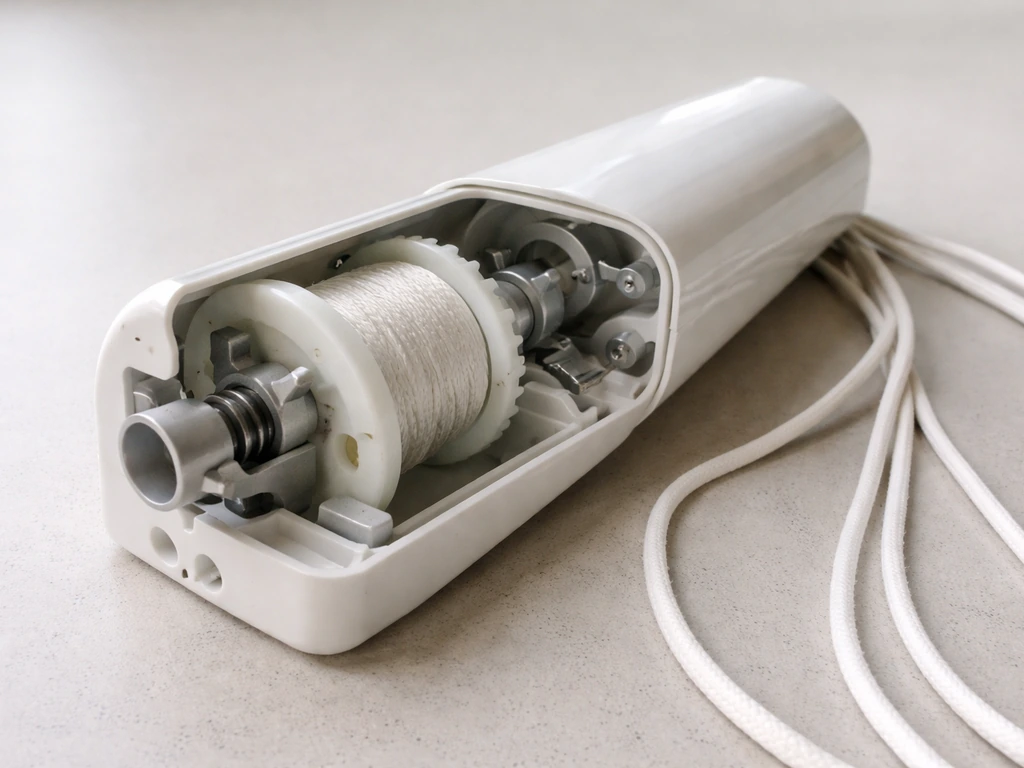
What you will see inside
Inside the crank housing you will find a plastic gear (sometimes two gears), a spool or channel where the cord wraps, and the end of the lift cord. On crank models, the cord winds around the spool as you turn the handle, pulling the runner up. On auto-tilt or push-button tilt models, there is an additional gear or cam assembly that engages once the canopy is fully open. Note how the cord is currently routed before you disconnect anything, take a photo with your phone right now if you have not already.
Removing the cord
With the housing open, use needle-nose pliers to unhook or untie the cord end from the spool. The cord runs from this spool up through the center of the pole, around a pulley at the top of the pole (or through a set of pulleys in quad-pulley systems), and ties to the runner. When detaching or rerouting the lift cord and linkage at the crank end, follow a crank-repair troubleshooting approach that keeps the cord and the parts it connects to aligned for safe disassembly blank" rel="noopener noreferrer">the cord ties to the runner. When you detach the cord at the crank end, tape the upper end to the pole so it does not disappear into the interior channel. This is the number one mistake people make: letting the cord drop into the pole. blank" rel="noopener noreferrer">Fishing it back out requires that stiff wire and a lot of patience.
Accessing a tilt mechanism
If your umbrella has a collar tilt, the tilt pivot is a separate collar on the pole, usually about two-thirds of the way up. It typically pops apart after you remove two to four screws on the collar housing. For integrated auto-tilt or push-button tilt, the tilt gear assembly lives inside the pole itself, and you access it by sliding the pole sections apart at the tilt point after the cord is free. On these models, the tilt cord (a separate thinner cord on some versions) routes inside the pole parallel to the lift cord. Note its path before pulling either cord free. If the internal tilt cord is dry-rotted or snapped, inspect the full length of the cord path inside the pole before attempting any repair, because the breakage is often not at the obvious access point.
Separating the pole, and removing base hardware
Taking the pole apart
Most patio umbrella poles come in two sections that slide together and are locked by a support pin, a set screw, or a friction fit. After the umbrella is disassembled, the remaining step is to detach the patio umbrella base from the patio by removing the base hardware or unbolting it from the mount remove patio umbrella from base. With the canopy and ribs already removed, simply pull the two pole sections apart. If there is a pin through the pole (a common setup on base-mounted market umbrellas), use needle-nose pliers or a flathead screwdriver to push the pin free from its hole before pulling the sections apart. On aluminum telescoping poles, look for a small hex-head set screw on the collar where the sections meet and loosen it with an Allen wrench.
Removing from the base
If you have not already removed the pole from the base, do it now. Before you start, make sure the patio umbrella is moved to a clear, stable spot so you have enough room to work safely move patio umbrella. Most bases have either a set screw on the side collar (loosen with an Allen wrench or Phillips screwdriver, then lift out) or a simple friction-fit sleeve. If the pole is stuck due to corrosion or mineral deposits, spray a little silicone lubricant at the joint, wait five minutes, and try again with a gentle rocking motion. Do not hammer the pole or force it with leverage against the base collar, you can crack the base. The base itself does not usually need to be disassembled unless you are repairing a cracked housing or preparing it for seasonal storage.
Cantilever-specific hardware
Cantilever umbrellas have additional locking arms and pivot joints that center-pole models do not. With the canopy already removed, the arms fold down in a specific sequence, usually the outer support arms detach from the canopy frame first (held by bolts with locking nuts), then the main horizontal arm detaches from the vertical pole at its pivot collar. Photograph each joint before you remove any bolt, because the sequence matters for reassembly and varies significantly by brand.
Reassembly tips and what to do when parts are stuck
Reassembling in the right order

Reassembly is just disassembly in reverse, but a few steps need extra attention. Thread the lift cord through the pole first, before you reattach the ribs or the runner, because once the runner is back on the pole it becomes nearly impossible to pull cord through from below. Use that stiff wire as a fish tape: tape the new or re-routed cord to the end of the wire, push the wire up through the pole from the crank housing end, and pull it out at the top. Then route it over the top pulley and drop the cord end back down to tie to the runner. On auto-tilt models, once everything is assembled, crank the umbrella fully open, then continue cranking past the stop point, you should feel a second click or bump that engages the tilt gear. If the tilt does not engage after reassembly, the cord is likely off the internal cam by one step.
Common sticking points and how to handle them
| Problem | Likely cause | Fix |
|---|---|---|
| Crank turns but canopy does not move | Cord has slipped off the spool or is broken inside the pole | Open the crank housing, inspect the spool and cord end. Re-seat or replace the cord. |
| Runner won't slide up the pole | Pole channel is dirty or corroded, or a rib pin is catching | Clean the pole with a rag, apply silicone spray to the runner channel. Check each rib pin is seated correctly. |
| Screw won't budge | Corrosion or over-tightened from factory | Apply penetrating oil, wait 10 minutes. Use a proper-fitting Phillips bit—a worn bit will strip the head immediately. |
| Tilt won't engage after reassembly | Cord is off the internal tilt cam or seated one tooth off | Disassemble the tilt housing again and reseat the cord, making sure it tracks the correct groove in the cam. |
| Pole sections won't separate | Corrosion or mineral deposit at the joint | Apply silicone spray, wait, then rock gently. Do not hammer or lever against the pole—you will crack the housing. |
| Cord drops inside the pole during disassembly | Cord end not secured before detaching from spool | Fish it back out with stiff wire, then tape the cord end to the pole before detaching it from the spool next time. |
Lubrication before reassembly
Before closing the crank housing back up, apply a small amount of silicone spray lubricant to the plastic gears and spool. Do not use WD-40 or petroleum-based grease, they attract grit, break down plastic, and will cause the same problem again in one season. While you have the pole sections apart, run a clean rag through the inside of the pole channel and apply a light coat of silicone to the runner's contact points. This is the best preventive maintenance step you can do while everything is already open.
When to stop and get a part instead of pushing through
There are a few situations where continuing to force disassembly will cost you more than stopping and ordering the right part. If the crank housing screws are fully stripped and the housing will not open without being pried apart, you will need to replace the entire crank assembly, prying plastic usually cracks it. If the internal tilt gear is chipped or a gear tooth is missing (you will see this as soon as you open the housing), no amount of cord work will fix the skip; the gear needs to be replaced. And if the pole itself is bent or has a visible crack at a joint, stop there, a bent pole can fail suddenly when re-loaded with a canopy in wind. Replacement poles and crank assemblies are widely available for popular brands, and sourcing a part is almost always cheaper than buying a new umbrella.
Storing disassembled parts
If you are taking the umbrella apart for seasonal storage rather than repair, keep all hardware (screws, pins, end caps) in a labeled zip-lock bag taped directly to the pole section it came from. Store the canopy fabric loosely rolled, not folded sharply, sharp fold lines weaken the fabric over winter. Once your umbrella is fully folded back into its stowed position, you can tie it down and store it so it is easy to reopen next time rolled, not folded sharply. Store the pole sections and ribs horizontally in a dry location rather than standing them on end, where they can warp or tip. And if you are planning to reassemble in spring, leave a cord fish-wire taped inside each pole section now so you are not hunting for wire when the season starts.
FAQ
What should I do first if my patio umbrella is stuck and will not close or open normally?
Stop trying to disassemble while the mechanism is loaded. Check whether the runner is jammed at the crank housing access point, then loosen tension by manually backing the crank slightly while keeping the fabric supported. If the canopy will not fully close, do not force the finial or canopy sleeves, because the ribs can be bent out of alignment and will not reassemble cleanly.
How can I tell whether my umbrella has self-tapping screws versus hidden rivets in the crank housing?
Look closely at the seam lines of the crank housing and check the underside and sides for any metal fasteners with screw heads. If you cannot find screw heads but the housing looks permanently joined, assume plastic rivets. In that case, you should work slowly with a small flat tool to separate the halves, and be prepared that you may need replacement rivets or a crank housing seal when you reassemble.
Can I take apart just the canopy without disconnecting the ribs or cords?
Usually yes, but only if your canopy is sleeve-style (slides over ribs) or uses end caps at rib tips that can be unscrewed while everything else stays in place. If your canopy is attached with bolts at the runner area or you see sleeves that are blocked by the runner components, you will need to remove the ribs from the runner first. If you feel resistance that is not coming from screws, stop and reassess your attachment type.
What is the best way to avoid damaging fabric sleeves or rib tips while removing the canopy?
Keep the umbrella fully closed and lay it flat, then slide each sleeve toward the rib tip rather than pulling the fabric backward toward the hub. For rib-tip end caps, remove all screws before any prying. If the canopy feels stuck, do not yank, check for one remaining cap or Velcro tab near the hub center.
How do I prevent the lift cord from getting lost inside the pole while I disconnect it?
Before you detach the cord end, tape the loose end of the cord to the pole with painter’s tape at least 6 to 12 inches above the bottom opening. After disconnecting at the crank housing, tape the upper cord end again so it cannot drop into the interior channel when you tilt the housing halves. If you still lose it, use a stiff wire fish tool, not a loose string, because string can tangle around the pulley.
My umbrella uses a tilt feature, how do I avoid mixing up the lift cord and tilt cord?
Treat the cords as separate systems. Take a photo of the full routing before you unhook anything, then label each cord with tape tags (for example, “lift” and “tilt”) right at the crank housing. When you reassemble, confirm engagement by cranking fully open before closing the housing, the tilt gear should click or bump at the correct open position.
What if the runner screws will not come out without stripping?
Try a better grip first: use the correct screwdriver size and press firmly downward while turning slowly. If the screw head is already worn, apply penetrating lubricant around the screw and let it sit briefly, then try again. If it still refuses, do not keep forcing, stripped runner screws often require replacing the runner assembly rather than just the screw.
How should I bag and label parts so I do not confuse rib hardware later?
Use one labeled bag per rib section, then one extra bag for the general hardware (finial, runner screws, rib caps, tilt/collar fasteners). Place the bolt, any protective cap, and the rib tip together in the same bag, and label with location (for example, left-front, right-front, top-hub side) if your umbrella’s ribs are not identical.
When I separate pole sections, what should I do if there is a pin or set screw, but it is seized?
For pins, use gentle pressure with needle-nose pliers or a flat tool to avoid bending the pin, if it will not move after a few minutes stop and lubricate the pin area. For set screws, confirm you have the correct Allen size before turning, stripping a collar set screw usually means replacing the collar or pole section. If corrosion is visible at the joint, use silicone lubricant, wait, then rock the pole rather than forcing.
Is it safe to pry the crank housing open, and what if the plastic cracks?
You can pry, but only at the housing seam and in small increments. If plastic begins to crack, stop and inspect for additional hidden screws or rivets you may have missed. Cracked housings often need replacement because they can misalign the gears and cause cord binding after reassembly.
How can I confirm correct reassembly before I put the umbrella back into service?
After routing the cord, confirm gear engagement by running the mechanism through full open and full close while the canopy is still off. Listen for smooth winding, ensure the runner travels to its expected position, and verify the tilt engages at the open stop. If anything binds, do not force, stop and re-check cord routing and gear alignment.
What is the recommended way to store the umbrella for the off-season after disassembly?
Store pole sections and ribs horizontally in a dry area to reduce stress on joints. For hardware, tape labeled zip bags to the specific pole section they came from. Roll the canopy loosely rather than folding sharply, and leave the cord fish-wire in place inside each pole section if you plan to reassemble soon, this prevents season-start frustration.
Learn how to remove a patio umbrella canopy safely: identify your type, detach ribs and tilt parts, then clean, store, r

Step-by-step fixes for patio umbrellas that won’t open or close, with checks for jams, cords, latches, and lubricating t
Learn how patio umbrellas work: components, open close tilt, stability, and step by step troubleshooting common mechanic