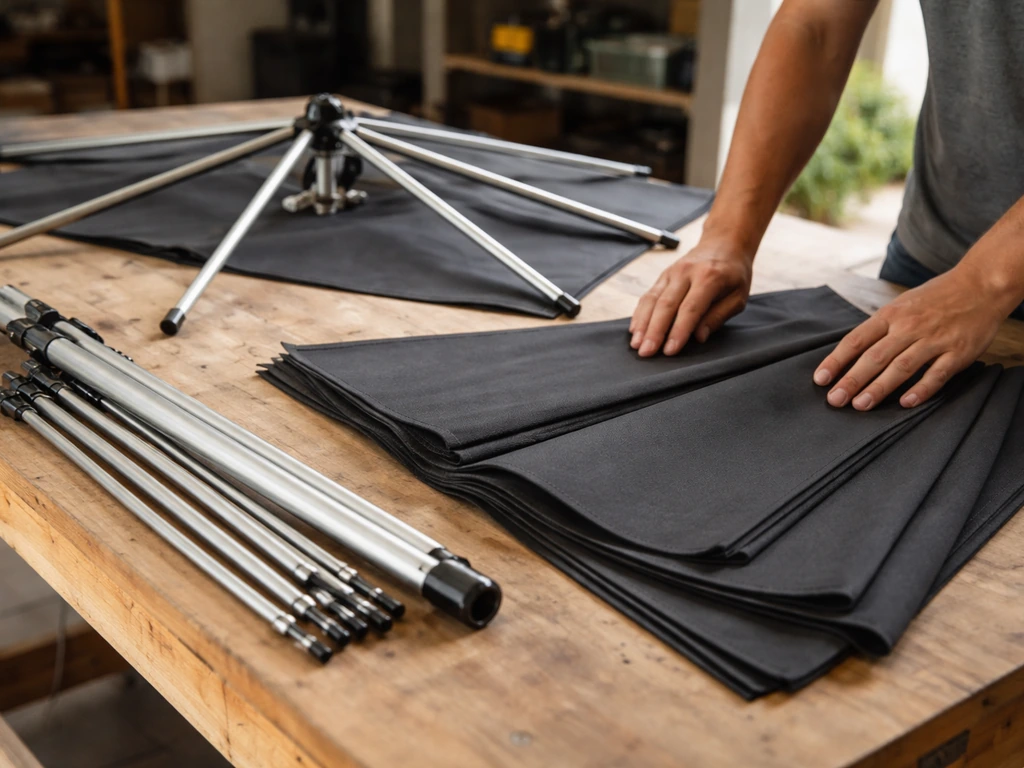
You can sew a custom, weatherproof patio umbrella cover from scratch using outdoor-rated fabric, UV-resistant thread, and a basic sewing machine. The process comes down to six steps: measure your umbrella accurately, choose the right fabric and hardware, draft a simple pattern, cut and sew the panels with reinforced seams, add closures and tie-downs, then waterproof the finished seams. Done right, a DIY cover fits better than most commercial ones, costs $20 to $50 in materials, and lasts three to five seasons. If you're also starting from scratch, follow the DIY steps below to learn how to make patio umbrella covers that fit and last season after season.
How to Make a Patio Umbrella Cover Step by Step

Luca Morrison
22 Jun 2026

Choosing the right umbrella cover style and fabric
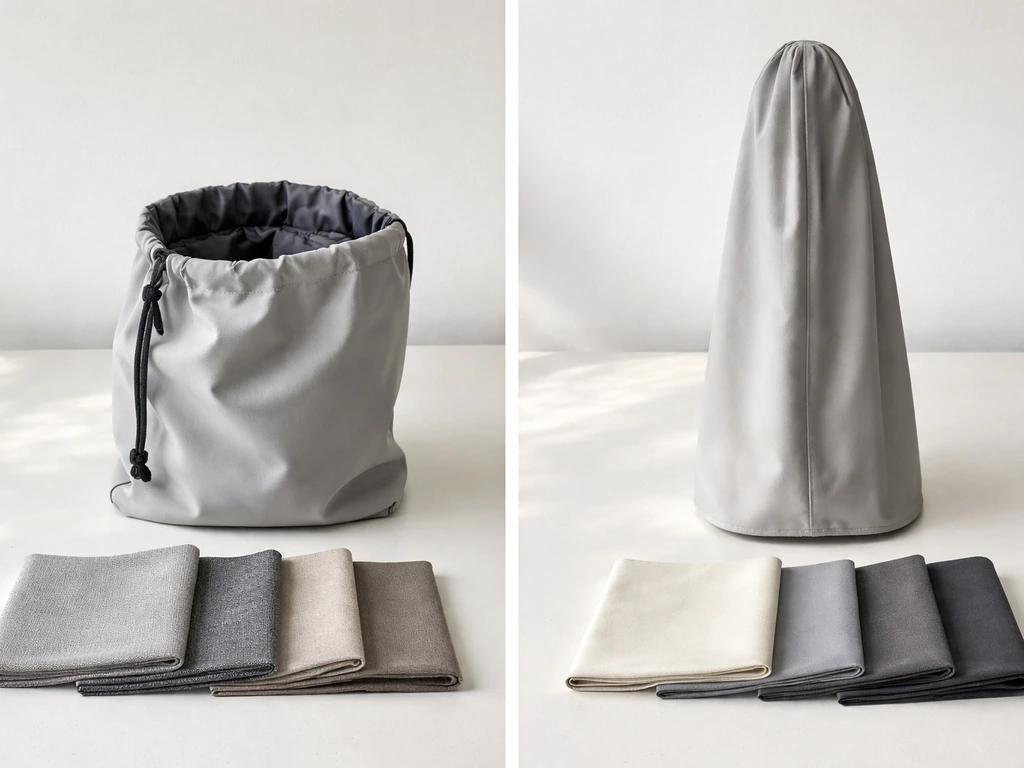
Before you cut a single piece of fabric, decide what kind of cover you actually need. There are two main styles: a storage cover (a loose bag that slips over a closed, folded umbrella when you put it away for the season) and a mounted cover (a fitted sleeve that stays on an open or semi-open umbrella while it's still in the stand). If you are also deciding how to make a patio umbrella stand for daily use, note that the cover style you choose for storage versus leaving it in the stand can change how the fit and fastening should work and a mounted cover. Storage covers are forgiving on fit and easier to sew. Mounted covers need a snugger shape and better fastening systems because wind will try to rip them off. Most homeowners need a storage cover, so that's what this guide focuses on, but the construction techniques apply to both.
For outdoor fabric, your two best options are solution-dyed acrylic (like Sunbrella-brand fabric) and coated polyester. Solution-dyed acrylic is the gold standard: it's UV-resistant, breathes slightly to reduce condensation, and holds color for years. The downside is cost, usually $15 to $25 per yard. Coated polyester (often labeled as Oxford cloth or marine-grade polyester with a PU or PVC coating) is cheaper at $5 to $12 per yard, more waterproof out of the box, but less breathable and prone to cracking after a few seasons in direct sun. For a cover that lives outdoors year-round, spend the extra money on acrylic. If the cover will be stored in a shed or garage most of the time, coated polyester works fine.
Weight matters too. Go with a fabric rated at 7 to 12 ounces per square yard. Lighter than that and it'll tear at grommets or seams in a windstorm. Heavier than 12 oz gets stiff and hard to work with on a home sewing machine. Whatever fabric you pick, make sure it's rated for outdoor use, specifically for UV resistance and mildew resistance. Interior upholstery fabric, even heavy canvas, will rot and fade within a season outside.
| Fabric Type | Waterproof? | UV Resistance | Breathability | Approx. Cost/Yard | Best For |
|---|---|---|---|---|---|
| Solution-dyed acrylic (e.g., Sunbrella) | Water-resistant (not fully waterproof) | Excellent | Good | $15–$25 | Year-round outdoor use |
| Coated polyester (Oxford / PU-coated) | Fully waterproof | Moderate | Poor | $5–$12 | Seasonal storage covers |
| Heavy-duty polyester canvas (uncoated) | Minimal | Fair | Good | $4–$9 | Not recommended outdoors |
| Vinyl-coated fabric | Fully waterproof | Good | None | $8–$15 | Rainy climates, short-term |
Thread and hardware need to match the fabric's lifespan outdoors. Use bonded polyester thread (size 69 is ideal for 7 to 12 oz fabric) or UV-stabilized nylon thread. Regular all-purpose cotton thread will rot in one season. For hardware, use brass or stainless steel grommets, nylon or Delrin plastic buckles, and polypropylene webbing for any straps. Avoid zinc-plated steel hardware; it rusts fast and stains the fabric.
Measuring your patio umbrella for a perfect fit
Bad measurements are the number-one reason a DIY cover doesn't fit. Take your time here and measure twice. You'll need a flexible tape measure, a notepad, and ideally a helper for the diameter measurement.
- Close the umbrella completely and let it hang naturally in its folded position. Don't force the ribs tighter than they go on their own.
- Measure the length from the very top of the finial (the decorative cap at the peak) to the bottom of the lowest rib tip when folded. This is your cover length. Add 4 inches to this number for seam allowance and hem.
- Measure the circumference of the folded umbrella at its widest point (usually right where the ribs meet the canopy fabric). Divide by 3.14 to get the diameter. Add 3 to 4 inches to the diameter for a cover that slides on and off easily without being so loose it flaps.
- If the umbrella has a tilt mechanism or a thick hub, measure that section separately. It's often the widest point and the spot most likely to cause fit problems.
- Note the pole diameter at the bottom of the folded umbrella. You'll use this for sizing the bottom opening and drawcord channel.
Write everything down with labels. A typical 9-foot market umbrella folded will measure roughly 60 to 68 inches long and 10 to 14 inches in diameter at the widest point. A 13-foot cantilever umbrella folded can run 72 to 80 inches long and up to 18 inches in diameter at the hub. Your cover is essentially a cylinder with a tapered or flat top, so all you really need are those two key measurements plus the bottom opening size.
One common mistake: measuring the umbrella canopy span (the diameter of the open umbrella) instead of the folded diameter. The canopy span is irrelevant for a storage cover. Another mistake is not accounting for the finial. If your umbrella has a large decorative finial or a pointed cap, add an extra 2 inches to cover length so the finial doesn't pop out the top seam.
Making a pattern and cutting the fabric
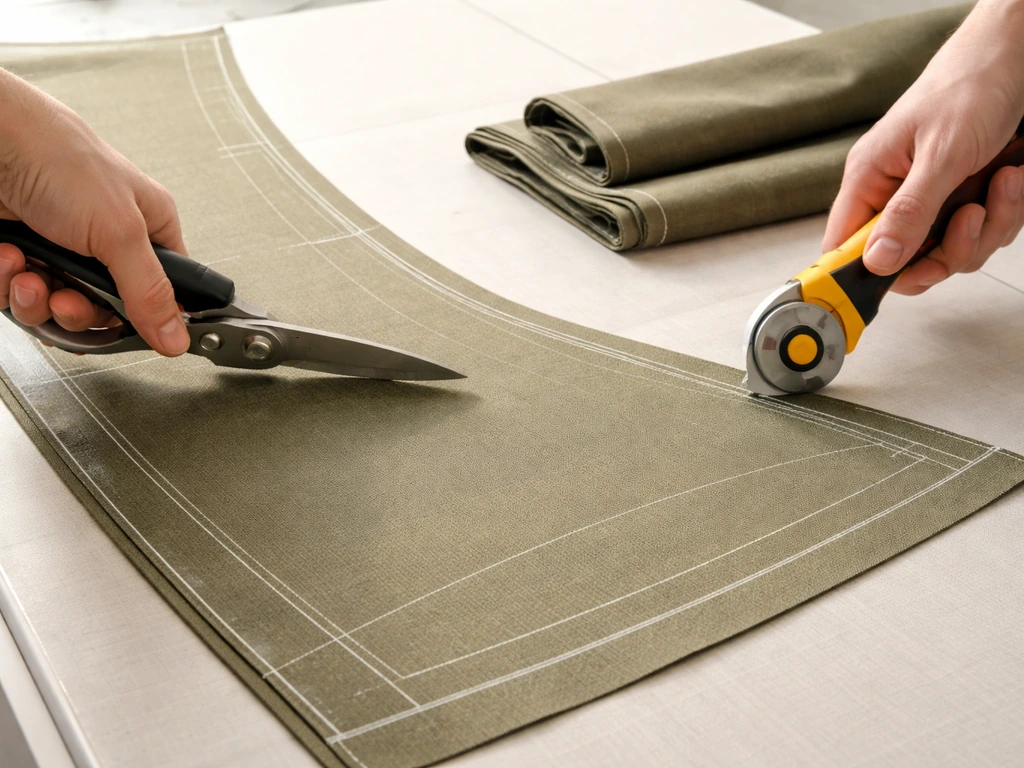
A basic patio umbrella storage cover is a cylinder: one rectangular main panel that wraps around the umbrella, a circular or flat top cap, and a hemmed bottom opening. If you are making the umbrella taller, measure the new pole height first so your cover pattern still matches the folded umbrella length making a patio umbrella taller. You don't need a commercial pattern for this. Kraft paper or old newspaper taped together works perfectly as a pattern material.
- Main body panel: Width equals the folded umbrella's circumference (diameter x 3.14) plus 2 inches for seam allowance on each long side. Height equals your adjusted cover length (actual measurement plus 4 inches). This piece wraps around to form the tube.
- Top cap: If you want a flat top, cut a circle with a diameter equal to the folded umbrella diameter plus 1.5 inches for seam allowance all around. For a tapered top that matches the umbrella's natural finial shape, cut a cone-shaped piece. To make the cone pattern, draw a quarter-circle arc on your paper using the folded umbrella's radius as the distance from center point to arc edge, then add 1 inch seam allowance.
- Bottom hem band: This is just a 3-inch-wide strip cut to match the circumference of the bottom opening. It gets folded over to create the drawcord channel.
- Optional vent: Cut a small circle about 3 inches in diameter at the top of the main body panel, centered, about 2 inches below where the top cap will attach. You'll finish this as a bound buttonhole or grommet opening. Vents reduce condensation and mold buildup significantly, especially in humid climates.
Lay your fabric on a flat surface, wrong side up. Pin the paper pattern pieces to the fabric and trace with chalk or a fabric marker. Cut with sharp fabric scissors or a rotary cutter on a cutting mat. Don't use dull scissors; they drag the fabric and throw off your cut lines by up to half an inch, which adds up fast. Cut one of each piece unless the main body panel isn't wide enough to wrap the circumference in one piece, in which case cut two identical half-panels and plan a seam down each side.
Before sewing, do a quick dry fit. Wrap the main body panel around the folded umbrella (unstitched) and check the overlap at the seam line. Hold the top cap in place. You want about an inch of ease all around, meaning the cover should feel comfortably loose but not baggy. If it's pulling tight, add half an inch to each seam allowance. If it's very loose, trim the pattern down. Adjusting now costs you 30 seconds; adjusting after sewing costs you 30 minutes.
Sewing durable seams and reinforcement details
Set your machine to a stitch length of 3.0 to 3.5mm. Longer stitches are stronger in outdoor fabric and reduce perforation along the seam line, which matters because every needle hole is a potential water entry point. Use a size 16 or 18 needle for 8 to 10 oz fabric. A size 14 works for lighter material but tends to skip stitches in heavier coated polyester.
The main body seam
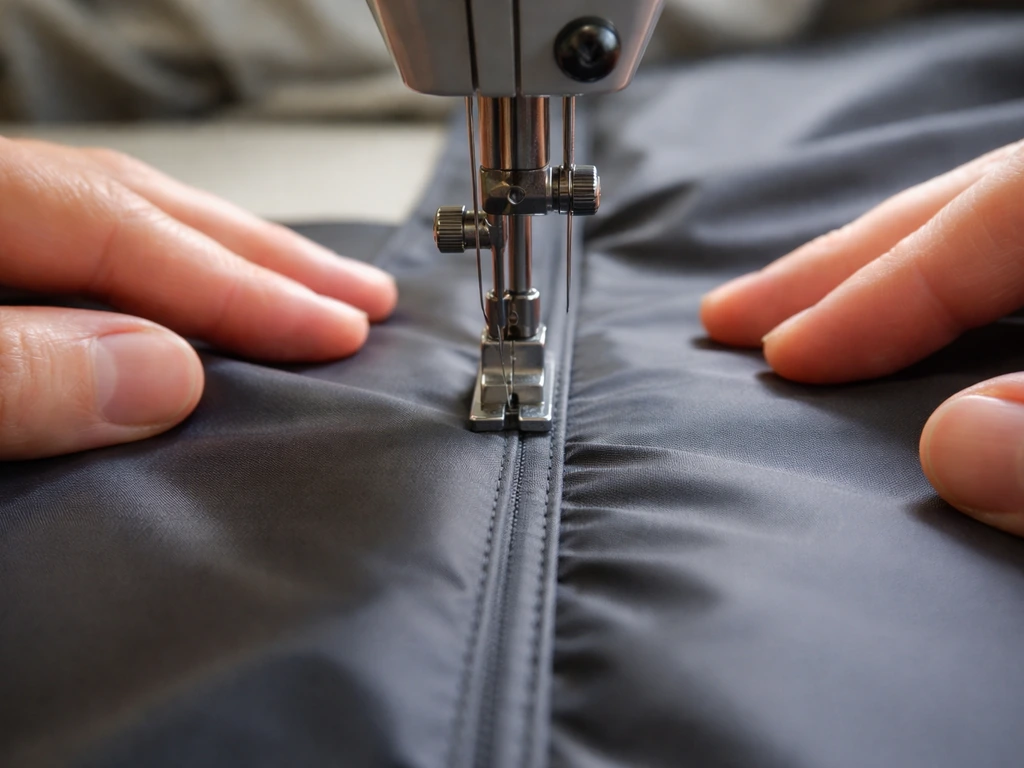
Fold the main body panel with right sides together, aligning the long edges. Sew a flat-felled seam rather than a simple straight seam. A flat-felled seam folds both raw edges inside and stitches them down with two rows of stitching, so there's no exposed raw edge to fray and no interior seam to wick water. To sew it: stitch the first row at your seam allowance (1 inch works well), trim one seam allowance to 3/8 inch, fold the wider allowance over the trimmed one, press flat, and topstitch close to the fold. This is the strongest seam for outdoor applications.
Attaching the top cap
With the body tube right side out, pin the top cap right side down to the top opening of the tube, matching raw edges. Clip small notches around the top opening every inch or so to allow the cap to curve without puckering. Sew all the way around with a 1-inch seam allowance, then sew a second row of stitching 1/4 inch away from the first for reinforcement. Trim the seam allowance to 1/2 inch, then flip the cap up and topstitch from the outside about 3/8 inch from the seam edge. This locks the seam flat and adds a third layer of stitching at what will be the highest-stress corner of the cover.
Reinforcing high-stress points
The top cap seam, any grommet locations, and the bottom hem corners are the spots that fail first. At each of these locations, sew a 2-inch square of the same fabric to the inside as a backing patch before installing any hardware. For grommets, use a grommet setter and install size 2 (3/8 inch inner diameter) solid brass grommets. Punch through both the main fabric and the backing patch, then set the grommet. Never install a grommet through a single layer of fabric alone; it will tear out in the first windstorm.
Adding closures, drawcords, and tie-down/securement options
A cover that doesn't stay closed is just a fabric flap waiting to blow off your umbrella. You need at least one closure system and ideally a secondary securement option for windy conditions.
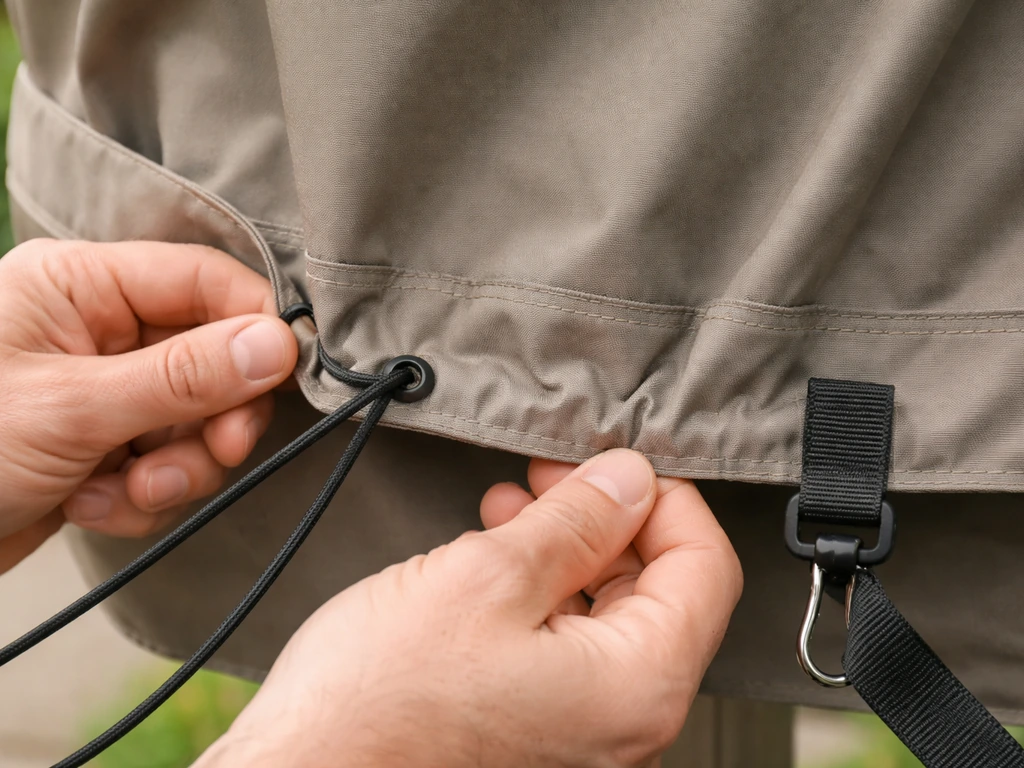
Bottom drawcord channel
Fold the bottom hem band in half lengthwise (wrong sides together) and press. Align the raw edges of the band to the bottom raw edge of the body tube, right sides together, and sew around with a 5/8-inch seam. Fold the band down and topstitch the folded edge to the tube body, leaving a 1.5-inch gap in the topstitching. Thread a 3/8-inch nylon or polyester cord through the channel using a safety pin. Exit the cord through the gap, add a cord lock (the spring-loaded type used on stuff sacks), and knot each end of the cord so it can't pull through. This lets you cinch the bottom snugly around the pole after the cover is on.
Zipper vs. drawstring closure along the body seam
You have two main options for the vertical body opening: a zipper or hook-and-loop tape (Velcro). A #5 or #8 coil zipper in marine-grade nylon is the cleanest option and the most weather-resistant. Cut the zipper to length and install it centered over the body seam. The downside is that zippers add complexity; if you're not comfortable installing a zipper in heavy fabric, stick with 2-inch-wide sew-on hook-and-loop tape applied along the seam allowance. Hook-and-loop is less elegant but bombproof and easy to replace. Close a zipper-style umbrella cover, then cinch the cover tight around the umbrella using the closure cord located in the bottom hem or tunnel.
Straps and buckles for wind resistance
For any cover that lives outdoors (even a storage cover on a balcony), add at least one adjustable strap that wraps around the outside of the cover. Cut a 1-inch-wide polypropylene webbing strap long enough to wrap around the cover's widest point plus 8 inches. Install a side-release (click-close) plastic buckle at the center and sew each end of the strap to the cover body at the widest point using a box-X stitch pattern (a rectangle with an X inside it). The box-X stitch distributes load across 8 anchor points and is nearly impossible to rip out. For umbrellas in particularly windy spots, add a second strap near the bottom. This is the same kind of adjustable fastening system used on commercial covers from brands like Classic Accessories and Duck Covers, and it genuinely makes the difference between a cover that stays put and one you find across the yard the morning after a storm.
Waterproofing, finishing edges, and preventing leaks
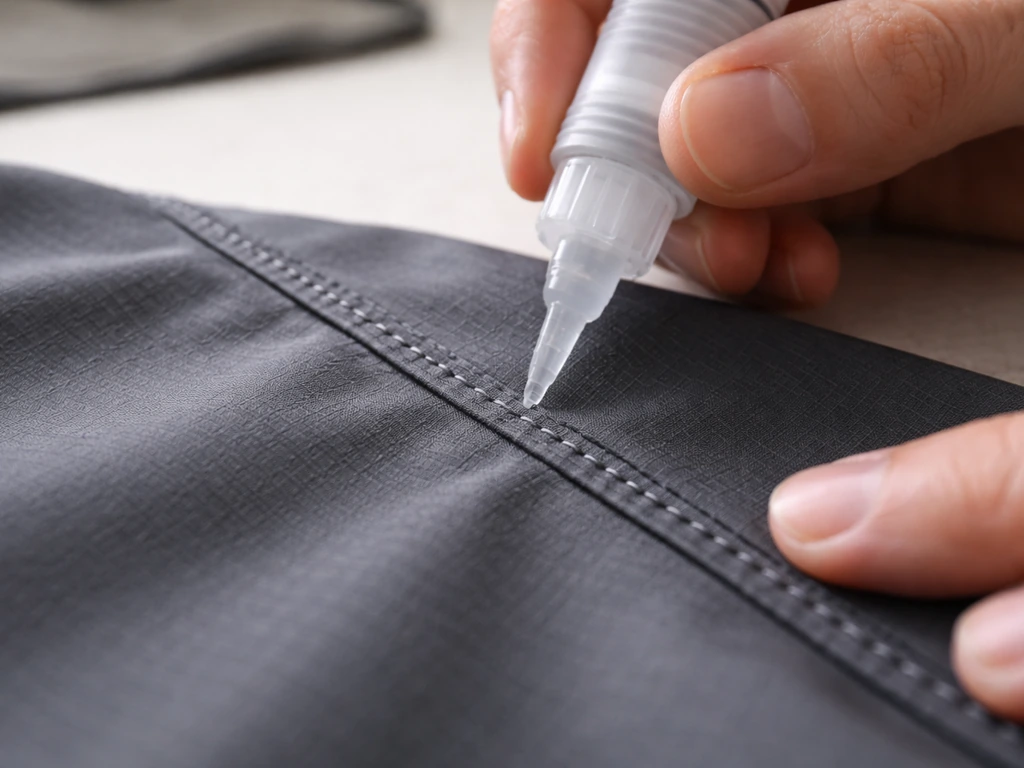
Even if you used waterproof fabric, your seams are not waterproof. Every needle hole is a gap, and water will find it. You have two ways to seal seams: seam sealer (a liquid adhesive painted over the stitching) or seam tape (an iron-on or heat-activated tape applied over the seam on the inside of the cover).
Seam sealer is easiest and works well for most applications. Products like Gear Aid Seam Grip or McNett Seam Sure are available at outdoor retailers for under $10. Turn the cover inside out and brush a thin bead along every seam line. Let it cure for 12 hours. Apply a second coat if you can see light through any seam. For fully waterproof coated polyester, seam tape is even more effective: cut strips of hot-melt seam tape to length, lay over each seam on the inside, and press with a household iron on medium heat (no steam). The tape bonds to the fabric and bridges every needle hole.
If you used solution-dyed acrylic (which is water-resistant but not fully waterproof), you can also spray the finished cover with a DWR (durable water-repellent) spray like 303 Fabric Guard or Nikwax Tech Wash. This makes water bead up and run off rather than soaking through. Reapply DWR spray every season or whenever you notice water soaking in rather than beading.
Finish all raw interior edges with a zigzag stitch or, better yet, fold them under and topstitch. Exposed raw edges fray and hold moisture, which leads to mold along the seam even if the outer fabric is mold-resistant. If your machine has a serger setting or you have access to a serger, use it on the seam allowances before assembly. It takes five minutes and adds years to the cover's life.
One thing worth building into the design: a small vent near the top of the cover. Even two 1-inch grommets set an inch below the top cap seam on opposite sides of the cover will allow enough airflow to prevent the condensation and dew buildup that causes mold and mildew under the cover. This is a feature that commercial cover brands explicitly include for this reason, and it's easy to add before you seal the seams.
Putting the cover on and seasonal storage best practices
Getting the cover on correctly matters more than most people think. Always close and secure the umbrella fully before covering it. Tilt the umbrella straight up if it has a tilt mechanism, then collapse the canopy all the way. Wipe the canopy fabric dry if it's damp (covering a wet umbrella is the fastest route to mildew). Drop the cover over the top finial first, working it down over the canopy until the bottom hem is level with the bottom of the lowest rib. If you are still trying to extend patio umbrella coverage, focus next on cinching the bottom and securing straps so wind cannot pull the cover loose Drop the cover over the top finial first. Pull the drawcord snug and lock it. Fasten any straps and click the buckles closed. Give it a gentle tug to make sure nothing is flapping loose.
If you're covering an umbrella that stays mounted in a base over the summer, check the cover every few days during windy periods. Make sure the straps haven't loosened and the drawcord is still cinched. A cover that's worked loose is worse than no cover because it acts like a sail and can knock the umbrella over. If you are planning a DIY patio umbrella setup, a do it yourself patio umbrella stand can help you keep the umbrella stable and secure in wind DIY patio umbrella stand. For mounted umbrellas in high-wind areas, you might consider removing the cover entirely when wind exceeds 20 mph rather than relying on the straps alone.
For seasonal storage and winterizing, the process is: remove the umbrella from its stand, clean the canopy fabric with mild soap and water, let it dry completely (a full sunny day minimum), then slide the cover on. If you want the cover on quickly, start by removing any finial attachments and then fully slide the patio umbrella cover down over the folded umbrella slide the cover on. Store the covered umbrella horizontally or vertically in a dry location like a garage, shed, or basement. Don't store it flat on a concrete floor; the moisture wicks through the cover and into the canopy. Hang it vertically from a wall hook if possible, or lay it across a pair of sawhorses so air can circulate underneath.
At the start of the next season, inspect the cover for any seam separation, faded spots, or hardware rust before you put it back into use. Touch up seam sealer anywhere you see gaps. If the DWR coating has worn off, re-spray. A few minutes of inspection and maintenance each spring and fall will get you five or more seasons out of a well-made cover.
When the cover doesn't fit right: quick troubleshooting
If your cover is too tight and won't slide down over the hub, the most likely cause is measuring the hub circumference at the wrong point. Remove the cover, measure the hub section again, and let out the body seam allowance by 1/2 inch in that zone only. Re-sew with the original seam allowance everywhere else to keep the fit snug lower down.
If water is pooling at the top cap seam, the cap is probably flat when it should be slightly convex. A flat top acts like a bowl and collects water right at the seam. Fix this by adding a small amount of dome shape to the cap pattern (raise the center by 1.5 to 2 inches) and re-cut the cap. Also check that you've applied seam sealer or tape to that seam; it's the most water-exposed spot on the whole cover.
If the cover flaps and billows in wind even with the drawcord tight, the circumference is too large. This usually happens when someone measures the open canopy span rather than the folded diameter. For a quick fix, take in the body seam by 1 inch on each side. For a permanent fix, re-cut the main panel with the correct measurement next time.
If seams are leaking even after sealing, look at the stitch density. A stitch length shorter than 2.5mm perforates the fabric so closely that sealer can't bridge all the holes. Re-sew any leaking seams with a longer stitch (3.0 to 3.5mm), apply two coats of sealer, and let each coat cure fully before testing in rain.
FAQ
How do I prevent the cover from getting water trapped inside after rain or dew?
When you’re finished putting it on, wipe the canopy dry if it feels damp, and consider adding a small vent with grommets near the top cap before you waterproof the seams. Also fully cinch the bottom and close the zipper or closure so wind doesn’t force cold, wet air under the cover repeatedly.
Can I use a tarp or canvas fabric and still expect it to last for seasons?
You can use canvas or a tarp short term, but it usually fails faster because it isn’t UV-stabilized, it can wick moisture through untreated fibers, and it often isn’t compatible with the seam-sealing methods that work best on outdoor synthetics. Outdoor-specific acrylic or coated polyester is the safer choice if you want multi-season durability.
What should I do if my umbrella has a tilt mechanism and the cover doesn’t fit how I expected?
Confirm which position you will cover, fully closed with the tilt locked (if it locks). Measure the folded height with the umbrella in that same locked position, then dry-fit the cover on the folded umbrella before you commit to final seam sealing, since tilt hardware can change the hub shape the cover needs to clear.
My grommets keep tearing out. Is it a fabric problem or a technique problem?
Most torn-out grommets come from skipping the backing patch or installing into only the main fabric layer. Use the same fabric for an interior backing patch at each grommet spot, punch through both layers, then set the grommet with a proper setter so it bites evenly.
Do I need to waterproof every seam, or just the top and bottom?
Seal every seam you stitched, including side seams and internal reinforcement rows. Even if pooled water seems like it only hits the top, needle holes along the rest of the cover can wick moisture and contribute to mildew over time, especially in shaded or humid climates.
Which is better for sealing seams on acrylic fabric, seam sealer or seam tape?
Seam sealer is usually the easiest and works well for solution-dyed acrylic because it only needs to bridge the needle holes. Seam tape is more fail-proof for coated polyester. If your acrylic cover will face frequent rain, you can still use seam sealer plus a DWR spray to improve water beading.
What seam sealer results indicate I sealed too little or didn’t let it cure enough?
If seams feel tacky after the stated cure time, the coating may not have set, and water may soak through along the stitching lines during testing. Wait the full cure window, then check for visible gaps, and apply a second coat anywhere you can see light through or where the fabric flexes and opens the seam.
How do I choose between a zipper and hook-and-loop without changing the whole pattern?
Hook-and-loop is simpler to install and easier to repair, but it needs enough overlap to block wind-driven lifting. If you prefer a zipper, plan for accurate zipper length and straight alignment on heavy fabric, since a misaligned zipper can create a leakage line at the body seam that you then must seal again.
My cover is tight around the hub, but loose everywhere else. How can I fix it without redoing the whole pattern?
Target the fit where it’s tight. Re-measure the hub circumference at the same point you used originally, then let out only that zone by about 1/2 inch in seam allowance. Re-sew while keeping the rest of the seam allowance consistent so the cover still cinches properly at the bottom.
How do I prevent fraying on edges I can’t zigzag or serge easily?
Fold under raw edges first, then topstitch to lock them in place. If you’re working on thick seams, use careful pressing to keep the fold even before topstitching, since uneven folds can create small open channels where water later finds its way inside.
Should I remove the cover in very high winds?
Yes, if you’re in a high-wind area, it’s safer to remove it when winds exceed about 20 mph rather than trusting straps alone. A loose, sail-like cover can generate extra force on the umbrella and can knock it over.
How often should I inspect and re-treat the cover during the season?
Check after windy storms and at least once mid-season. Look for strap looseness, cord slippage at the bottom cinch, rust on hardware, and any whitening or cracking on coated polyester. Reapply DWR when water no longer beads and starts soaking in.
Next Articles
How to Make a Patio Umbrella: Canopy to Frame Guide
Step-by-step DIY guide to make a patio umbrella, from UV canopy cutting to frame tilting, testing, and weatherproofing.
How to Make a Patio Umbrella Stand DIY and Concrete
Step-by-step DIY and concrete patio umbrella stand with pole fitting, stable alignment, weatherproof finishing, and wobb
Do It Yourself Patio Umbrella Stand: DIY Guide
Step-by-step DIY patio umbrella stand guide with weight, anchoring, tools, and safe setup for stability in wind.