Most patio umbrella tilt problems come down to one of four things: a gear or slider clogged with grit, a snapped or jumped tilt cord, a worn ratchet or lock pin that won't hold position, or a mechanism that was never fully engaged in the first place. In almost every case, you can fix it yourself in under an hour with basic tools, a can of silicone spray, and a close look at what's actually broken. If you still want a step-by-step guide for tilt mechanism repair, follow the sections below for lubrication, cord fixes, and parts replacements.
Fix Patio Umbrella Tilt: Diagnose and Repair Steps

Luca Morrison
26 Jun 2026
What a broken tilt looks like (symptoms check)
Before you start taking anything apart, it helps to name exactly what your umbrella is doing wrong. The repair path is different depending on the symptom, so be specific.
- Umbrella tilts but won't stay put: it slowly droops back to center after you set the angle. Usually a worn ratchet, detent, or lock pin.
- Tilt action feels stiff or grinding: the mechanism turns but with resistance or a crunching sensation. Typically dried lubricant, packed-in grit, or early gear wear.
- Crank turns freely but nothing happens: the umbrella doesn't tilt (or doesn't open/close). A strong sign the internal cord has jumped off its spool or snapped.
- Umbrella tilts crooked or uneven: the canopy leans to one side rather than straight back. Often a misaligned tilt housing, a bent pivot pin, or one-sided cord tension.
- Tilt button or collar won't engage or release: the button feels mushy, doesn't click, or the collar spins without catching. Packed grit, a broken detent spring, or a misaligned housing.
- Mechanism looks fine but tilt simply won't activate: on auto-tilt (crank-driven) models, this often just means the crank wasn't turned far enough to trigger the tilt cycle.
Identifying your exact symptom now will save you a lot of time later. Write it down if you need to, because once you're elbow-deep in the housing you'll want to stay focused on the right fix.
Before you touch anything: safety, tools, and identifying your tilt type
Safety first
Close the canopy completely before starting any repair. A partially open umbrella puts tension on the rib assembly and the lift cord, which can cause parts to snap or spring loose unexpectedly. Work on a calm day if the umbrella is still mounted in the base, or lay it flat on a padded surface (a folded blanket on the patio works fine) if you need better access. If your umbrella has a crank, never force it once you've identified a problem. Continuing to crank against resistance is one of the fastest ways to strip gear teeth or snap a cord.
Tools you'll need
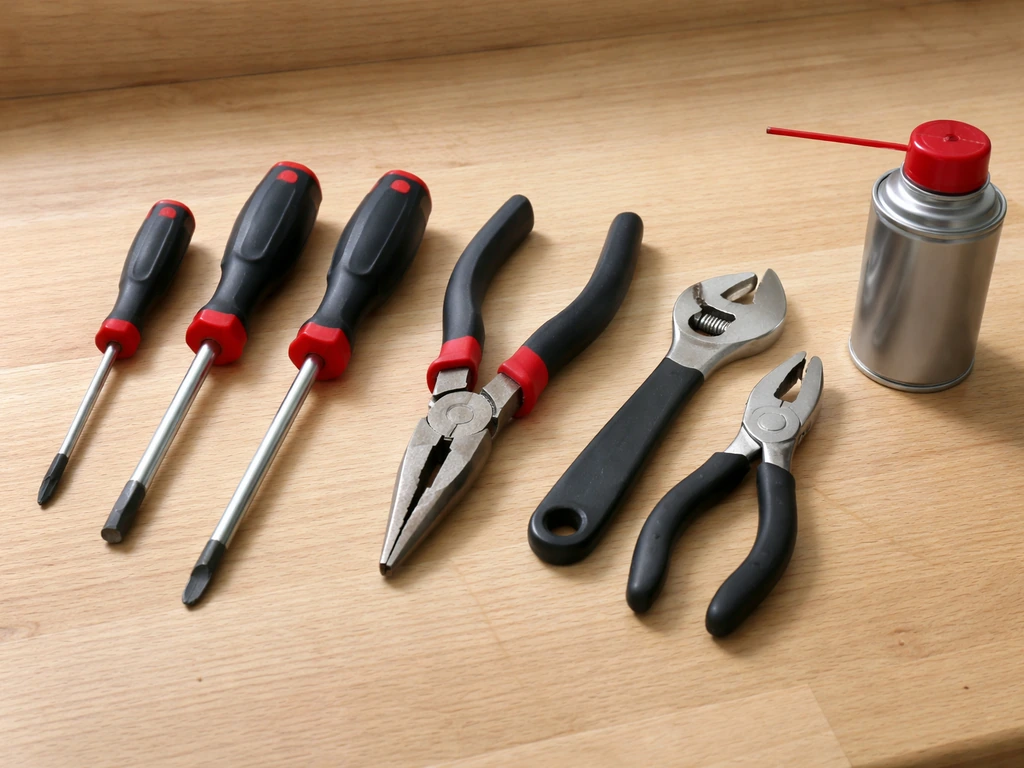
- Phillips and flat-head screwdrivers (multiple sizes)
- Needle-nose pliers
- Small adjustable wrench or pliers
- Silicone-based spray lubricant (not WD-40, which dries out and attracts dirt)
- Light water-resistant lithium grease for gear teeth if gears are exposed
- Soft cloth or paper towels for cleaning
- Replacement tilt cord or tilt mechanism assembly (check your brand/model before ordering — more on this below)
- A phone for photos: take pictures of the mechanism before you disassemble anything
Identify your tilt mechanism type
Patio umbrella tilt systems are not all the same, and the repair steps vary depending on which type you have. Before doing anything else, figure out which category your umbrella falls into.
| Tilt Type | How It Works | How to Identify It | Common Failure Points |
|---|---|---|---|
| Push-button tilt | A button on the pole locks the umbrella into preset tilt angles | There's a visible button or pin on the upper pole shaft | Worn detent spring, packed grit, bent pin |
| Collar/knob tilt | A rotating collar or lock knob on the pole releases and locks the tilt | Twist-and-lock ring sitting just below the canopy hub | Worn threads, stripped collar, misaligned housing |
| Auto-tilt (crank-driven) | Cranking past the fully-open position activates the tilt via an internal gear or slider | Single crank handle, no separate tilt button; tilting happens automatically at the end of the opening cycle | Jammed gear/slider, snapped cord, crank not turned far enough |
| Cord/cable tilt | A cord routed through the pole tilts the canopy when pulled or tensioned | You'll see or feel a cord inside the pole or coming out near the hub | Cord jumped off spool, frayed, or broken |
| Cantilever/offset tilt | A locking arm or lever at the base or side frame adjusts the canopy angle | Side-mounted pole with tilt lever usually near the base or mid-mast | Worn locking teeth, loose pivot bolt, bent linkage arm |
If you have a Treasure Garden umbrella, check whether your model is in the Glide Tilt or Collar/Auto Pushbutton family before following any generic steps. These use proprietary mechanisms, and Treasure Garden publishes model-specific manuals that are worth downloading before you start. For the CollarAutoPushButton family, Treasure Garden also publishes model-specific rib replacement instructions (including safety context and a “identify broken rib” approach) to guide disassembly more safely blank" rel="noopener noreferrer">UM801/UM800/UM812 CollarAutoPushButton Series rib replacement instructions. The same goes for other major brands: a quick search for your model number plus 'assembly manual PDF' will often surface a parts diagram that labels exactly what's inside your pole housing.
Why tilt mechanisms fail: the most common causes
Understanding why these things break is more useful than it sounds, because the cause tells you how serious the fix is. Here are the failures you're most likely to encounter.
- Dried lubricant and packed grit. This is the number one cause of stiff, grinding, or binding tilt mechanisms. Dust, pollen, and moisture work into the housing over a season and turn any residual grease into a thick paste that locks up moving parts.
- Auto-tilt not cranked far enough. On auto-tilt (crank-driven) models, the tilt only engages after the canopy is fully open. If you stop cranking early, the umbrella just sits flat. Many 'broken' auto-tilt calls are actually just this.
- Cord or cable jumped off the spool. The internal cord that drives either the lift or the tilt function can slip off its routing path inside the pole. When this happens, the crank spins freely without doing anything. It feels very broken but is often repairable.
- Snapped tilt cord or strap. The cord itself breaks, usually at a stress point near the hub or where it exits a small eyelet. You'll sometimes see a frayed end hanging out of the pole when you inspect it.
- Worn or broken ratchet/detent. The toothed mechanism that locks the umbrella into a tilt position wears down over time. When the teeth are worn, the umbrella won't hold its angle.
- Stripped gear teeth. Forcing a stiff crank, or years of normal use, can strip the plastic or aluminum gear teeth inside the crank housing. Once stripped, the crank turns without gripping.
- Misaligned housing or pivot pin. The tilt housing can rotate slightly out of its correct position, especially if the umbrella has been knocked around or stored carelessly, causing the tilt to feel crooked or stick on one side.
- Broken or corroded lock button/collar. Push-button and collar systems rely on small springs and pins. These corrode or break, leaving the tilt stuck open, stuck closed, or unable to hold an angle.
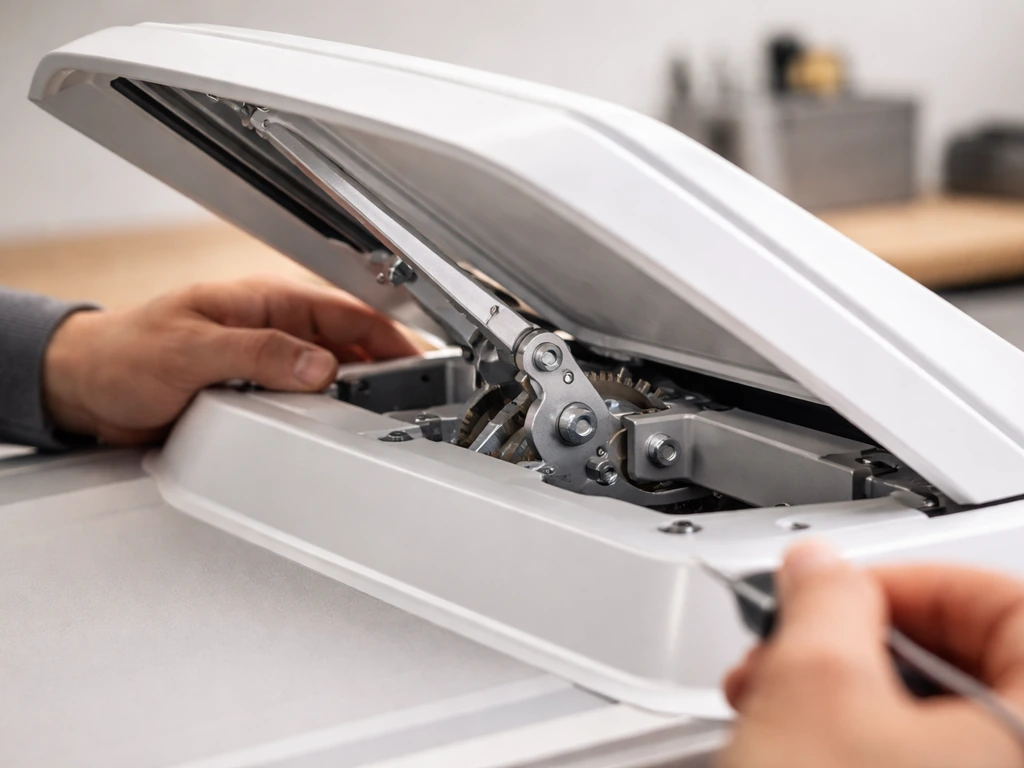
How to disassemble and inspect the tilt mechanism
Take your phone out and photograph the mechanism from multiple angles before you remove anything. This is the single most important prep step. The assembly order and cord routing inside these housings is easy to forget, and a photo will save you an hour of confusion when you're putting it back together.
- Close and lower the canopy completely. Make sure all tension is off the lift system before proceeding.
- Lay the umbrella flat on a padded surface if possible, or have a second person hold it steady while you work.
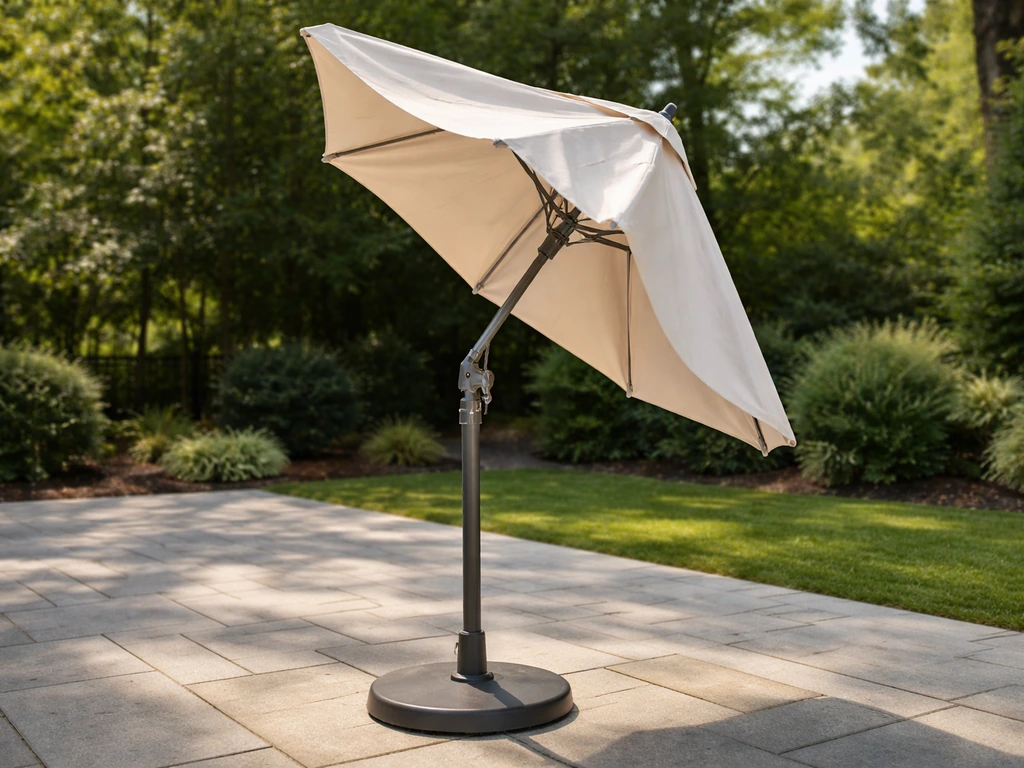
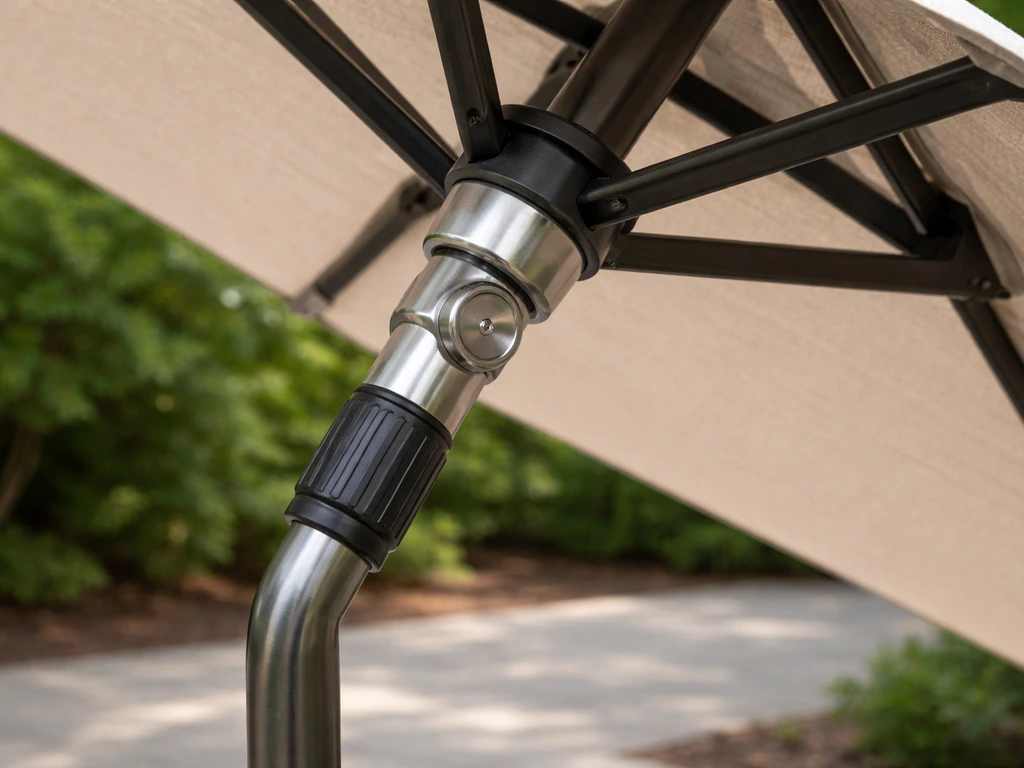
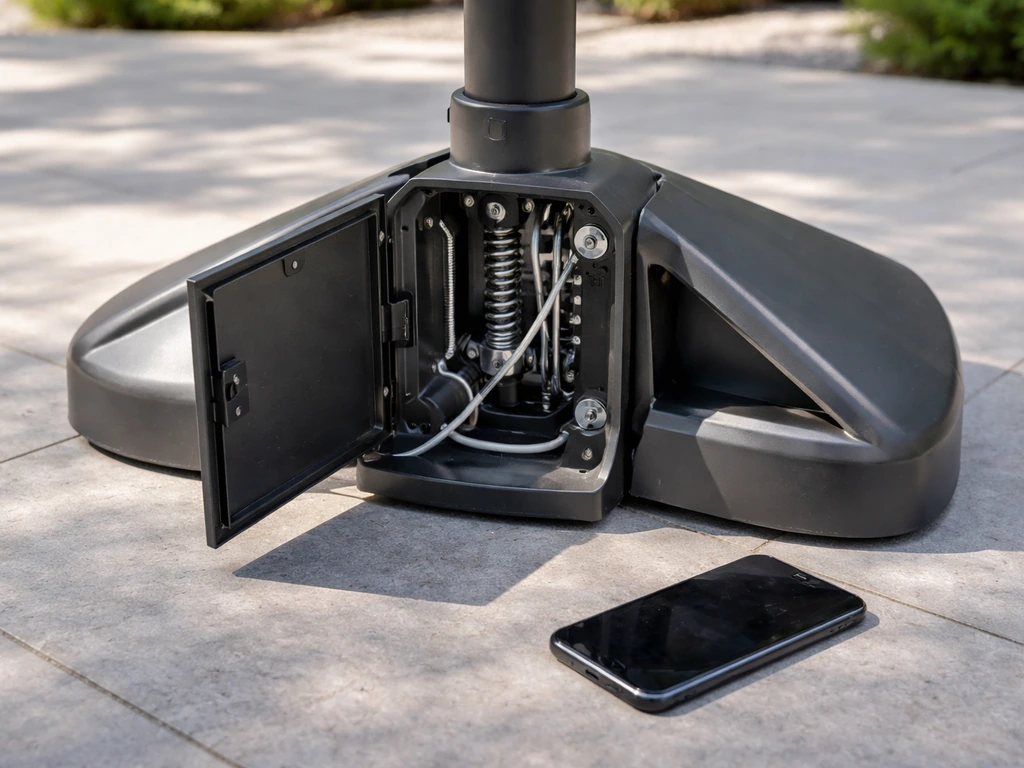
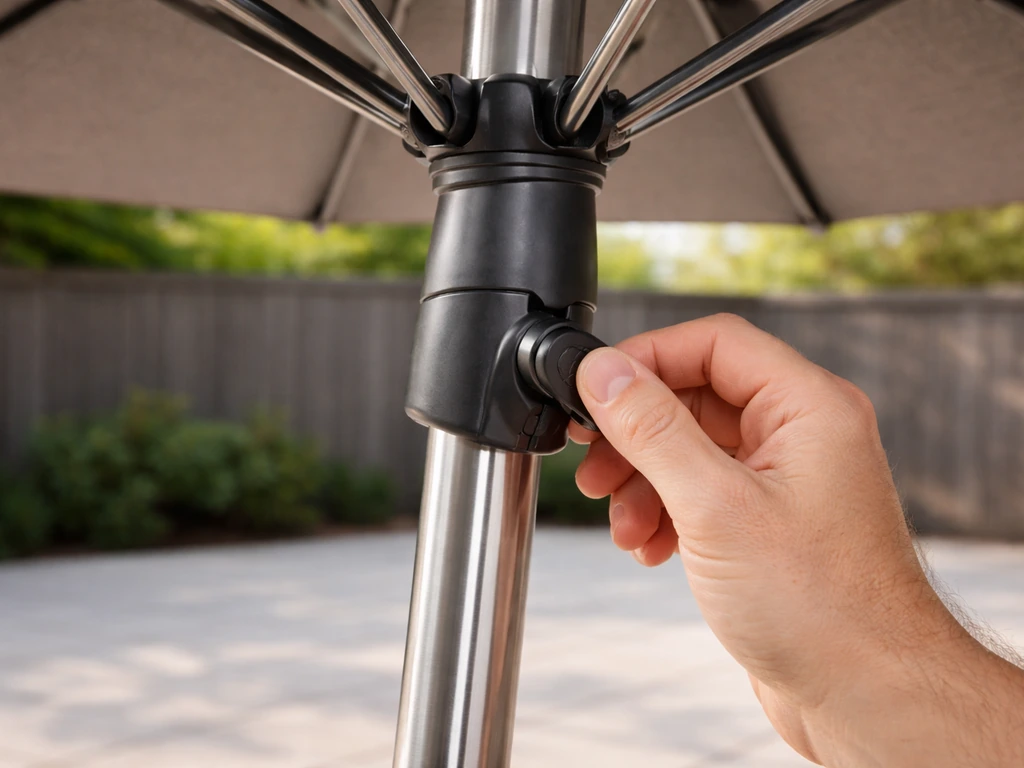
- Locate the tilt mechanism housing on the pole. It's usually a slightly wider section of the upper pole, sitting just below or just above the main hub where the ribs attach.
- Look for screws, clips, or a twist-off cover plate on the housing. Most residential umbrellas use Phillips-head screws. Some brands, especially mid-range and premium models, use a snap-fit cover that pries off with a flat-head screwdriver (gently, at the seam).
- Remove the cover carefully and set all screws in a small container so you don't lose them. Note which screw goes where if they're different sizes.
- With the cover removed, you'll typically see one or more of the following: a gear-and-slider assembly, a cord/cable routed around a spool or through eyelets, a ratchet plate with notched teeth, or a button pin with a small spring.
- Look for obvious damage first: broken teeth, a cord that's off its path, corrosion, or cracked plastic. Then check for grit buildup by running a finger across the surfaces.
- If you see a cord or cable, trace its full path from where it exits toward the hub and back through the housing. Note whether it's seated in its groove or whether it has jumped out.
- If the mechanism involves gears, try turning the crank slowly by hand while watching the gear engagement. You should be able to see where the mesh breaks down if a tooth is stripped.
- Separate the upper hub/runner hub from the tilt mechanism only if necessary, and only after photographing how everything connects. These components (visible on parts diagrams as distinct from the rib assembly) are usually connected by a single pivot pin or bolt.
Fixes matched to each problem
Stiff or grinding mechanism (dried lubricant/grit)
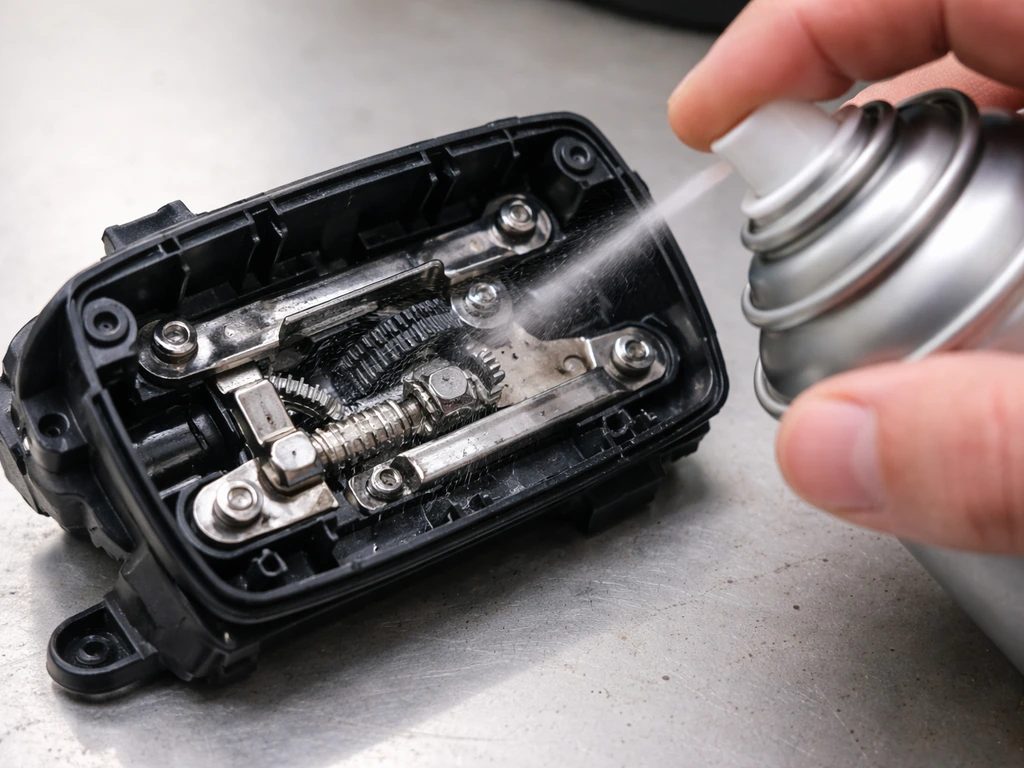
This is the easiest fix. Wipe out any visible grit with a dry cloth. Then apply silicone-based spray lubricant directly to the moving surfaces: gear teeth, slider tracks, pivot pins, and any points where metal contacts metal or plastic. Work the mechanism back and forth by hand several times to distribute the lubricant.
Wipe off excess. If the grit is packed in tightly around a push button, spray silicone into the gap around the button and pump it in and out repeatedly until it moves freely. Do not use WD-40 as a long-term lubricant. It cleans well but evaporates quickly and leaves behind residue that attracts dirt.
Silicone spray or light lithium grease on gear teeth is the right choice here.
Auto-tilt that won't engage
Before suspecting a mechanical failure, fully open the canopy and then keep cranking. On auto-tilt models, the tilt function only kicks in after the canopy is completely open. You'll usually feel a slight resistance change or hear a soft click when the mechanism transitions from lift mode to tilt mode. If this fixes it, great.
If the crank engages but the tilt still doesn't move, check whether a lock knob or collar on the pole needs to be released first. Some models require you to loosen the collar before cranking will drive the tilt. Consult your manual on this step: Treasure Garden Glide Tilt models, for example, have a specific button alignment step before the tilt housing snaps into position.
Cord jumped off the spool

Open the housing and visually trace where the cord has come off its path. The cord should run through a specific set of eyelets or grooves: typically down through the tilt mechanism, up through the pole, and out at the top toward the hub. Carefully re-route the cord back into its groove or eyelet path by hand, using needle-nose pliers for tight spots.
Once re-seated, apply gentle tension by pulling the cord taut and checking that it stays in its channel when you work the mechanism. Reassemble the housing and test. This fix sounds simple but can be fiddly, especially on brands that route the cord through a narrow internal channel. The access hardware (cover plates and screws) can be non-obvious on some models, so work slowly and don't force anything.
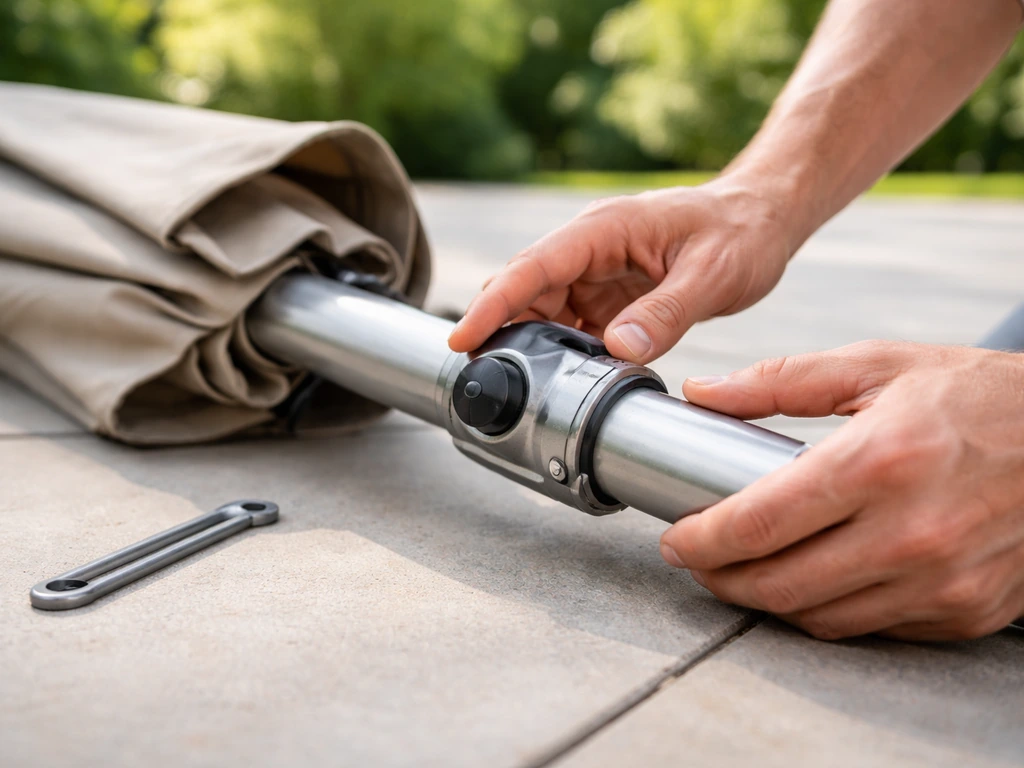
Snapped or frayed tilt cord
If the cord is broken, you need a replacement cord. Look up your umbrella's model number and search for a replacement tilt cord or tilt mechanism kit from the manufacturer or a patio parts supplier. Many cords are generic enough that a replacement set sold for your umbrella size will work.
Thread the new cord through the same path the old one followed (this is where your photos are invaluable), knot or clip it at both ends per the original design, and confirm there's correct tension before reassembling the housing. Some assembly manuals describe this as: insert the cord through the tilt degree mechanism until it comes out at the top of the umbrella, then lower the tilt lever back to the main frame. Follow that exact sequence for your model.
Umbrella won't hold its tilt angle (worn ratchet or detent)
Open the housing and look at the ratchet plate or notched detent surfaces. If the teeth are visibly worn flat or rounded off, the mechanism will never hold reliably again regardless of lubrication. This is a parts replacement situation. Search for a replacement tilt mechanism assembly for your brand and model. On push-button systems, also check the small detent spring behind the button: if it's flattened or missing, that's why the button doesn't snap into position. Replacement springs are cheap and available from hardware stores if you can match the dimensions.
Stripped gear teeth
You'll know the gears are stripped when the crank turns without any resistance but nothing moves. Inside the housing you'll see chipped or rounded-off gear teeth, sometimes accompanied by plastic shavings. Light lubrication won't fix stripped gears. You need a replacement crank mechanism or tilt gear assembly. On some umbrellas, the crank housing is a single replaceable unit. On others, the tilt gear is integrated into the handle assembly, which makes individual gear replacement harder and may mean replacing the whole crank/tilt unit. Check your parts diagram to understand what's available before ordering.
Crooked tilt or misaligned housing
If the umbrella tilts but leans to one side rather than straight back, check the pivot pin or bolt that connects the tilt housing to the pole. It may have worked loose. Tighten it first and test. If the housing itself has rotated out of position, you should be able to re-align it by loosening the mounting hardware, rotating it to the correct orientation (straight back from the opening of the canopy), and re-tightening. On some designs, there's a foot pedal or lever alignment that also needs to match: the tilt lever should align with the foot pedal on the ground-level base. If these are out of sync, the tilt feels off even when the mechanism is otherwise intact.
Loose hardware throughout the mechanism
Sometimes the problem is simply screws or bolts that have vibrated loose over a season of use. Before assuming any component is broken, go through the mechanism with a screwdriver and snug up every fastener you can access. Check the tilt button mechanism specifically: a loose button assembly is a documented cause of tilt failure that's often overlooked. Once everything is tight, test the tilt again before moving on to more involved repairs.
Reassembly, lubrication, and testing
Once you've made your repair, reassemble in the reverse order of how you took it apart. Refer to your photos at each step. Here's the reassembly sequence that applies to most tilt mechanism types.
- Before closing the housing, apply a fresh coat of silicone spray to all moving surfaces: gear teeth, slider tracks, pivot points, and cord eyelets. For exposed metal gear teeth, a small amount of light lithium grease is even better than spray alone.
- Route any cord or cable carefully back through its correct path before the housing goes on. A cord that's slightly off-track will cause the same problem to recur within a week.
- Seat the housing cover and hand-tighten all screws before fully snuggling them down. This lets you make small adjustments if the alignment feels off before everything is locked in.
- Tighten all screws firmly but don't overtighten into plastic housings. Snug is enough.
- With the umbrella still in the closed position, do a slow manual test of the tilt mechanism before you crank anything. On push-button and collar designs, test the engagement and release action by hand. It should feel smooth and positive, not mushy or sticky.
- Open the canopy fully using the crank, then engage the tilt and move through the full range of angles. Watch the canopy as you do: it should tilt smoothly and hold each position without drooping.
- Try tilting to the maximum angle and leaving it there for a few minutes, then check that it hasn't shifted. This confirms the ratchet or lock is actually holding under the canopy's weight.
- Close and re-open the umbrella once more to confirm the full cycle works correctly.
If the mechanism still feels slightly stiff after reassembly, work it back and forth a dozen times with the cover on. New lubrication often needs a few cycles to distribute fully. If stiffness persists beyond that, you likely have a remaining alignment issue or a component that needs replacement rather than lubrication.
Repair it or replace it? And how to keep this from happening again
When repair makes sense
Repair is the right call when the damage is isolated to one component: a jumped cord, a loose fastener, a grit-packed button, or a worn spring. These fixes cost a few dollars and under an hour of your time. Even replacing a full crank/tilt mechanism assembly is usually worth it if the umbrella frame and canopy are otherwise in good shape. Replacement assemblies for common brands typically run $15 to $40 and drop right in.
When replacement makes more sense
Consider replacing the whole umbrella when the pole is bent or cracked, when multiple components have failed at once, when the canopy fabric is also in poor condition, or when replacement parts for your specific model are no longer available. A low-cost umbrella (under $80) with a stripped gear and a frayed cord is rarely worth repairing because the parts cost approaches the replacement cost. For a quality umbrella worth $200 or more, repairing the tilt mechanism almost always makes financial sense. If your patio umbrella will not stay tipped where you want it, check the tilt mechanism and replace worn parts before you rely on how it holds the angle tip patio umbrella.
Prevention: stop this from happening again
The biggest cause of early tilt mechanism failure is forcing the crank when something is stuck or skipping the annual lubrication. Build these habits and you'll get years more life out of the mechanism.
- Lubricate the tilt mechanism and crank at the start and end of each season with silicone spray. It takes two minutes and prevents the most common failure mode entirely.
- Close the umbrella before high wind. An open, tilted umbrella acts as a sail and puts enormous stress on the tilt pivot and lock. Wind is the fastest way to bend a pivot pin or crack a housing.
- Open and close the umbrella correctly every time. On auto-tilt models, tilt back to center before cranking the canopy closed. Cranking down while the umbrella is still tilted can snap the cord or strip gears.
- Never force the crank. If resistance increases suddenly, stop and investigate. Forcing through resistance is how stripped gears happen.
- Store seasonally with the canopy closed and, ideally, with the umbrella indoors or under a cover. Moisture and UV degrade plastic housings and corrode metal pins over winter.
- Periodically check and snug all fasteners on the tilt housing. Vibration from wind slowly loosens hardware over a season, and a loose housing is the start of a misalignment problem.
- Rinse the tilt mechanism area with clean water a few times per season to flush out pollen, dust, and salt (in coastal areas). Let it dry before applying lubricant.
Most tilt problems are genuinely fixable at home, and the repair is usually simpler than it looks from the outside. If you want to go deeper on any part of this, understanding how your specific tilt type works is the foundation: knowing whether you have a push-button, collar, or auto-tilt system changes everything about how you approach a repair or an adjustment. If you are trying to figure out what auto-tilt means on a patio umbrella, the key is how the mechanism locks the tilt with a spring or cam so it holds its angle auto-tilt system.
FAQ
Can I just lubricate the tilt mechanism when my patio umbrella tilt is failing to hold?
Yes, but only after you’ve confirmed the canopy is fully open and the tilt transition engages. If the crank turns freely with no tilt movement, that usually points to stripped gears or a detent that is not catching, not a simple stiffness issue. In that case, lubricating first can make it harder to diagnose because the mechanism will feel smoother while still not locking.
Where exactly should I apply silicone spray when fixing a patio umbrella tilt that won’t move?
Don’t spray lubricant into the center hub or around the canopy fabric. Focus on the moving metal-to-metal and slider surfaces inside the pole housing (gear teeth, tracks, pivot pins). Also wipe off excess after each application, because leftover spray can attract grit and recreate the tilt problem faster.
What happens if I already used WD-40 to fix patio umbrella tilt?
If you use the wrong lubricant, you may worsen the problem over time. WD-40 can evaporate and leave residue that holds dirt, so the next season you may get a gritty slider and a stuck tilt button. Stick with silicone spray or light lithium grease on gear teeth and tracks, then exercise the mechanism several times before reassembly.
Can I buy a generic replacement tilt cord for my umbrella?
Replacement parts availability varies by brand and tilt type, but a model number match is the safest approach. Even “generic” tilt cords may differ in length, knot/clip style, and routing eyelets, which can lead to incorrect tension. If your repair depends on correct cord tension for the tilt lever to lock, use the manufacturer’s parts diagram when possible.
How do I tell whether loose bolts or a worn part is causing the tilt issue?
Tightening fasteners first is worth doing, especially if the umbrella is leaning or the tilt feels inconsistent. However, if you find a visibly worn ratchet/detent surface or chipped gear teeth, tightening won’t restore holding power. In those cases you need a replacement detent spring, lock pin, or gear assembly depending on what’s worn.
My patio umbrella tilts but it feels crooked or doesn’t lock evenly. What should I check next?
Check for misalignment between the tilt lever and any ground-level alignment feature (pedal or lever), then confirm the tilt housing orientation is straight relative to the canopy opening. If the mechanism is aligned but still feels off, you may have re-routed the cord into the wrong internal groove, which can make the lock engage at the wrong moment.
The tilt cord looks fine, but the umbrella still won’t tilt. Could the cord be the problem anyway?
If the cord looks intact but the tilt still won’t operate, the cord may be off its groove, routed through the wrong eyelet, or the cord tension may be insufficient. Use your photos and re-route the cord through the correct channel, then pull it taut and verify it stays in place while you cycle the tilt mechanism by hand.
On auto-tilt umbrellas, why does the crank turn but the tilt never kicks in?
If the crank engages but the umbrella never changes to tilt mode, confirm the auto-tilt transition is happening only after the canopy is fully open. Some models also require releasing a lock knob or collar before the tilt can drive. For crank resistance, never force it, stop, and check that release steps and button alignment steps are completed.
Is it safe to keep trying the crank after lubrication if the tilt still fails?
Yes, but only if the symptoms match a quick fix. Repeated forcing usually strips gears or snaps cords, so a simple lubrication attempt should be paired with a quick functional check (does it lock when fully open, does it click or change resistance). If any component looks rounded, chipped, or flattened, switch to parts replacement rather than trying multiple lubrication cycles.
What can I do after a successful repair to prevent patio umbrella tilt from failing again?
Start by preventing the problem from happening again: do seasonal lubrication on the moving surfaces, keep grit out by cleaning the pole housing opening area, and never crank against resistance. Also store the umbrella in a way that reduces moisture pooling, because corrosion accelerates wear on pivot pins and detents.
Next Articles
What Does Auto Tilt Mean on a Patio Umbrella?
Auto tilt lets a patio umbrella adjust angle automatically with controls and motors, plus tips to fix tilt issues safely
How to Repair Patio Umbrella Tilt Mechanism Fast
Step-by-step guide to diagnose and repair a patio umbrella that won’t tilt right, including button, linkage, and parts.
How to Tilt a Patio Umbrella: Fix It Fast
Step-by-step fixes to tilt a patio umbrella, troubleshoot jams and uneven tilt, and maintain the mechanism safely.